
I thought we could use something a bit more – or less- modern or industrial seeming and something with a touch of cottage chic going on! Depending on the style of trim you choose for this piece, you may actually have yourself a more traditional or even a coastal or country chic style bed, just depends on your preference.
This bed is inspired by (allegedly) the Rosenberry Rooms Cottage bed, and is offered in this fabulous Dodger blue, that I am fairly certain shall become a bit of cool trend…I know I’m loving it!
- Tape Measure
- Saw – Jig Saw, Circular, Table, or Miter Saw
- Drill
- Multi-Square and Carpenter’s Square
- Sander
- Kreg Jig – if you build frequently, invest in this one.
- Nail Gun
- 1 Sheet of 3/4″ Plywood or MDF
- 1 – 3/4″ Square Trim at 10′
- 2 – 1×8 at 8′
- 1 – 1×3 at 10′
- 6 – 1×3 at 8′
- 1 – 1×3 at 6′
- 4 – 1×2 at 8′
- 2 – 3″ Crown Molding at 10′
- 2 – 1/2″ or 3/4″ Molding Trim at 10′
- 1-1/4″ Wood Screws
- 2″ Wood Screws
- 1-1/4″ Brad Nails
- Countersink Drill Bit
- Pocket Hole Plugs – Paint Grade, Pine, Oak – optional
- Clamps
- Safety Gear
- 3/4″ Edge Banding – optional
- Wood Filler
- Wood Glue
- Sanding Supplies
- Paste Wax
- Finishing Supplies
- 1 – 3/4″ Ply at 38 1/4″ x 41″ Head Board Panel
- 1 – 3/4″ Ply at 18 1/2″ x 41″ Foot Board Panel
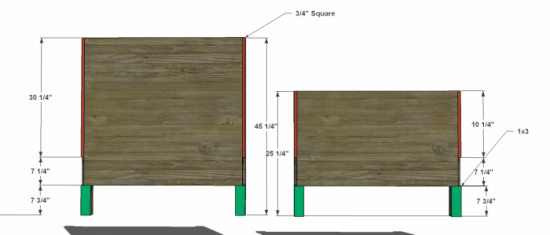
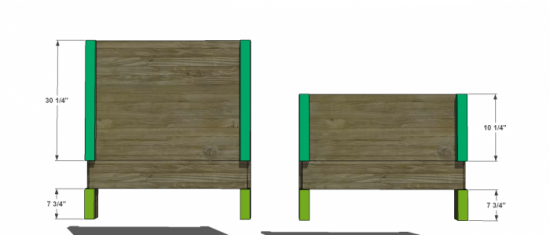
- 2 – 1×3 at 45 1/4″ First Leg Headboard
- 2 – 1×3 at 25 1/4″ First Leg Foot Board
- 2 – 1×3 at 30 1/4″ 3rd Leg Layer Headboard
- 2 – 1×3 at 10 1/4″ 3rd Leg Layer Foot board
- 8 – 1×3 at 7 3/4″ 2nd and 3rd Leg Layers Head and Foot Board
- 9 – 1×3 at 41″ Slats
- 2 – 3/4″ Square Trim at 30 1/4″ 2nd Leg Layer Headboard
- 2 – 3/4″ Square Trim at 10 1/4″ 2nd Leg Layer Foot Board
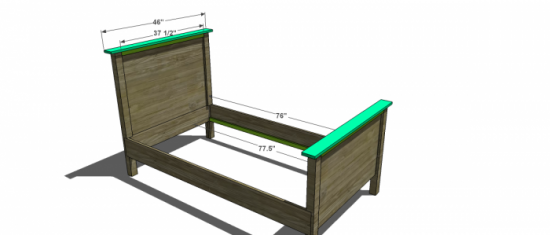
- 2 – 1×5 at 46″ Top Trim Board Head and Foot Board
- 4 – 1×2 at 37 1/2″ Spacer Between Leg Boards Head and Foot Boards
- 2 – 1×2 at 77 1/2″ Cleats
- 2 – 1×8 at 77 1/2″ Bed Rails
- 4 – 46″ Length of Larger Crown Molding (3″ or so is a nice height for this)
- 4 – 3″ Length Crown Molding (3″ or so is a nice height for this) – sides at top under top trim board
- 4 – 28 1/2″ Length of Smaller Trim Molding – Rectangle
- 2 – 18″ Length of Smaller Trim molding – Rectangle
- 2 – 7″ Length of Smaller Trim Molding – Rectangle
Before beginning to build, always check in on my site to make sure you have the most up to date set of plans, I occasionally update and change the plans to make the building process easier or to allow for less expensive purchasing of materials! Read through the entire set of instructions and all comments before beginning this project. If you print out or save plans, be sure to check in on my site to be sure you have the most up to date set of plans, as I occasionally update things for ease of building or buying. If you are new to building, read through the GETTING STARTED section and other articles found under the BUILD tab in the menu on my site, it has valuable information about how to get started, tools and techniques. If you are unfamiliar with the finishing process, visit my Finishing school for some tips and tricks for painting like a pro and for special finishing practices. Use glue to secure your joints and Consider Painting or Staining individual sections prior to assembling. This makes the paint application virtually flawless. Coat with a spray on Poly or Wipe on Poly to protect your finish and your piece and it will last for ages. Adhere to all safety standards and guidelines, and be sure you follow safety protocol throughout your build. If you are unsure about whether you are building safely, run a quick online search for the tool or technique you are using, or contact me via email or post to the forum before you move ahead. My contact info can be found in the menu of my site.

Begin building your Headboard and Foot board. Join the Panels to the First Leg Pieces using glue and your #8 countersink bit with 1 1/4″ Wood Screws.
Fasten the 2nd Layer of your Legs to the First Set. Fasten from the inside of the leg, use glue and 1 1.4″ Wood Screws. the top portion of the 2nd Set of Leg panels will be 3/4″ square trim pieces, and the lower set will be a 1×3, there should be a gap between the 2 that is equal in size to your 1×8 bed rails and will house them in a later step.
Fasten your 3rd Leg board layer. Just as for the step above, you will leave a gap between your 1×3’s that will accommodate the bed rails. I have demarcated the area in the diagram below to show the approximate size.
Add your Top Trim board and the spacer between the legs just underneath it on both the head and foot boards, then fasten your cleats in place on the bed rails and then attach the rails in place as well. Use glue and 2″ screws to fasten the trim and rails and 1 1/4″ screws for the cleats.
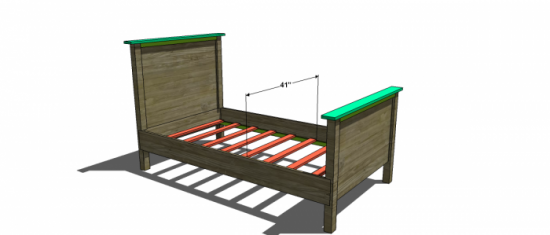
Once you have fastened the trim and cleats in place, lay your slats down and attach using 1 1/4″ wood screws. They should be spaced approximately 4-6 inches apart.
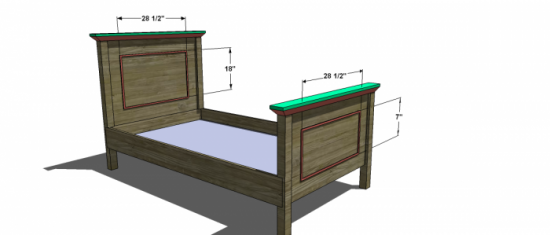
Add your crown molding under the top trim board and in a rectangular shape on the head and foot boards. Use one thin molding on the front edge of the top trim board that matches the rectangular trim and a larger molding type for just under the top trim board if you prefer or you can simply use regular crown molding under the top trim board and a coordinating and much smaller type on the head and foot board in a rectangular shape. You will need to miter the edges of the rectangular trim and will need to miter and cope the trim under the top trim board (which is a fancy way of saying miter inward so the sides fit nicely with the front and back pieces). Fasten with 1 1/4″ finish nails and glue.
Fill any Screw, Nail or Pocket Holes, Sand and Finish as Desired. For Finishing Tips and Tricks visit my Finishing School
**Disclaimer: Some rights reserved. Private use only. Feel Free to link to any of my plans so long as you ONLY use 1 image and provide an ADEQUATE link back to the original source and appropriate plan! Plans from this page are not to be used for commercial purposes or republished without the express written consent of Rayan Turner, The Design Confidential I hope to provide accurate plans, however, I cannot guarantee each plan for accuracy. Not every plan that I post has been built and tested, so you are building at your own risk. It is recommended that you have a clear understanding of how the project works before beginning any project. Please contact me if you find an error or inaccuracy so that I might fix it. / Affiliate links are used for tools and materials. The Design Confidential will earn a small commission for any items purchased using these links. Thank you for your support – every little bit counts!

Hi. I would love to download these plans but none of the photos are showing up and I can’t find the link for the download. I’ve used your plans before and LOVED them. Thank you so much.
This is a link to the bed I’d love to try and make just in case this helps…https://www.thedesignconfidential.com/2011/07/free-woodworking-plans-to-build-a-twin-solid-wood-rosenberry-rooms-inspired-cottage-bed/
I will have it fixed in just a bit! stay tuned…