
It’s the simple projects that really excite me. Somehow I always get myself into long drawn out projects, that go on for days and days, but the simple ones that can be multiplied into an amazing dramatic affect… those are the ones that get me going in the morning! This cellar wine rack could easily double as awesome shelving for just about anything so don’t be fooled by the name of this bad boy. Imagine a whole wall (or half of a wall) lined with these gorgeous X’s. Wouldn’t that be amazing? Yahoo! Xx… Rayan
Pssst… I hope to be back later this afternoon with one of many exciting projects that I have actually finished recently (well, in the last 3 months so…. pretty recent). One of which has taken me down the rabbit hole of video editing (which I am apparently terrible at) and has sucked me in for several days. Hoping to see the daylight again this afternoon… wish me luck!
As with all of our plans, you are building at your own risk and you should have a firm understanding of building in general before you attempt many of our plans (some are easy as pie and perfect for beginners). With that, go forth, have fun, take lots of pictures and share them in a showcase on the site or on social media with the hashtag #builtTDCtuff and we will share our faves! Be sure to tag @thedesignconfidential on Instagram / FB and @thedesconf on Twitter / Pinterest. If you are a blogger and you post about your build, don’t forget to include a link to your post on your showcase here. Don’t forget… for all of our newer plans, clicking on the images will let them expand to enormous sizes with much greater clarity. The older plans may need updating so please let us know if you need one fixed!
Under $25

- Tape Measure
- Saw – Jig Saw, Circular, Table, or Miter Saw
- Drill
- Multi-Square and Carpenter’s Square
- Sander
- Nail Gun
- 1 half sheet of ½” plywood
- 2 – ½” plywood at 9” x 19” – Box Frame
- 2 – ½” plywood at 9” x 20” – Box Frame
- 2 – ½” plywood at 9” x 26-3/8” – X
Before beginning to build, always check in on my site to make sure you have the most up to date set of plans, I occasionally update and change the plans to make the building process easier or to allow for less expensive purchasing of materials! Read through the entire set of instructions and all comments before beginning this project. If you print out or save plans, be sure to check in on my site to be sure you have the most up to date set of plans, as I occasionally update things for ease of building or buying. If you are new to building, read through the GETTING STARTED section and other articles found under the BUILD tab in the menu on my site, it has valuable information about how to get started, tools and techniques. If you are unfamiliar with the finishing process, visit my Finishing school for some tips and tricks for painting like a pro and for special finishing practices. Use glue to secure your joints and Consider Painting or Staining individual sections prior to assembling. This makes the paint application virtually flawless. Coat with a spray on Poly or Wipe on Poly to protect your finish and your piece and it will last for ages. Adhere to all safety standards and guidelines, and be sure you follow safety protocol throughout your build. If you are unsure about whether you are building safely, run a quick online search for the tool or technique you are using, or contact me via email or post to the forum before you move ahead. My contact info can be found in the menu of my site.

Edge banding will be applied to the exposed edges of the plywood prior to assembly.
Cut the pieces for the box frame. Assemble the box frame as shown using glue and 1-1/4” brad nails.

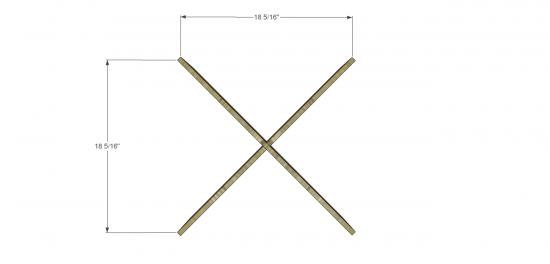
Cut the pieces for the X and cut the notches using a jigsaw. Slide the pieces together to form the X insert.
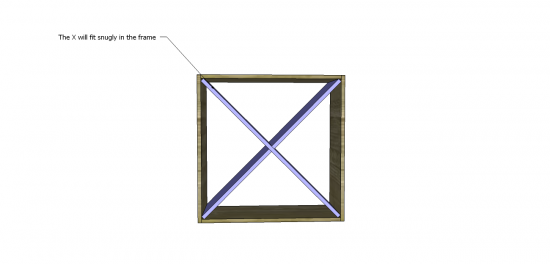
Insert the X into the box frame. It should fit snugly. Secure the X with a few 1-1/4” brad nails.
Fill any Screw, Nail or Pocket Holes, Sand and Finish as Desired. For Finishing Tips and Tricks visit my Finishing School
**Disclaimer: Some rights reserved. Private use only. Feel Free to link to any of my plans so long as you ONLY use 1 image and provide an ADEQUATE link back to the original source and appropriate plan! Plans from this page are not to be used for commercial purposes or republished without the express written consent of Rayan Turner, The Design Confidential I hope to provide accurate plans, however, I cannot guarantee each plan for accuracy. Not every plan that I post has been built and tested, so you are building at your own risk. It is recommended that you have a clear understanding of how the project works before beginning any project. Please contact me if you find an error or inaccuracy so that I might fix it. / Affiliate links are used for tools and materials. The Design Confidential will earn a small commission for any items purchased using these links. Thank you for your support – every little bit counts!

Images no longer work
i shall get them all fixed in just a bit!
Really like the design and am looking to build shelving in my wine cellar and I agree a whole wall of these would be really cool, not to mention hold a fair amount of wine. Any idea how much of a load these could support? Is it reasonable to assume they would hold up stacked three high and full of wine bottles?