[carousel-horizontal-posts-content-slider]
Plans
This collection gets more exciting by the day! I know you will love this fabulous storage piece regardless of how genius you think Martha Stewart is, or not? Inspired by her Craft Space Collection sold by Home Decorator’s. This piece retails for over $400 once you include the special handling cost, and that isn’t even including the cost of shipping in general! You can build this similar piece for far less, and completely customize it however you like!
Tools
- Tape Measure
- Drill
- Kreg Jig – optional but definitely recommended
- Saw
Lumber
- 2 sheet of 3/4″ Plywood or MDF
- 2 sheet of 1/2″ Plywood
- 4 – 1×2 at 10′ (2 at 39″ and 1 at 25″ per board when cutting)
- 1 – 1×2 at 6′ (1 at 39″ and 1 at 25″ when cutting)
- 2 – 1×4 at 8′
- 2 – 2×2 at 8′
- 4 – 1/4×3/4 Trim (Lattice Board) at 10′
- 1 – 1/4×3/4 Trim at 3′
Materials
- 24″ Full Extension Side Mount Drawer Slides with 1/2″ clearance – 8 pair
- 12 Drawer Pulls
- 1 1/4″ Pocket hole screws
- 1″ Pocket hole screws
- 3″ Wood Screws – if not using a pocket hole system
- 2 1/2″ Wood screws – if not using a pocket hole system
- 1″ Wood Screws
- 2″ Finish nails
- 3/4″ Finish nails
- Wood Glue
- Wood Filler
- Sanding Supplies
- Finishing Supplies
Cut List
- 4 – 2×2 at 35 1/4″ Legs
- 1 -3/4″ Stock at 39″x 30 3/4″ Back Panel
- 2 -3/4″ Stock at 25″x30 3/4″ Side Panels
- 1 -3/4″ Stock at 25″x39″ Bottom Panel Bottom Shelf
- 1 -3/4″ Stock at 28″x42″ Top
- 1 -3/4″ Stock at 25″x12 3/4″ Center Divider
- 4 – 3/4″ Ply at 5 3/4″ x 19 3/8″ Large Drawer False Front
- 5 – 1×2 at 25″ Rails
- 9 – 1×2 at 39″ Rails
- 4 – 1×4 at 38 3/4″ Shallow Drawer False Front
- 8 – 1/2″ Ply at 3″ x 23″ Shallow Drawer Sides
- 4 – 1/2″ Ply at 3″ x 36 1/2″” Shallow Drawer Back
- 4 – 1/2″ Ply at 3″ x 37 1/2″ Shallow Drawer Front
- 4 – 1/2″ Ply at 23″ x 36 1/2″ Shallow Drawer Bottoms
- 8 – 1/2″ Ply at 5 1/2″ x 23″ Large Drawer Sides
- 8 – 1/2″ Ply at 5 1/2″ x 17 7/8″” Large Drawer Front and Back
- 4 – 1/2″ Ply at 23″ x 16 7/8″ Large Drawer Bottoms
- 8 – 1/4×3/4″ Trim at 37 1/4″ Top and Bottom Shallow Drawer Trim
- 8 – 1/4×3/4″ Trim at 3 1/2″ Shallow Drawer Side Trim
- 8 – 1/4×3/4″ Trim at 17 7/8″ Top and Bottom Large Drawer Trim
- 8 – 1/4×3/4″ Trim at 5 3/4″ Large Drawer Side Trim
Instructions
Before beginning to build, always check in on my site to make sure you have the most up to date set of plans, I occasionally update and change the plans to make the building process easier or to allow for less expensive purchasing of materials! Read through the entire set of instructions and all comments before beginning this project. If you print out or save plans, be sure to check in on my site to be sure you have the most up to date set of plans, as I occasionally update things for ease of building or buying. If you are new to building, read through the GETTING STARTED section and other articles found under the BUILD tab in the menu on my site, it has valuable information about how to get started, tools and techniques. If you are unfamiliar with the finishing process, visit my Finishing school for some tips and tricks for painting like a pro and for special finishing practices. Use glue to secure your joints and Consider Painting or Staining individual sections prior to assembling. This makes the paint application virtually flawless. Coat with a spray on Poly or Wipe on Poly to protect your finish and your piece and it will last for ages. Adhere to all safety standards and guidelines, and be sure you follow safety protocol throughout your build. If you are unsure about whether you are building safely, run a quick online search for the tool or technique you are using, or contact me via email or post to the forum before you move ahead. My contact info can be found in the menu of my site.
Step 1
Create your Plywood or MDF Panels by fastening them to the 1×2’s (rails) sitting flush with the inside edge of the 1×2’s and using your pocket hole system set for 3/4″ stock or 2 1/2″ Screws, use glue. Then fasten your panels (attached to the rails) to the legs using 1 1/4″ pocket hole screws and glue. If you aren’t using a pocket hole system, use your 3″ screws to fasten the panels to the legs, and be sure to countersink and use glue.
Step 2
Flip your unit over and fasten the rails and panels in place using your pocket hole system set for 3/4″ stock and your 1 1/4″ pocket hole screws and glue. If you aren’t using a pocket hole system, use your 2 1/2″ screws to fasten the panels to the rails and then use 3″ screws to fasten the rails (with panels) to the legs, and be sure to countersink.
Step 3
Attach your Divider and the Rail above it. Use your pocket hole system set for 3/4″ stock and your 1 1/4″ pocket hole screws and glue. If you aren’t using a pocket hole system, use your 2 1/2″ screws to fasten the panel to the rails and the back and bottom. Be sure to countersink and use glue.
Step 4
Attach your drawer slides. Doing this now, will make it much easier. You will have 16, so pull up a stool or chair and get comfy!
Step 5
Build 4 Shallow Drawers as indicated below. The bottom is inset and the drawer is constructed of 1/2″ plywood with a 1×4 false front that sits flush with the bottom of the drawer and is trimmed out. The Drawer front overlaps the sides while the back is inset from the sides. Fasten the False Front to the drawer front using glue and 1″ screws. Use finish nails and glue to fasten the trim in place.
Build the Larger Bottom Drawers. Note**: The inside edge of each drawer False Front will overhang farther than the outside edge. You will not be fastening your False Front centered! On the left 2 drawers the overhang will be 1″ on the right side of the drawer false front, and on the right 2 drawers the overhang will be 1″ on the left side! Be sure to make the 2 drawers on the left, opposite of the 2 drawers on the right in terms of which side has the false front overhang. If you are looking at your unit, the portion of the drawers that covers the lower center divider is where the wider overhang will be. This is due to the center divider needing to be there for proper sliding mechanisms and yet still having to work around the typical 1/2″ clearance of the drawer slides. The bottom is inset and the drawer is constructed of 1/2″ plywood with a false front constructed from 3/4″ ply or mdf, that sits flush with the bottom of the drawer and is trimmed out. The Drawer front overlaps the sides while the back is inset from the sides. Fasten the False Front to the drawer front using glue and 1″ screws. Use finish nails and glue to fasten the trim in place.
Step 7
Insert the drawers and Fasten the top in place. Use finish nails and glue.
Finishing Instructions
Fill any Screw, Nail or Pocket Holes, Sand and Finish as Desired. For Finishing Tips and Tricks visit my Finishing School
**Disclaimer: Some rights reserved. Private use only. Feel Free to link to any of my plans so long as you ONLY use 1 image and provide an ADEQUATE link back to the original source and appropriate plan! Plans from this page are not to be used for commercial purposes or republished without the express written consent of Rayan Turner, The Design Confidential I hope to provide accurate plans, however, I cannot guarantee each plan for accuracy. Not every plan that I post has been built and tested, so you are building at your own risk. It is recommended that you have a clear understanding of how the project works before beginning any project. Please contact me if you find an error or inaccuracy so that I might fix it.
Plans
I am so excited for this collection (have I mentioned that yet?) and this piece satisfies my need for crafty storage AND my need for some traditional home office functionality. I can have it all…and so can you!
Tools
Tape Measure
Drill
Kreg Jig – optional but definitely recommended
Saw – optional and can have pieces cut at local lumber supply
Lumber
1 sheet of 3/4″ Plywood or MDF
1/2 sheet of 1/2″ Plywood
3 – 1×2 at 8′
2 – 2×2 at 6′ or 8′ if that is what your store carries (mine only carries 8′ unless you shop stair railing parts)
1 – 1/4×3/4 Trim at 5′ (can get a 3′ and 2′)
Materials
24″ Full Extension Side Mount Drawer Slides with 1/2″ clearance – 1 pair
Drawer Pull
1 1/4″ Pocket hole screws
1″ Pocket hole screws
3″ Wood Screws – if not using a pocket hole system
2″ Finish nails
3/4″ Finish nails
Wood Glue
Wood Filler
Sanding Supplies
Finishing Supplies
Cut List
4 – 2×2 at 30 1/4″ Legs
1 -3/4″ Stock at 12″x18″ Back Panels
2 -3/4″ Stock at 12″x25″ Side Panels
2 -3/4″ Stock at 25″x18″ Bottom Panels
1 -3/4″ Stock at 21″x28″ Top
6 – 1×2 at 25″ Rails
6 – 1×2 at 18″ Rails
2 – 1/2″ Ply at 11 1/2″ x 23 1/4″ Drawer Sides
2 – 1/2″ Ply at 11 1/2″ x 16 1/2″ Drawer Front and Back
1 – 1/2″ Ply at 11 1/2″ x 23 1/4″ Drawer Bottom
1 -3/4″ Stock at 11 3/4″x17 3/4 ” False Front
2 – 1/4×3/4″ Trim at 11 3/4″ Side Trim (drawer front)
2 – 1/4×3/4″ Trim at 16 1/4″ Top and Bottom Trim (drawer front)
Instructions
Before beginning to build, always check in on my site to make sure you have the most up to date set of plans, I occasionally update and change the plans to make the building process easier or to allow for less expensive purchasing of materials!
Read through the entire set of instructions and all comments before beginning this project. If you print out or save plans, be sure to check in on my site to be sure you have the most up to date set of plans, as I occasionally update things for ease of building or buying. If you are new to building, read through the GETTING STARTED section and other articles found under the BUILD tab in the menu on my site, it has valuable information about how to get started, tools and techniques. If you are unfamiliar with the finishing process, visit my Finishing school for some tips and tricks for painting like a pro and for special finishing practices.
Use glue to secure your joints and Consider Painting or Staining individual sections prior to assembling. This makes the paint application virtually flawless. Coat with a spray on Poly or Wipe on Poly to protect your finish and your piece and it will last for ages. Adhere to all safety standards and guidelines, and be sure you follow safety protocol throughout your build. If you are unsure about whether you are building safely, run a quick online search for the tool or technique you are using, or contact me via email or post to the forum before you move ahead. My contact info can be found in the menu of my site.
Step 1
Cut your Legs to size, then cut Plywood or MDF to size and fasten it to the 1×2’s sitting flush with the inside edge of the 1×2’s. Using your pocket hole system set for 3/4″ stock, fasten your panels to the legs using 1 1/4″ pocket hole screws and glue. If you aren’t using a pocket hole system, use your 3″ screws to fasten the panels to the rails and the rails with panels attached to the legs, and be sure to countersink and use glue.
Step 2
Flip your unit over and fasten the rails and panels in place using your pocket hole system set for 3/4″ stock and your 1 1/4″ pocket hole screws and glue. If you aren’t using a pocket hole system, use your 2 1/2″ screws to fasten the panels to the rails and the rails with panels to the legs, and be sure to countersink.
Step 3
Attach your drawer glides. Doing this now, will make it much easier.
Step 4
Fasten the top in place using finish nails and glue.
Step 5
Build the Drawer. Below the diagram shows the layout for the drawer parts. Fasten together using your Pocket Hole system set for 1/2″ stock and your 1″ pocket hole screws and glue or use 1 1/2″ wood screws. To fasten the false front in place, use 1″ wood screws and glue from inside the drawer. To secure the trim, use finish nails and glue.
Fill any Screw, Nail or Pocket Holes, Sand and Finish as Desired. For Finishing Tips and Tricks visit my Finishing School
Note
If you enjoyed this post, comment below, Share it or Like it, and subscribe to my feed to stay up to date!
You can now also:
Follow my blog with blog lovin!
Disclaimer
**Disclaimer: Some rights reserved. Private use only. Feel Free to link to any of my plans so long as you provide an adequate link back to the appropriate post! Plans from this page are not to be used for commercial purposes or republished without the express written consent of Rayan Turner, The Design Confidential I hope to provide accurate plans, however, I cannot guarantee each plan for accuracy. Not every plan that I post has been built and tested, so you are building at your own risk. It is recommended that you have a clear understanding of how the project works before beginning any project. Please contact me if you find an error or inaccuracy so that I might fix it.
Plans
This piece matches the Tea Table by the same name (plans for that can be found here) and will also go quite well with a few pieces we will be covering later this week!
Tools
- Tape Measure
- Drill
- Jig Saw
- Kreg Jig – optional but definitely recommended
Lumber
- 1 sheet of 3/4″ Plywood or MDF
Materials
- 1 1/4″ Pocket hole screws
- 2″ Wood screws – if not using a pocket hole system
- 2″ Finish nails – you can also use pocket hole screws or wood screws, just be sure to countersink.
- Wood Glue
- Wood Filler
- Sanding Supplies
- Finishing Supplies (spackle along the cut edge of mdf is recommended)
Cut List
- 2 – 3/4″ Ply or MDF at 29″x47 1/2″ Front and Back
- 2 – 3/4″ Ply or MDF at 29″ x 21″ Sides
- 1 – 3/4″ Ply or MDF at 22 1/2″x 47 1/2″ Top
Instructions
Before beginning to build, always check in on my site to make sure you have the most up to date set of plans, I occasionally update and change the plans to make the building process easier or to allow for less expensive purchasing of materials! Read through the entire set of instructions and all comments before beginning this project. If you print out or save plans, be sure to check in on my site to be sure you have the most up to date set of plans, as I occasionally update things for ease of building or buying. If you are new to building, read through the GETTING STARTED section and other articles found under the BUILD tab in the menu on my site, it has valuable information about how to get started, tools and techniques. If you are unfamiliar with the finishing process, visit my Finishing school for some tips and tricks for painting like a pro and for special finishing practices. Use glue to secure your joints and Consider Painting or Staining individual sections prior to assembling. This makes the paint application virtually flawless. Coat with a spray on Poly or Wipe on Poly to protect your finish and your piece and it will last for ages. Adhere to all safety standards and guidelines, and be sure you follow safety protocol throughout your build. If you are unsure about whether you are building safely, run a quick online search for the tool or technique you are using, or contact me via email or post to the forum before you move ahead. My contact info can be found in the menu of my site.
Step 1
Cut Front and Back to Size and Shape. Do this by cutting one long panel at 47 1/2″ wide by 60″. Carve an approximate shape as indicated below from the large panel. Once you have one of these shapes carved out, you can use it as a template for the second piece in the remainder of this Ply or MDF Panel.
Step 2
Cut the Sides to the Proper Size and Shape. Do this by cutting one long panel at 42″ wide x 29 high”. Carve an approximate shape as indicated below from the large panel. Once you have one of these shapes carved out, you can use it as a template for the second piece in the remainder of this Ply or MDF Panel.
Step 3
Attach your Sides and the Top. Use your Pocket Hole System set for 3/4″ Stock and your 1 1/4″ pocket hole screws and glue to fassten together. Place your pocket holes as shown below on the shorter of the sides so they will fasten into the longer (wider) sides. You can place pocket holes all around the top edges of the sides so that you might fasten the top to the sides without your screws being seen. If you aren’t using a Pocket Hole System, use 2″ screws and glue, be sure to countersink for the most professional appearance. Fasten the top using Finish Nails and Glue if possible otherwise you can also use screws and countersink.
Finishing Instructions
Fill any Screw, Nail or Pocket Holes, Sand and Finish as Desired. For Finishing Tips and Tricks visit my Finishing School
**Disclaimer: Some rights reserved. Private use only. Feel Free to link to any of my plans so long as you provide an adequate link back to the appropriate post! Plans from this page are not to be used for commercial purposes or republished without the express written consent of Rayan Turner, The Design Confidential I hope to provide accurate plans, however, I cannot guarantee each plan for accuracy. Not every plan that I post has been built and tested, so you are building at your own risk. It is recommended that you have a clear understanding of how the project works before beginning any project. Please contact me if you find an error or inaccuracy so that I might fix it.
Plans
This beauty is the smaller counterpart of the 120″ version (plans for that can be found here). Inspired by the Provence Beam Dining Table from Restoration Hardware, this Indoor/Outdoor table should serve for most of your entertaining needs. The orignial inspiration piece (allegedly) will cost you over $4000. This version, should come in at under $75 (may vary by geography)! This collection is actually meant for outdoor use and has board spacing to accommodate water run off or potential weather issues that may arise. However, this would be equally as fabulous indoors…no.. this would be even MORE fabulous indoors because you would have the pleasure of using it more frequently and getting a glimpse of it’s beauty more often! This plan has been modified for ease of building and readily available materials and is in no way affiliated with the above mentioned specialty retailer (allegedly). Consider using reclaimed materials for this build and you will really get that weathered look of the original.
Below are the other plans for variations of this table and plans for the benches!
Free DIY Furniture Plans to Build Provence Beam Benches
Free Furniture Plans to Build a Restoration Hardware Inspired Provence Beam Dining with 4×4’s
Free Furniture Plans to Build a Restoration Hardware Inspired 10′ Provence Beam Dining
As with all of our plans, you are building at your own risk and you should have a firm understanding of building in general before you attempt many of our plans (some are easy as pie and perfect for beginners). With that, go forth, have fun, take lots of pictures and share them in a showcase on the site or on social media with the hashtag #builtTDCtuff and we will share our faves! Be sure to tag @thedesignconfidential on Instagram / FB and @thedesconf on Twitter / Pinterest. If you are a blogger and you post about your build, don’t forget to include a link to your post on your showcase here. Don’t forget… for all of our newer plans, clicking on the images will let them expand to enormous sizes with much greater clarity. The older plans may need updating so please let us know if you need one fixed!
- 4 – 2×10 at 8′
- 10 – 2×4 at 8′
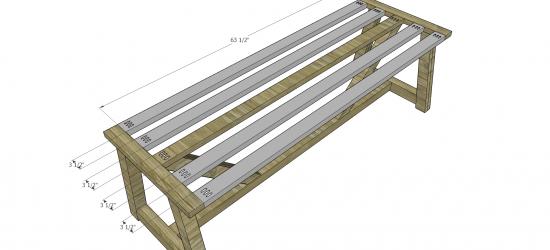
- ·4 – 2×10 at 96″ (Table Top)
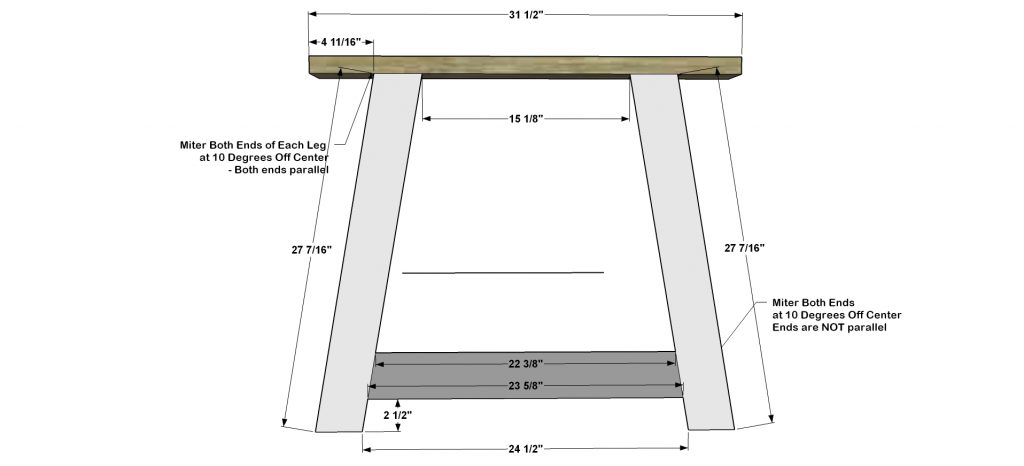
- ·8 – 2×4 at 27 7/16″ (Legs)
- ·2 – 2×4 at 31 1/2″ (Top Supports)
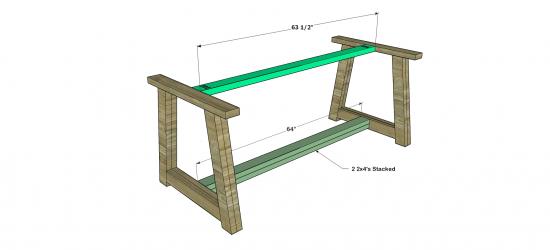
- ·5 – 2×4 at 63 1/2″ (Table Braces and Upper Cross Beam)
- ·2 – 2×4 at 64″ (Bottom Cross Beams)
- ·4 – 2×4 at 23 5/8″ (Leg Stretchers)
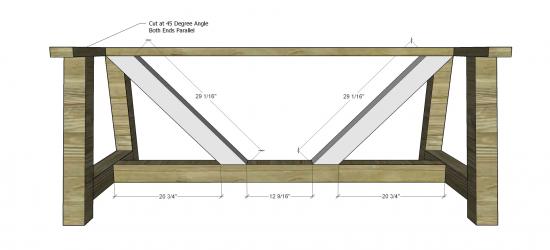
- ·4 – 2×4 at 29 1/16″ (Table Trusses)
** Since this project can be used outdoors, consider finishing (or sealing) each board prior to assembling to ensure the most water tight and protected coating. Certain wood species tend to be a bit better for outdoor use as a general rule: Cedar, Redwood, and Teak are a few. The original piece that this is modeled after is made from Reclaimed Teak and has the most amazing graining and color. This is likely to be difficult for you to find, but you can substitute with the wood specie of your choice and give your piece a reclaimed finish. **The original uses large beams for the legs and supports. I have chosen to draw this plan using mainly 2×4’s for their ease of use, cost, and availability. When you are finished building, you can fill the seams between the boards and sand flush to give the appearance of larger beam construction. Before beginning to build, always check in on my site to make sure you have the most up to date set of plans, I occasionally update and change the plans to make the building process easier or to allow for less expensive purchasing of materials! Read through the entire set of instructions and all comments before beginning this project. If you print out or save plans, be sure to check in on my site to be sure you have the most up to date set of plans, as I occasionally update things for ease of building or buying. If you are new to building, read through the GETTING STARTED section and other articles found under the BUILD tab in the menu on my site, it has valuable information about how to get started, tools and techniques. If you are unfamiliar with the finishing process, visit my Finishing school for some tips and tricks for painting like a pro and for special finishing practices. Use glue to secure your joints and Consider Painting or Staining individual sections prior to assembling. This makes the paint application virtually flawless. Coat with a spray on Poly or Wipe on Poly to protect your finish and your piece and it will last for ages. Adhere to all safety standards and guidelines, and be sure you follow safety protocol throughout your build. If you are unsure about whether you are building safely, run a quick online search for the tool or technique you are using, or contact me via email or post to the forum before you move ahead. My contact info can be found in the menu of my site.
Build the Leg Bases: You will build 2 of these, exactly the same.
The Legs will be cut at a 10° Angle (off center) and depending on which direction you choose to ‘stack’ them will either be a miter or a bevel. The diagram for this step shows the legs stacked so that you would miter rather than bevel, but if you want to turn them, simply bevel instead! The outside toe of each leg will be lined up with the outside of the Top Supports. To secure you can either use your 3” screws to secure down through the Top Supports and into each leg or you can use your Kreg Jig and 2 1/2″ pocket hole screws to secure each leg to the top support. I would secure with 4 screws per leg in a square layout and at an angle if possible. Be sure to countersink so there isn’t an issue with the additional pieces in the table frame laying flat. Secure the Bottom Support using your Kreg Jig and 2 1/2″ pocket hole screws. You can choose to secure the outside piece first, with pocket holes facing inward, then the inside piece will cover those. When you secure the inside piece, simply place your pocket holes on the inside of the leg unit.
Create the Table Top: it will be comprised of 4 – 2×10’s spaced 1/2″ apart for proper water run off and outdoor use (not necessary for indoor use or dry climate – optional).
Fasten the Center Braces (Top and Bottom): Use your 5” lag screws or your 2 1/2″ pocket hole screws to secure your Bottom Braces to the Leg Stretchers. Use your 2 1/2″ pocket hole screws to secure your Top Brace to the Top Support.
Cut and Fasten the Table Trusses. These will sit at a 45° Angle and will be cut at a 45° Angle . Secure to the Top Center Brace using 3” wood screws in the same manner you secured the top Support in Step 1. Use 5” Lag screws or 2 1/2″ pocket hole screws to secure to the Bottom Cross Beams.
Build out the remainder of the Frame: Use your Kreg Jig on a 1 1/2″ stock setting and your 2 1/2” pocket hole screws and glue, and fasten the remaining 4 cross beams.
Attach your Table Top Boards: Use 2 1/2″ Wood Screws and secure from underneath and up through the Cross Beams and Top Supports
Fill any Screw, Nail or Pocket Holes, Sand and Finish as Desired. For Finishing Tips and Tricks visit my Finishing School
**Disclaimer: Some rights reserved. Private use only. Feel Free to link to any of my plans so long as you provide an adequate link back to the appropriate post! Plans from this page are not to be used for commercial purposes or republished without the express written consent of Rayan Turner, The Design Confidential I hope to provide accurate plans, however, I cannot guarantee each plan for accuracy. Not every plan that I post has been built and tested, so you are building at your own risk. It is recommended that you have a clear understanding of how the project works before beginning any project. Please contact me if you find an error or inaccuracy so that I might fix it. / Affiliate links are used for tools and materials. The Design Confidential will earn a small commission for any items purchased using these links. Thank you for your support – every little bit counts!
DIY
Photoshop Elements is a paired down program that is a tad more user friendly for us Non-Graphically inclined folks…but let’s be honest, even that has a price and a definite learning curve. So what if you want to create graphics or edit photos on the fly and you neither own such a program nor have the time to learn it before you need to have your project finished?
Enter Microsoft Office… Most of us have it, in some form or another…so whether you have a student version or the full blown Office Suite, this technique will work for you. If you aren’t familiar with your Microsoft Office program, visit your start menu and scroll through your Programs or Accessories. From there, you will choose either PowerPoint or Publisher depending on which program your Office Suite happens to have. It will almost definitely have one or the other, or both!
Not to difficult so far, ay? Well not to worry it stays precisely this easy all the way through this tutorial! So once you have your program open, whichever it is, you will insert your image of choice. For this lesson I will choose an ‘easy to see the transformation’ image, and I happen to be working with Power Point on my current computer. Truth be told PowerPoint is a newer program for me to be doing this with, and I previously used Publisher 98% of the time, but I don’t have it on my current computer and so boo hoo…although Power Point actually seems to do everything Publisher does…AND MORE!
In the image above I have INSERTED the PICTURE I am using in precisely that format…Insert and then Picture, browse for the file and choose it. Once you have inserted your image you will Click on it to select it, which gives you an additional set of menu options. For PowerPoint, the options appear in the menu bar of the program for Publisher some of the options may also appear as a floating toolbar specifically for making changes and edits to the picture, depending on your settings. In the image above, for Power Point, I will choose Format which appears after I select the image. Once I am in that menu bar item, I will select the option to Recolor, and then choose the little wand and corner bracket icon for Set Transparent Color and I will select that then click on the gray blue background of my image to remove the background color! For Publisher it is a bit more direct in that once you select the image (by clicking on it) and once the Picture Edit Toolbar appears you simply click on the icon, then click on the background of your image. It won’t very likely say the words Set Transparent Color as mine does for Power Point but the icon is the same. Below is an enlarged image of the icon, so you know what you are looking for. So now that I have touch the background color with the wand, you can see below how fabulous the image looks!
Now that your image has a transparent background, in order to keep the background Transparent.. you must follow this next set of steps. You will need to save your image. Right click on the image and your Right Click menu appears. You will scroll down and select ‘Save as Picture’.
Once your Browse Folder Opens for you to select a file name, you can type in any name that fits your purpose and then you will change the File Type to PNG. This is crucial, if you save the file as a JPG or TIF, it most likely won’t retain your transparent background. At least not from these programs, you need to save as a PNG to keep it clear…
Assuming you followed the steps as indicated above and managed to save your Image as PNG file, when you are ready to use your image or insert it into a Blog post, it will have your beautiful transparent background an you can overlay it on another image, arrange it in a collage or display it withougt extra ‘junk’ in the background. Note: There are some tricky aspects to creating a transparent background that pop up in certain situations, such as if your image has a portion that is white. You will likely find that it will ‘transparent’ out a bit of your image in a less than desirable way. If this occurs you should consider another course of action, such as a magnetic lasso or cropping tool. If you are interested in how to do some of these things without using Photoshop please speak up and let me know…I will assume you aren’t interested if you don’t say anything, how’s a girl to know….you know?
Plans
You have been asking…and would you believe I finally answered? It took me a while to come up with a method of building this piece that looks good, and yet is also easy to build and inexpensive as well! I know there are many, many, many of you who have been waiting for this plan, so I hope that each of you will help me out by making sure that everyone knows it’s been posted so that you might be able to finish in time for the holidays, if you so desire! Please tell everyone you know who has a toddler… this is easy and cost effective, you will save HUNDREDS! Cute right? Love this… Sturdy, Safe and still provides a learning and tactile experience for your little ones! Four adjustable height levels to grow with your kiddo’s! This is part of our Hand Built Holiday Workshop Series! Our new kind of “No Child Left Behind” policy!
Showcase: Built From These PlansI am so honored each and every time one of you fine friends builds from these very plans! If you have built this piece, please take a moment and showcase your build! We are dying to see your fabulous hard work!
Lumber
- 2 – 1×3 at 6′
- 1 – 1×4 at 6′
- 1 – 1×12 at 6′
- 3/4 Sheet of 3/4″ Plywood or MDF
- 1 – 1″ Round Dowel Rod at 6′ or 54″ if you can purchase by inch or linear foot.
Cut List
- 4 – 1×3 at 35″ Leg Stands
- 2 – 1×4 at 22 1/2″ Upper Front Board
- 2 – 1×12 at 22 1/2″ Lower Front Board
- 2 – 3/4″ Ply or MDF at 25″x39″ Side Panels
- 1 – 3/4″ Ply or MDF at 22 1/4″ x 20″ Standing Board
- 2 – 1″ Round Dowel Rod at 27″ Dowels
Instructions
Before beginning to build, always check in on my site to make sure you have the most up to date set of plans, I occasionally update and change the plans to make the building process easier or to allow for less expensive purchasing of materials! Read through the entire set of instructions and all comments before beginning this project. If you print out or save plans, be sure to check in on my site to be sure you have the most up to date set of plans, as I occasionally update things for ease of building or buying. If you are new to building, read through the GETTING STARTED section and other articles found under the BUILD tab in the menu on my site, it has valuable information about how to get started, tools and techniques. If you are unfamiliar with the finishing process, visit my Finishing school for some tips and tricks for painting like a pro and for special finishing practices. Use glue to secure your joints and Consider Painting or Staining individual sections prior to assembling. This makes the paint application virtually flawless. Coat with a spray on Poly or Wipe on Poly to protect your finish and your piece and it will last for ages. Adhere to all safety standards and guidelines, and be sure you follow safety protocol throughout your build. If you are unsure about whether you are building safely, run a quick online search for the tool or technique you are using, or contact me via email or post to the forum before you move ahead. My contact info can be found in the menu of my site.
Step 1
Cut your Side Panels to size and shape accordingly. You will need 2 of these, so consider creating one and using that as the template for the other. Use your drill to create pilot holes that are large enough for your jig saw blade or router bit to fit, inside the areas you will be cutting out, then use your jig saw or router to carve the shape. For the circular holes that will house the dowel rods, you can use a 1″ hole saw drill bit or spade bit.
Step 2
Cut your front boards to size and create pocket holes using your Kreg Jig set for 3/4″ material, then fasten to the Side Panels using 1 1/4″ pocket hole screws and glue. They should sit 20 1/4″ apart to allow for your 20″ deep standing board to have 1/8″ on either side. Cut your standing board to size and your dowel rods…
Step 3
Attach the Leg Stands, one on each side of the Panel. Use 1 1/4″ Wood Screws and Glue. If you would like to carve the ends into an arc shape for decorative purposes, you can! Each stand should extend beyond the panel by 5″ on either side.
Step 4
With curved leg stands: Use a sander, jig saw, or router to slightly curve the top outside edges. I would very likely use my sander for this, it’s fast and easy this way.
Finishing Instructions
Fill any Screw, Nail or Pocket Holes, Sand and Finish as Desired. For Finishing Tips and Tricks visit my Finishing School
// Disclaimer: Some rights reserved. Private use only. Feel Free to link to any of my plans so long as you ONLY use 1 image and provide an ADEQUATE link back to the original source and appropriate plan! Plans from this page are not to be used for commercial purposes or republished without the express written consent of Rayan Turner, The Design Confidential. By accessing or using any part of the web site, you agree to become bound by the terms and conditions of this website as outlined under Terms of Use. If you do not agree to all the terms and conditions of this agreement, then you may not access the Website or use any services. The information contained in this website is for general information purposes only. The information is provided by The Design Confidential.com and while we endeavor to keep the information up to date and correct, we make no representations or warranties of any kind, express or implied, about the completeness, accuracy, reliability, suitability or availability with respect to the website or the information, products, services, or related graphics contained on the website for any purpose. Any reliance you place on such information is therefore strictly at your own risk. In no event will we be liable for any loss or damage including without limitation, indirect or consequential loss or damage, personal injury or death, or any loss or damage whatsoever arising from loss of information or profits arising out of, or in connection with, the use of this website. I hope to provide accurate plans, however, I cannot guarantee each plan for accuracy. Not every plan that I post has been built and tested, so you are building at your own risk. It is recommended that you have a clear understanding of how the project works before beginning any project. Please contact me if you find an error or inaccuracy so that I might fix it. The Design Confidential.com is inspired by but does not replicate exact designs, any similarities between these plans and items sold at specialty retailers is coincidential and not endorsed by or related to any said retailers. // Post May Contain Affiliate Links
DIY
Ever wonder how people get those perfect and fabulous rows of images or information? Well chances are, if they are WordPress Users, they probably use a plugin of some sort. But what if you want to create rows within a blog post, article, or even for items inside a widget or text box? Are there plugins for that? Well, probably for goodness sakes there are plugins for everything known to man…and them some.
For our purposes today, let’s say you want to organize images or buttons on your site or within a post and you can’t seem to get them to line up perfectly and space them out, or color code them by row for easier visual organization…
I will show you an easy way to whip your information into high gear and force it to submit to your organizational whims.
Take a peak at my buttons page for an example of rows with images all nicely tucked in their respective beds and snuggled up for the long haul. These are my “grab-able” buttons, for all of you to share with your friends, family, and readers (hint, hint).
If I wanted to organize photos in a blog post or as a gallery of thumbnails, the process I used there will work!
Let’s get down to business and dissect this bad boy.
Let’s break down the anatomy of a table, just in case you aren’t familiar with exactly how they orient.
The image above shows a table with it’s respective body parts, and we will use these body parts to create our own table in just a bit! Take note: Table, Table Row, Table Cells…
Tables aren’t used as frequently now as they used to be..but I’m not really sure why since they provide the visual functionality that most of us are seeking and they are extremely easy to create in any medium that accepts html.
We will create a Table:
The image above shows the code for creating one.
The code above will give you 1 table, 1 row, 1 cell…
My cellspacing =0 though you will most likely want this to be closer to 5 or 10 to space your items out enough to visually separate them if you aren’t creating a continuous block of info.
My cellpadding=6 and this refers to the amount of space between your info inside the cell and the cell wallx or imaginary structure itself…In other words, you may or may not want the items within your cell to span the entire width of the cell box or to touch the box walls that are containing them…though for some instances, you may want exactly that.
Now that we have our table structured properly, let’s see how this would change if you wanted multiple cells…
Ok so all we did above is copy and paste the code for the table cell (equal to the number of cells we are hoping for) in this case 3 total. We should have 1 table, 1 row, 3 cells… You will change the url, and image url for each cell (unless you want to repeat the same info for each cell, in which case…well don’t change it). The text in question for the cells themselves is the line of code that looks like this:
Simply add as many of this line above, as you would like to have cells in your row.
So how do you modify this to add multiple rows? Rather than simply copying and pasting the cell code, you will copy and paste the entire section that begins with:
Every time you open something, you need to be sure you close it, or the code won’t work properly. By open I am referring to starting something with <> and to close you simply add a / between your brackets:
< / >
Below I am outlining a pattern for creating 1 table, 2 rows, 1 cell per row.
That’s it, that’s all she wrote…I will expand on easy table creations in another article, so please stay tuned for more Tech Confidential articles…stay up to date and subscribe to my feed or leave me a sweet sweet comment below! I just love to hear from you!
DIY / Entertaining
I don’t know about you…but I like my chocolate… chocolaty…VERY chocolaty. Semi-Sweet has it’s place, but it’s not in my mug of hot chocolate! This fun project is one the whole family can get in on. Setting up an assembly line to crank these out is just pure fun for the little ones especially. The lucky people you give this to will adore the presentation of this simple gift that has been made just for them!
Recipe for this Chocolaty Goodness: I have mixed and mingled several recipes over the years, to come up with my own variation of mouth watering chocolaty chocolate! The ingredients below seem to yield just the right flavor, and just the right amount for gifting to approximately4- 6 people (Using 4 or 6 Large Mason Jars). Makes 8 cups of MIX and 24 cups of Hot Chocolate (mmmm)…reduce by half to create 3 Hot Chocolaty Chocolate Jars! This is the total amount of each item you will need for making this quantity of mix, so do not blend ingredients unless you are going to drink and store for your own use. Below that you will find the breakdown per mason jar for 2 different sizes of jar. **For a less chocolaty experience you can use 1/2 the amount of pudding mix (1 package). 3 cups chocolate chips 3 cups of mini marshmallows 6 1/2 cups powdered milk 2 packages non-instant chocolate pudding mix (package typically 5 oz.) 1 cup powdered chocolate milk drink mix (Nesquik,or something of the sort) 1/2 cup powdered non-dairy creamer 1/2 cup powdered sugar 1/2 cup unsweetened cocoa powder 1/2 cup chocolate chips 1/2 cup of mini marshmallows This can be stored for the season if you are making for your own use. Just be sure to seal in an airtight container. If your Mason Jar will hold enough MIX for 4 cups of hot chocolate: 1/2 cup of chocolate chips 1/2 cup of mini marshmallows 1 cup and 1 tablespoon powdered milk 1 1/2 oz. of non-instant chocolate pudding mix 2 tablespoons and 2 teaspoons powdered chocolate drink mix 1 tablespoon and 1 teaspoon powdered non-dairy creamer 1 tablespoon and 1 teaspoon powdered sugar 1 tablespoon and 1 teaspoon unsweetened cocoa powder If your Mason Jars are sized for the amount of MIX needed for 8 cups of hot chocolate: 1 cup of chocolate chips 1 cup mini marshmallows 2 cups and 3 tablespoons powdered milk 3 oz. of non-instant chocolate pudding mix 1/3 cup powdered chocolate drink mix 2 tablespoons and 2 teaspoons powdered non-dairy creamer 2 tablespoons and 2 teaspoons powdered sugar 2 tablespoons and 2 teaspoons unsweetened cocoa powder Optional: add cinnamon and nutmeg for more of a Mexican Hot Chocolate flavor. Add a touch of Almond Extract while boiling…fantastic… Throw a Vanilla Bean into the mix and watch your taste buds electrify. There are so many variations on hot chocolate, but each and every recipe should have one thing in common…sweet, chocolatly, rich flavor! Add layers of each ingredient to your jar in any order you prefer: Creating your layered mason jar container is most easily maintainable if you put the solid ingredients on the bottom (chocolate chips, marshmallows, etc). In my experience, if they are placed at the top, they will shimmy and shake their way down your container, mixing your beautifully defined layers for you as you go! Not preferable for the striping effect. Keep your ingredients separated and add to the jar individually, layering for color variation as you go. If you want the marshmallows to be given as a topper, consider placing only those at the top of the jar or placing them in a separate cello bag along with your instructions!
Create a personalized gift tag with instructions for use: {Pour contents into mixing bowl and wisk ingredients together. Be sure to blend well so each cup has an equal flavoring of chocolaty goodness. To drink: Add 1/4 – 1/3 cup of blended mix to 8 oz. of boiling water. Stir until disolved and serve. If you prefer, you can also add 1/4-1/3 cup of blended mix to 8 oz water and bring to a boil, stirring frequently (chocolate can burn fairly easily if you aren’t careful). Reduce heat and serve. To make multiple servings of hot chocolaty chocolate at the same time, boil the appropriate amount of water necessary for the total number of servings you will be making (8 oz of water per serving). Stir in 1/4-1/3 cup of blended mix until dissolved, reduce heat and serve. Enjoy….}
Plans
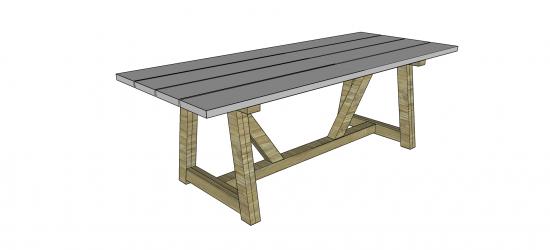
For those of you who loved the Provence Beam Dining Table, but prefer a more compact and rounded version, this table is perfect for you! Isn’t she gorgeous? Love her…wish I didn’t have an overabundance of dining tables already. Perhaps Someone local needs a gift?
As with all of our plans, you are building at your own risk and you should have a firm understanding of building in general before you attempt many of our plans (some are easy as pie and perfect for beginners). With that, go forth, have fun, take lots of pictures and share them in a showcase on the site or on social media with the hashtag #builtTDCtuff and we will share our faves! Be sure to tag @thedesignconfidential on Instagram / FB and @thedesconf on Twitter / Pinterest. If you are a blogger and you post about your build, don’t forget to include a link to your post on your showcase here. Don’t forget… for all of our newer plans, clicking on the images will let them expand to enormous sizes with much greater clarity. The older plans may need updating so please let us know if you need one fixed!
- 2 – 2×6 at 10′
- 3 – 2×6 at 8′
- 1 – 2×6 at 6′
- 1 – 1×6 at 6′
- 1 – 2×4 at 10′
- 1 – 2×4 at 8′
- 1 – 4×4 at 6′
- 1 – 4×4 at 23 1/4″ Center Post
- 4 – 1×6 at 8″ Base Feet
- 1 – 2×6 at 34 1/2″ Base
- 1 – 2×6 at 23″ Base
- 2 – 2×6 at 14 1/2″ Base
- 2 – 2×6 at 8 3/4″ Base
- 2 – 2×6 at 34″ Table Top
- 2 – 2×6 at 46″ Table Top
- 2 – 2×6 at 53 1/2″ Table Top
- 2 – 2×6 at 56 1/2″” Table Top
- 1 – 2×6 at 60 1/2″ Table Top
- 1 – 2×4 at 55″ Top Support
- 2 – 2×4 at 20″ Top Supports
- 4 – 2×4 at 13 1/2″ Angled Beams – top
- 4 – 2×4 at 13 3/4″ Angled Beams – bottom
Before beginning to build, always check in on my site to make sure you have the most up to date set of plans, I occasionally update and change the plans to make the building process easier or to allow for less expensive purchasing of materials! Read through the entire set of instructions and all comments before beginning this project. If you print out or save plans, be sure to check in on my site to be sure you have the most up to date set of plans, as I occasionally update things for ease of building or buying. If you are new to building, read through the GETTING STARTED section and other articles found under the BUILD tab in the menu on my site, it has valuable information about how to get started, tools and techniques. If you are unfamiliar with the finishing process, visit my Finishing school for some tips and tricks for painting like a pro and for special finishing practices. Use glue to secure your joints and Consider Painting or Staining individual sections prior to assembling. This makes the paint application virtually flawless. Coat with a spray on Poly or Wipe on Poly to protect your finish and your piece and it will last for ages. Adhere to all safety standards and guidelines, and be sure you follow safety protocol throughout your build. If you are unsure about whether you are building safely, run a quick online search for the tool or technique you are using, or contact me via email or post to the forum before you move ahead. My contact info can be found in the menu of my site.
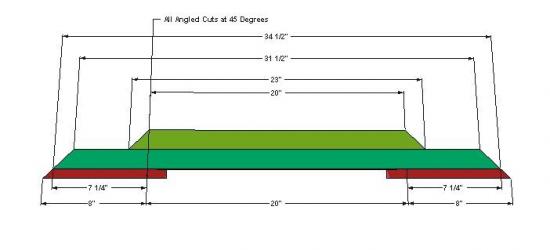
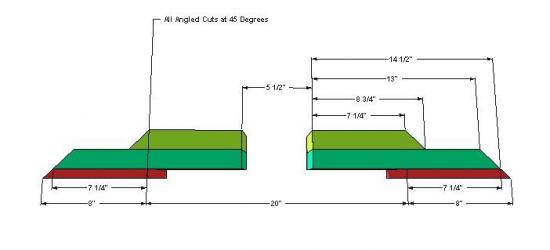
Cut your bases. One side will be whole, the other will be 2 halves that will sit astride the whole base leg. Below are the diagrams for both. Each angle is a 45 Degree at the measurements indicated, and I have given you the long and the short of it, so to speak…meaning if you don’t have a Miter Saw or a Compass or Protractor, you can still make these cuts by marking off the long and short and creating a line between the 2. **You won’t fasten together yet, but you will need them to be prepared. Side 1 and Side 2::
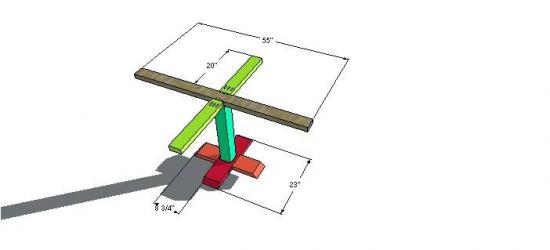
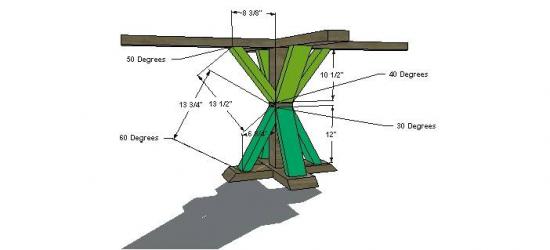
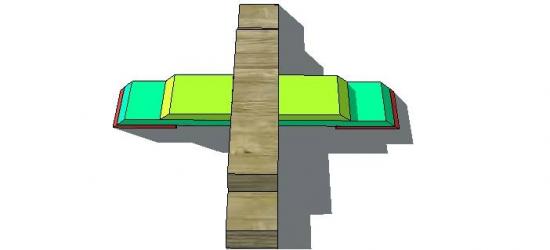
Cut your Upper Table Pieces to size and assemble as shown to the upper most pieces of the leg bases. Fasten the Center Post to the Center Leg Base (red) using 3″ Screws, secure the leg base halves (orange) to the center leg base (red) using a Pocket hole system set for 1 1/2″ stock and your 2 1/2″ pocket hole screws from underneath. Secure the Table Support Halves (green) to the Center Table Support using you rpocket hole system set for 1 1/2″ stock and your 2 1/2″ pocket hole screws, then fasten the Center support to the Center Post using 3″ Screws.
Cut and fasten the Beams in place. They will connect to the upper bases and the table supports with 3″ screws at an angle into the beams. Each side of each beam is cut at a different angle. The upper angle of the upper beams are at a 50 Degree angle, the Lower angle of the Upper beams are at a 40 Degree angle. The Upper angle of the lower beam is cut at a30 degree angle and the lower angle of the lower beam should be cut at 60 Degrees.
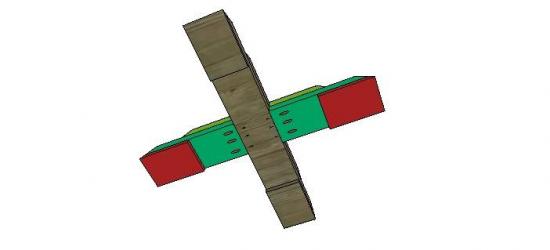
Fasten your leg Base Pieces together and then fasten each half to the center leg base. To fasten the pieces together use 2″ screws to fasten the base feet (red) to the center base board (aqua), then use 2 1/2″ screws to fasten the center base board (aqua)to the upper base foot that is already attached to the Table unit (green). They will fit together as shown directly below, further down I have shown how to fasten together using your Pocket Hole System. If you aren’t using a Pocket hole jig, you can use a strip of your 1×6 and run it along the bottom to hold both sides in place to the main leg base. You would need an 8″ piece or so…just fasten across the “bridge” with 2″ screws. This doesn’t show the upper portion as it should be connected at this point, it’s easier to see the way it fits together like this, so just understand you have the rest of the table assembled so far (except for the table top itself).
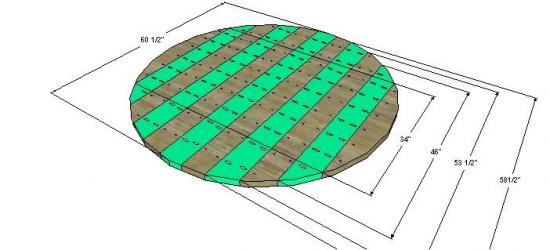
If you aren’t purchasing a solid round table top, you will need to create your circular top by cutting the pieces to size and attaching them, and then creating your circle and cutting it out with a jig saw. To secure your top boards together, use your pocket hole system set for 1 1/2″ stock and fasten every other board to the 2 boards on either side of it with your 2 1/2″ pocket hole screws. Begin at the 2nd board in from each side (aqua colored) and place your pocket holes in either direction. Once your boards are all fastened together, and you have cut your circular shape, attach to the table supports from underneath using 2 1/2″ screws.
Fill any Screw, Nail or Pocket Holes, Sand and Finish as Desired. For Finishing Tips and Tricks visit my Finishing School
**Disclaimer: Some rights reserved. Private use only. Feel Free to link to any of my plans so long as you provide an adequate link back to the appropriate post! Plans from this page are not to be used for commercial purposes or republished without the express written consent of Rayan Turner, The Design Confidential I hope to provide accurate plans, however, I cannot guarantee each plan for accuracy. Not every plan that I post has been built and tested, so you are building at your own risk. It is recommended that you have a clear understanding of how the project works before beginning any project. Please contact me if you find an error or inaccuracy so that I might fix it.
Plans
So far, we have covered the table and the chair, how about a cute little bench option? Provide your little bundle(s) of joy with a stylish furniture choice that will blend seamlessly with the rest of your home’s big kid style pieces.
- Tape Measure
- Square
- Sander
- Drill
- **Saw – Optional if you have your local lumber supply cut your boards.
- **Kreg Jig – Optional, but makes the build a snap.
- 2 – 1×2 at 8′
- 1 – 1×3 at 10′
- 1 1/4″ Pocket Hole Screws – if using a Pocket Hole Jig
- 1 1/4″ Wood Screws
- 2″ Wood Screws
- Wood Glue
- Wood Filler
- Sanding Supplies
- Finishing Supplies
- 2 – 1×2 at 21″ Legs
- 2 – 1×2 at 10 1/4″ Legs
- 3 – 1×2 at 10″ Bench Seat Frame
- 5 – 1×2 at 19″ Bench Seat Frame, Seat, Stretcher, Back Rest
- 4 – 1×3 at 20 1/2″ Bench Seat
- 1 – 1×3 at 19″ Back Rest
Before beginning to build, always check in on my site to make sure you have the most up to date set of plans, I occasionally update and change the plans to make the building process easier or to allow for less expensive purchasing of materials! Read through the entire set of instructions and all comments before beginning this project. If you print out or save plans, be sure to check in on my site to be sure you have the most up to date set of plans, as I occasionally update things for ease of building or buying. If you are new to building, read through the GETTING STARTED section and other articles found under the BUILD tab in the menu on my site, it has valuable information about how to get started, tools and techniques. If you are unfamiliar with the finishing process, visit my Finishing school for some tips and tricks for painting like a pro and for special finishing practices. Use glue to secure your joints and Consider Painting or Staining individual sections prior to assembling. This makes the paint application virtually flawless. Coat with a spray on Poly or Wipe on Poly to protect your finish and your piece and it will last for ages. Adhere to all safety standards and guidelines, and be sure you follow safety protocol throughout your build. If you are unsure about whether you are building safely, run a quick online search for the tool or technique you are using, or contact me via email or post to the forum before you move ahead. My contact info can be found in the menu of my site.
Build and Attach the Bench Seat Frame. Use a pocket hole system to construct the frame, set for 3/4″ stock or Use a #8 countersink bit and your2″ wood screws to build the frame and to attach use your 1 1/4″ wood screws.
Fasten the Bench Seat in Place. You can elect to use plywood or MDF and Iron on Edge Banding, or you can line up 1×3’s and secure them to the frame. To avoid so many screw holes showing , you can use a pocket hole system to join the boards together underneath and then attach as a single unit to the frame. You have a few options for this step please note that joining the boards with a pocket hole system is really more for the benefit of creating a single chair seat piece that can be secured with less frequent visible screw holes, to the frame and isn’t really a stability issue. To fasten the Seat to the Bench Base otherwise, use your #8 countersink bit and 2″ wood screws from the top and down into the frame and legs. Use 2 screws per seat slat on either side and fasten to either the frame or the leg depending upon which slat you are securing.
Step 4
Attach the Aprons, Back Rests, and Stretchers. Use your pocket hole system set for 3/4″ stock or 2″ screws and your #8 countersink bit to pre-drill and fasten the stretchers and back rests, and use 1 1 /4″ wood screws to attach the aprons from underneath and on the inside of the bench seat frame.
Fill any Screw, Nail or Pocket Holes, Sand and Finish as Desired. For Finishing Tips and Tricks visit my Finishing School
**Disclaimer: Some rights reserved. Private use only. Feel Free to link to any of my plans so long as you provide an adequate link back to the appropriate post! Plans from this page are not to be used for commercial purposes or republished without the express written consent of Rayan Turner, The Design Confidential I hope to provide accurate plans, however, I cannot guarantee each plan for accuracy. Not every plan that I post has been built and tested, so you are building at your own risk. It is recommended that you have a clear understanding of how the project works before beginning any project. Please contact me if you find an error or inaccuracy so that I might fix it.
Plans
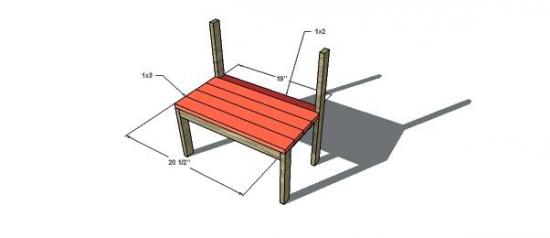
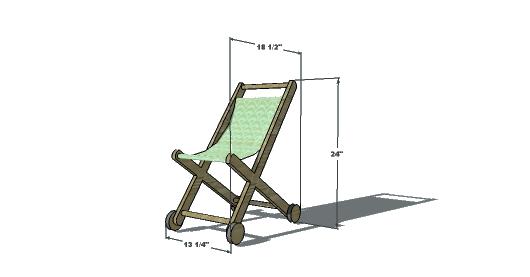
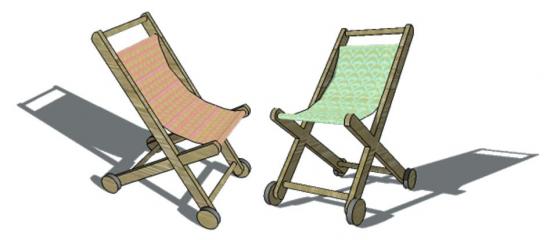
Solid wood construction, and fabric of your choosing make this the perfect little accessory for your perfect little girl! This stroller will fit an 18″ doll, so for all of you American girl Doll loving folks out there, this is a perfect choice. For all of you non-sewers, not to worry, you can make the seat using Fabric Glue or Hem Tape and your Iron. You can modify this to suit your particular needs and taste preferences. Cut the ends in an angled manner, or rounded, use square dowels if you prefer and you can even purchase rubber tire wheels if you like that sporty look or you are concerned about bumps and dings. I will also throw in instructions for making this into a fold up stroller, if space is a concern, please note the original (allegedly) does not have any of those custom options! Of course it costs quite a bit more as well, and naturally as is the way of the specialty retailer, you have only 1 option for fabric and wood tone. I present you with Options! Options! Options! Nothing less will do…
As with all of our plans, you are building at your own risk and you should have a firm understanding of building in general before you attempt many of our plans (some are easy as pie and perfect for beginners). With that, go forth, have fun, take lots of pictures and share them in a showcase on the site or on social media with the hashtag #builtTDCtuff and we will share our faves! Be sure to tag @thedesignconfidential on Instagram / FB and @thedesconf on Twitter / Pinterest. If you are a blogger and you post about your build, don’t forget to include a link to your post on your showcase here. Don’t forget… for all of our newer plans, clicking on the images will let them expand to enormous sizes with much greater clarity. The older plans may need updating so please let us know if you need one fixed!
- 1 – 1×2 at 10′
- 3/4″ Diameter Round Dowel at 6′ – each store carries different sizing options…you need 52″ of this including saw blade cut away.
- 2 – 1×2 at 28″ Long Single Legs
- 2 – 1×2 at 6″ Upper Short Legs
- 2 – 1×2 at 12 1/2″ Lower Short Legs
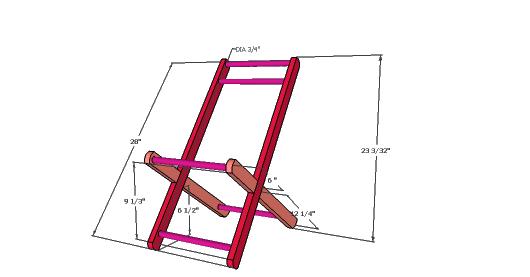
- 5 – 3/4″ Round Dowel at 10 1/4″ Rails
Before beginning to build, always check in on my site to make sure you have the most up to date set of plans, I occasionally update and change the plans to make the building process easier or to allow for less expensive purchasing of materials! Read through the entire set of instructions and all comments before beginning this project. If you print out or save plans, be sure to check in on my site to be sure you have the most up to date set of plans, as I occasionally update things for ease of building or buying. If you are new to building, read through the GETTING STARTED section and other articles found under the BUILD tab in the menu on my site, it has valuable information about how to get started, tools and techniques. If you are unfamiliar with the finishing process, visit my Finishing school for some tips and tricks for painting like a pro and for special finishing practices. Use glue to secure your joints and Consider Painting or Staining individual sections prior to assembling. This makes the paint application virtually flawless. Coat with a spray on Poly or Wipe on Poly to protect your finish and your piece and it will last for ages. Adhere to all safety standards and guidelines, and be sure you follow safety protocol throughout your build. If you are unsure about whether you are building safely, run a quick online search for the tool or technique you are using, or contact me via email or post to the forum before you move ahead. My contact info can be found in the menu of my site.
Cut your Boards to Size as indicated by the dimensions above. If you plan to round out the corners as shown, you will want to create no more than a 1/2″ radius for your arc. Anymore than that, and you will actually be changing the overall measurements of your stroller, which is obviously a-ok, assuming you were planning to do so! This diagram indicates all of the measurements required for each piece, prior to rounding out the corners. Hopefully, if you are careful, the dimensions as measured from right down the middle of each board won’t change, you will just carve away the corners a tad.
This diagram outlines an easy way to lay out your boards to ensure precisely placed pieces and cuts, however, it is more than likely that a smidgen of an error here and there won’t affect this too terribly, so don’t fret to much about this, you will do just fine!

Drill your holes for the Wheels prior to fastening the boards together, it will be easier. If you are choosing Wooden Wheels and Dowel Rod Axles, use a 1″ Drill Bit or hole saw bit and place your holes at least 1″ from the bottom of each leg. Be sure you place your wheels in the precise same position for all 4 Bottom Leg Pieces. Then go ahead and Attach all 3 leg pieces together, for both sides, using your Kreg Jig Set for 3/4″ stock and your 1 1/4″ pocket hole screws and glue. Fasten the leg pairs together by attaching the Rails to either side. Be sure you mark off your attachment site so you don’t end up with a lop-sided stroller. Countersink and pre-drill using a #8 Countersink Bit, then fasten with glue and 2″ Wood Screws (#8).
Use 3″ Wheels with a Wooden Axle made from 3/4″ dowel rod. You can either cut out your wheel from a 1×4 board or a 2×4 board and using a 3/4″ drill bit or hole saw bit with a depth collar set for 1/2″ drill a hole part way into each wheel that the dowel rod will fit into. You will be gluing the dowel rod into each wheel. In my case, I purchased small bun feet and removed the screw that protrudes. Then I used a 3/4″ hole saw bit to drill out a hole about 1/2″ into each bun foot for the dowel rod to fit. Glue the dowel rod into one wheel and once it’s dry slide the dowel through the holes in the stroller legs then glue on the opposite wheel. Do this for the front and back wheels.
Go ahead and sand and finish your stroller and while your finish is drying, you can begin the Seat cover. For those of you who sew, this is a no brainer, for the rest of you folks who are on My Team of Non-Sewers, click the image below for some very simple instruction on creating this using Fabric Glue.
Fill any Screw, Nail or Pocket Holes, Sand and Finish as Desired. For Finishing Tips and Tricks visit my Finishing School
// Disclaimer: Some rights reserved. Private use only. Feel Free to link to any of my plans so long as you ONLY use 1 image and provide an ADEQUATE link back to the original source and appropriate plan! Plans from this page are not to be used for commercial purposes or republished without the express written consent of Rayan Turner, The Design Confidential. By accessing or using any part of the web site, you agree to become bound by the terms and conditions of this website as outlined under Terms of Use. If you do not agree to all the terms and conditions of this agreement, then you may not access the Website or use any services. The information contained in this website is for general information purposes only. The information is provided by The Design Confidential.com and while we endeavor to keep the information up to date and correct, we make no representations or warranties of any kind, express or implied, about the completeness, accuracy, reliability, suitability or availability with respect to the website or the information, products, services, or related graphics contained on the website for any purpose. Any reliance you place on such information is therefore strictly at your own risk. In no event will we be liable for any loss or damage including without limitation, indirect or consequential loss or damage, personal injury or death, or any loss or damage whatsoever arising from loss of information or profits arising out of, or in connection with, the use of this website. I hope to provide accurate plans, however, I cannot guarantee each plan for accuracy. Not every plan that I post has been built and tested, so you are building at your own risk. It is recommended that you have a clear understanding of how the project works before beginning any project. Please contact me if you find an error or inaccuracy so that I might fix it. The Design Confidential.com is inspired by but does not replicate exact designs, any similarities between these plans and items sold at specialty retailers is coincidental and not endorsed by or related to any said retailers. // Affiliate links are used for tools and materials. The Design Confidential will earn a small commission for any items purchased using these links. Thank you for your support – every little bit counts!
Plans
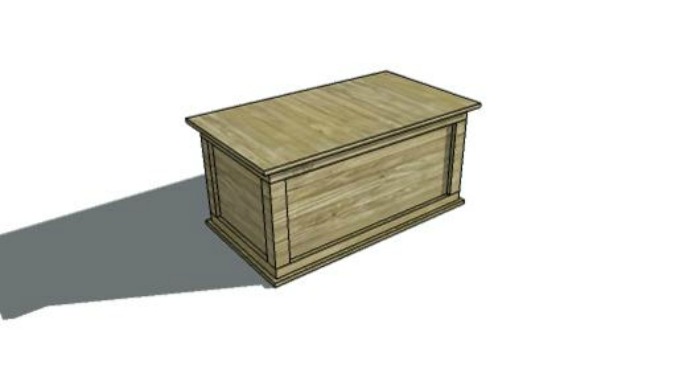
 The oversized Bailey Cube is perfect for storing blankets, or as a coffee table perhaps. Even a Hope chest would be a fabulous use for this piece. Tailor it to suit the other pieces in your room by changing the trim to match.
- 3 – 3/4″ Square or Quarter round Trim at 8′
- 1 sheet – 3/4″ Ply or MDF
- 1 – 1×3 at 10′
- 1 – 1×3 at 6′
- 3 – 1×2 at 10′
- 1 – 1×2 at 6′
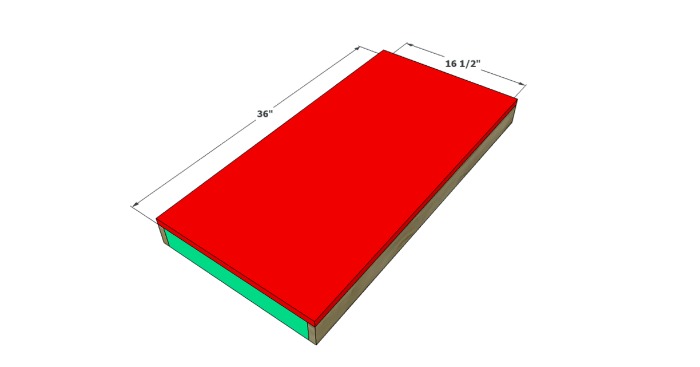
- 1 – 3/4″ Ply at 36″ x 16 1/2″ Bottom
- 1 – 3/4″ Ply at 40 1/2″ x 22 1/2″ Top
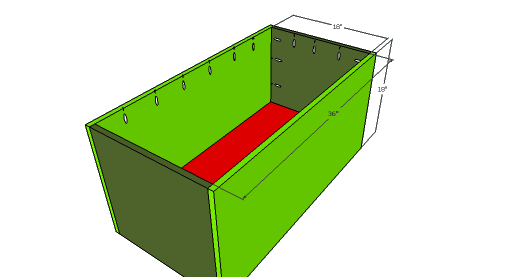
- 2 – 3/4″ Ply at 36″ x 18″ Front and Back
- 2 – 3/4″ Ply at 18″ x 18″ Sides
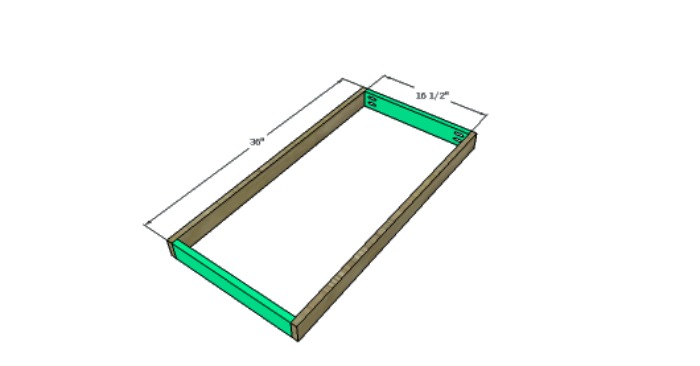
- 2 – 1×2 at 36″ Frame
- 2 – 1×2 at 16 1/2″ Frame Sides
- 4 – 1×2 at 39″ Face Frame Top of box, and top trim of front/ back box
- 2 – 1×2 at 18″ Face Frame Sides Top of Box
- 4 – 1×2 at 14″ Trim Sides on Sides of box
- 2 – 1×2 at 19 1/2″ Trim Bottom on Sides of Box
- 4 – 1×3 at 14″ Trim Sides of Front/Back of Box
- 2 – 1×3 at 39″ Trim Bottom on Front/Back Box
- 2 – 1×3 at 19 1/2″ Trim Bottom on Sides of Box
- 2 – 3/4″ x 3/4″ at 42″ Square or Quarter Round Trim on Top
- 2 – 3/4″ x 3/4″ at 22 1/2″ Square or Quarter Round Trim on Top
- 2 – 3/4″ x 3/4″ at 21″ Square or Quarter Round Trim on Top
- 2 – 3/4″ x 3/4″ at 40 1/2″ Square or Quarter Round Trim on Top
This storage chest is really pretty simple to construct. I think you shouldn’t have many problems whipping this together, but just in case you do, please feel free to toss me a line and I shall help you along.
Before beginning to build, always check in on my site to make sure you have the most up to date set of plans, I occasionally update and change the plans to make the building process easier or to allow for less expensive purchasing of materials!
Read through the entire set of instructions and all comments before beginning this project. If you print out or save plans, be sure to check in on my site to be sure you have the most up to date set of plans, as I occasionally update things for ease of building or buying. If you are new to building, read through the GETTING STARTED section and other articles found under the BUILD tab in the menu on my site, it has valuable information about how to get started, tools and techniques. If you are unfamiliar with the finishing process, visit my Finishing school for some tips and tricks for painting like a pro and for special finishing practices.
Use glue to secure your joints and Consider Painting or Staining individual sections prior to assembling. This makes the paint application virtually flawless. Coat with a spray on Poly or Wipe on Poly to protect your finish and your piece and it will last for ages. Adhere to all safety standards and guidelines, and be sure you follow safety protocol throughout your build. If you are unsure about whether you are building safely, run a quick online search for the tool or technique you are using, or contact me via email or post to the forum before you move ahead. My contact info can be found in the menu of my site.

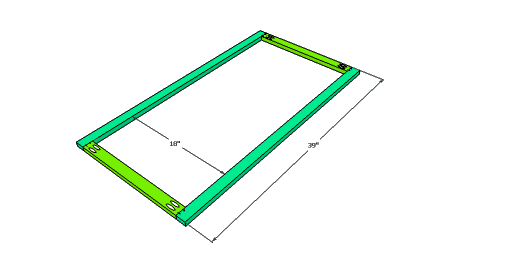
Build your Base Frame. Use your pocket hole system and glue to join the Frame Sides to the Frame Front and Back. If you aren’t using a Kreg Jig, feel free to use your 2″ Wood Screws from the outside of the front/back frame pieces into the sides. The frame is constructed of 1×2’s.
Fasten the Chest Bottom to the top of the Base Frame. Fasten down using 1 1/4″ Screws and Glue.
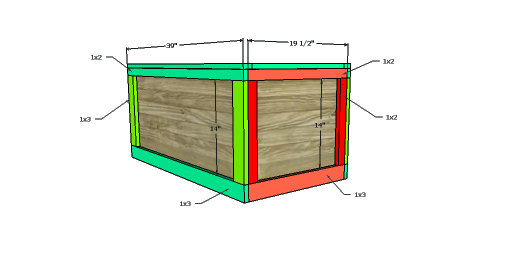
Build the Chest Box. if you are using a Pocket Hole system, you will create pocket holes along the top of each side to attach to the frame later, and will create pocket holes along the sides of the sides to join to the front and back of the box.
If you aren’t using a Pocket Hole system, use your 1 1/4″ screws and fasten the box sides to each other and to the frame and bottom as well.
Create a Face Frame for the top of the chest. Place your pocket holes on the rails of the frame (these would be the shorter sides). If you aren’t using a Pocket hole system, you will skip this step and simply move on to step 5, and fasten the frame to the box itself using your 1 1/4″ screws or finish nails.
Fasten the Face frame to the box as shown below, use 1 1/4″ pocket hole screws from the inside pocket holes you created earlier or 2″ screws from the top. Then trim out the remainder of the box. Create face frames as in the step above if you are working with a pocket hole system, then fasten in place from the inside using 1 1/4″ screws. If you aren’t working with a pocket hole system, simply fasten the trim in place using finish nails or 1 1/4″ screws from the inside of the box. Use glue
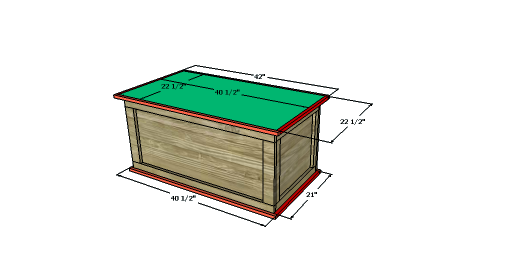
Create your box lid and trim it out with either square trim or quarter round depending on the style you prefer. Trim out the bottom edge in the same manner. Fasten the top in place using hinges of your choice. I prefer this kind for storage chests, but feel free to choose any within your budget and that you feel suit your needs.
Fill any Screw, Nail or Pocket Holes, Sand and Finish as Desired.
// Disclaimer: Some rights reserved. Private use only. Feel Free to link to any of my plans so long as you ONLY use 1 image and provide an ADEQUATE link back to the original source and appropriate plan! Plans from this page are not to be used for commercial purposes or republished without the express written consent of Rayan Turner, The Design Confidential. By accessing or using any part of the web site, you agree to become bound by the terms and conditions of this website as outlined under Terms of Use. If you do not agree to all the terms and conditions of this agreement, then you may not access the Website or use any services. The information contained in this website is for general information purposes only. The information is provided by The Design Confidential.com and while we endeavor to keep the information up to date and correct, we make no representations or warranties of any kind, express or implied, about the completeness, accuracy, reliability, suitability or availability with respect to the website or the information, products, services, or related graphics contained on the website for any purpose. Any reliance you place on such information is therefore strictly at your own risk. In no event will we be liable for any loss or damage including without limitation, indirect or consequential loss or damage, personal injury or death, or any loss or damage whatsoever arising from loss of information or profits arising out of, or in connection with, the use of this website. I hope to provide accurate plans, however, I cannot guarantee each plan for accuracy. Not every plan that I post has been built and tested, so you are building at your own risk. It is recommended that you have a clear understanding of how the project works before beginning any project. Please contact me if you find an error or inaccuracy so that I might fix it. The Design Confidential.com is inspired by but does not replicate exact designs, any similarities between these plans and items sold at specialty retailers is coincidential and not endorsed by or related to any said retailers. // Post May Contain Affiliate Links