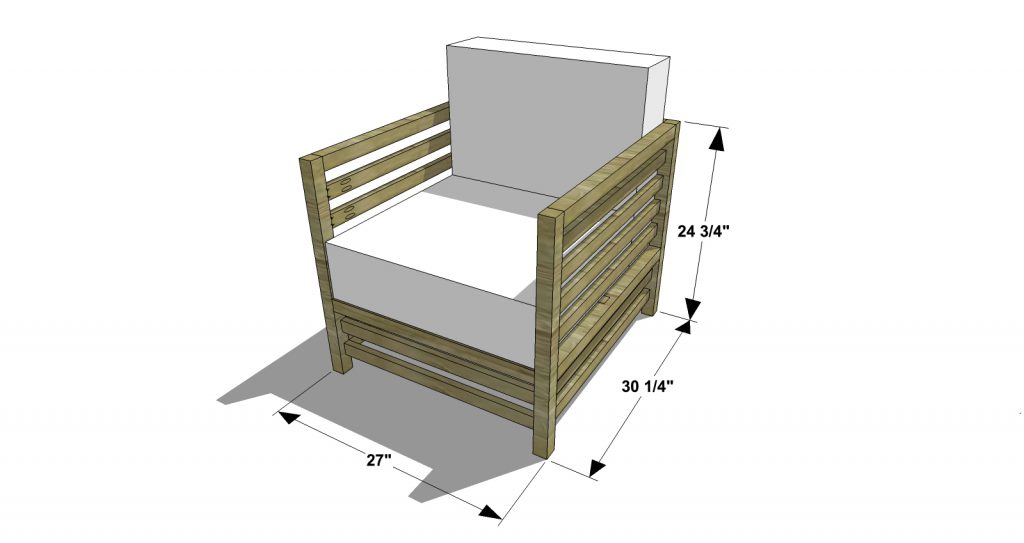
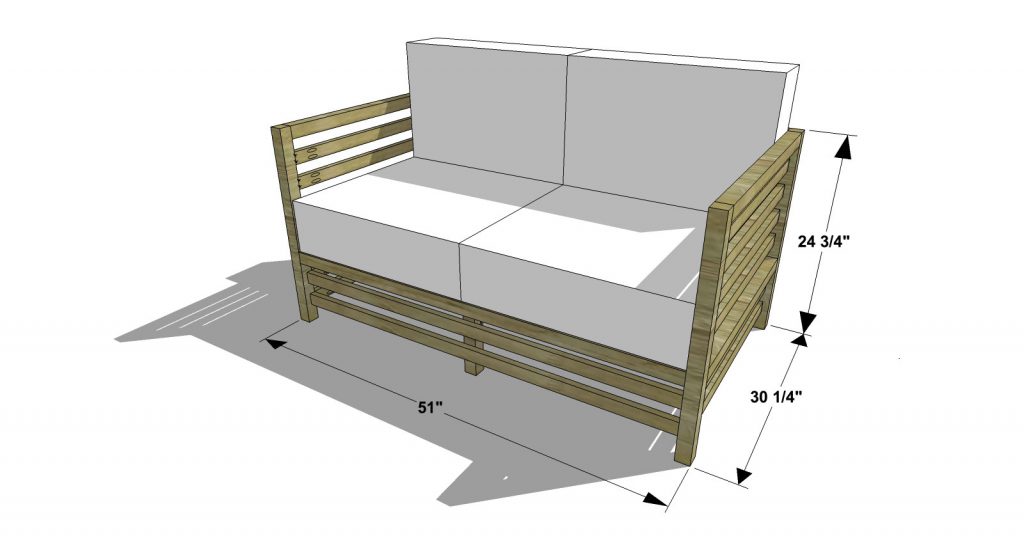
Just as promised, here is the newest addition to our new outdoor collection. This Outdoor Slatted Armchair pairs perfectly with the Outdoor Slatted Loveseat. Go ahead and plan that big end of summer party – we have you covered!
This plan was custom made to fit these fabulous cushions with a smattering of these for the back! You can also buy this combo set if you prefer. Cushions have a way of being super expensive, so we took the chore out of this task and designed the piece to fit them perfectly. A great price and gorgeous color selection – hard to beat!
As with all of our plans, you are building at your own risk and you should have a firm understanding of building in general before you attempt many of our plans (some are easy as pie and perfect for beginners). With that, go forth, have fun, take lots of pictures and share them in a showcase on the site or on social media with the hashtag #builtTDCtuff and we will share our faves! Be sure to tag @thedesignconfidential on Instagram / FB and @thedesconf on Twitter / Pinterest. Don’t forget… for all of our newer plans, clicking on the images will let them expand to enormous sizes with much greater clarity. The older plans may need updating so please let us know if you need one fixed!
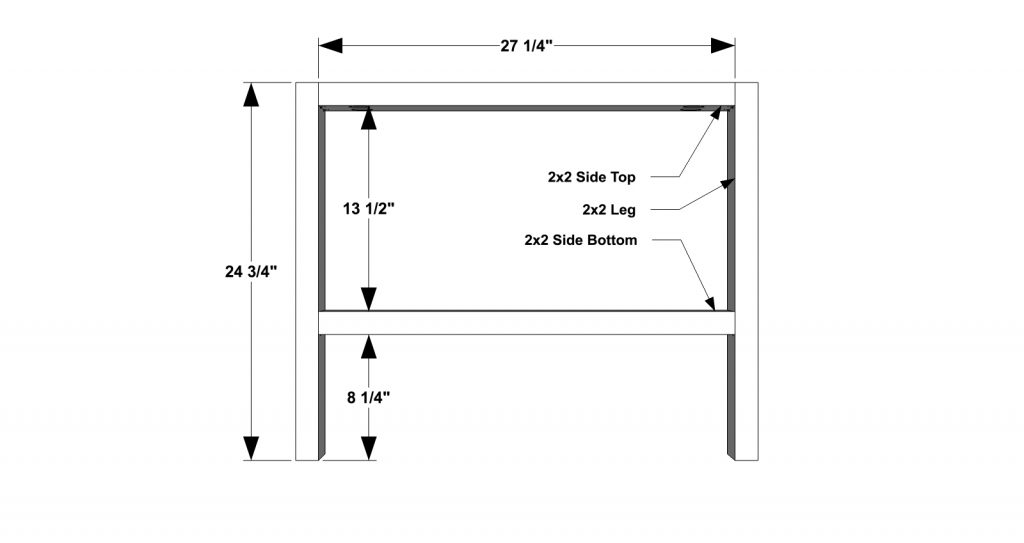
4 – 2×2 at 24-3/4” – Legs
4 – 2×2 at 27-1/4” – Side Tops and Bottoms
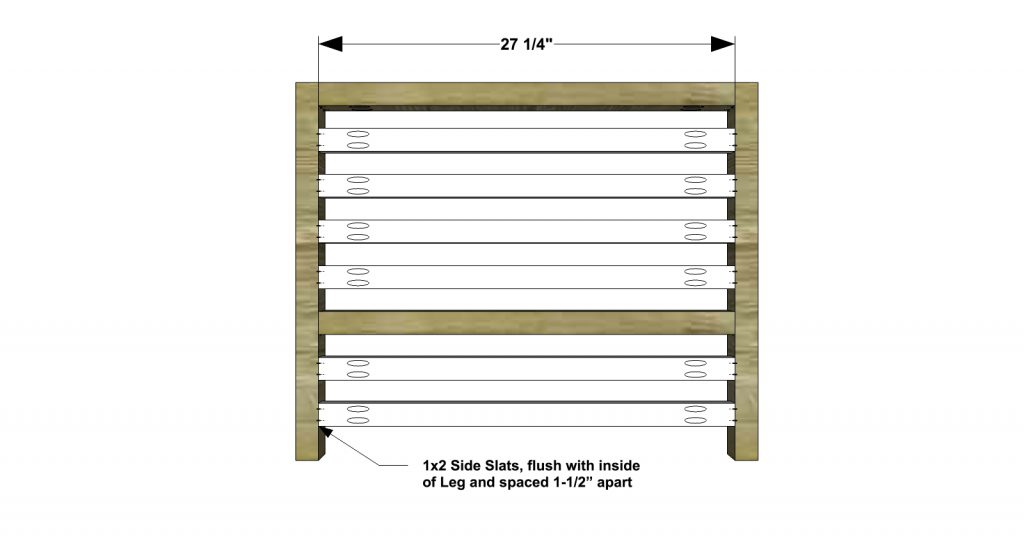
12 – 1×2 at 27-1/4” – Side Slats
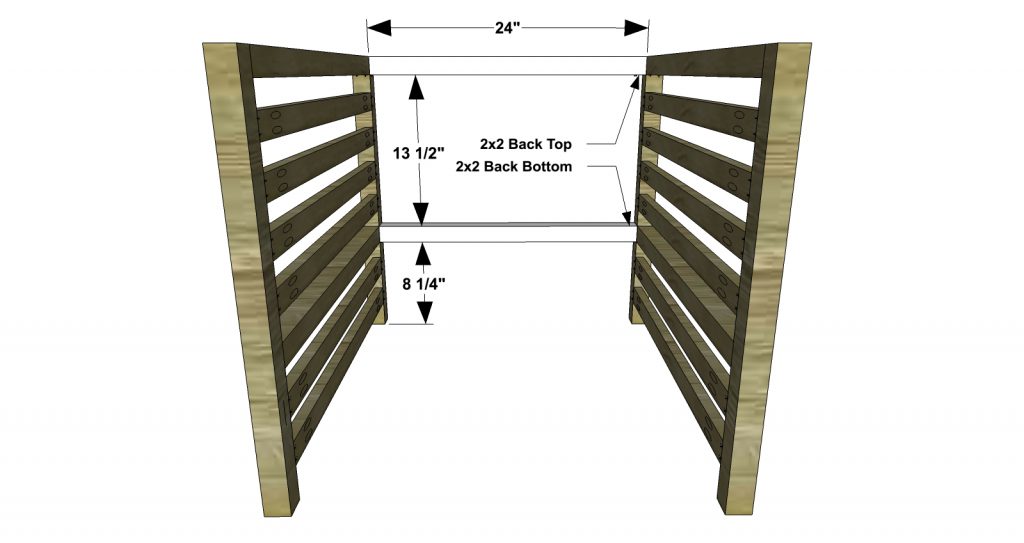
2 – 2×2 at 24” – Back Top and Bottom
4 – 1×2 at 24” – Back Slats
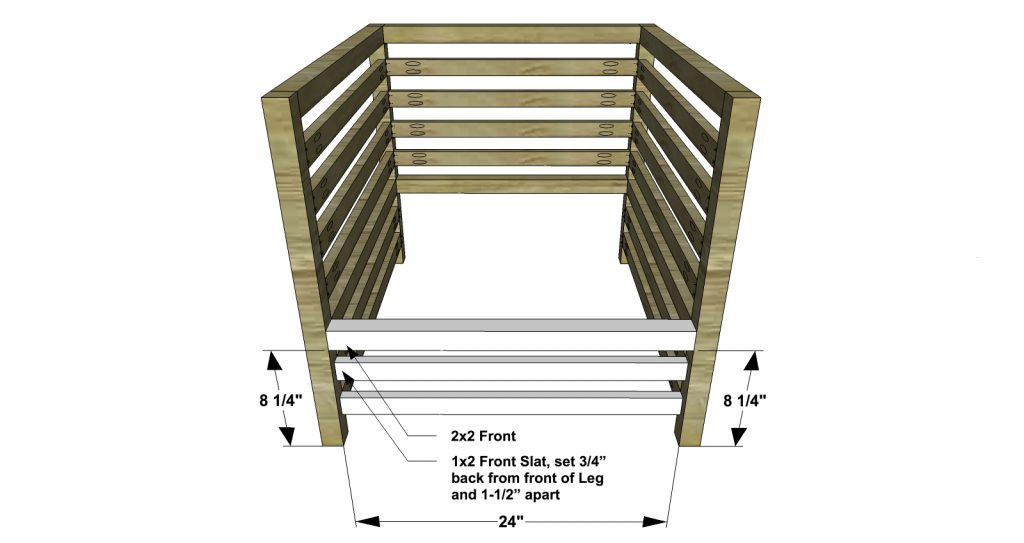
1 – 2×2 at 24” – Front
2 – 1×2 at 24” – Front Slats
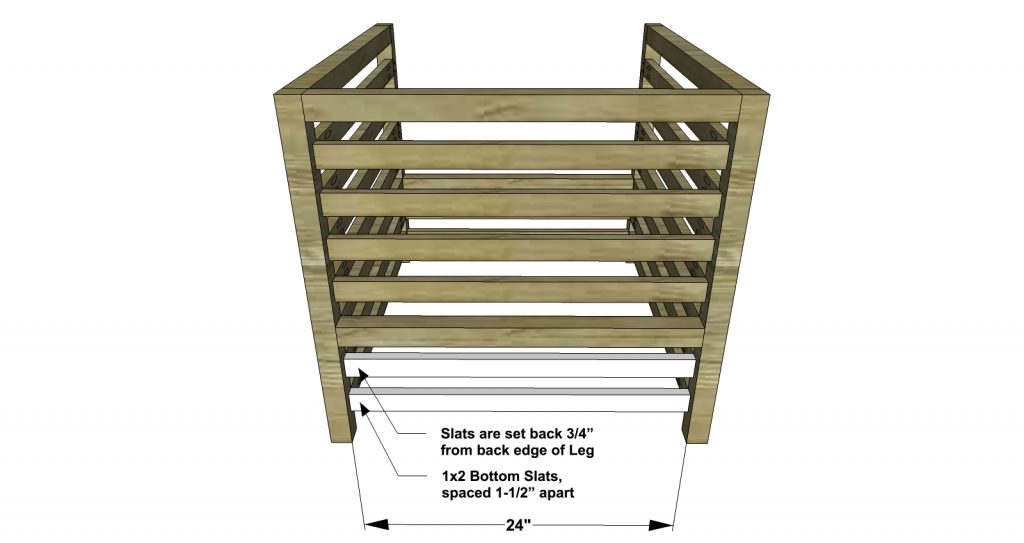
2 – 1×2 at 24” – Bottom Slats
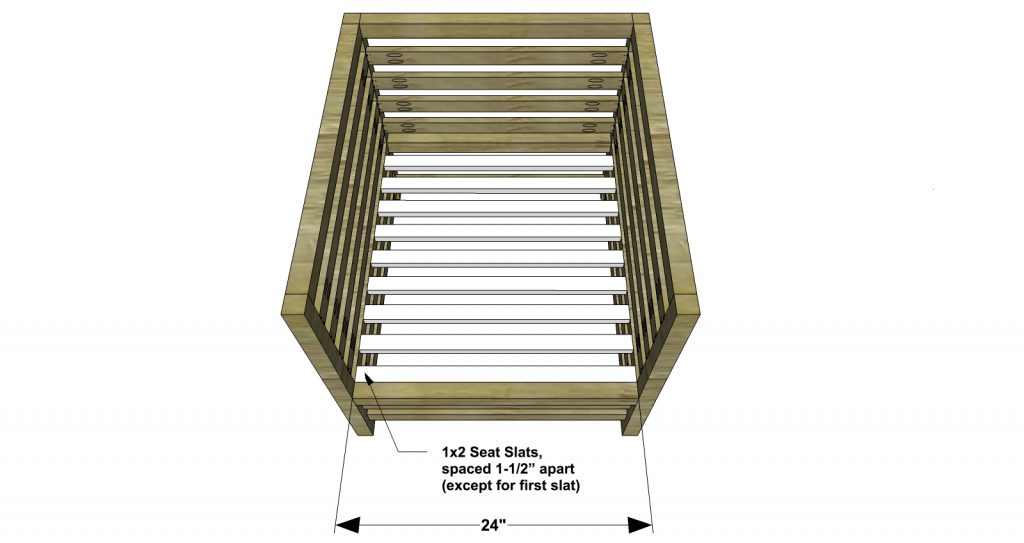
9 – 1×2 at 24” – Seat Slats
Before beginning to build, always check in on my site to make sure you have the most up to date set of plans, I occasionally update and change the plans to make the building process easier or to allow for less expensive purchasing of materials! Read through the entire set of instructions and all comments before beginning this project. If you print out or save plans, be sure to check in on my site to be sure you have the most up to date set of plans, as I occasionally update things for ease of building or buying. If you are new to building, read through the GETTING STARTED section and other articles found under the BUILD tab in the menu on my site, it has valuable information about how to get started, tools and techniques. If you are unfamiliar with the finishing process, visit my Finishing school for some tips and tricks for painting like a pro and for special finishing practices. Use glue to secure your joints and Consider Painting or Staining individual sections prior to assembling. This makes the paint application virtually flawless. Coat with a spray on Poly or Wipe on Poly to protect your finish and your piece and it will last for ages. Adhere to all safety standards and guidelines, and be sure you follow safety protocol throughout your build. If you are unsure about whether you are building safely, run a quick online search for the tool or technique you are using, or contact me via email or post to the forum before you move ahead. My contact info can be found in the menu of my site.
Cut the pieces for the Legs, Side Tops and Side Bottoms. With the Kreg jig set for 1-1/2” material, drill pocket holes in both ends of the Side Tops and Side Bottoms. Assemble as shown with glue and 2-1/2” pocket screws. Pay close attention to which direction your pocket holes face – it’s up to you (just make sure that you are consistent).
Cut the pieces for the Side Slats. With the Kreg jig set for 3/4” material, drill pocket holes in both ends of the Side Slats. Place the Side Slats to where they are flush with the inside of the Legs and spaced 1-1/2” from each other. Assemble as shown with glue and 1-1/4” pocket screws.
Cut the pieces for the Back Top and Back Bottom. With the Kreg jig set for 1-1/2” material, drill pocket holes in both ends of the Back Top and Back Bottom. Assemble as shown with glue and 2-1/2” pocket screws.
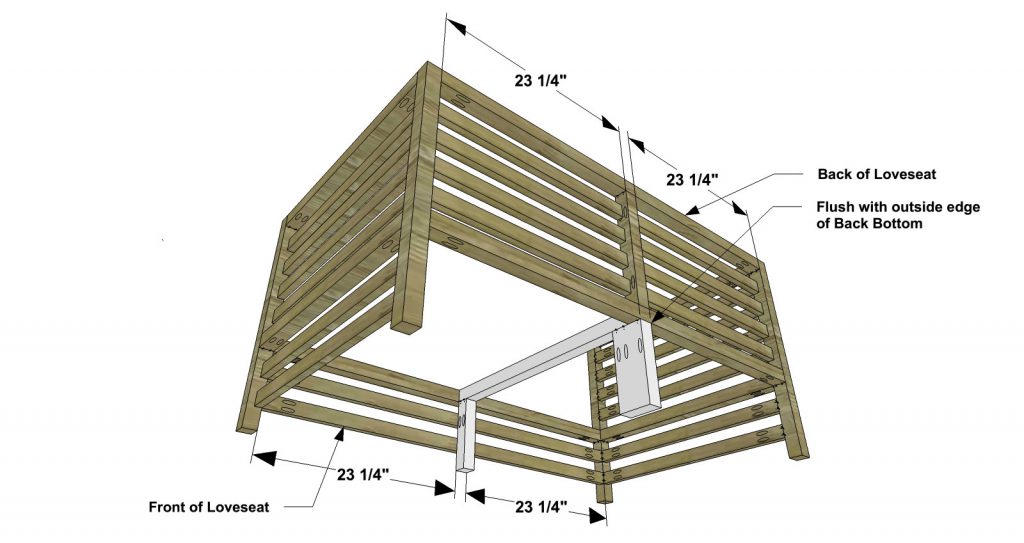
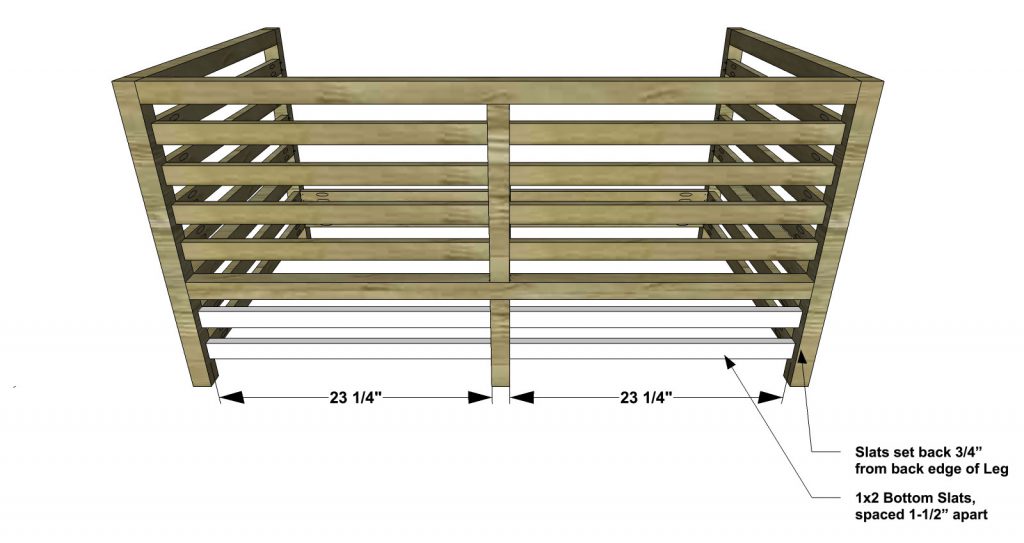
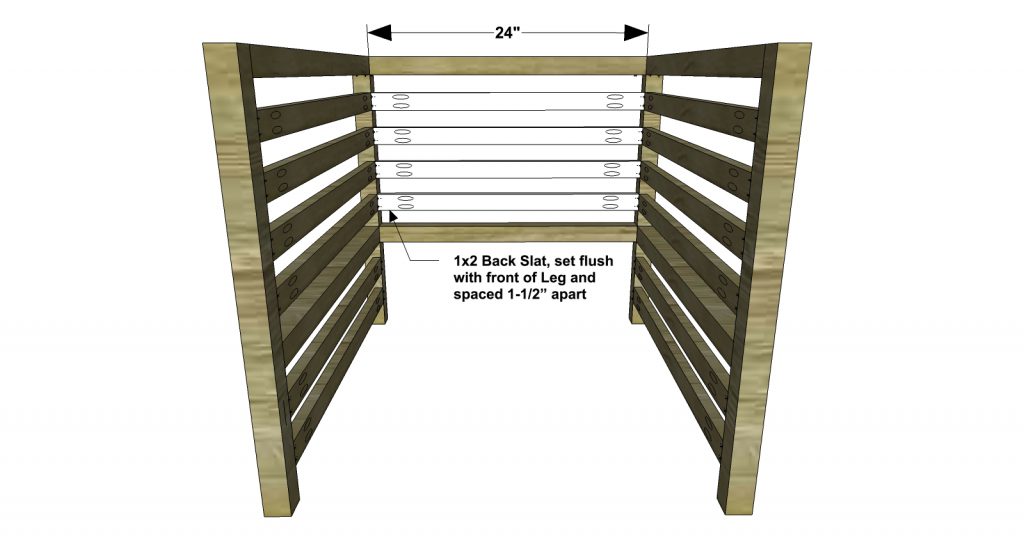
Cut the pieces for the Back Slats. With the Kreg jig set for 3/4” material, drill pocket holes in both ends of the Back Slats. Place the Back Slats to where they are flush with the inside of the Legs and spaced 1-1/2” from each other. Assemble as shown with glue and 1-1/4” pocket screws.
Cut the pieces for the Front and Front Slats. With the Kreg jig set for 1-1/2” material, drill pocket holes in both ends of the Front. Reset the Kreg jig set for 3/4” material, and drill pocket holes in both ends of the Front Slats. Place the Front Slats to where they are flush with the inside of the Legs and 3/4” from the front edge of the Legs and spaced 1-1/2” from each other. Assemble the Front as shown with glue and 2-1/2” pocket screws and the Front Slats with glue and 1-1/4” pocket screws.
Cut the pieces for the Bottom Slats. With the Kreg jig set for 3/4” material, drill pocket holes in both ends of each Bottom Slat. Place the Bottom Slats to where they are 3/4” from the back edge of the Legs and spaced 1-1/2” from each other. Assemble as shown with glue and 1-1/4” pocket screws.
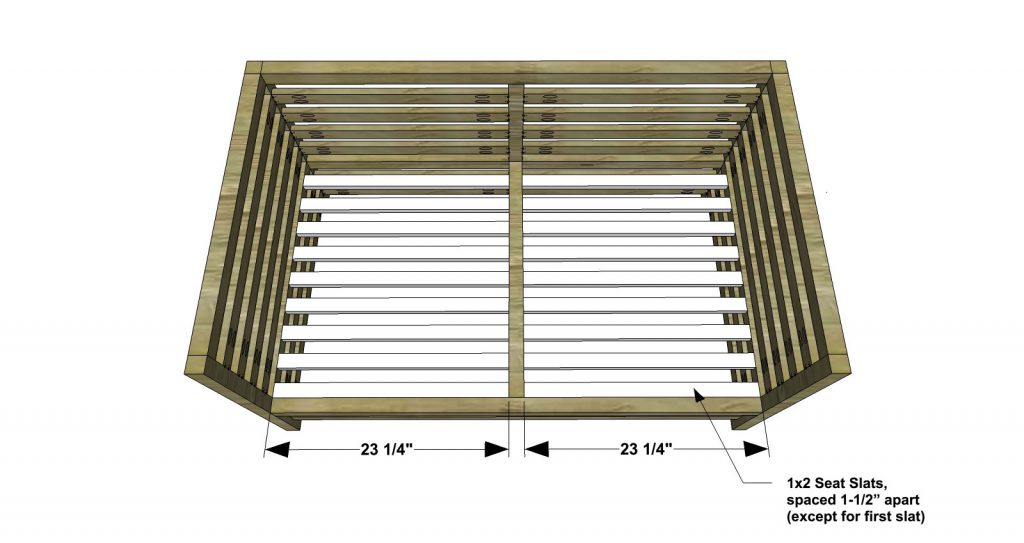
Cut the pieces for the Seat Slats. With the Kreg jig set for 3/4” material, drill pocket holes in both ends of each Seat Slat. Place the Seat Slats to where they are flush with the top edge of the Side Bottoms and spaced 1-1/2” from each other. Assemble as shown with glue and 1-1/4” pocket screws.
Fill any Screw, Nail or Pocket Holes, Sand and Finish as Desired. For Finishing Tips and Tricks visit my Finishing School
// Disclaimer: Some rights reserved. Private use only. Feel Free to link to any of my plans so long as you ONLY use 1 image and provide an ADEQUATE link back to the original source and appropriate plan! Plans from this page are not to be used for commercial purposes or republished without the express written consent of Rayan Turner, The Design Confidential. By accessing or using any part of the web site, you agree to become bound by the terms and conditions of this website as outlined under Terms of Use. If you do not agree to all the terms and conditions of this agreement, then you may not access the Website or use any services. The information contained in this website is for general information purposes only. The information is provided by The Design Confidential.com and while we endeavor to keep the information up to date and correct, we make no representations or warranties of any kind, express or implied, about the completeness, accuracy, reliability, suitability or availability with respect to the website or the information, products, services, or related graphics contained on the website for any purpose. Any reliance you place on such information is therefore strictly at your own risk. In no event will we be liable for any loss or damage including without limitation, indirect or consequential loss or damage, personal injury or death, or any loss or damage whatsoever arising from loss of information or profits arising out of, or in connection with, the use of this website. I hope to provide accurate plans, however, I cannot guarantee each plan for accuracy. Not every plan that I post has been built and tested, so you are building at your own risk. It is recommended that you have a clear understanding of how the project works before beginning any project. Please contact me if you find an error or inaccuracy so that I might fix it. The Design Confidential.com is inspired by but does not replicate exact designs, any similarities between these plans and items sold at specialty retailers is coincidential and not endorsed by or related to any said retailers. // Affiliate links are used for tools and materials. The Design Confidential will earn a small commission for any items purchased using these links. Thank you for your support – every little bit counts!
This post is brought to you by TargetStyle. Shop the new Home collection in stores and online.Summertime soiree’s are officially in season, and I couldn’t be more excited to let my hair down and have some fun! Nothing sounds more perfect than lounging on a beach blanket, enjoying the breeze and basking in the cooler temperatures the evening brings. The only things missing are the hula dancers and a live band serenading me with the sounds of a tropical vacation.
For this party, I was partnered with Jessica from Little Baby Garvin and together we were challenged to providing each other with inspiration for our respective parties. So fun! She pulled together some fabulous items from Target, to help me decorate for a Palm Springs-esque Tiki Tropical backyard bash – and I ran with it!
The fabulous thing about decorating for an event with items from Target, is that I can always rest assured they will have anything and everything I could possibly want or need. I can pull in pieces I already own from past seasons, and everything will coordinate beautifully.
The Summer Collection is bursting at the seams with color and perfectly reflects my current state of mind. The rainbow melamine tray is the stuff that happiness is made of – fun, stylish, durable and able to withstand a house full of boys and beach balls bouncing off the walls. If your house gets rowdy, like my house gets rowdy – run, don’t walk, to your nearest Target and stock up on all of the durable pieces they have on the shelves for outdoor dining and entertaining.
No party is complete without a bar cart filled with fun treats for the 21 and over crowd, and a signature drink – or in this case a signature poptail – my new favorite way to cool down and spice things up at the same time. Make them ahead of time with a popsicle mold and a mix of juices and flavors and you won’t be stuck behind the bar blending frozen drinks while your guests have all the fun! Display them in the happiest rainbow serving bowl ever, and fill it with ice and frozen cherries to keep things cool.
Whether you plan to stay inside to beat the heat or take it outside for some fun in the sun, Target is the place to go for all of your shopping needs. Just don’t forget the sunblock and some sunnies, it’s hard to mingle with your guests if you are blinded by the light and burned to a crisp, amiright?
If you need me… I will be out back. I plan to put in some serious quality time taking up 3 out of the 4 spots on the 4 person picnic blanket and will stay cool with refreshments from the bar cart!
It’s high time you give that lonely patio a refresh with a brand new outdoor collection debuting here on TDC. Enjoy those long summer days to the fullest. We have plans today for the loveseat, and many more collection pieces will be coming down the line in the next few weeks!
This plan was custom made to fit these fabulous cushions with a smattering of these for the back! You can also buy this combo set if you prefer. Cushions have a way of being super expensive, so we took the chore out of this task and designed the piece to fit them perfectly. A great price and gorgeous color selection – hard to beat!
As with all of our plans, you are building at your own risk and you should have a firm understanding of building in general before you attempt many of our plans (some are easy as pie and perfect for beginners). With that, go forth, have fun, take lots of pictures and share them in a showcase on the site or on social media with the hashtag #builtTDCtuff and we will share our faves! Be sure to tag @thedesignconfidential on Instagram / FB and @thedesconf on Twitter / Pinterest. If you are a blogger and you post about your build, don’t forget to include a link to your post on your showcase here. Don’t forget… for all of our newer plans, clicking on the images will let them expand to enormous sizes with much greater clarity. The older plans may need updating so please let us know if you need one fixed!
Before beginning to build, always check in on my site to make sure you have the most up to date set of plans, I occasionally update and change the plans to make the building process easier or to allow for less expensive purchasing of materials! Read through the entire set of instructions and all comments before beginning this project. If you print out or save plans, be sure to check in on my site to be sure you have the most up to date set of plans, as I occasionally update things for ease of building or buying. If you are new to building, read through the GETTING STARTED section and other articles found under the BUILD tab in the menu on my site, it has valuable information about how to get started, tools and techniques. If you are unfamiliar with the finishing process, visit my Finishing school for some tips and tricks for painting like a pro and for special finishing practices. Use glue to secure your joints and Consider Painting or Staining individual sections prior to assembling. This makes the paint application virtually flawless. Coat with a spray on Poly or Wipe on Poly to protect your finish and your piece and it will last for ages. Adhere to all safety standards and guidelines, and be sure you follow safety protocol throughout your build. If you are unsure about whether you are building safely, run a quick online search for the tool or technique you are using, or contact me via email or post to the forum before you move ahead. My contact info can be found in the menu of my site.
Cut the pieces for the Legs, Side Tops and Side Bottoms. With the Kreg jig set for 1-1/2” material, drill pocket holes in both ends of the Side Tops and Side Bottoms. Assemble as shown with glue and 2-1/2” pocket screws. Pay close attention to which direction your pocket holes face – it’s up to you (just make sure that you are consistent).
Cut the pieces for the Side Slats. With the Kreg jig set for 3/4” material, drill pocket holes in both ends of the Side Slats. Place the Side Slats to where they are flush with the inside of the Legs and spaced 1-1/2” from each other. Assemble as shown with glue and 1-1/4” pocket screws.
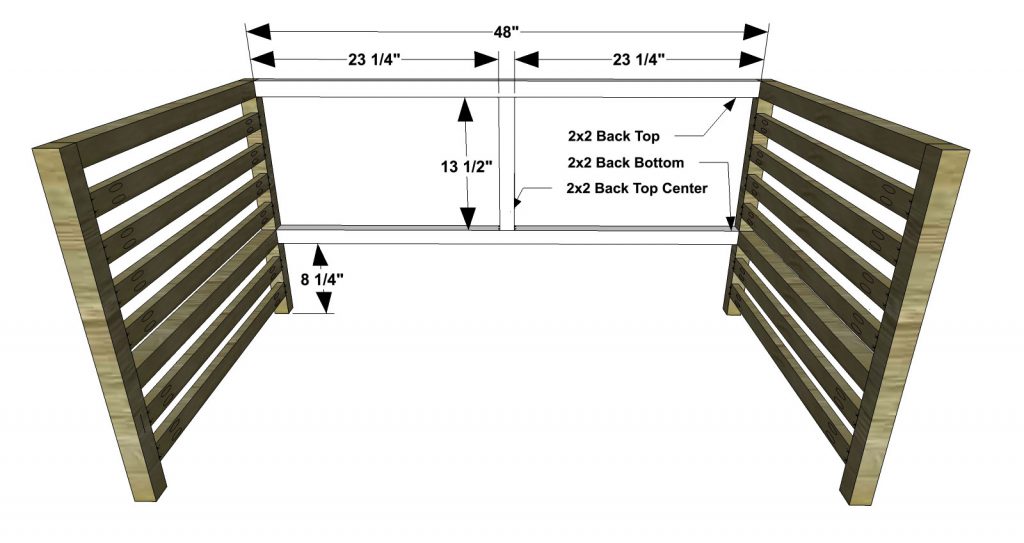
Cut the pieces for the Back Top, Back Bottom, and Back Top Center. With the Kreg jig set for 1-1/2” material, drill pocket holes in both ends of the Back Top and Back Bottom. Drill pocket holes in both ends and each sides of the Back Top Center. Assemble as shown with glue and 2-1/2” pocket screws.
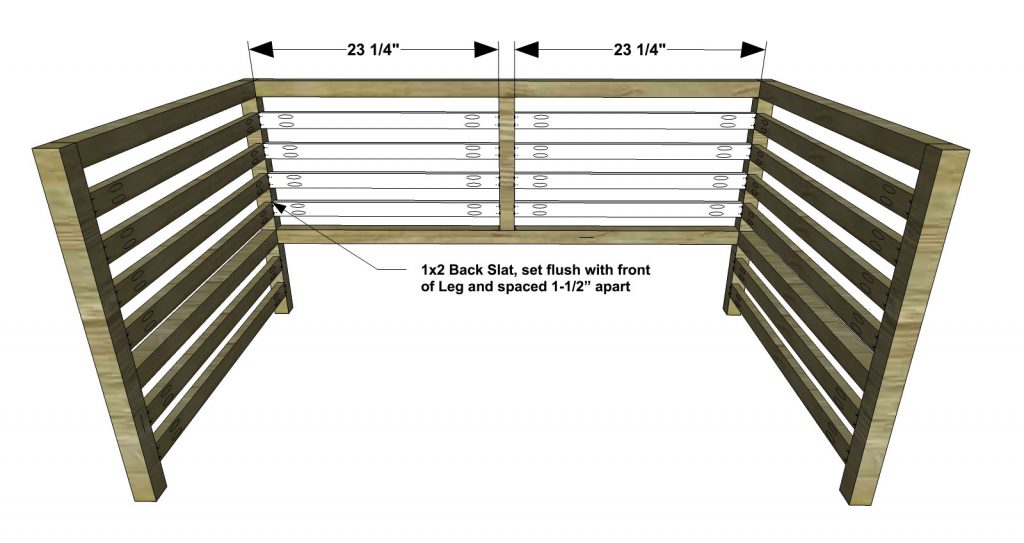
Cut the pieces for the Back Slats (you will only use 8 of the Back Slats in this step). With the Kreg jig set for 3/4” material, drill pocket holes in both ends of the Back Slats. Place the Back Slats to where they are flush with the inside of the Legs and the front side of the Back Top Center and spaced 1-1/2” from each other. Assemble as shown with glue and 1-1/4” pocket screws.
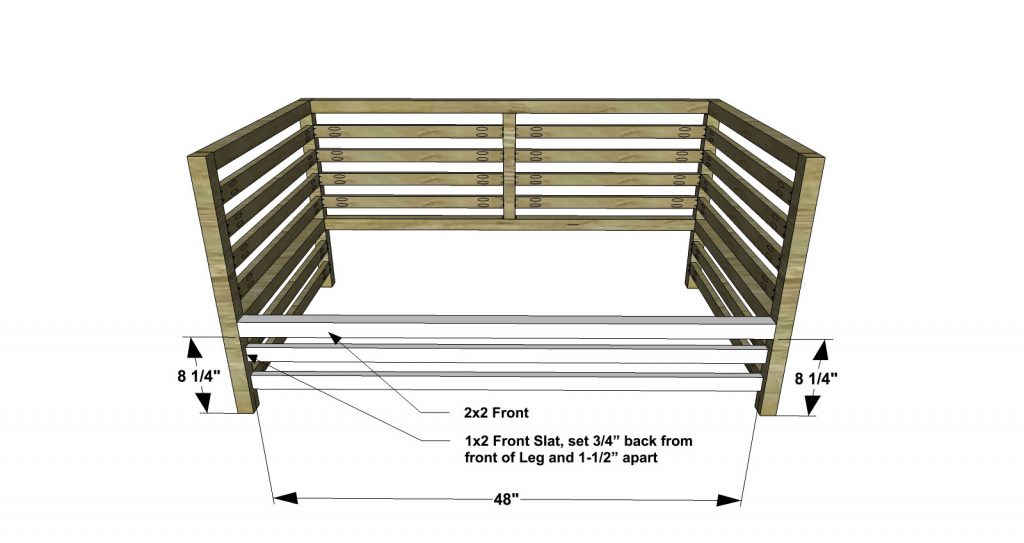
Cut the pieces for the Front and Front Slats. With the Kreg jig set for 1-1/2” material, drill pocket holes in both ends of the Front. Reset the Kreg jig set for 3/4” material, and drill pocket holes in both ends of the Front Slats. Place the Front Slats to where they are flush with the inside of the Legs and 3/4” from the front edge of the Legs and spaced 1-1/2” from each other. Assemble the Front as shown with glue and 2-1/2” pocket screws and the Front Slats with glue and 1-1/4” pocket screws.
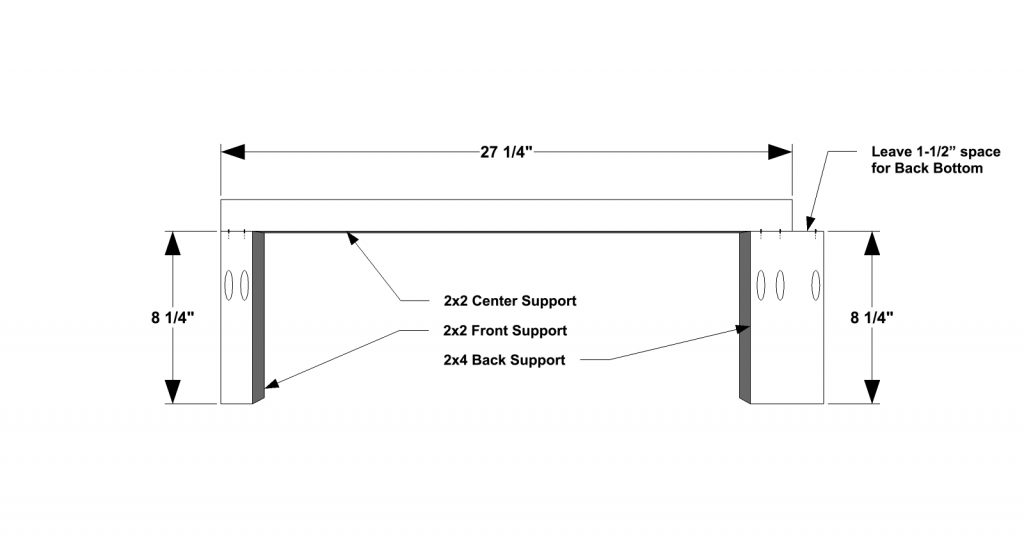
Cut the pieces for the Center Support, Back Support, and Front Support. With the Kreg jig set for 1-1/2” material, drill pocket holes in the top ends of the Front Support and Back Support. Assemble as shown with glue and 2-1/2” pocket screws. Secure the Front Slats to the Front Support with 2-1/2” wood screws.
Use the remaining 4 Slats from Step 4. Place the Bottom Slats to where they are 3/4” from the back edge of the Back Support and spaced 1-1/2” from each other. Assemble as shown with glue and 1-1/4” pocket screws.
Cut the pieces for the Seat Slats. With the Kreg jig set for 3/4” material, drill pocket holes in both ends of each Seat Slat. Place the Seat Slats to where they are flush with the top edge of the Center Support/Side Bottoms and spaced 1-1/2” from each other. Assemble as shown with glue and 1-1/4” pocket screws.
To make this a Loveseat that you can really sink into, purchase the Outdoor Deep Seating Cushions from Target. After all, we based our Loveseat dimensions off of these cushions – they will fit like a glove!
Fill any Screw, Nail or Pocket Holes, Sand and Finish as Desired. For Finishing Tips and Tricks visit my Finishing School
// Disclaimer: Some rights reserved. Private use only. Feel Free to link to any of my plans so long as you ONLY use 1 image and provide an ADEQUATE link back to the original source and appropriate plan! Plans from this page are not to be used for commercial purposes or republished without the express written consent of Rayan Turner, The Design Confidential. By accessing or using any part of the web site, you agree to become bound by the terms and conditions of this website as outlined under Terms of Use. If you do not agree to all the terms and conditions of this agreement, then you may not access the Website or use any services. The information contained in this website is for general information purposes only. The information is provided by The Design Confidential.com and while we endeavor to keep the information up to date and correct, we make no representations or warranties of any kind, express or implied, about the completeness, accuracy, reliability, suitability or availability with respect to the website or the information, products, services, or related graphics contained on the website for any purpose. Any reliance you place on such information is therefore strictly at your own risk. In no event will we be liable for any loss or damage including without limitation, indirect or consequential loss or damage, personal injury or death, or any loss or damage whatsoever arising from loss of information or profits arising out of, or in connection with, the use of this website. I hope to provide accurate plans, however, I cannot guarantee each plan for accuracy. Not every plan that I post has been built and tested, so you are building at your own risk. It is recommended that you have a clear understanding of how the project works before beginning any project. Please contact me if you find an error or inaccuracy so that I might fix it. The Design Confidential.com is inspired by but does not replicate exact designs, any similarities between these plans and items sold at specialty retailers is coincidential and not endorsed by or related to any said retailers. // Affiliate links are used for tools and materials. The Design Confidential will earn a small commission for any items purchased using these links. Thank you for your support – every little bit counts!
School is officially out for the summer here and we have quite a few big-deal graduations to celebrate! One in particular marks the end of school all together, for my baby brother, as he just recently graduated from Vanderbilt Law School. My mom is going to be retiring, my step son just graduated from High School, and my littlest graduated from toddler-hood (totally a thing) and will be heading into preschool this fall. Lots of firsts and lots of lasts that definitely warrant a fun and festive shindig of epic proportions!
Michaels has every single thing I could ever dream of needing for a fabulous party, from decor to baking supplies, it makes my crazy color loving heart go all aflutter… For this party we are giving it an old school summer vacay theme, complete with flamingo string lights and a lightbox to set the tone.
SHOP THIS ARTICLE //
They have a crazy good selection of garlands, lanterns, photo backdrop props and tissue paper poufs – both ready made and DIY. Dip dye a white fabric garland in a color that suits your decor and throw in some shiny pinwheels for good measure.
I love a fun activity at a party that guests can dabble at here and there as they please. A friendship bracelet making station and coloring for grownups put everyone in a summer camp state of mind and take us back to a time when summer vacation meant something entirely different and was altogether carefree and wonderful.
RAINBOW POPTAIL RECIPE //
This would be fabulous as a non-alchoholic treat as well, simply substitute water for rum.
Ingredients / Each popsicle mold holds about 4 tsp. For larger molds, double or triple as needed.
1 tsp Rum
3 tsp Flavor
To create the rainbow I used 4 flavors and mixed as needed- Cherry, Pina Colada, Berry Blue, Cotton Candy (can purchase a flavor for each color of the rainbow or mix as indicated below)
Red = 3 tsp of Cherry
Orange = 1.5 tsp of Cherry + 1.5 tsp of Pina Colada
Yellow = 3 tsp of Pina Colada
Green = 1.5 tsp of Pina Colada + 1.5 tsp of Berry Blue
Teal = 1 tsp of Pina Colada + 2 tsp of Berry Blue
Blue = 3 tsp of Berry Blue
Purple = 1.5 tsp of Cherry + 1.5 tsp of Berry Blue
Magenta = 1.5 tsp of Berry Blue + 1.5 tsp of Cotton Candy
Pink = 3 tsp of Cotton Candy
From paper crafts, party goods and baking supplies to new outdoor lighting, glass and floral, Michaels is your DIY destination for all of your summer celebrations. Be sure to check out all of the other Michaels Makers DIY summer party ideas on the Michaels blog.
We are a community of Makers here at TDC… wouldn’t you say? Of course by ‘we’, I truly mean all of you – in addition to me! As it happens, a great many of you – hundreds and hundreds to be exact – contact me on a regular basis to ask where you can purchase ready made pieces of furniture or custom furniture because you aren’t able to build, or simply don’t prefer to. I know you will flip your lid and jump for joy when I share all of the juicy details about the exciting launch of AVE Raw by Ave Home. Created specifically for the DIY’er and Designer who want high quality pieces for your own custom finishes.
I have had the pleasure of getting to know a few of their pieces, on an intimate level, and the craftsmanship is nothing short of amazing. I have often complained of the difficulty of staining pine, and that is no joke – it is tough, especially if you are a beginner. But through the process of finishing this gorgeous table for outdoor use, I stumbled across a new technique that I will be sharing with you shortly and reaffirmed my belief that 90 percent of your staining success, involves sanding. The Jax Pedestal Table you see here, sitting so pretty, arrived in a state of flawless sanded bliss. It was so perfect in fact, that I didn’t dare sand it any further and contemplated leaving it be entirely…
Alas… the weather and climate in Northern California don’t really allow for that, so I chose the next best thing – a clear, waterproofing sealer with UV protection, and a light varnish suitable for marine use. The original state of this table made for the easiest most seamless finishing process I have ever experienced. The. End. Inclement weather not included of course, and that alone made for prolonged drying times and tricky timing in between sporadic spring rain and humidity.
Delivery was fast, like lightning speed and the price points are marvelous. As you enjoy Memorial Day weekend here in the US, take a moment to check out their goods – shipping is free for the newest member of your household through June 3rd, so get clicking and start browsing. Based in beautiful New Orleans, all of the AVE Raw pieces are available for purchase online and it is a mighty fine collection of pieces at that.
This project created in partnership with Ave Home for the launch of AVE Raw. Thank you for supporting the brands that help bring fresh new content like this to The Design Confidential, I heart you guys!
Got pests and weeds? Ortho has you covered. Trust the Ortho® family of products to provide solutions to pest and weed problems in and around your home. Visit Ortho.com to learn more
Spring is truly the only season of the year when it is possible to enjoy our outdoor living space here in Northern California. The days are numbered and summer comes fast and hard before we have even had a chance to stop and smell the roses. Naturally, with weather that is only beginning to warm and intermittent rain, nature can spiral out of control around here and start to take over in some less than enjoyable ways.
There is nothing I like less than having an unexpected visitor of the biting or stinging variety show up to my party uninvited… And when they bring enough plus 1’s to start a party of their own – well that doesn’t make anyone feel much liking dancing or laughing and a restful afternoon is utterly out of the question.
If the parties of my youth were any indication, things can get ugly faster than you know what hit you… and despite what anyone tells you, nobody likes to cry at their own party. So what is a gal to do when your outdoor living space goes from 0 to no fun in a minute flat?
Lucky for us, we don’t have to suffer pesky bugs, prickly weeds or teenage broken hearts for very long… Ortho’s party crasher fighting duo – Home Defense MAX Insect Killer and Weed B Gon are the perfect pair to help create a bug free perimeter around your home and a weed free zone for your lawn and garden. One simple application of Home Defense MAX Insect Killer can even end your worries about those sneaky pests that make their way inside. You know the ones I mean- the quintessential worst guests ever…
To be continued… who will prevail on this showdown between Ortho and my unwanted guests?
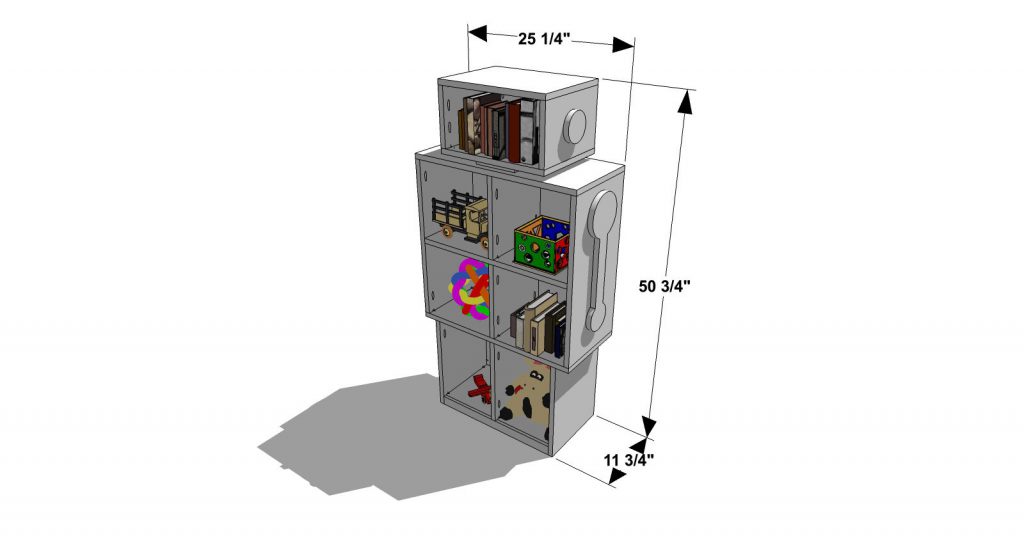
This Robot Bookcase is out of this world! It has TONS of storage and super cute details. This piece would be great for a kid’s room, or a fun conversation piece in any room of the house. Ok, earthling… let’s get building!
As with all of our plans, you are building at your own risk and you should have a firm understanding of building in general before you attempt many of our plans (some are easy as pie and perfect for beginners). With that, go forth, have fun, take lots of pictures and share them in a showcase on the site or on social media with the hashtag #builtTDCtuff and we will share our faves! Be sure to tag @thedesignconfidential on Instagram / FB and @thedesconf on Twitter / Pinterest. If you are a blogger and you post about your build, don’t forget to include a link to your post on your showcase here. Don’t forget… for all of our newer plans, clicking on the images will let them expand to enormous sizes with much greater clarity. The older plans may need updating so please let us know if you need one fixed!
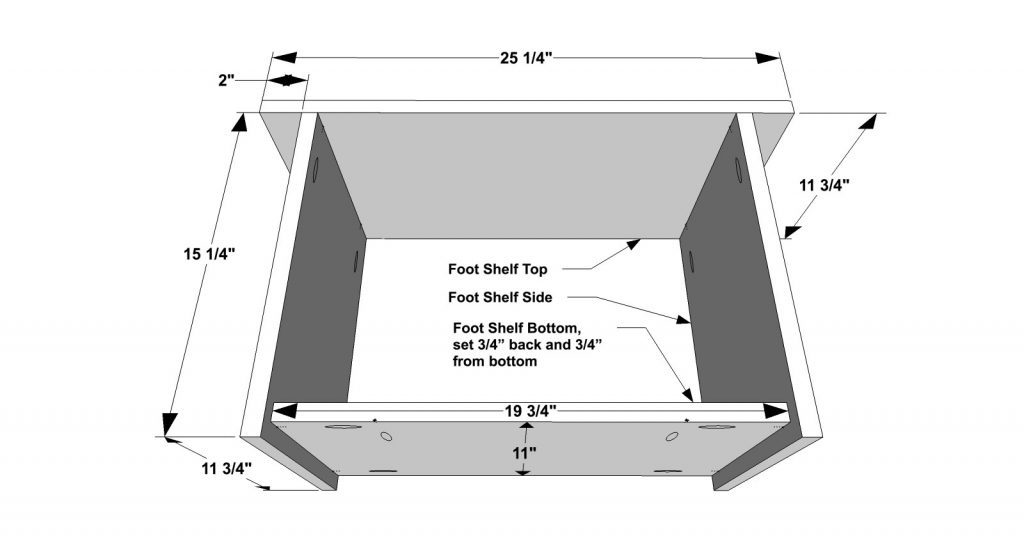
2 – 3/4” plywood at 11-3/4” x 15-1/4” – Foot Shelf Sides
1 – 3/4” plywood at 11” x 19-3/4” – Foot Shelf Bottom
1 – 3/4” plywood at 11-3/4” x 25-1/4” – Foot Shelf Top
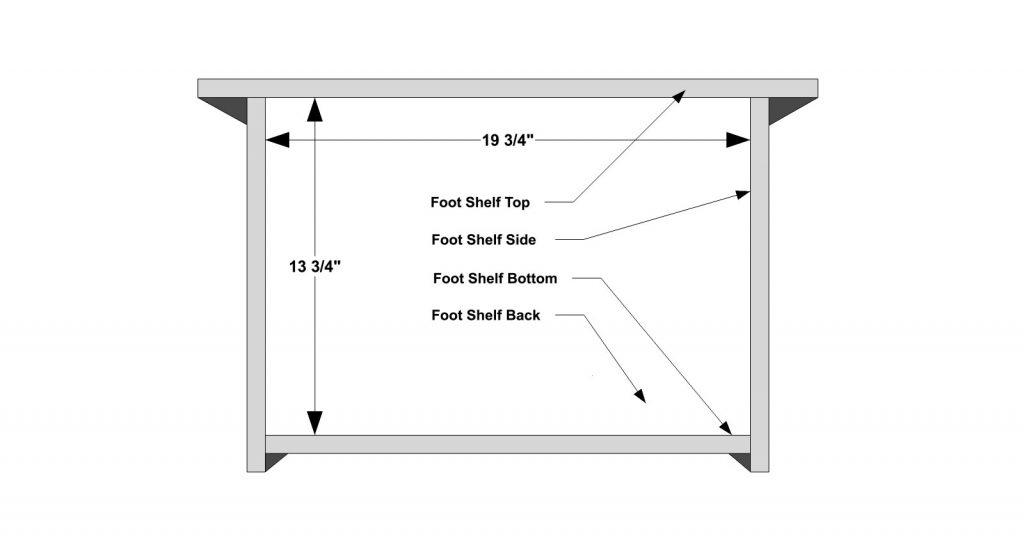
1 – 3/4” plywood at 13-3/4” x 19-3/4” – Foot Shelf Back
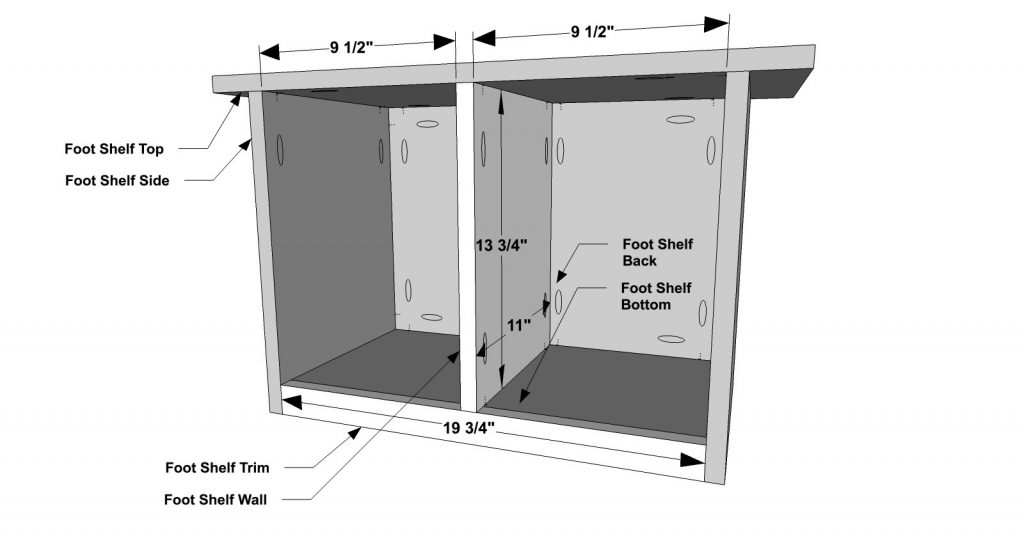
1 – 3/4” plywood at 11” x 13-3/4” – Foot Shelf Wall
1 – 3/4” plywood at 1-1/2” x 19-3/4” – Foot Shelf Trim
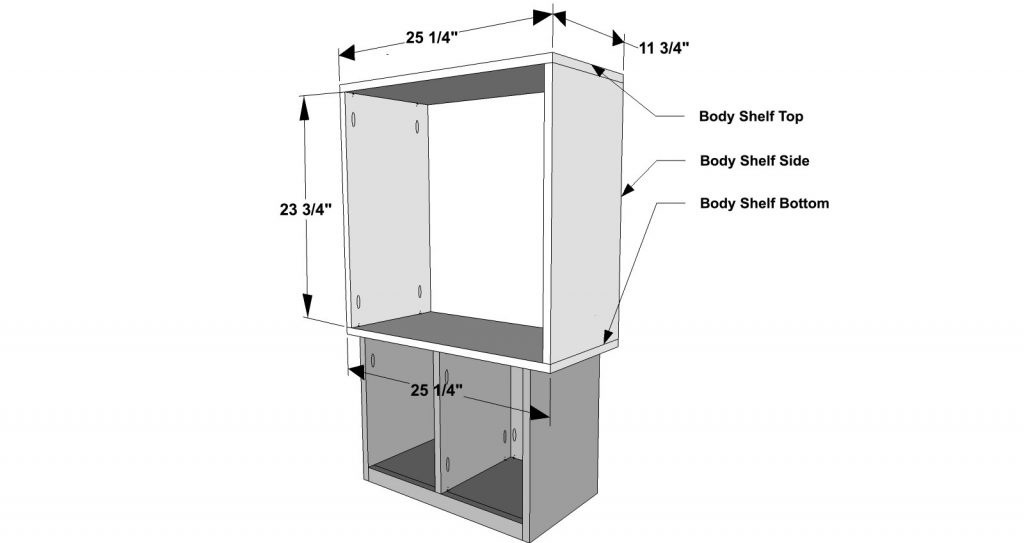
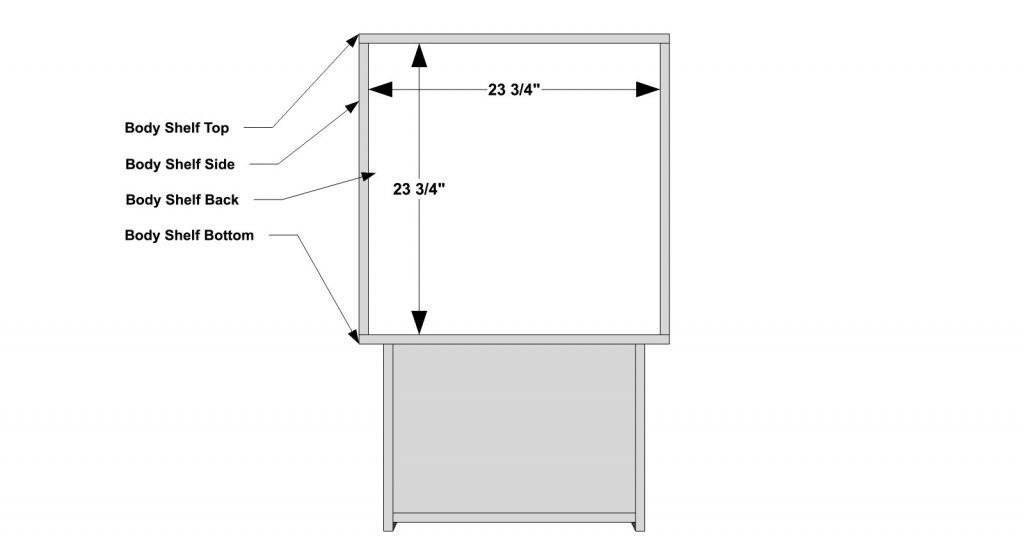
2 – 3/4” plywood at 11-3/4” x 23-3/4” – Body Shelf Sides
2 – 3/4” plywood at 11-3/4” x 25-1/4” – Body Shelf Top And Bottom
1 – 3/4” plywood at 23-3/4” x 23-3/4” – Body Shelf Back
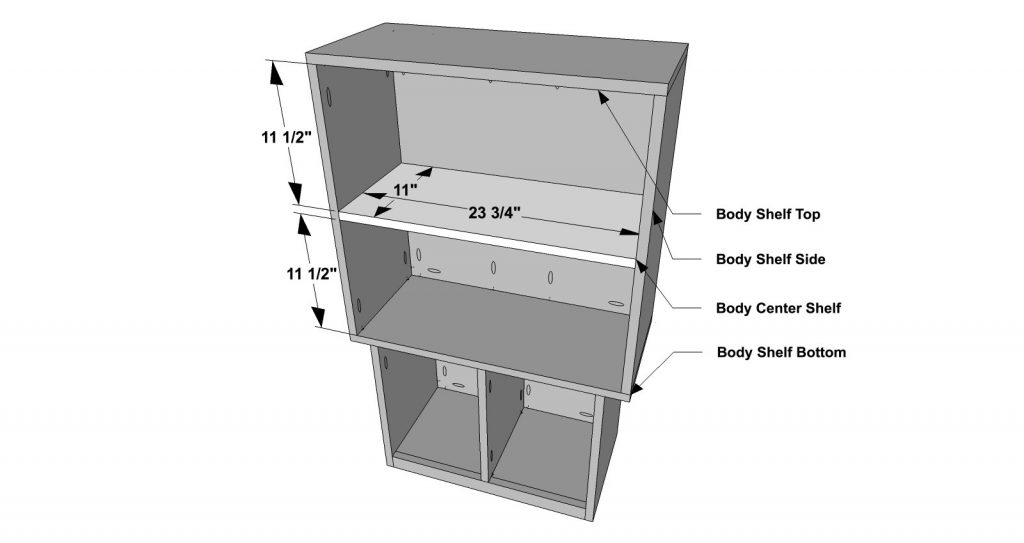
1 – 3/4” plywood at 11” x 23-3/4” – Body Center Shelf
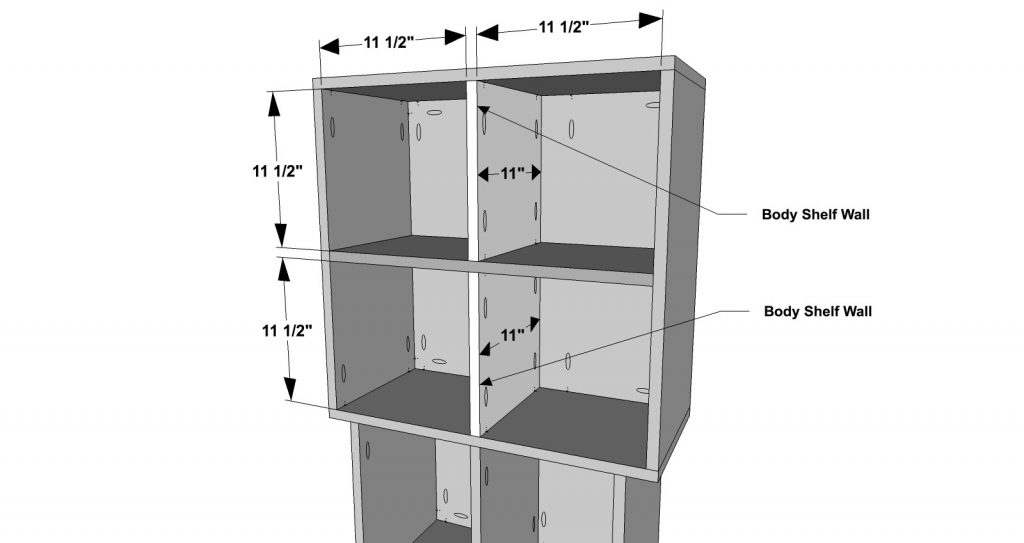
2 – 3/4” plywood at 11” x 11-1/2” – Body Shelf Walls
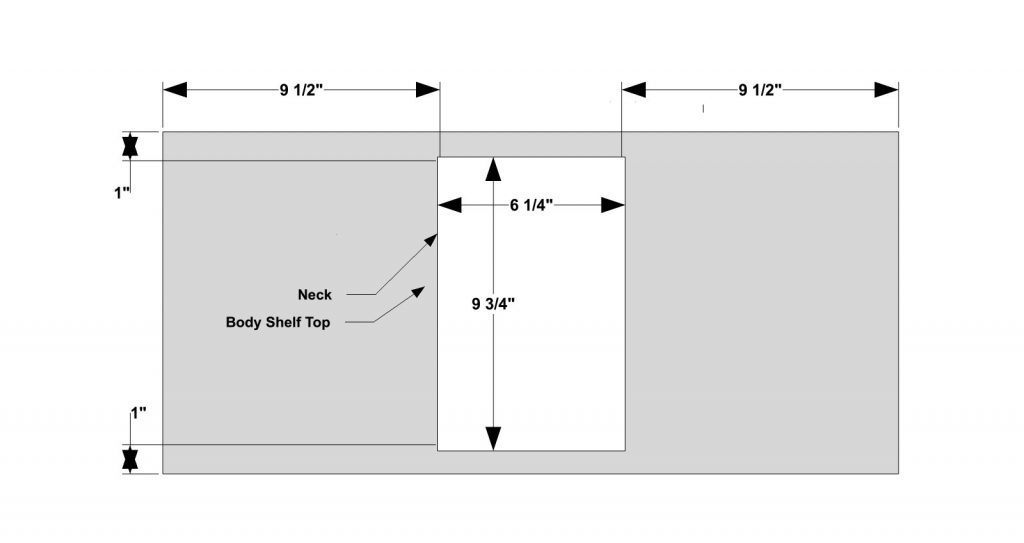
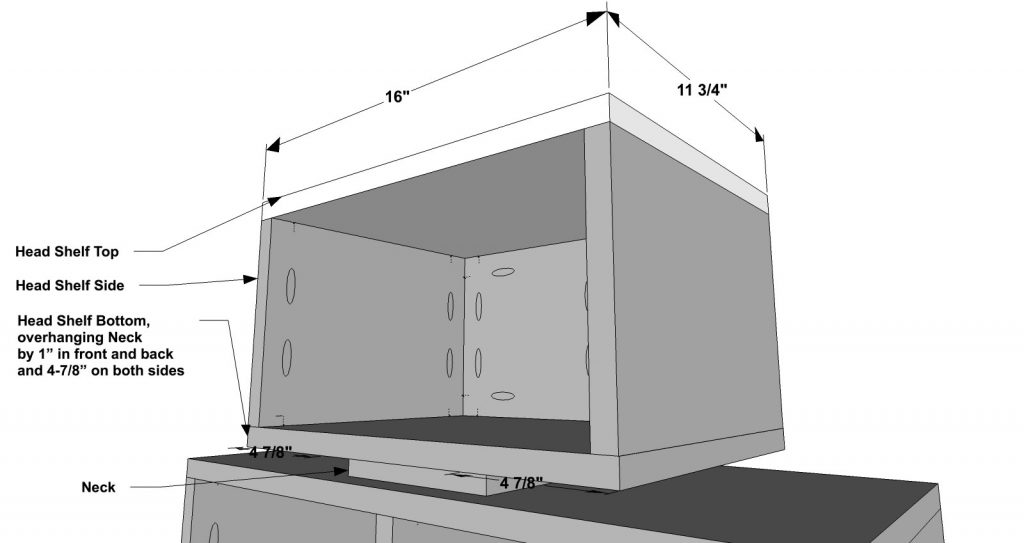
1 – 3/4” plywood at 6-1/4” x 9-3/4” – Neck
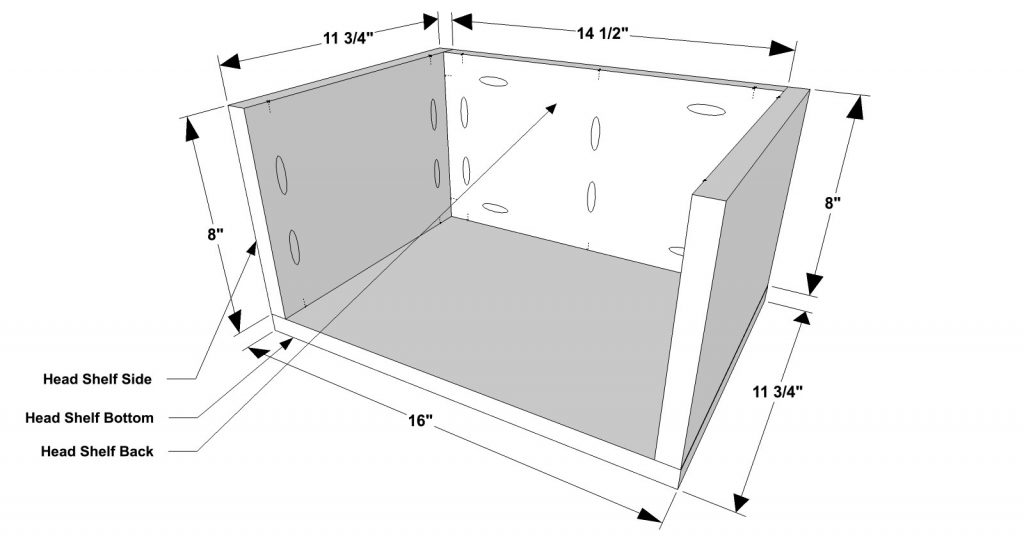
2 – 3/4” plywood at 11-3/4” x 16” – Head Shelf Top and Bottom
2 – 3/4” plywood at 8” x 11-3/4” – Head Shelf Sides
1 – 3/4” plywood at 8” x 14-1/2” – Head Shelf Back
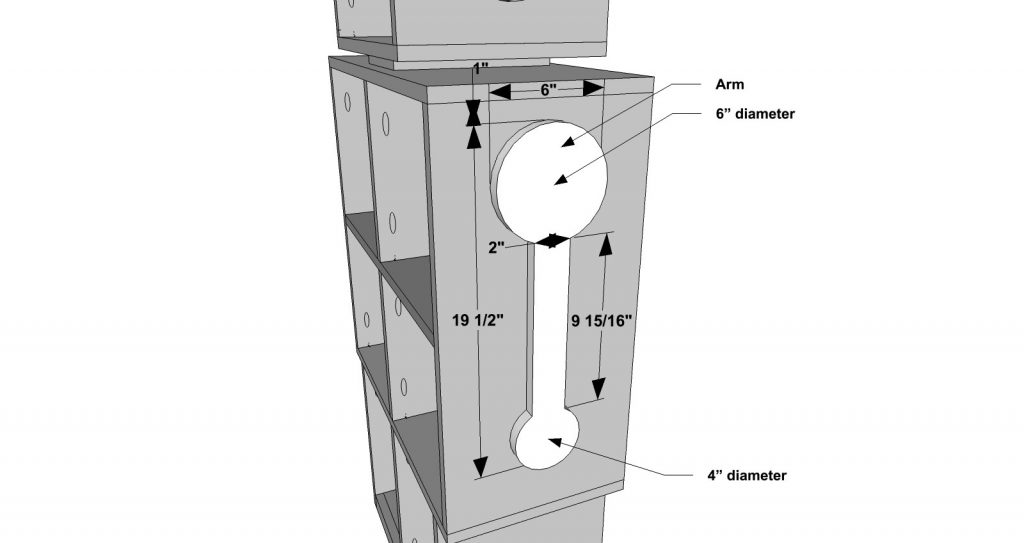
2 – 3/4” plywood at 4” x 4” (4″ diameter) – Ears
2 – 3/4” plywood at 6” x 19-1/2” – Arms
Before beginning to build, always check in on my site to make sure you have the most up to date set of plans, I occasionally update and change the plans to make the building process easier or to allow for less expensive purchasing of materials! Read through the entire set of instructions and all comments before beginning this project. If you print out or save plans, be sure to check in on my site to be sure you have the most up to date set of plans, as I occasionally update things for ease of building or buying. If you are new to building, read through the GETTING STARTED section and other articles found under the BUILD tab in the menu on my site, it has valuable information about how to get started, tools and techniques. If you are unfamiliar with the finishing process, visit my Finishing school for some tips and tricks for painting like a pro and for special finishing practices. Use glue to secure your joints and Consider Painting or Staining individual sections prior to assembling. This makes the paint application virtually flawless. Coat with a spray on Poly or Wipe on Poly to protect your finish and your piece and it will last for ages. Adhere to all safety standards and guidelines, and be sure you follow safety protocol throughout your build. If you are unsure about whether you are building safely, run a quick online search for the tool or technique you are using, or contact me via email or post to the forum before you move ahead. My contact info can be found in the menu of my site.
Cut the pieces for the Foot Shelf Sides, Bottom, and Top. With the Kreg jig set for 3/4” material, drill pocket holes in the tops of the Foot Shelf Sides and along the front and ends of the Foot Shelf Bottom. The Foot Shelf Bottom will be 3/4” up from the bottom of the Foot Shelf Sides and 3/4” back from the front edge of the Foot Shelf Sides. Assemble as shown with glue and 1-1/4” pocket screws. Apply Edge Banding to exposed plywood edges if desired.
Cut the piece for the Foot Shelf Back. With the Kreg jig set for 3/4” material, drill pocket holes along all four edges of the Foot Shelf Back. Assemble as shown with glue and 1-1/4” pocket screws.
Next, cut the pieces for the Foot Shelf Wall and Foot Shelf Trim. With the Kreg jig set for 3/4” material, drill pocket holes in the tops and bottoms of the Foot Shelf Wall and at each end of the Foot Shelf Trim. Assemble as shown with glue and 1-1/4” pocket screws. Apply Edge Banding to exposed plywood edges if desired.
Cut the pieces for the Body Shelf Sides, Bottom, and Top. With the Kreg jig set for 3/4” material, drill pocket holes in the tops and bottoms of the Foot Shelf Sides. Assemble as shown with glue and 1-1/4” pocket screws. Apply Edge Banding to exposed plywood edges if desired.
Cut the pieces for the Body Shelf Back. With the Kreg jig set for 3/4” material, drill pocket holes along all four edges of the Foot Shelf Back. Assemble as shown with glue and 1-1/4” pocket screws.
Next, cut the piece for the Body Center Shelf. With the Kreg jig set for 3/4” material, drill pocket holes in both ends of the Body Center Shelf. Assemble as shown with glue and 1-1/4” pocket screws. Apply Edge Banding to exposed plywood edges if desired.
Next, cut the pieces for the Body Shelf Walls. With the Kreg jig set for 3/4” material, drill pocket holes in the tops and bottoms of the Body Shelf Walls. Assemble as shown with glue and 1-1/4” pocket screws. Apply Edge Banding to exposed plywood edges if desired.
Cut the piece for the Neck. Position as shown and assemble with glue and 1-1/4” Wood Screws. Apply Edge Banding to exposed plywood edges if desired.
Cut the pieces for the Head Shelf Sides, Bottom, and Back. With the Kreg jig set for 3/4” material, drill pocket holes in the tops and bottoms of the Head Shelf Sides and along all four sides of the Head Shelf Back. Assemble as shown with glue and 1-1/4” pocket screws. Apply Edge Banding to the front of the Head Shelf Sides and Head Shelf Bottom if desired.
Secure the Head Assembly to the Neck as shown with glue and 1-1/4” Wood Screws. Finish the Head Assembly by securing the Head Shelf Top to the Head Shelf Sides and Back as shown with glue and 1-1/4” Pocket Screws. Apply Edge Banding to exposed plywood edges if desired.
Cut the pieces for the Ears. Position as shown with glue and 1-1/4” Wood Screws. Apply Edge Banding to exposed plywood edges if desired.
Cut the pieces for the Arms. Position as shown with glue and 1-1/4” Wood Screws. Apply Edge Banding to exposed plywood edges if desired.
Fill any Screw, Nail or Pocket Holes, Sand and Finish as Desired. For Finishing Tips and Tricks visit my Finishing School
// Disclaimer: Some rights reserved. Private use only. Feel Free to link to any of my plans so long as you ONLY use 1 image and provide an ADEQUATE link back to the original source and appropriate plan! Plans from this page are not to be used for commercial purposes or republished without the express written consent of Rayan Turner, The Design Confidential. By accessing or using any part of the web site, you agree to become bound by the terms and conditions of this website as outlined under Terms of Use. If you do not agree to all the terms and conditions of this agreement, then you may not access the Website or use any services. The information contained in this website is for general information purposes only. The information is provided by The Design Confidential.com and while we endeavor to keep the information up to date and correct, we make no representations or warranties of any kind, express or implied, about the completeness, accuracy, reliability, suitability or availability with respect to the website or the information, products, services, or related graphics contained on the website for any purpose. Any reliance you place on such information is therefore strictly at your own risk. In no event will we be liable for any loss or damage including without limitation, indirect or consequential loss or damage, personal injury or death, or any loss or damage whatsoever arising from loss of information or profits arising out of, or in connection with, the use of this website. I hope to provide accurate plans, however, I cannot guarantee each plan for accuracy. Not every plan that I post has been built and tested, so you are building at your own risk. It is recommended that you have a clear understanding of how the project works before beginning any project. Please contact me if you find an error or inaccuracy so that I might fix it. The Design Confidential.com is inspired by but does not replicate exact designs, any similarities between these plans and items sold at specialty retailers is coincidential and not endorsed by or related to any said retailers. // Affiliate links are used for tools and materials. The Design Confidential will earn a small commission for any items purchased using these links. Thank you for your support – every little bit counts!
We temporarily had a plastic fold-up table with fold-up benches and wanted something more permanent where guests can sit and eat/drink/relax. This table with the built-in drink cooler/trough is perfect and has enough weight where the wind can’t blow it around. Since I’ve never built anything like this before, especially with pocket screws, it took me a lot longer than expected (easily 2 full weekends). But the end product is worth it and we can’t wait to start using it! I already built one of the Francine dining benches that needs to be stained next weekend.
My measurement was off by 1/2″ on the short cross legs but everyone who’s seen my mistake say it’s a design flaw that looks good. I didn’t have any spare wood to cut new lugs so I made them work.
Lumber Used
Treated pine
Finishing Technique
Used Rust-Oleum Ultimate Wood Stain in Sunbleached color and applied two coats of Varathane Clear Matte Soft Touch Polyurethane to help protect it.
I have always been drawn to the yarn aisle at Michaels – the color, the texture -I just can’t help myself. I have even attempted to master the art of knitting many times over the years. It is such a soothing craft, the perfect thing to do while you binge watch your fave shows and yet I haven’t ever been able to stick with it and finish a single project I started. I think I may actually be coming up on year three for my attempt at making a pillow cover.
Learning a new craft is definitely good for my soul, but there is something about learning from a real person – who can steer you in the right direction when you suddenly have a tangled mess – that might just be important for me and how I tend to learn best. This month our Michaels Makers Challenge was all about learning something new, so of course I knew instantly where I would focus my energy. I had the pleasure of attending one of the classes they offer at Michaels, for beginning knit, and it was fabulous.
Clearly I need a little of that peer pressure or team effort thing going on, because this is quite literally the first project of this kind I have ever actually finished! The class size is kept small so the personal attention to each student is amazing. Note to self… if you pull the yarn from the middle of the skein, it doesn’t roll all over the place and tangle the dogs in a crazy mess. Duh – might have been good to know several project starts and many moons ago… I am in no way a good knitter at this point (terrible actually), but I understand some of the basics and feel comfortable enough now to venture out and try some other projects and maybe even a new stich or two.
MATERIALS //
The pattern for making this clutch is very simple… I did 85-90 rows with 30 stitches in each (about 10 inches in length), with the basic knit stitch. I dropped the first stitch in each row to create a nice looking side profile (also called slipping a stitch) which means that instead of knitting into it as I would for the other stitches, I simply slid it onto my right needle, then knit into the second stitch. PS – turns out a pattern made entirely with the knit stitch is called a garter stitch. How is that for confusing.. Once my rectangle was the right length, I cast off with a knit bind method (I think) that involved knitting into two stitches, then bringing the first stitch over the top of the second. Then you are left with one stitch on your needle so you will need to knit an additional stitch and pull the firsst over. Do this till you get to the end and cut your trailing yarn and pull it through your single remaining loop. Then I simply used a darning needle to sew the sides together after folding up the bottom 4 inches. I couldn’t find a diagram for this that worked so I got creative and did something similar to an embroidery loop stitch. It worked so yahoo. To add the fringe, I chose an alternating color and cut it into 4 inch strips. I folded each in half and pushed the looped end through the bottom edge row of my fold, which was actually my cast on row, and tucked the dangling ends through the loop I just pushed through. So easy…
If you are like me and a group activity is exactly what you need to try something new and craft among friends, check out the class schedule at your local store. They rotate throughout the month and some of them are even free – you only need to buy your supplies – but that is the fun part anyhow, don’t you think? If a class isn’t quite your thing, or you don’t live close enough to a location to attend, one of their craft kits would be a fabulous way to explore something new and learn a new skill!
I have my eye on the next class in the beginning knit series, because I absolutely love the project and checking two completed projects off my list is usually what it takes for something to truly stick. Is it like that for you too?
If you would like to see what the other Makers learned this month and need a bit of inspiration to help you decide which class to take and what to make, check them all out right here!
Got pests and weeds? Ortho has you covered. Trust the Ortho® family of products to provide solutions to pest and weed problems in and around your home. Visit Ortho.com to learn more
When last we left off, nature was creeping in at a rapid pace and crashing our party. Not unlike rock stars trashing hotel rooms, these unwanted guests were making a mess of things and skipping out on the cleaning bill after the fact. So rude…but then!
Fear not! The party-crime fighting duo – Ortho Home Defense Max Insect Killer and Ortho Weed B Gon – came to our rescue, to help us right the wrongs of our unwanted visitors. One fast and easy application of Home Defense MAX around the perimeter of my home and our house has long-lasting protection against ants, spiders and our latest and greatest irritation – springtails! BOOM!
THEN, Weed B Gon leapt into action to reclaim our lawn, taking out crabgrass, clover and the ever deadly foot killer – thistle – left and right. . If you are fortunate enough to nary a single one of these horrid additions to your backyard -I’m jealous! If other varieties are your culprits, not to worry – Weed B Gon works on a ton of other unfriendly weeds! It’s got you covered! The best part? There was no sign of the epic fight that ensued on our grassy battlefront. Weed B Gon is guaranteed to not harm your grass! YAHOO!
After a satisfying victory, our resident superheroes went back to their humble abodes (the garage – duh!), and we live to fight another day doing what we do best and enjoying our outdoor space without worry of irritating pests and weeds.
Ah, the good life… because everyone deserves to be able to mow the lawn as they please…. in peace and quiet, and then ride off into the sunset to revel in the glory of a weed and bug free home.
Having young kiddos in the house often means that when my boys have play dates, I do as well. It is such a wonderful way to get to know other moms, and build that village we want to raise our babes in. But, knowing a seemingly simple play date will likely turn into more of an event can easily derail even the best laid plans and often feels a more like a chore, than something laid back and relaxing. Since I want my boys to be fully socialized, skipping this isn’t precisely an option, so naturally I have attempted to find some shortcuts that help me pull something together quickly and easily, but still set the stage for an enjoyable afternoon for kids and adults alike. Luckily there is a Target store less than two miles from my house – this is my number one trick of the trade.
My first life hack for easy impromptu entertaining is to buy kid and outdoor friendly entertaining pieces whenever possible, and have a stockpile of chic disposables on hand and in bulk, at any given time. If you don’t need to stress about what everyone will eat with or whether something precious will get broken, you are already way ahead of the game in my book. I now keep my shelves stocked with gold striped paper napkins, chic melamine dinnerware and a stylish collection of serving platters and other various pieces to fill with snacks or utensils.
I am on a kick to declutter and streamline all areas of my life right now, a major spring cleaning if you will, and décor tends to be the major culprit in all of my chaos. So for an item to come into my home, it needs to be both beautiful and functional, not simply one or the other. If it can serve more than one purpose then all the better to enjoy it with. Which leads to my next newly discovered life hack of repurposing items I use in my everyday life, for special purposes when I am entertaining. The amazing plant stands I bought the other day, look amazing as is, or as a center piece that simply screams spring and as it turns out the larger plant stand base is the perfect size for my drink dispenser. A great way to quickly whip together some lemonade (which I also keep on hand for exactly this sort of thing) or maybe a lemonade inspired adult beverage that sits out of reach from prying hands…
Chances are, if you are heading to my house for a playdate, you definitely have kids and you are probably exhausted as a general rule of thumb. Kiddos are not for the faint of heart, but they certainly keep you young at heart… when you aren’t sound asleep before it’s even dark outside. So, what could be better than a short little getaway and a bit of rest and relaxation – without actually leaving your kids behind and all of the planning and prep that comes along with it? Not a lot…
In the spring, it starts to heat up around here and the sun can be intense for anyone older than the age of 12. And yet, the kids always want to play outside regardless, so I like the idea of reinventing my outdoor space to bring in a little of that quiet enjoyment I experience on vacation. By simply adding a few creature comforts and some relaxing entertainment, I can set the mood for a carefree afternoon all within direct sight of the little ones who aren’t old enough to run wild just yet.
Chaise lounges, good reading material, and easy to handle refreshments all under a gorgeous umbrella, to shield me from the heat… It is just so simple and lovely, requiring only the effort of filling a pitcher and grabbing a tray with something easy to snack on.
When I shop for groceries, I try to buy a mix of things that are fresh and things that will keep. Some of my absolute favorites for outdoor entertaining also happen to be things I buy on a regular basis, so I don’t have to go far to find some fabulous and simple options to feed a crazy crew with a lot of different age groups. When I am entertaining in the hot, hot sun, frozen or chilled fruit is the perfect way to cool down and hydrate a bit. Buying fruit as I normally would and leaving everything unpeeled means there is little waste for what isn’t eaten and a more importantly, no need to worry about prep or leaving things out in the sun with the bugs.
Since these mom dates are often much like first dates, it helps to have open ended activities for both kids and adults, that will keep the small talk at bay. We are huge fans of outdoor games here at Casa de TDC, and pulling out the macrame net, over sized badminton rackets and gorgeous Kubb set, makes for quite the icebreaker. Whether merely an instant conversation starter or a fun ongoing activity to get everyone moving and having fun, outdoor games are always well paired with a chic refreshment area to help beat the heat and stay hydrated. Having a front row seat also makes for great people watching – or kid watching, in my case.
If there is one thing I love, it’s a no hassle solution to food and décor, that doesn’t involve skimping or skipping the things I love. Target is always my first stop and I can always count on them to have the perfect things to add to my arsenal that let me enjoy an afternoon with my guests instead of slaving away and stressing out.
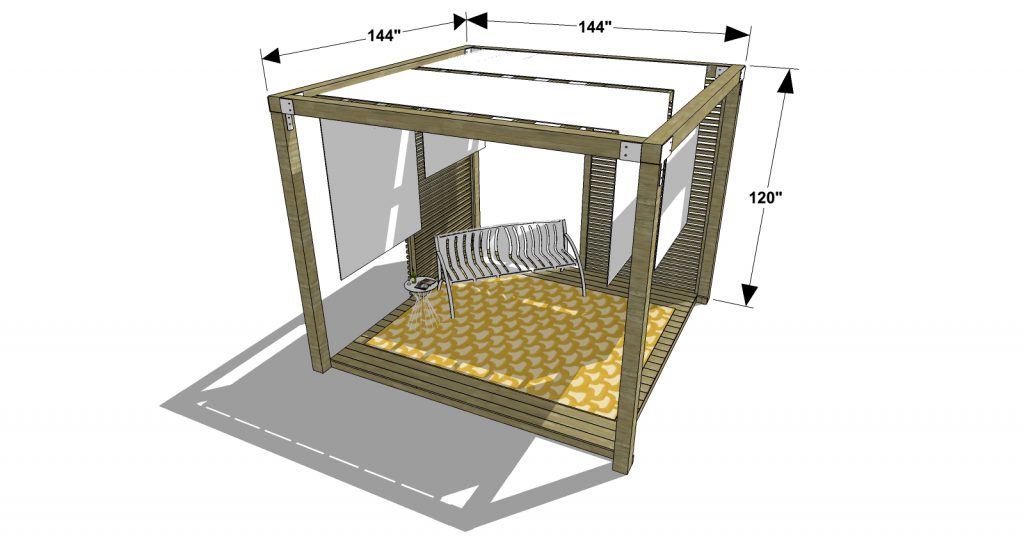
Make your vacation, the staycation of a lifetime with the Staycation Pergola. This little beauty has plenty of room, privacy screens, and joists to hang fabric… and it will cost a fraction of that trip to the Bahamas! Make your favorite drink, let the wind blow throw your hair, and enjoy your masterpiece!
As with all of our plans, you are building at your own risk and you should have a firm understanding of building in general before you attempt many of our plans (some are easy as pie and perfect for beginners). With that, go forth, have fun, take lots of pictures and share them in a showcase on the site or on social media with the hashtag #builtTDCtuff and we will share our faves! Be sure to tag @thedesignconfidential on Instagram / FB and @thedesconf on Twitter / Pinterest. If you are a blogger and you post about your build, don’t forget to include a link to your post on your showcase here. Don’t forget… for all of our newer plans, clicking on the images will let them expand to enormous sizes with much greater clarity. The older plans may need updating so please let us know if you need one fixed!
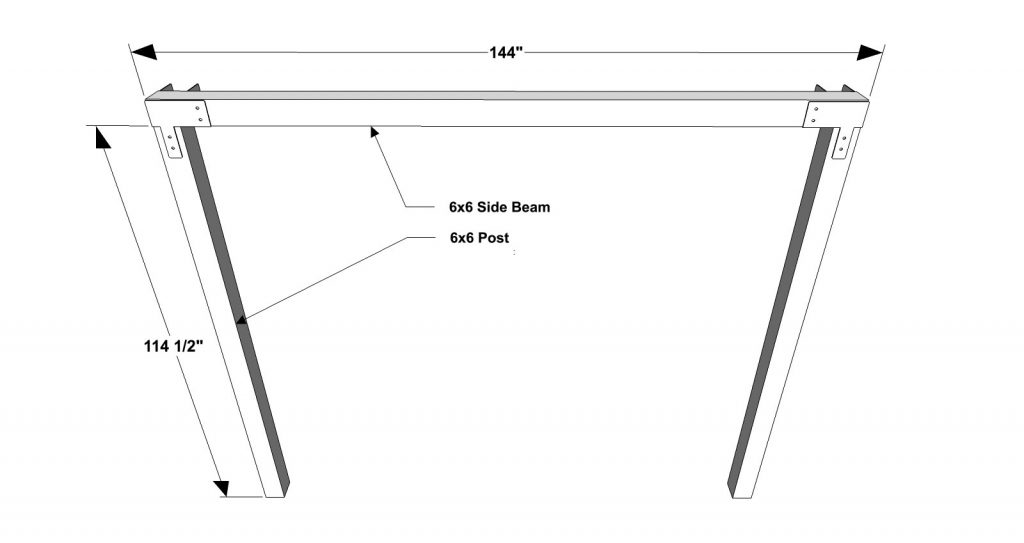
2 – 6×6 at 144” – Side Beams
4 – 6×6 at 114-1/2” – Posts
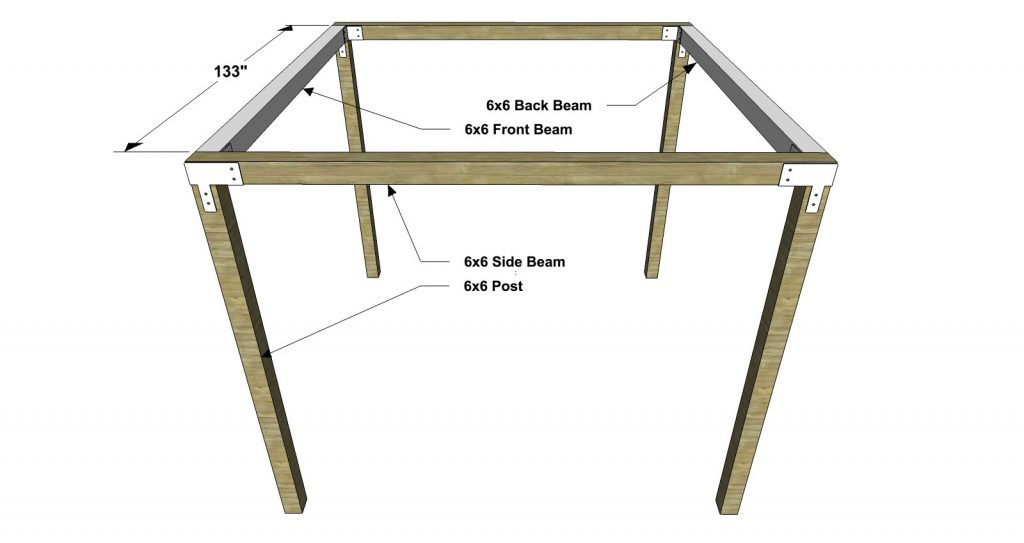
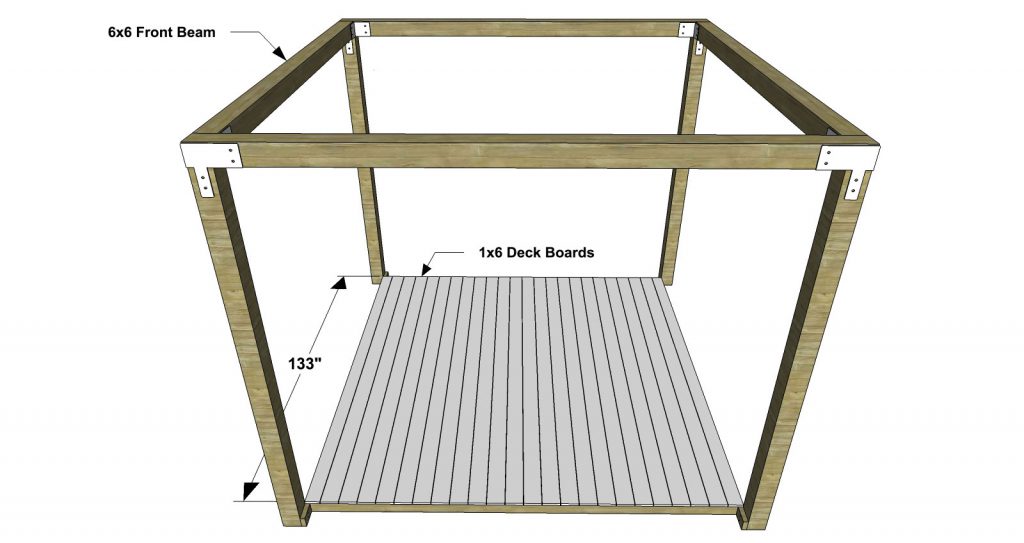
2 – 6×6 at 133” – Front and Back Beams
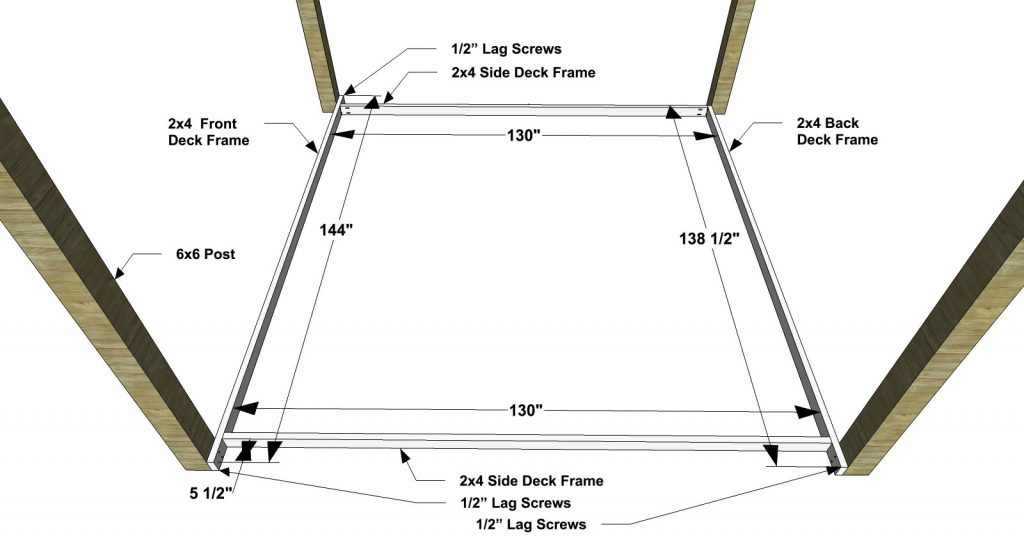
2 – 2×4 at 130” – Side Deck Frames
1 – 2×4 at 144” – Front Deck Frame
1 – 2×4 at 138-1/2” – Back Deck Frame
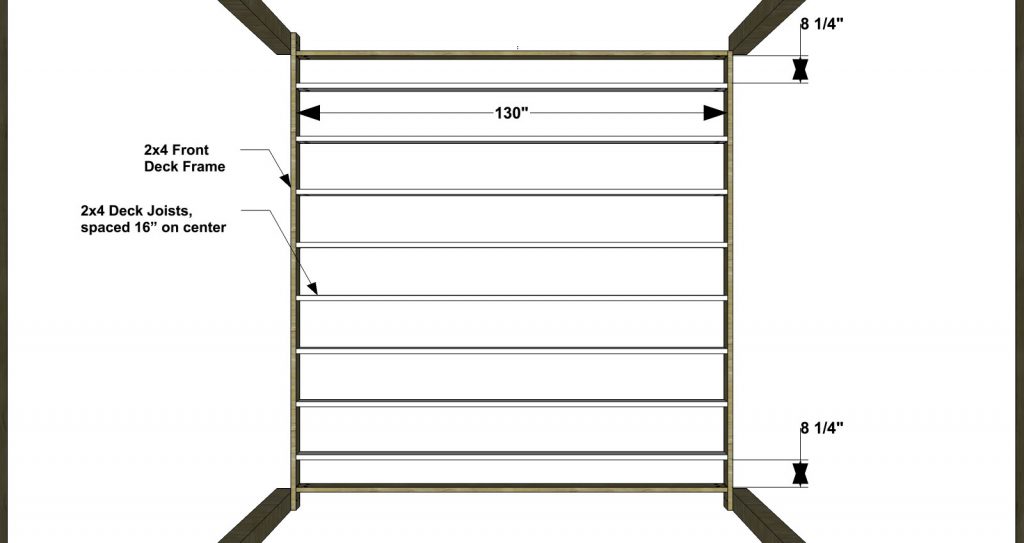
8 – 2×4 at 130” – Deck Joists
24 – 1×6 at 133” – Deck Boards
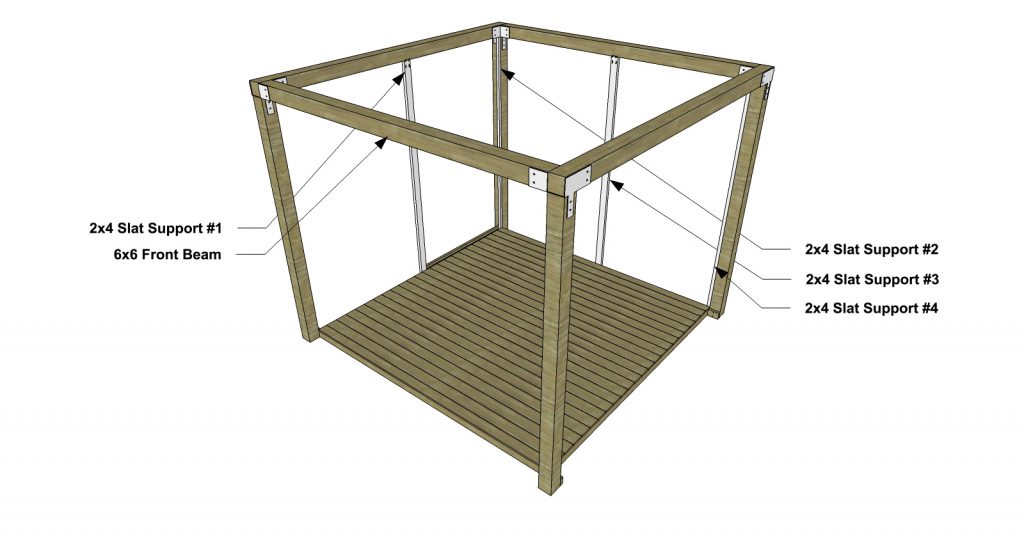
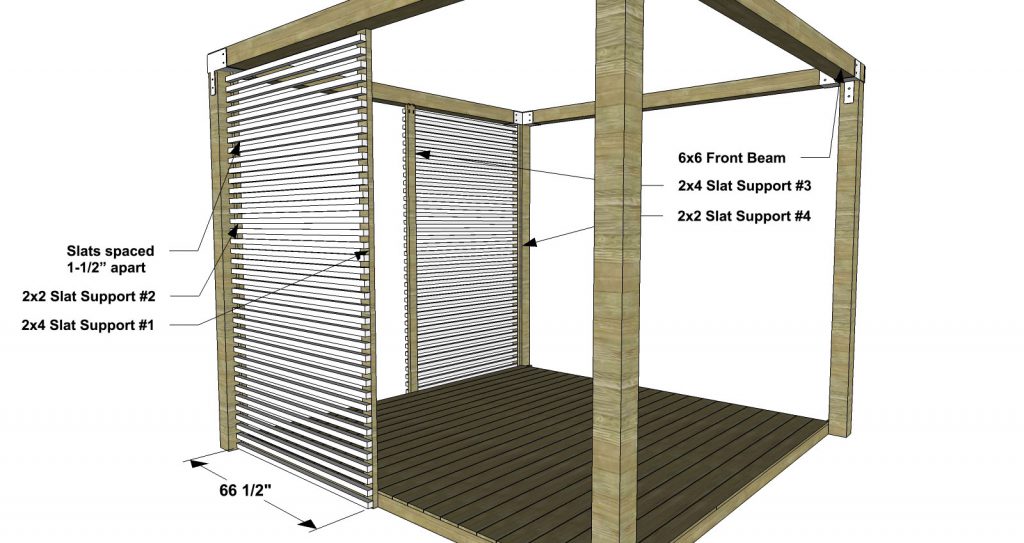
1 – 2×4 at 114-1/2” – Slat Support #1
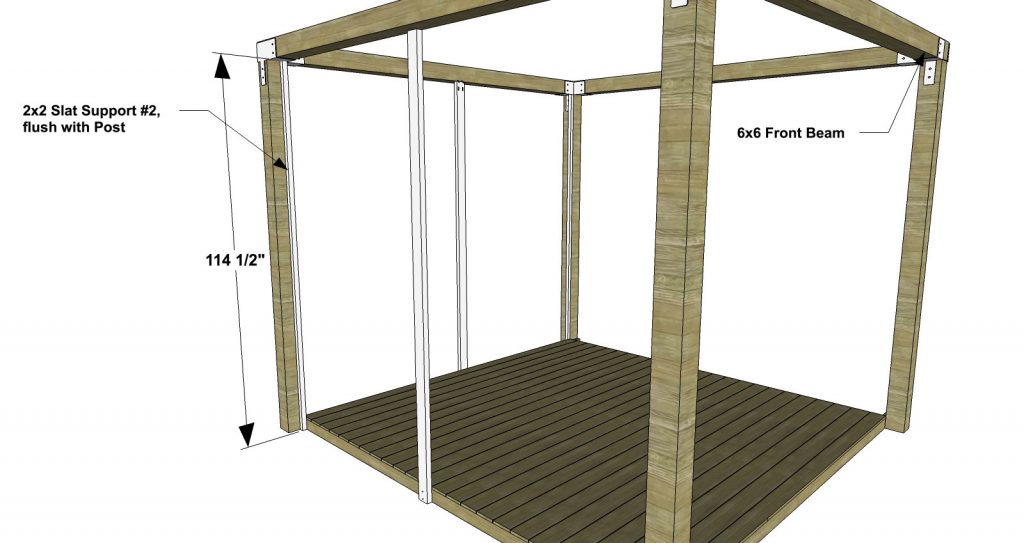
1 – 2×2 at 114-1/2” – Slat Support #2
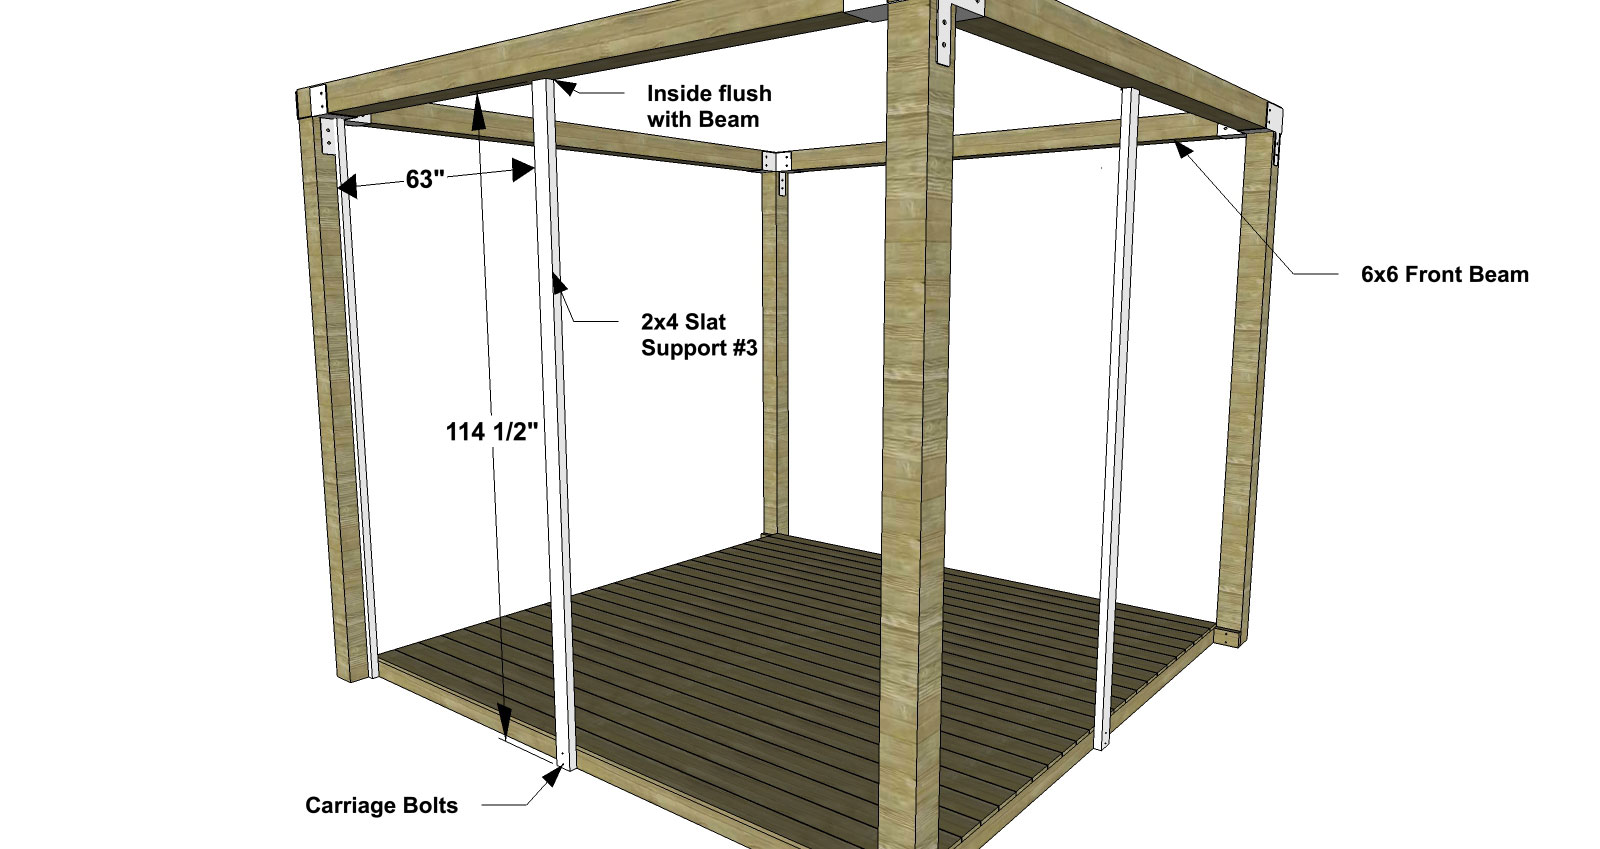
1 – 2×4 at 114-1/2” – Slat Support #3
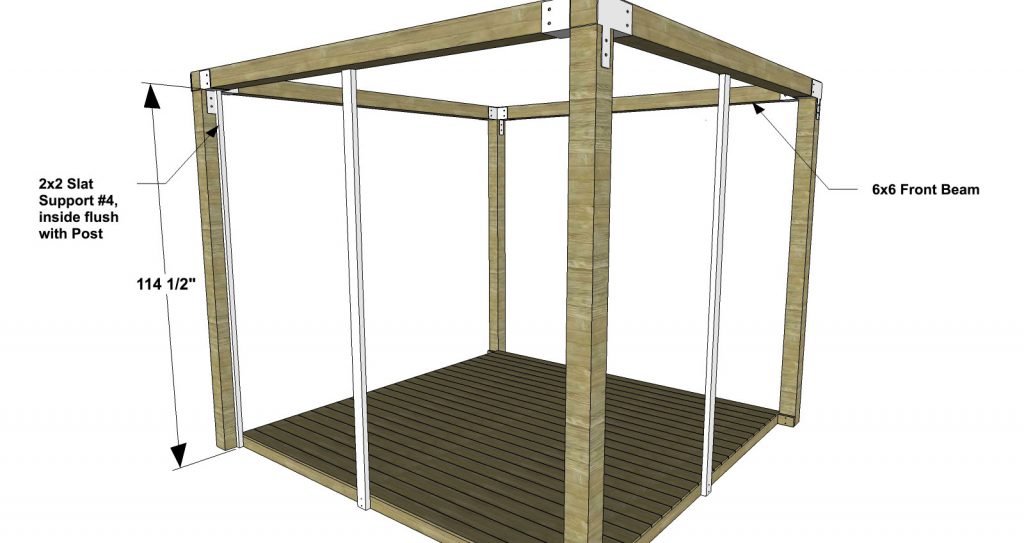
1 – 2×2 at 114-1/2” – Slat Support #4
76 – 2×2 at 66-1/2” – Slats
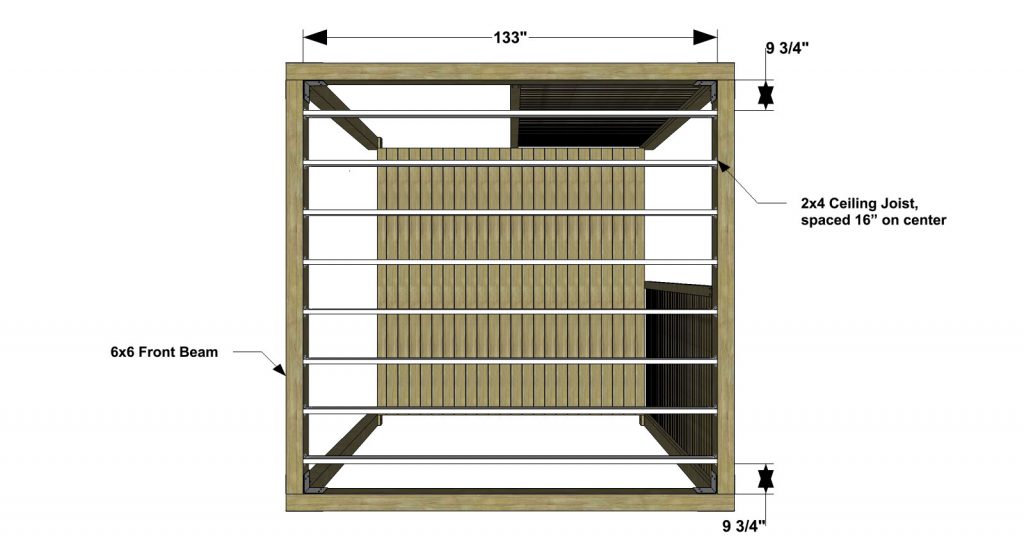
8 – 2×4 at 133” – Ceiling Joists
Before beginning to build, always check in on my site to make sure you have the most up to date set of plans, I occasionally update and change the plans to make the building process easier or to allow for less expensive purchasing of materials! Read through the entire set of instructions and all comments before beginning this project. If you print out or save plans, be sure to check in on my site to be sure you have the most up to date set of plans, as I occasionally update things for ease of building or buying. If you are new to building, read through the GETTING STARTED section and other articles found under the BUILD tab in the menu on my site, it has valuable information about how to get started, tools and techniques. If you are unfamiliar with the finishing process, visit my Finishing school for some tips and tricks for painting like a pro and for special finishing practices. Use glue to secure your joints and Consider Painting or Staining individual sections prior to assembling. This makes the paint application virtually flawless. Coat with a spray on Poly or Wipe on Poly to protect your finish and your piece and it will last for ages. Adhere to all safety standards and guidelines, and be sure you follow safety protocol throughout your build. If you are unsure about whether you are building safely, run a quick online search for the tool or technique you are using, or contact me via email or post to the forum before you move ahead. My contact info can be found in the menu of my site.
Cut the pieces for the Side Beam and Posts. Using the manufacturer’s recommendations, attach the End Column Caps to the Posts. Place the Side Beam on top of the Posts as shown – per the manufacturer’s recommendations. Complete this step twice, once for each side of the Pergola.
Cut the pieces for the Front and Back Beams. Install as shown into the End Column Caps per the manufacturer’s recommendations.
Cut the pieces for the Front Deck Frame, Back Deck Frame, and Side Deck Frames. With the Kreg jig set for 1-1/2” material, drill pocket holes in each end of the Side Deck Frames. Assemble as shown with glue and 2-1/2” Pocket Screws. Note that both ends of the Front Deck Frame and one end of the Back Deck Frame will overhang the Side Deck Frames by 5-1/2”. These overhanging ends will be attached to the Posts with 1/2” Lag Screws. Clamp the Deck Frame to the Post and drill two 5/16” pilot holes through the Deck Frame into the Post. Release the clamp and insert the Lag Screws. Repeat this process on the other two overlapping pieces of Deck Frame.
Cut the pieces for the Deck Joists. With the Kreg jig set for 1-1/2” material, drill pocket holes in each end of the Deck Joists. Assemble as shown with glue and 2-1/2” Pocket Screws. Note that the Deck Joists will be spaced 16” on center, except for the first and last one, which will be 8-1/4” from the Side Deck Frames.
Cut the pieces for the Deck Boards. Attach to the Deck Frame and Deck Joists with glue and 1-1/2” wood screws. Leave approximately a 1/8” gap between each Deck Board to allow for expansion. You may need to rip down the first and last Deck Boards for a perfect fit.
Cut the pieces for the Slat Supports. With the Kreg jig set for 1-1/2” material, drill pocket holes in one top ends of Slat Support #1 and #3.
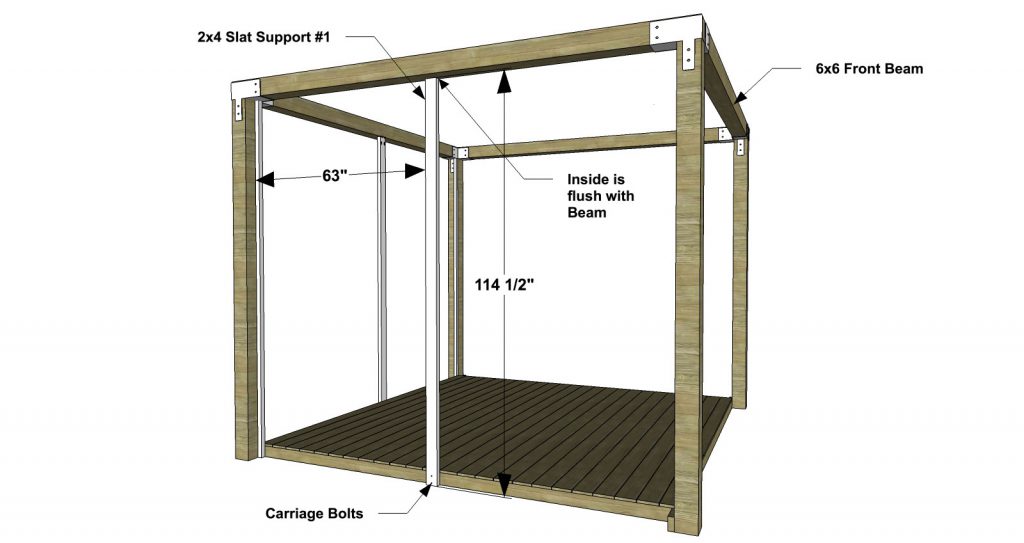
Position Support #1 as shown. Clamp the bottom of the Support to the Deck Frame and drill two 1/2” holes with the 1/2” spade bit through Support #1 and the Deck Frame. Secure with 1/2” Carriage Bolts, Washers, and Nuts. Attach the top of the Support to the Beam with glue and 2-1/2” Pocket Screws.
Attach Support #2 to the Post as shown with glue and 3” Wood Screws. Look ahead to Step 10 where you will attach the Slats to the Slat Support and make sure you leave room for all necessary fasteners.
Position Support #3 as shown. Clamp the bottom of the Support to the Deck Frame and drill two 1/2” holes with the 1/2” spade bit through Support #3 and the Deck Frame. Secure with 1/2” Carriage Bolts, Washers, and Nuts. Attach the top of the Support to the Beam with glue and 2-1/2” Pocket Screws.
Attach Support #4 to the Post as shown with glue and 3” Wood Screws. Look ahead to Step 10 where you will attach the Slats to the Slat Support and make sure you leave room for all necessary fasteners.
Cut the pieces for the Slats. Position as shown and secure in place with glue and 2-1/2” Wood Screws. The Slats will be spaced 1-1/2” apart.
Lastly, cut the pieces for the Ceiling Joists. Install the Joist Hangers per the manufacturer’s recommendations. Attach the Ceiling Joists to the Joist Hangers as shown, per the manufacturer’s recommendations. Note that the Ceiling Joists are spaced 16” on center, except for the first and last Ceiling Joists, which are 9-3/4” from the Side Beams.
Fill any Screw, Nail or Pocket Holes, Sand and Finish as Desired.
// Disclaimer: Some rights reserved. Private use only. Feel Free to link to any of my plans so long as you ONLY use 1 image and provide an ADEQUATE link back to the original source and appropriate plan! Plans from this page are not to be used for commercial purposes or republished without the express written consent of Rayan Turner, The Design Confidential. By accessing or using any part of the web site, you agree to become bound by the terms and conditions of this website as outlined under Terms of Use. If you do not agree to all the terms and conditions of this agreement, then you may not access the Website or use any services. The information contained in this website is for general information purposes only. The information is provided by The Design Confidential.com and while we endeavor to keep the information up to date and correct, we make no representations or warranties of any kind, express or implied, about the completeness, accuracy, reliability, suitability or availability with respect to the website or the information, products, services, or related graphics contained on the website for any purpose. Any reliance you place on such information is therefore strictly at your own risk. In no event will we be liable for any loss or damage including without limitation, indirect or consequential loss or damage, personal injury or death, or any loss or damage whatsoever arising from loss of information or profits arising out of, or in connection with, the use of this website. I hope to provide accurate plans, however, I cannot guarantee each plan for accuracy. Not every plan that I post has been built and tested, so you are building at your own risk. It is recommended that you have a clear understanding of how the project works before beginning any project. Please contact me if you find an error or inaccuracy so that I might fix it. The Design Confidential.com is inspired by but does not replicate exact designs, any similarities between these plans and items sold at specialty retailers is coincidential and not endorsed by or related to any said retailers. // Affiliate links are used for tools and materials. The Design Confidential will earn a small commission for any items purchased using these links. Thank you for your support – every little bit counts!


