
Well, I will tell you all that I wasn’t sure I could create something beautiful and keep it budget friendly for this particular type of outdoor structure. I clearly didn’t have enough faith in myself because now that I am finished, I feel a bit like superwoman! Witness and observe…know that this is actually very budget friendly and affordable.
$200-$300
- 4 – 6×6 Posts at either 8′ or 10′ according to your preference
- 4 – 2×8 at 8′
- 2 – 2×8 at 10′
- 2 – 2×4 at 8′
- 5 – 2×4 at 10′
- 4 – 1×2 at 10′
- 1 – 1×3 at 10′
- 1 – 1×8 at 10′
- Qty 8 – 9″ Galvanized Carriage Bolts
- Qty 8 – 7 1/2″ Galvanized Carriage Bolts
- 4″ Galvanized Deck Screws
- 3″ Galvanized Deck Screws
- For Installation using method below: otherwise you will need to purchase alternate hardware for fastening to concrete in a form or using post anchors on your patio etc.
- 4 – 42″ long 1 1/2″ Galvanized Metal Pipe (can purchase a pre-cut 48″ pipe and remove 6″)
- Concrete (I recommend a Quick Mix variety it will cure in several hours rather than several days)
- 1 1/2″ x 18″ Auger Bit
- 2” Galvanized Deck Screws
- ** Optional: Galvanized Hanging Hardware – especially for areas with Seismic Activity- this is also an additional method of building that makes certain aspects a bit easier when working with heavy beams.
- Post and Beam connectors
- Rafter Ties
- Wood Filler
- Wood Glue
- Sanding Supplies
- Paste Wax
- Finishing Supplies
- Note: This cut list will change if you alter your method for installing and change the dimensions. If you need help calculating any of your new dimensions, feel free to send me an email and I can help walk you through it.
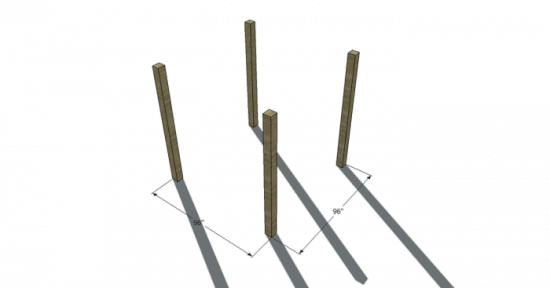
- 4 – 6×6 Posts at 8′ if you prefer 10′ height, this will change as an exact measurement if you install as outlined below. If you are planning on cementing the post directly into the ground, you will need to allow for that added length.
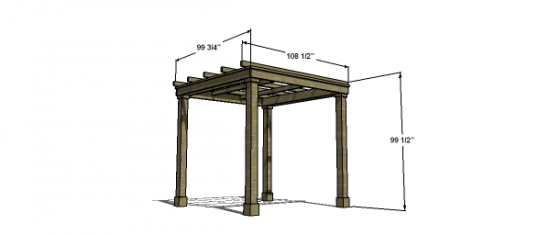
- 4 – 2×8 at 96″ (Double Beams)
- 2 – 2×8 at 99″ (Single Beams)
- 2 – 2×4 at 96″ (Cross Beams)
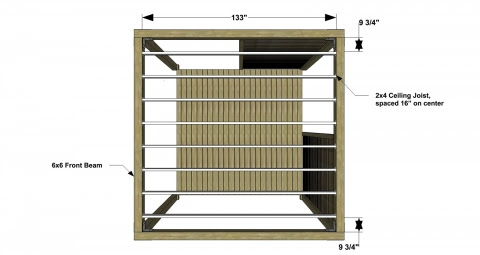
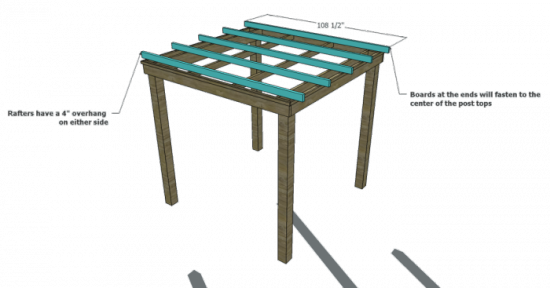
- 5 – 2×4 at 108 1/2″ (Rafters) you can allow this to have a greater overhang and/or cut into a decorative pattern on the ends if you like. I have designed this with a 4″ Overhang
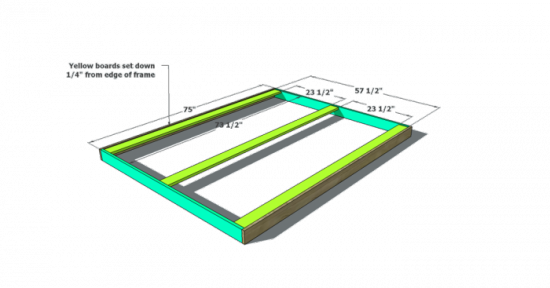
- 2 – 1×2 at 99″ (Frame Trim)
- 2 – 1×2 at 100 1/2″ (Upper Trim) – **if you prefer to miter the corners you will actually need 4 at this length.
- 8 – 1×3 at 7″ (Upper Post Trim) – if you prefer to miter the corners you will need 16 at this length.
- 8 – 1×3 at 5 1/2″ (Upper Post Trim)
- 8 – 1×8 at 7″ (Lower Post Trim) – if you prefer to miter the corners you will need 16 at this length
- 8 – 1×8 at 5 1/2″ (Lower Post Trim)
// ** You will want to pre-drill and then pre-finish for the most optimal outdoor use and a more water tight seal for each board. Choose wood appropriate for outdoor use if possible to ensure a greater lifetime for this structure. This would include Cedar and Redwood. Check with your local lumber supply for additional options available for your area.
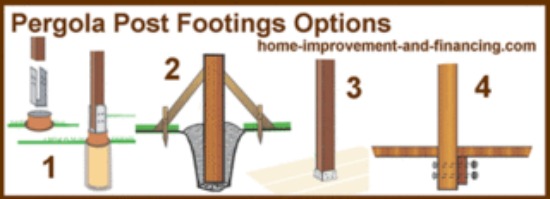
**For installation of this structure I am going to refer you to an article on another site. I think it does a fabulous job of explaining the different options available. I will include one additional option for installation that the article doesn’t include, but
is a very viable option (maybe one of the better options if you will be installing into the ground rather than attaching to a patio or deck) and recommended by several sites including This Old House (Love this program…)
**I would like to call to your attention the fact that you may need to check with your county before building to ensure you don’t need a permit. Some counties are very strict regarding anything that can be construed as a structure in, near or around your home. The Building Department can help you determine an appropriate distance from your home as well as an appropriate level to bury your posts. You will want to secure them just below the frost line if you live in a locale that has freezing temps at any point. Be safe and be sure so that you don’t pay the price later. Trust me it isn’t worth it.
**For those of you who need to consider seismic activity, there is special hardware for hanging your beams, that you can purchase to ensure your safety in the event of an earthquake.
** You can customize the outside edges of the rafters on this project by carving out a design with a jig saw. I chose to leave that off of this plan for ease of building and design purposes. I will likely provide a later plan that will include this.
Before beginning to build, always check in on my site to make sure you have the most up to date set of plans, I occasionally update and change the plans to make the building process easier or to allow for less expensive purchasing of materials! Read through the entire set of instructions and all comments before beginning this project. If you print out or save plans, be sure to check in on my site to be sure you have the most up to date set of plans, as I occasionally update things for ease of building or buying. If you are new to building, read through the GETTING STARTED section and other articles found under the BUILD tab in the menu on my site, it has valuable information about how to get started, tools and techniques. If you are unfamiliar with the finishing process, visit my Finishing school for some tips and tricks for painting like a pro and for special finishing practices. Use glue to secure your joints and Consider Painting or Staining individual sections prior to assembling. This makes the paint application virtually flawless. Coat with a spray on Poly or Wipe on Poly to protect your finish and your piece and it will last for ages. Adhere to all safety standards and guidelines, and be sure you follow safety protocol throughout your build. If you are unsure about whether you are building safely, run a quick online search for the tool or technique you are using, or contact me via email or post to the forum before you move ahead. My contact info can be found in the menu of my site.
Setting or fixing your posts:
1. Dig your footing holes:
Dig each footing hole about 18-inches-wide and 24-inches-deep, or to the frost line, whichever depth is greater. Fill each hole with concrete, then insert a 48-inch-long piece of 1 ½-inch-diameter galvanized-metal pipe. (The pipe has an outside diameter of 1 ½ inches) Leave 24 inches of pipe sticking up from the middle of the footing. Allow the concrete to cure at least 24 hours. Next, use a long, 1 ½-inch-diameter auger bit or spade bit to bore a center hole into the bottom end of a post.Dig your footing hole to approximately
2. Treat and lift the post:
Treat the end of the post with wood preservative. Then lift up the post and have a helper align the center hole with the pipe. Slowly lower the post over the pipe until it sits on the concrete footing. Do the same for the remaining five posts. Check to be sure that each post is perfectly plumb; if necessary, drive a cedar-shingle shim underneath to align it.
Article for additional methods of building and securing your posts: How to Build a Pergola
Image of the different options explained: click on the link above and scroll down for information on these methods.
Set your Posts into the ground in your desired manner. For those of you working over a patio you will install the posts with the hardware required and make sure each post is plumb and square to all of the other posts. I have designed this to be at an 8′ height and width for cost, however you are welcome to increase this height and the overall dimensions as desired for your space. If you go beyond the 10′ mark, consider adding a third pair of posts to increase the strength and stability of your structure.

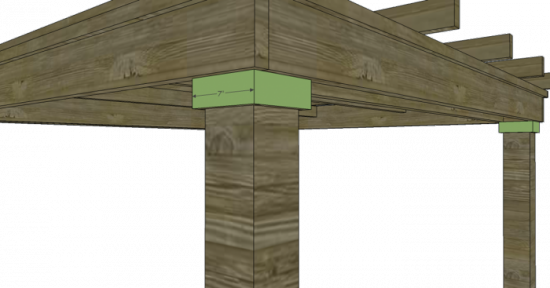
Build the Frame of the structure: Attach the beams with Screws, then drill for bolts and secure using 9″ Carriage Bolts on the sides that have double beams. Go through the beams and the post, slip on a washer and nut on the inside of the inner beam or post and tighten. For the side that has only one beam, use 8″ Bolts. Offset them at a diagonal on every board to avoid wood weakening. The frame should be constructed as shown below.
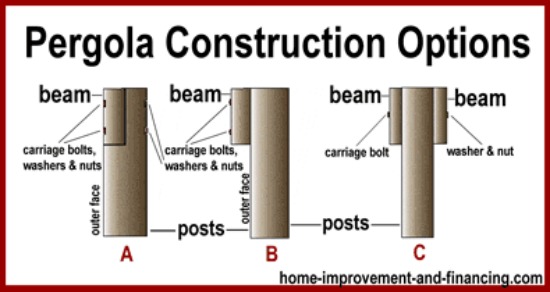
This image shows the manner we will attach the beams in example C: and in the right hand example in the image just below that. Only you will be offsetting your bolts which these images don’t show.
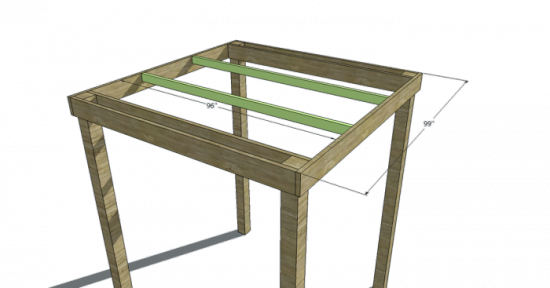
Attach the Cross Beams: Use 4″ Galvanized Deck Screws.
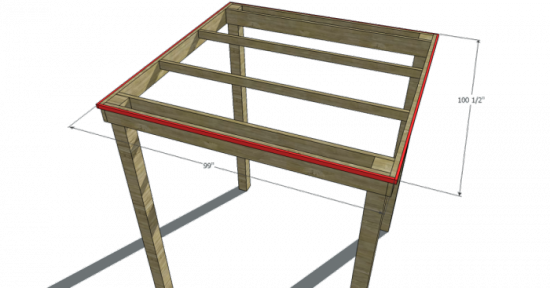
Fasten the Upper Trim to the Frame. You can choose to Miter the corners, if you like, for a more finished appearance. I did not do so in this example and believe it still looks amazing. I wanted to keep this simple with no special tools required but this is subjective and you can choose your preference. Secure with 2″ Galvanized Deck Screws.
Attach the Rafters: Use 3″ Galvanized Deck Screws, pre-drill at an angle down through the side, then bottom of the rafter, and into the beams. Fasten the first screw on one side then the next screw from the other side, and so on, so that it is well balanced and supported on both sides.
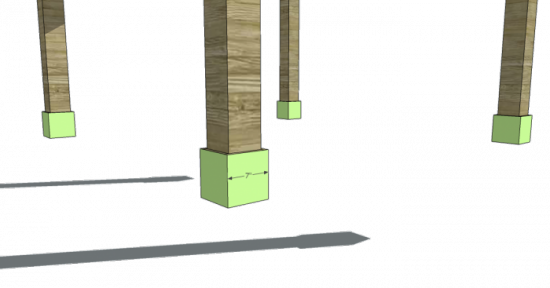
Trim out your posts up at the top under the beams and at the bottom covering your hardware or for decorative purposes. Use the 3″ Screws since you have them, not because it is necessary. If you prefer, you can purchase the more appropriate 2 1/2″Galvanized Finish Nails or use a 2″ Screw. Since this project is about being efficient and budget friendly I am giving you permission for overkill because it is easier that way. Again you can choose to miter the corners for a more finished appearance but this is optional.
Upper Trim:
Fill any screw holes, sand, and finish or seal as desired if you didn’t do so up front.
Fill any Screw, Nail or Pocket Holes, Sand and Finish as Desired. For Finishing Tips and Tricks visit my Finishing School
Image Source: the few images included in addition to my own drawings, are from the site I have provided a link to above, for installation methods.
**Disclaimer: Some rights reserved. Private use only. Feel Free to link to any of my plans so long as you ONLY use 1 image and provide an ADEQUATE link back to the original source and appropriate plan! Plans from this page are not to be used for commercial purposes or republished without the express written consent of Rayan Turner, The Design Confidential I hope to provide accurate plans, however, I cannot guarantee each plan for accuracy. Not every plan that I post has been built and tested, so you are building at your own risk. It is recommended that you have a clear understanding of how the project works before beginning any project. Please contact me if you find an error or inaccuracy so that I might fix it.

Hi,
Love the style and look of this pergola that you have posted. We are considering building one of this style but would like it to be a bit bigger dimension. I am wondering if you could help with the list of necessary lumber and cut list for our dimensions? We would like our pergola to be 10′ x 12″. We would be building our pergola on a cement patio. Any suggestions or advice you have would be greatly appreciated.
Thanks!
definitely! give me a day or so and i can post the alterations for you! i can likely do it here in a comment with ease. in the meantime, they have some fantastic hardware options out there that work specifically for securing pergolas to concrete. the idea is that it will grip the base of your posts and bolt to both the concrete and the posts. simpson strong tie has all sorts of things like this, so it would just take a bit of digging on the interwebs to find. stay tuned and let me see what i can gather for you.
Hello Rayan,
Do you have the plans for a 12×12 pergola? I’ve searched but cannot find anything posted for this style pergola. Love your plan and we are building one within the next month. Would really like to build this one.. Thank you.
Looks beautiful! I’m also looking to build this as a 10’x12′ on concrete and would love to see the altered plans if possible. Thank you!
This is great breaks it down very well, I was wondering if you could give me a altered plan for a 12 by 10 on a ground level wooden deck thanks !
Hi Love your design I was wondering if you could give me a materials list for a 12×15 foot pergola over an existing concrete patio.
Thanks so much
This is a quality design idea, possible even for the DIY-er… I’m a professional in the business and I’m impressed by your planning, This is a great wood pergola! Thanks for sharing, Rayan
I am looking to build a triangle AKA corner AKA quarter circle pergola which means it has three posts. The open end would be 12 foot preferably. I want the corner to keep the posts out of the way, give the far corner some utility and add some design to a series of square patios and rectangle pathways in a rectangle yard. Do you have any thoughts or design in your incredibly useful template? Thank you for assistance! Russelee
I love the look of this pergola! I would like to build a 10 x 16 one on my concrete patio. Any additional info you could give would be appreciated. Debby
Have you put together plans for larger versions of this? I see a few requests. I am looking for something like 14 x 20 or 12 x 18. I guess I am wondering how you would manage a post midway and joining the cross pieces.
I love the look of the Pergola, do you have a shopping list / cut list for a 10 x 12 pergola?
thanks a bunch!