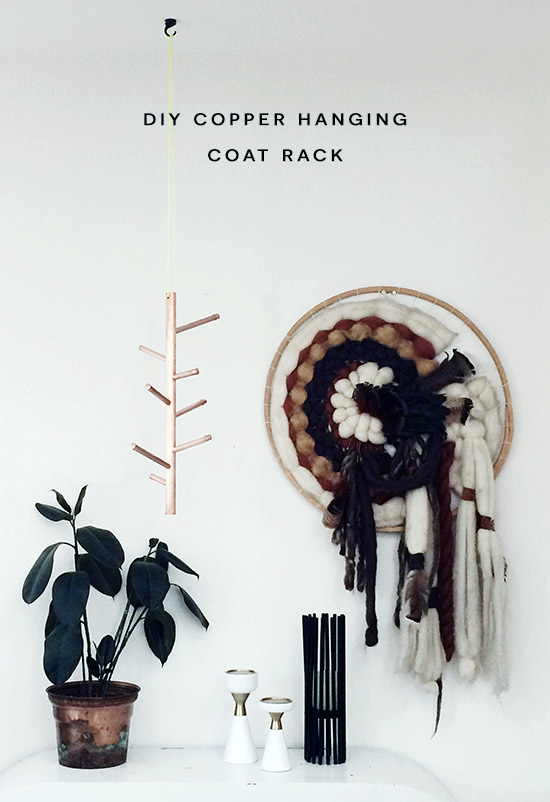
I mentioned a while back I would be partnering with Bernzomatic to bring you guys a new project each month and would be working to develop my metal working skill-set… I am pretty excited to share today’s project because I really put those skills to the test and learned so very much in the process. The result is a fabulous shiny new solution for the mess that is our entryway… especially during the colder months, which we are about to enter (4 months from now).
Let’s get real for a minute – I was terrified about using this torch, and I have actually used a torch many times before. You see, I took a metalsmithing class in college and I loved it so very much, but everything was set up in a space that was used exclusively for working with fire and acid and all of those crazy things that sound terrifying to use in my own home and those torches used a manual striker to light so much harder and a lot more scary. I mean, eek, right? But I set up a work space that felt safe and took a few extra precautions that in hindsight were probably a tad much, but you can never be too safe when you are playing with fire so I am glad I did. Turns out there was nothing to worry about and jumping back on that bike was a cake walk. They say most things come back to you, just like riding a bike, and this was true for soldering… though I am fairly certain I have actually forgotten how to ride a bike, so who knows. Also, the new and improved torches have an easy on / off trigger so you don’t have to start the gas and then spark it with a striker, so that alone makes this sooooo much better.
So I will walk you through the steps for this project and a few of my tips for getting started with soldering and torch work because… that is the part you are likely to be nervous about at first. Promise it’s so much easier than it seems!

Here are the supplies you will need for this project. Keep in mind that the techniques here will work for any variation so feel free to make your fabulous creation if you prefer that!
MATERIALS //
Copper Pipe – 1″ x 2 feet
Copper Pipe – 1/2″ x 5 feet
8 – 1/2″ Copper Pipe Caps
Drill Bits with 1/2″ Bit
Bernzomatic TS8000 Self Igniting Torch Head
Soldering Kit //
Bernzomatic Plumbing Kit – I purchased this kit and used it with the torch head listed above, but if you prefer to purchase the pieces individually, they are listed below.
Individual Kit Pieces //

Safety is extremely important when you are playing with fire… so be sure to wear gloves, goggles and glasses to shield yourself from debris and burns. You will also need at least 2 drill bits – one small bit like 5/64″ and one 1/2″ larger bit that are appropriate for metal. A center punch is also extremely helpful when you are drilling metal, so your bit doesn’t slip or twirl, but if you don’t have one, any screw with a nice tap from a hammer in the center of where you plan to drill your hole will also help.
Let’s get to work! Start by laying out where your pegs will go on your 1 inch pipe. I chose to put two holes per side and 4 approximate sides for a total of 8 holes. I varied the locations on each side for an organic look. Use a small piece of your 1/2″ pipe to trace a hole in each of these 8 locations on your 1 inch pipe.
You can cut your 1/2 inch pegs to length using your pipe cutter. You will need //
3 – at 7 inches
3 – at 5 inches
2 – at 3 inches


I gave each future hole a tap with a screw and then used the smallest bit in my assortment to drill a tiny pilot hole. You probably won’t drill all the way through, so watch the pressure you apply as you are drilling or you will go all the way through whether you want to or not.
Once I had my pilot hole drilled, I switched to my large 1/2″ bit and opened the hole up quite a bit.
Then use your rounded metal file to give it more room and to smooth it out so your pegs will fit nicely. You can do a dry fit to make sure you are on the right path.

Once you are finished cutting your pegs and drilling / filing your holes, you will want to prep your surfaces for soldering. This means you need to clean the area where the joint will be and you need to clean both your pegs as well as the large 1″ pipe, in and around all of your holes.
You will do this using your sanding cloth and you can simply wrap it around the ends of your pipe and sand (clean) until it shines. For your 1 inch pipe, sand inside your holes and the entire area around each hole. Try not to touch or dirty these prior to soldering. If it’s helpful to do each peg as you go along then that works as well – I found it easiest to set up for soldering both pegs along one side at the same time. Which reminds me, it might be helpful to decide how you want to arrange your various sizes of pegs around your pipe. I never put two of the same size on the same side and tried to think about what we might be hanging up (hats, scarves, jackets) so that I could figure out my arrangement. Obviously having a sweater hanging above a hat is tricky so put that shorter hat peg on top, or on a different side from your longer pegs.
// You will also need to set up your work space. I found it easiest to work on concrete and set my pipe on two pavers that were standing up on end. You will want to have a bucket of water nearby – just in case – or if you are outside, you can use your hose. If you are working near flammable materials – move them or your work area – and if you have plants, trees, or mulch that might catch fire, you should give your surrounding area a good hosing before you get started.


After you clean with your sanding cloth, you will apply your paste flux to the end of the peg that will sit down into your hole and the area around the hole as well as the edges of your hole. Use the silver brush that comes with your flux do this and then move your flux and brush away from the area where you plan to work.


Your Torch Head will screw onto your Map-Pro or Propane tank easily and there are directions for setting things up in the torch head package. Follow those directions and you should have no problem! Basically, you will begin with your torch head and tank separated, make sure your trigger on your torch head is set to the off position, then turn your valve clockwise all the way so that it is shut off. Then attach your torch head to your tank and tighten by hand. I will note that I didn’t quite understand where the trigger was – not sure why this little fact was over my head – but just in case you are blonde like I am… the trigger is the same button you turn in the on and off position (the only one so you can’t miss it). Once your tank is attached, you will simply open your valve all the way, then turn your trigger to the on position and when you are ready, press your trigger to ignite. It all works so smoothly and easily that you will absolutely love it once you realize it really isn’t scary at all and the process is a cake walk. No guessing or difficult steps.


With your flux applied and your flame lit – you will now actually begin to solder. You want to hold your torch in one hand and your solder in the other for the easiest manner of handling things. You should have a decent portion of your solder unrolled and extending away from the remainder so you can easily let it do it’s thing without burning your hand.
Start by heating your joint. You will want to heat the area evenly all around your joint rather than heating your solder directly. Since your peg will sit down into your hole, you will heat your peg and the 1 inch pipe in the immediate vicinity. Keep your flame moving and you will start to see the flux begin to bubble a bit, this takes a few seconds or more and you can then see if your solder will run.
To do this, remove your flame from the area and let go of the trigger so it stops. Then touch the end of your solder to the joint and you will know you have heated the area enough if when you touch your solder to the joint, it runs easily into the joint and looks a bit like liquid. If you touch your solder to the area and nothing happens, you will need to heat it a tiny bit more so you will remove your solder, then ignite your flame again by pressing the trigger and heat your joint by keeping that flame moving evenly over the area you are working. When you are ready to try again, let go of your trigger and remove your torch while you touch your solder to the joint with your other hand. It should flow beautifully right down into your hole and will run around the edges. It’s so utterly gratifying. Promise!
// It may not make it all the way around so you will likely need to let it cool, and once it does apply another round of flux, then heat the joint and finish it off with your solder. Just try to avoid directly heating the area you have already soldered or it may run or overheat and ball up a bit, leaving you with yet another area that isn’t soldered.
It will take a bit of practice with how much heat you need and in controlling your solder, but not to worry because those colorful heated areas and messy solder can all be fixed!

If you have an area that has a large clump of solder, you can give it just a little bit of heat and it will run just enough to flatten out a bit. It will likely run down onto your pipe, but that is far easier to deal with than a huge clump that needs to be filed down.
For everything else, use your rounded file to smooth out the solder around your joints. You can see above one that I filed to fix a big run and clump versus one that hasn’t been filed yet.

Finish off your piece by sanding the entire thing with your sanding cloth. This will remove the colorful sections and any crazy marks from filing your solder. Try to work it in a uniform way so that it looks more perfect ultimately. I chose to sand in an up and down manner and as you can see above it turned out beautifully!
Clean everything off with soapy water or a water and vinegar mix and then add your caps to the ends of your pegs. Drill your holes at the top for hanging, using a medium sized drill bit (maybe a bit smaller than 1/4″) and for this one you can drill all the way through. Now you simply need to string it up and hang from your ceiling hook! Yahoo
This awesome-sauce project was created in partnership with Bernzomatic and is part of an ongoing series between that fabulous company and The Design Confidential! Yahoo. All crazy talk and opinions are 100% my own… you know – as per the usual.
