
I am so very excited to share this project with you today! You see, we are still in the warmer months out here in Northern California, but it is finally starting to cool down enough that we can actually enjoy some outdoor time. One of my favorite things to do, ever! So you better believe that when the amazing folks over at Simpson Strong-Tie challenged me to create something using their Workbench/Shelving Hardware Kit, that includes the metal connectors and screws (and fabulous directions for building a workbench or shelving unit), I had to build something that had nothing whatsoever to do with the kit’s initial intention. Naturally… And instead, I built something that can be used outside as easily as it can be used inside and for a variety of purposes and people, because that is how we roll here at TDC, am I right?
So this baby is one part outdoor chaise daybed lounge, one part twin sized bed, and one part indoor or outdoor playhouse! If you are just heading into your nice weather too, you can enjoy this fun house with a canopy over top for shade and lounge away or as an open construction imaginative play space for the kids. But, if you are beginning the descent into normal fall and winter months, this piece is a great way to bring some fun indoors without sacrificing playtime or sleep since there is plenty of room for both!
For mine, I spray painted the hardware in a neon yellow, then gave it a clear protective coat, and I left enough space below the floor to slide the mattress under and out of the way for when my boys want to play. Of course, you can use this space for storage and toys or lower the floor altogether and let the play have free reign. If you would like to build this using the kits, which made this build so ridiculously easy to put together, you can purchase them here and be sure to check out other clever uses for these on their FB page!
Psst… the easy tutorial for the pretend campfire will be coming soon and we now have plans for a toddler sized house bed , a twin sized house bed and a full sized version too that all sit on the floor with a platform base and have a chimney as well as a toddler size bed rail to help keep those little in the bed!
Thank you to Simpson Strong-Tie for sponsoring this project and thank you to all of you for supporting the sponsor that help make content like this possible. You all make my world go round!

- 10 – 1×4 at 8’
- 5 – 2×2 at 8’
- 10 – 2×3 at 8’
- 4 – 2×3 at 42-1/2” – Legs
- 4 – 2×2 at 42-1/2” – Legs
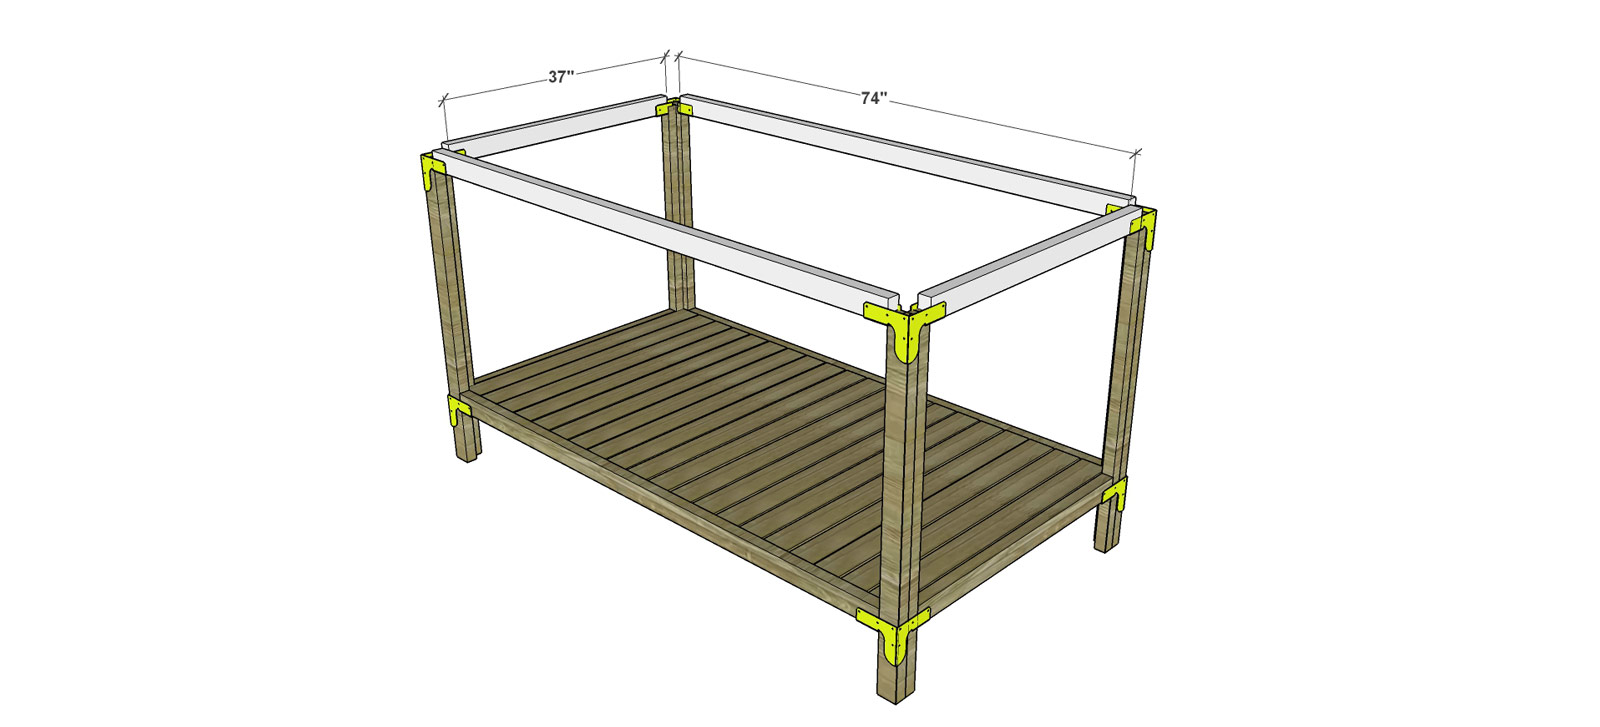
- 2 – 2×3 at 74” – Bottom Sides
- 2 – 2×3 at 37” – Bottom Head and Foot
- 2 – 2×2 at 75” – Outer Slat Supports
- 2 – 2×3 at 75” – Inner Slat Supports
- 20 – 1×4 at 39” – Slats
- 2 – 2×3 at 37” – Top Head and Foot
- 2 – 2×3 at 74” – Top Sides
- 2 – 2×3 at 31” Roof Front Rafters
- 2 – 2×3 at 29 ½” Roof Back Rafters
- 1 – 2×2 at 74” – Roof Ridge Beam
Before beginning to build, always check in on my site to make sure you have the most up to date set of plans, I occasionally update and change the plans to make the building process easier or to allow for less expensive purchasing of materials! Read through the entire set of instructions and all comments before beginning this project. If you print out or save plans, be sure to check in on my site to be sure you have the most up to date set of plans, as I occasionally update things for ease of building or buying. If you are new to building, read through the GETTING STARTED section and other articles found under the BUILD tab in the menu on my site, it has valuable information about how to get started, tools and techniques. If you are unfamiliar with the finishing process, visit my Finishing school for some tips and tricks for painting like a pro and for special finishing practices. Use glue to secure your joints and Consider Painting or Staining individual sections prior to assembling. This makes the paint application virtually flawless. Coat with a spray on Poly or Wipe on Poly to protect your finish and your piece and it will last for ages. Adhere to all safety standards and guidelines, and be sure you follow safety protocol throughout your build. If you are unsure about whether you are building safely, run a quick online search for the tool or technique you are using, or contact me via email or post to the forum before you move ahead. My contact info can be found in the menu of my site.
* Notes: This bed will be hard to get through doorways once it is completely built. If you plan this for indoor use, you would be well served to build this in sections and then assemble in place. The sections I would build this in are 2 leg unit/sides: this would be a head and foot leg with side rail and there will be 2 of these for this bed, the floor: this would be the head and foot rails, slat supports and slats, and the roof: both pitches and the roof beam. The instructions below direct you to build these sections in this manner, so rather than attaching each section to the hardware as shown, you will build each section, move into place, and then secure each section to the hardware. Yahoo.
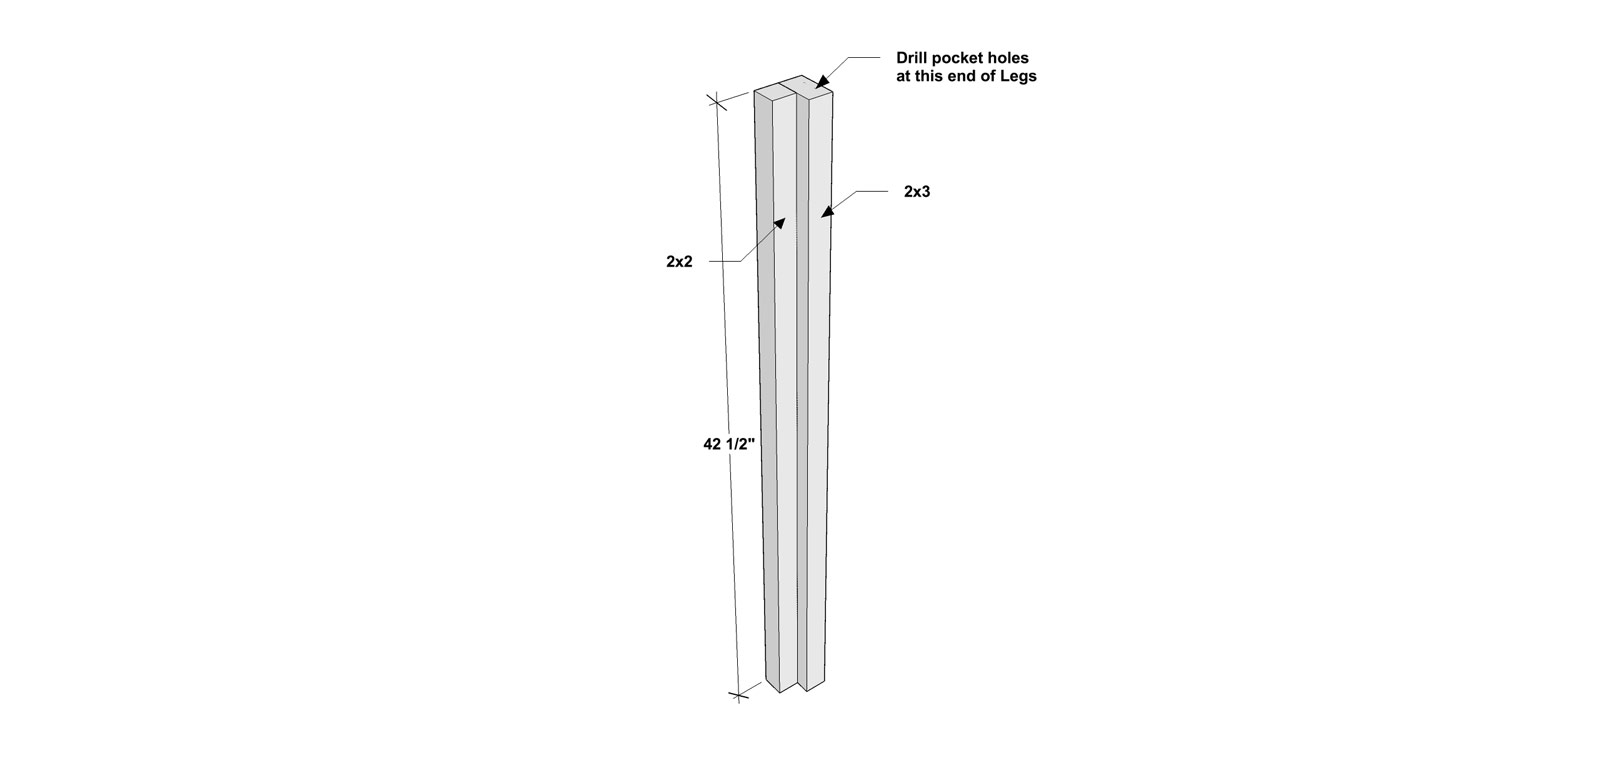
Cut the lumber for the four Legs at the appropriate length. Each Leg will be composed of a 2×2 piece and a 2×3 piece. Set your Kreg Jig for 1-1/2” material and drill pocket holes as shown at the top of each 2×3 Leg. This will help you secure your roof pieces later. Attach the 2×2 piece to the 2×3 piece with glue and 2” wood screws. Be sure to countersink for the best result.
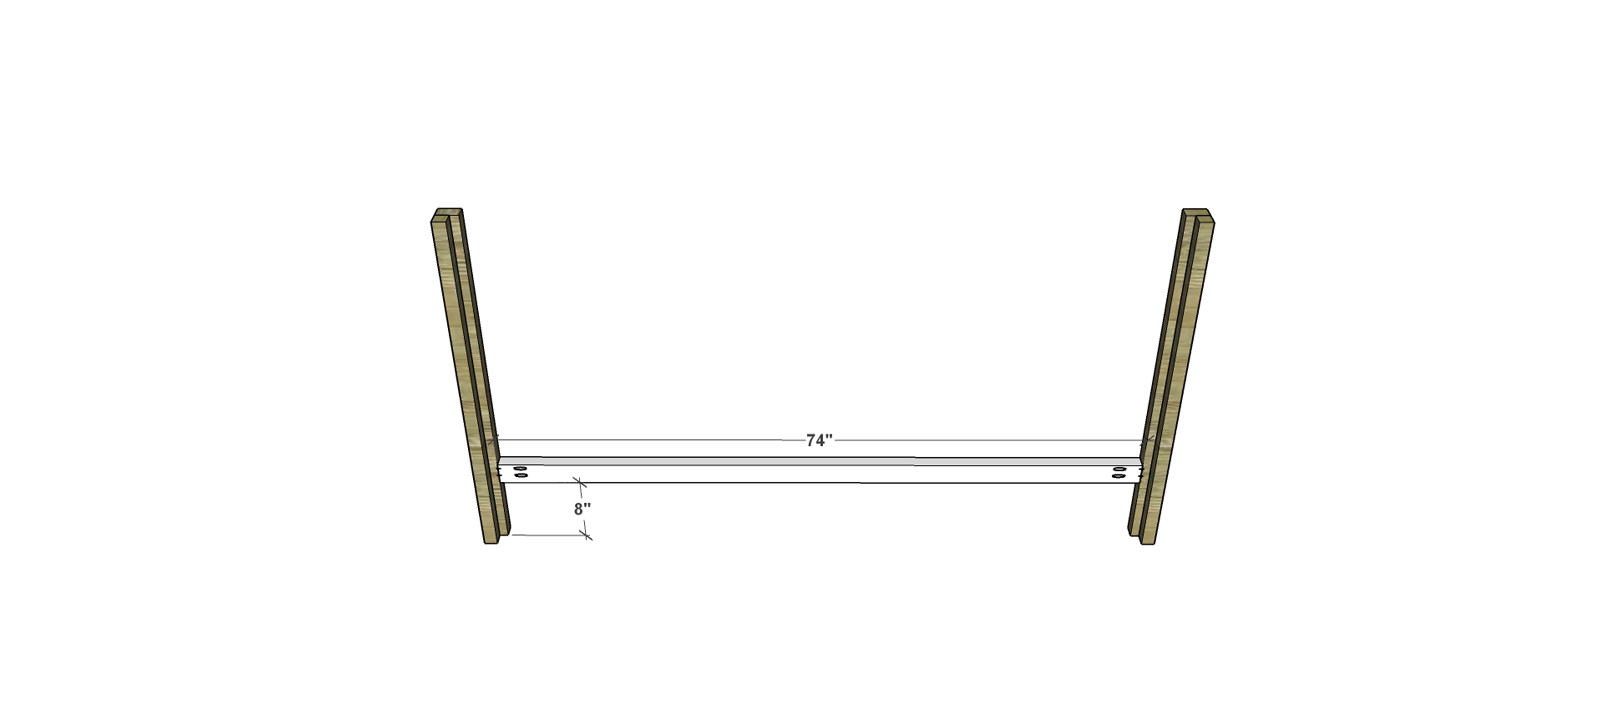
Cut the pieces for the Bottom Sides. Drill pocket holes in each end of the Sides and assemble as shown with glue and 2-1/2” pocket screws. Note that the Bottom Side is attached to the 2×3 portion of the Leg. You will do this two times, once for each side of the project. Take note of the position of the legs here (the 2×3 versus the 2×2). Your second leg unit will mirror this and your pocket hole placement should be facing in toward your 2×2 leg pieces.
Note: The placement of this side rail is a bit subjective and flexible. You can place it higher as shown below if you want store things underneath (like the mattress during play or when not used as bed). If you only plan for one use, feel free to set this piece at 3” up from the bottom.
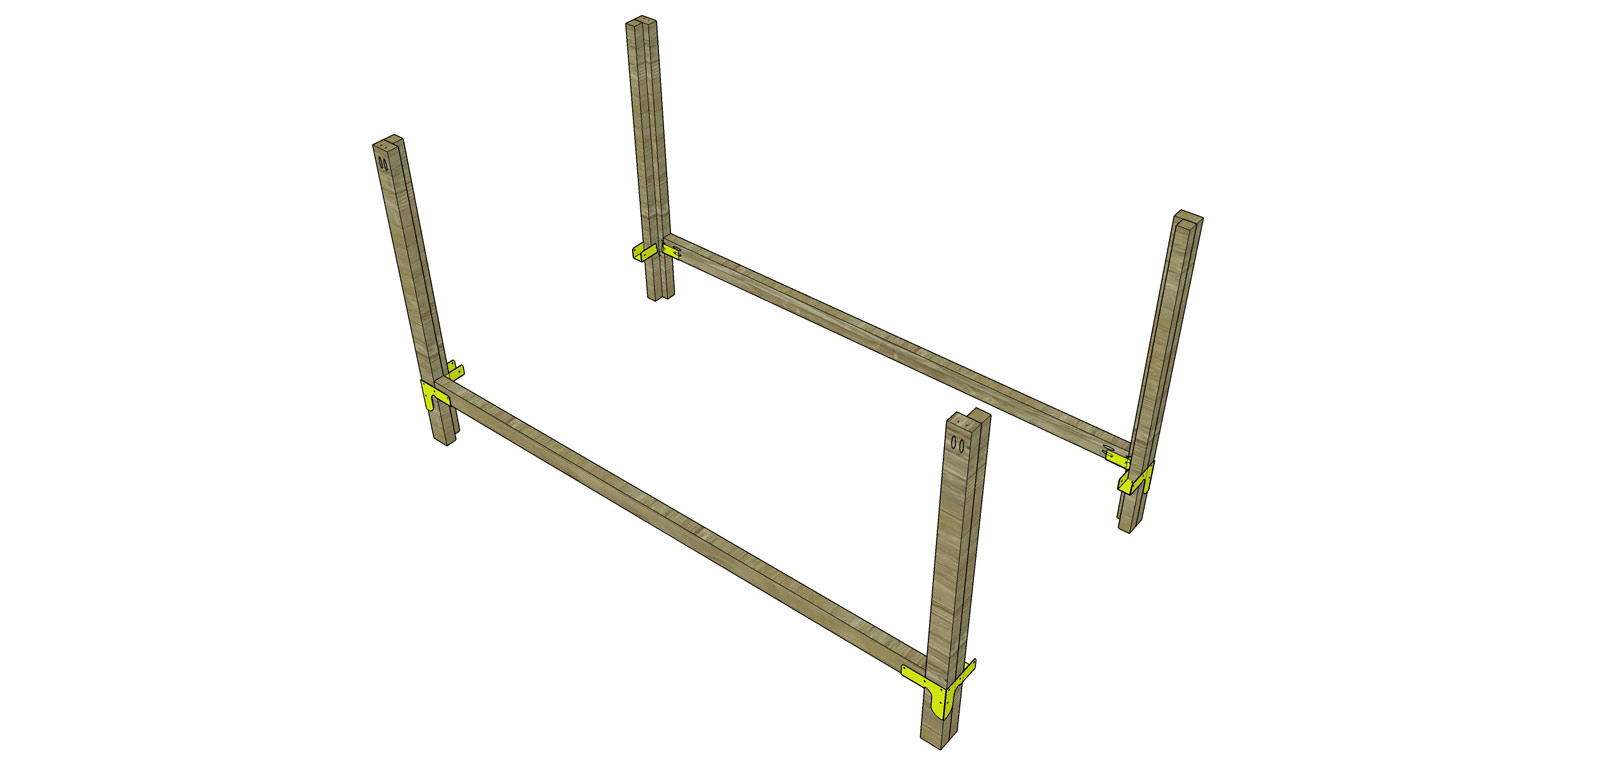
Attach the connectors as shown by using provided screws. They will slide up and support the side rails and should attach where your side rails meet your leg units.
Note the direction of the connectors below. You will place the empty arm of your connector on the side of your leg unit where your 2×2 sits and away from the side rails themselves.
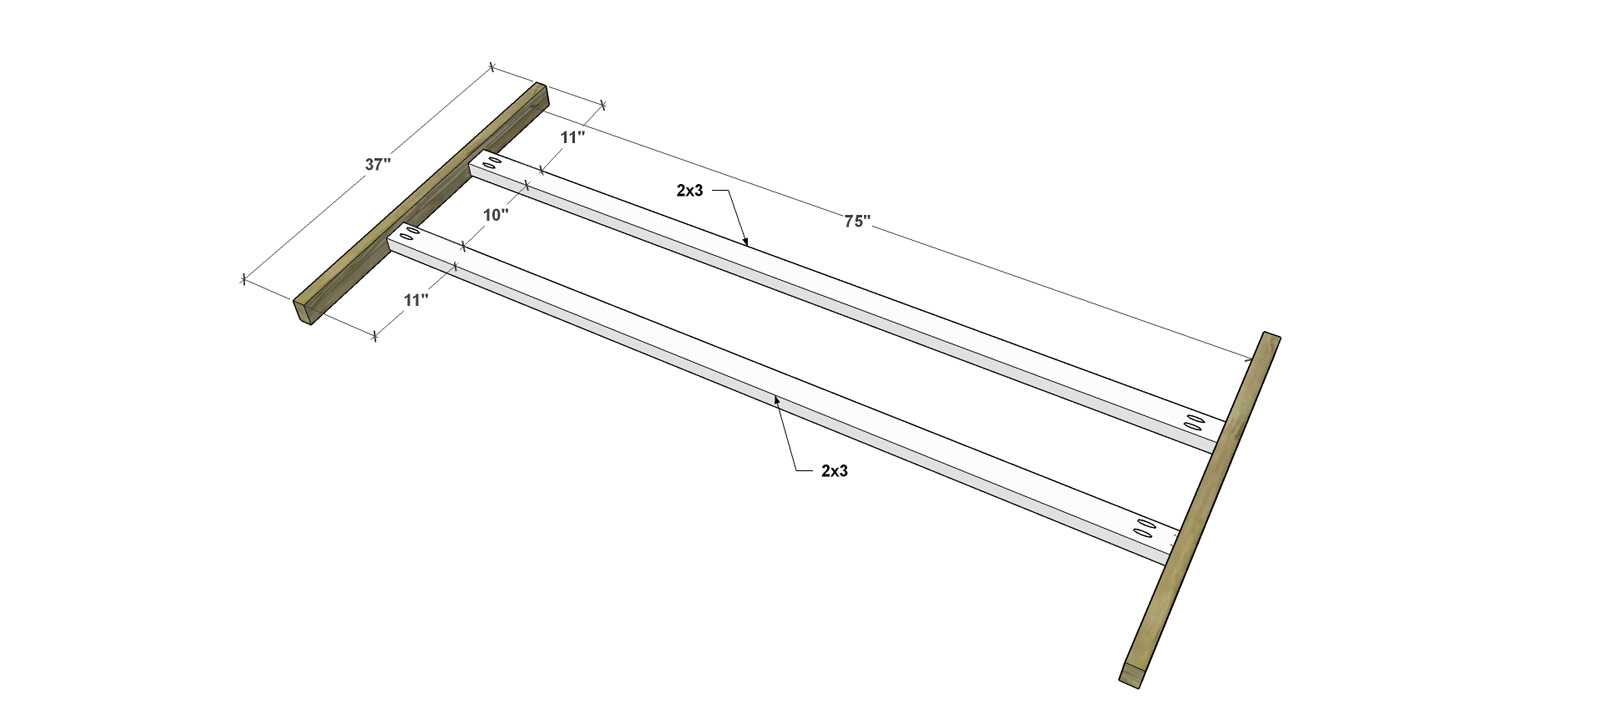
Cut the pieces for the Bottom Head and Foot Rails and the 2×3 Inner Slat Supports. Drill pocket holes in each end of the Inner Slat Supports. Attach the Slat Supports to the Bottom Head and Foot with glue and 2-1/2” pocket screws.
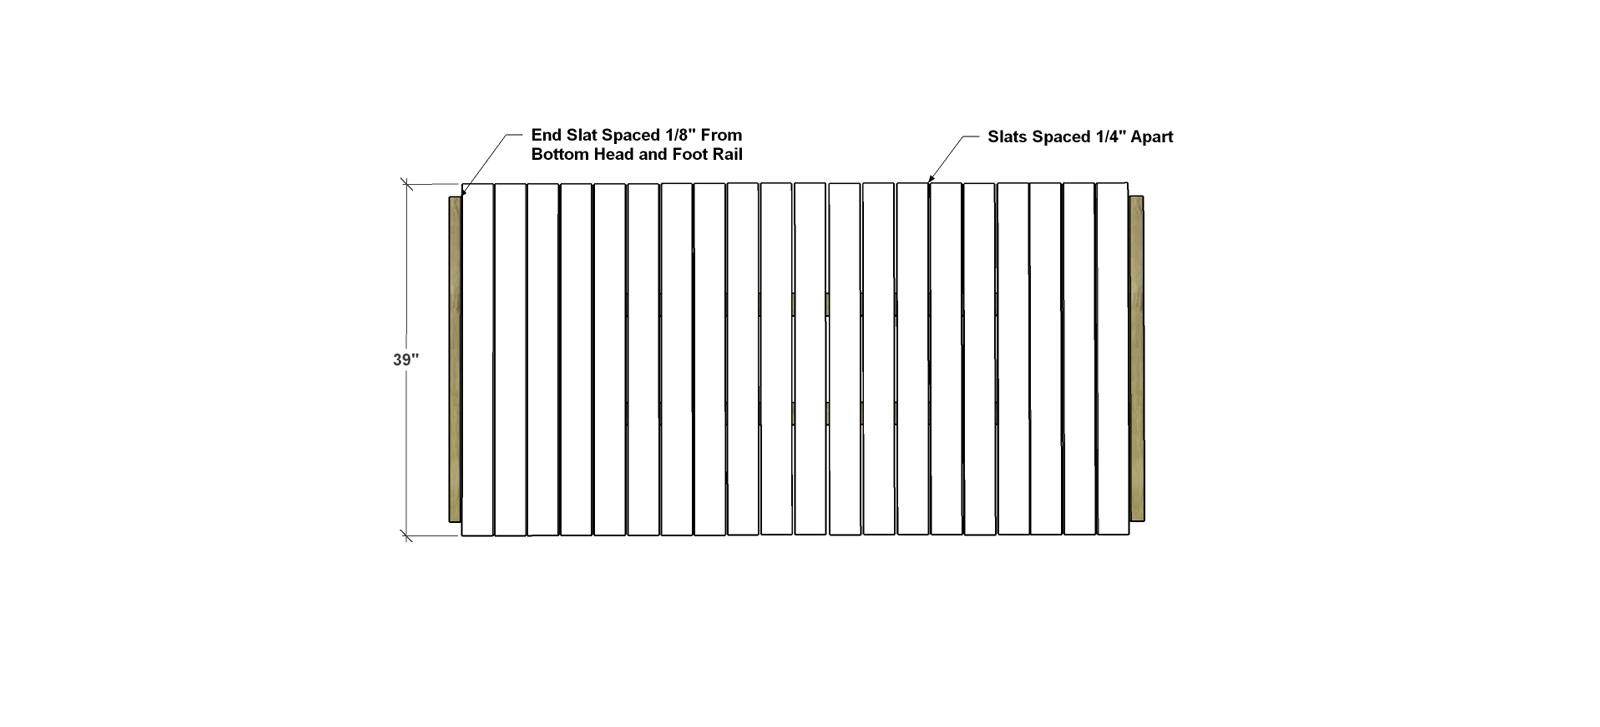
Build your floor: Cut the Slats. Note that the first and last Slat will be ½” shorter on each end – this will allow room for the hardware. Attach the Slats to the Inner Slat Supports as shown with glue and 1-1/4” wood screws. The first and last slat will be spaced about 3/16” from the Bottom Head and Foot Rails. The Slats will be spaced between 1/4” from each other.
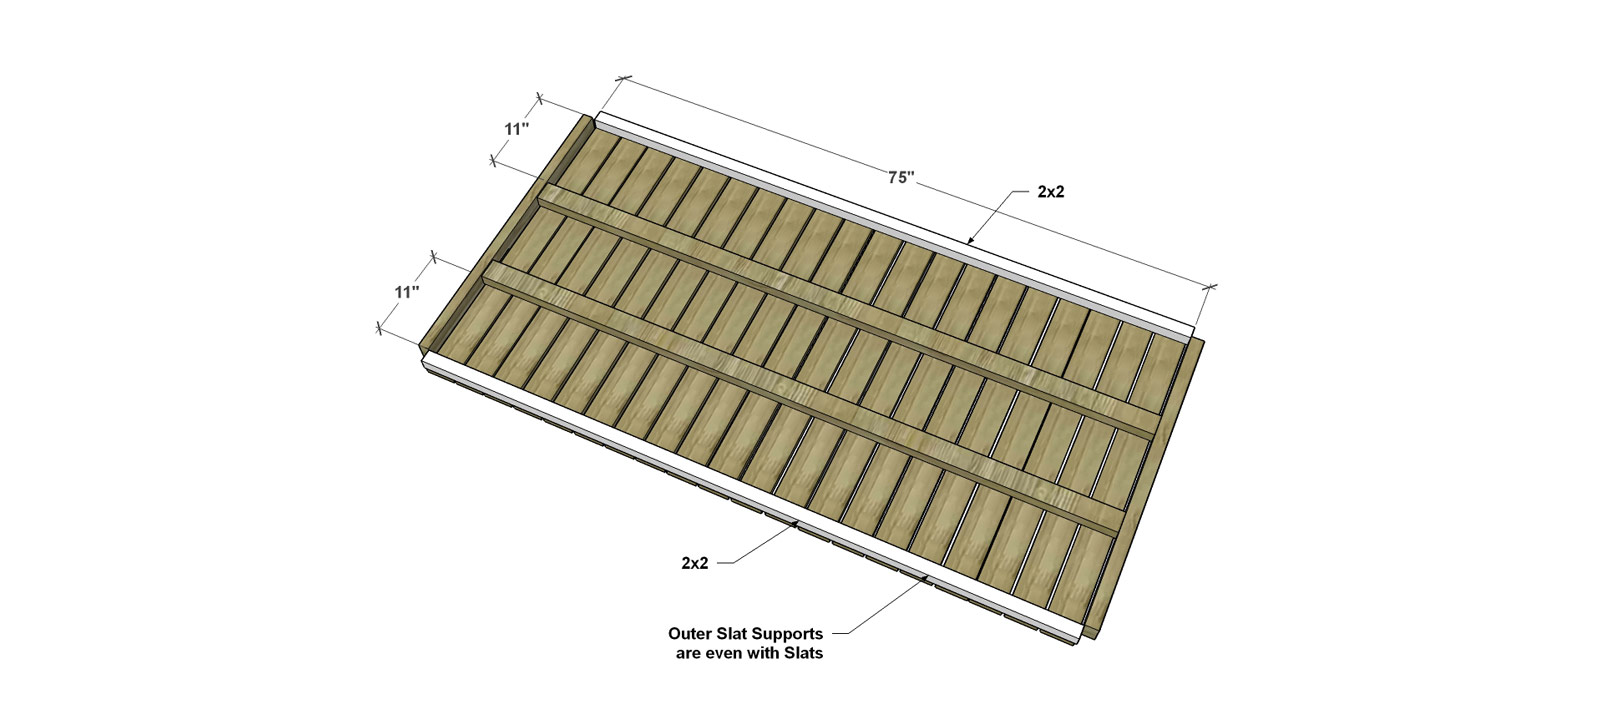
Cut the 2×2 Outer Slat Supports. Attach the Outer Slats Supports to the Slats as shown with glue and 1-1/4” wood screws. (The Slat assembly has been flipped over in this graphic to better show how to line the pieces up.)
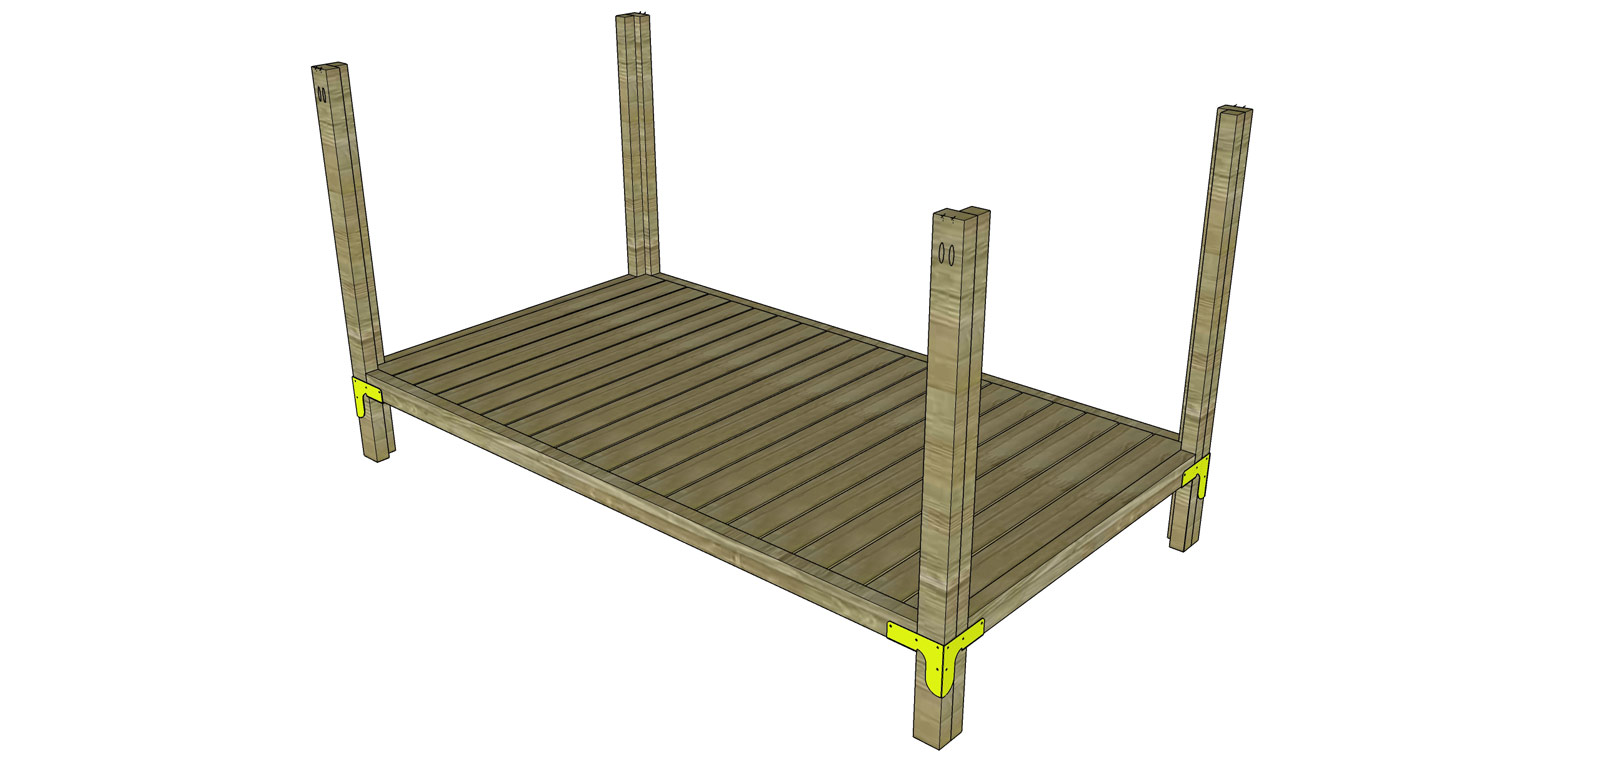
Now things are really coming together for this piece! Place the slat assembly on top of the Legs/Bottom Sides/Brackets. Attach with provided connector hardware.
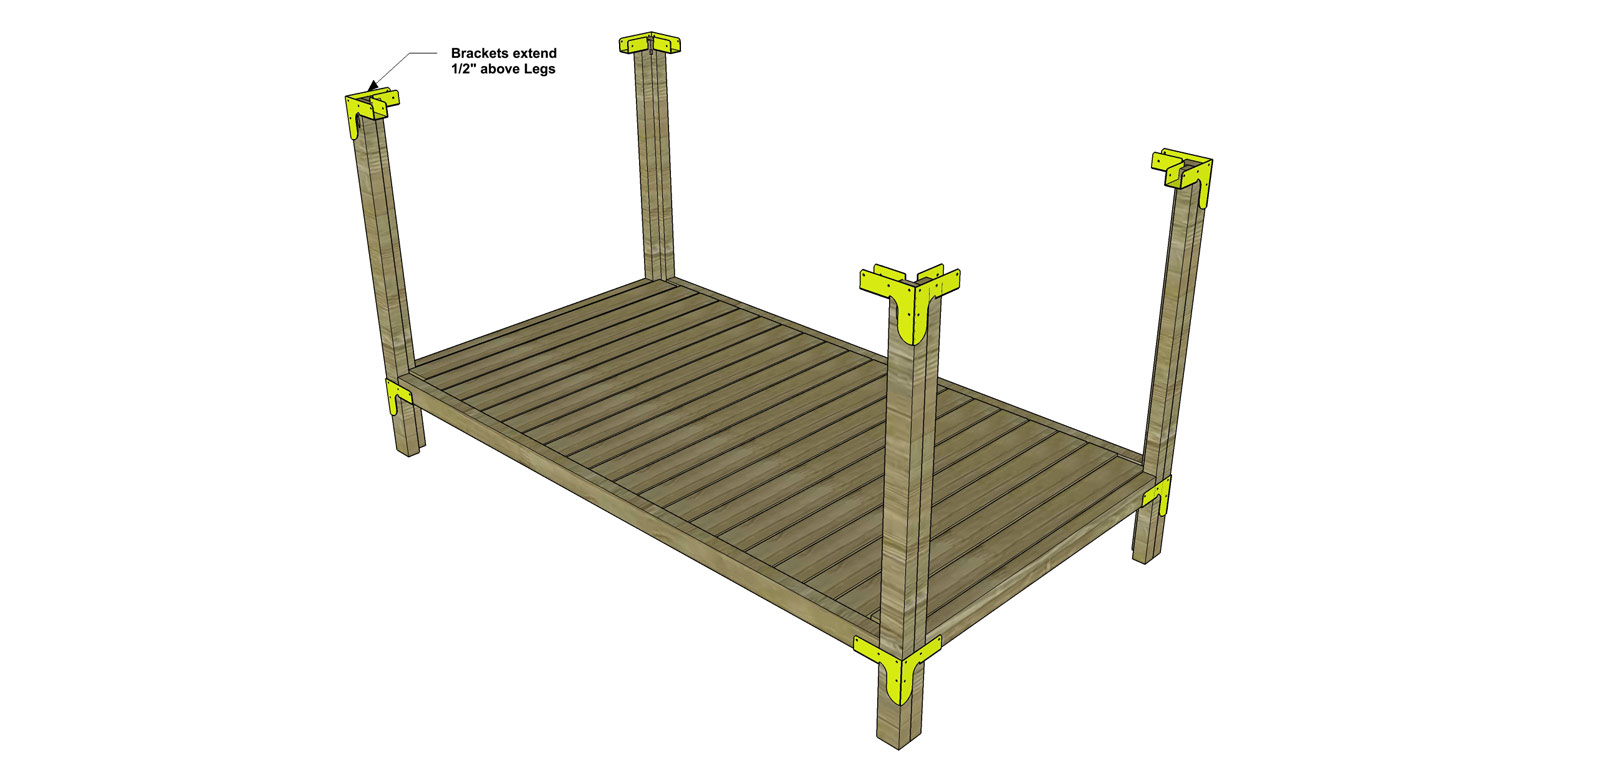
Next, attach the Upper Connectors to the Legs with the provided connector hardware. Note that the top of the connector will sit 1/2” above the top of the Legs.
Cut the pieces for the Upper Sides, Head and Foot. Assemble as shown by “nesting” the pieces into the connectors. Secure wood to the brackets by using the provided connector hardware.
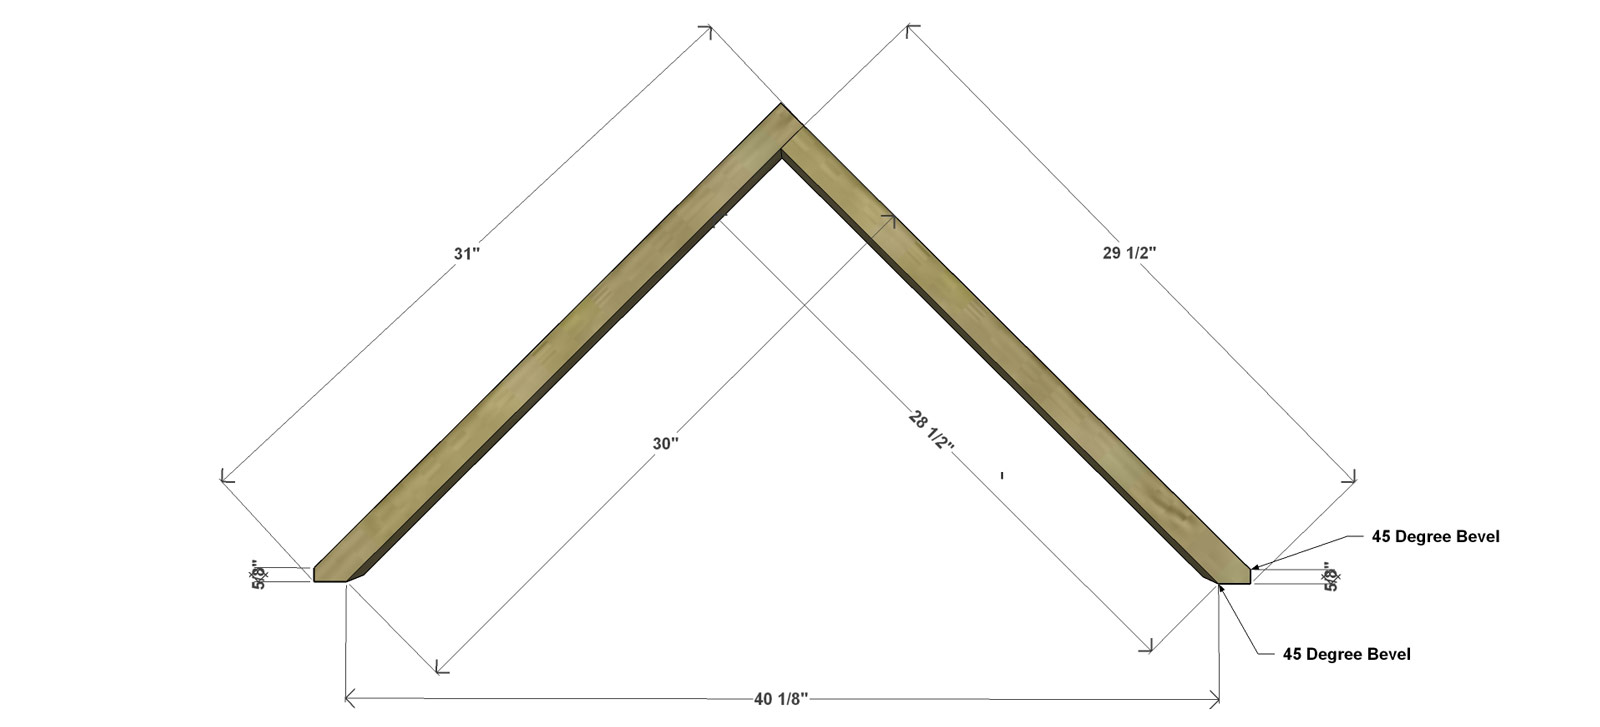
This step will seem a tad tricky, but if you give yourself just a bit of wiggle room in your initial cut for this (2” or so will do it – cut at 33” and 31 ½”), then create your beveled ends and then adjust for length on the top which will be a standard straight cut, you will be just fine!
To create your beveled ends, you will lay your board flat and set against your fence, then tilt your saw blade to a 45⁰ angle. Note that tilt in this context does not mean turn but actually tilt. Your cut angle (the miter) will remain at 0 or 90⁰ depending on how your saw reads.
Make your first bevel cut, then flip the board over to the back side and made a second bevel cut 5/8” from the pointed edge. This will create a flat surface for your pitch to sit and will then carve off enough point to allow it to rest right inside your upper brackets!
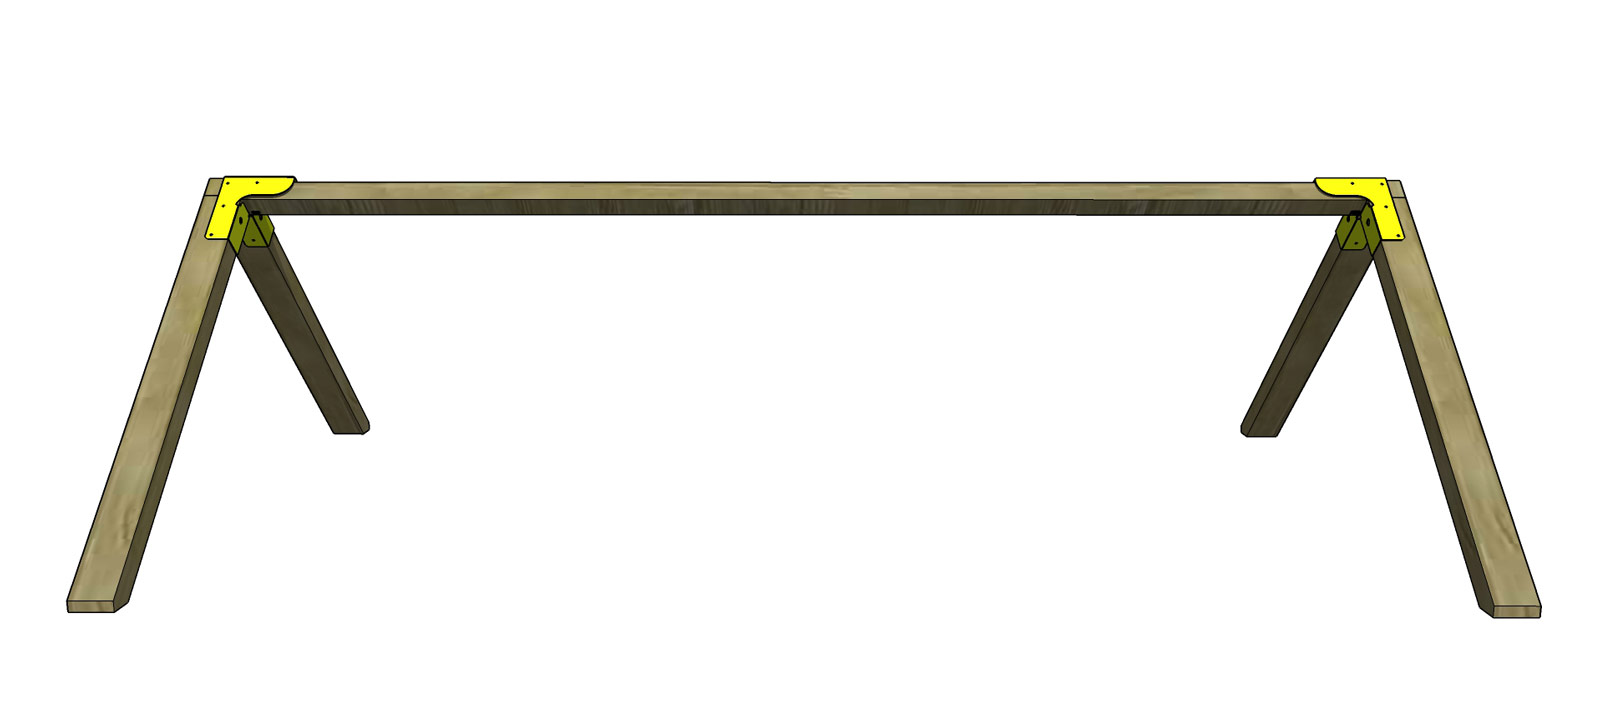
The Roof Beam is simply a 2×2 that runs between your two A-Frame Roof Lines. You will connect all pieces as you see above, using the provided connector hardware, however this beam might also benefit from pocket hole screws on either end to secure it to the pitch in a secondary manner. The connector hardware will be plenty strong, but since we are using the hardware in a non-traditional manner here and it isn’t sitting underneath the beam, it never hurts to give your joints a bit of that something extra, just in case your kiddos get monkey bar bound!
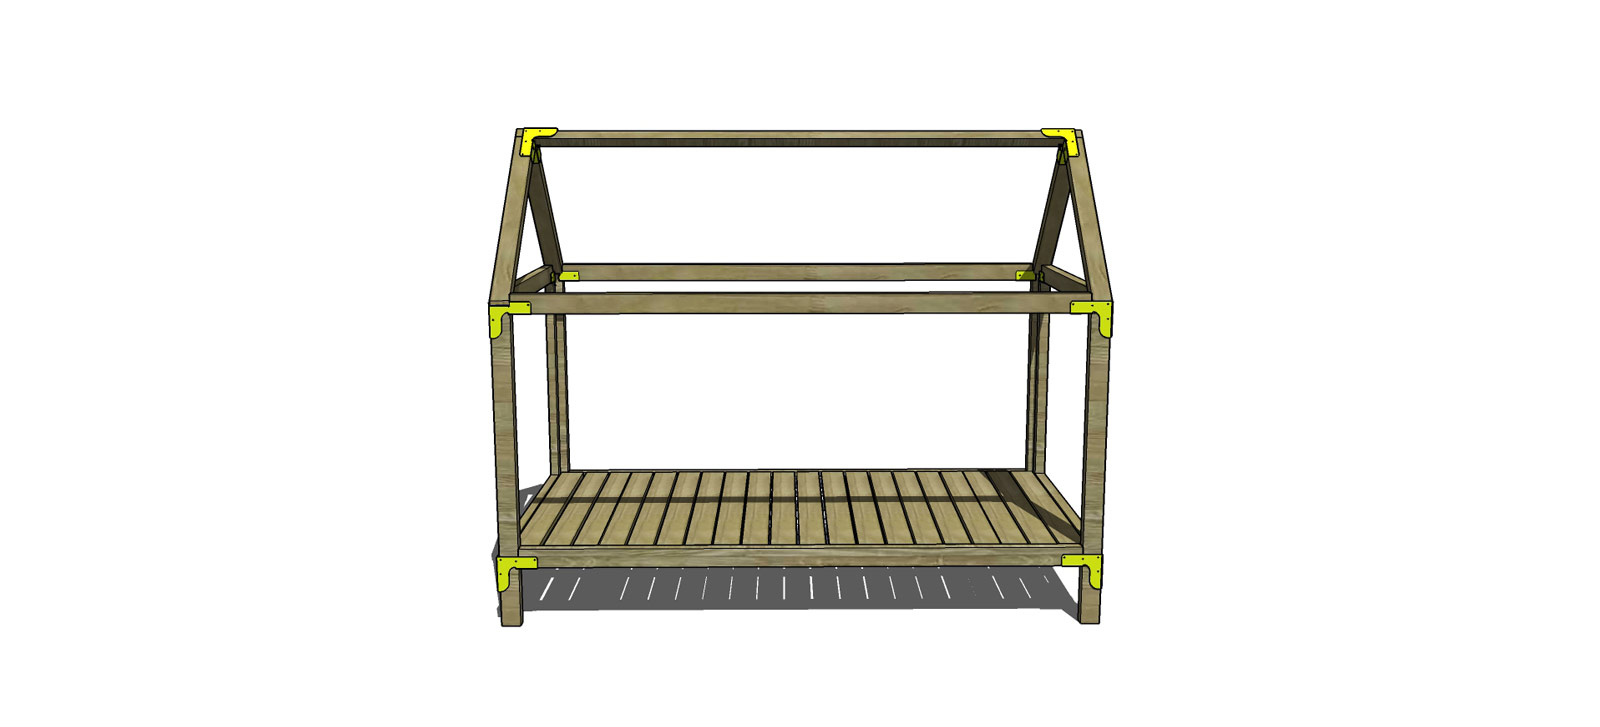
To secure your roof section to your legs, fasten in place with those pocket holes you created in the legs early on! You can also secure from the top down into the legs using a countersink bit and 2” Wood Screws if you prefer. Just be sure to do this on the widest portion of leg unit you can so it doesn’t split apart your 2 boards that form those leg units or split your wood.
Fill any Screw, Nail or Pocket Holes, Sand and Finish as Desired. For Finishing Tips and Tricks visit my Finishing School
// Disclaimer: Some rights reserved. Private use only. Feel Free to link to any of my plans so long as you ONLY use 1 image and provide an ADEQUATE link back to the original source and appropriate plan! Plans from this page are not to be used for commercial purposes or republished without the express written consent of Rayan Turner, The Design Confidential I hope to provide accurate plans, however, I cannot guarantee each plan for accuracy. Not every plan that I post has been built and tested, so you are building at your own risk. It is recommended that you have a clear understanding of how the project works before beginning any project. Please contact me if you find an error or inaccuracy so that I might fix it. // Post May Contain Affiliate Links

Thanks for the plans! I am going to give it a go. If I’m not mistaken, it seems the you would actually need 12 of the 2×3 at 8 feet, right?
That’s what I had to get too! I thought I made some cuts wrong, but I guess I’m not alone!
Hi Anna! How did this DIY go? I’m thinking about pursuing this..