
At long last, we have the plans for a toddler sized house bed playhouse! You all loved the twin sized version so much that I am rolling out the other requested sizes and each will have a slightly different variation in style, from the last. Hopefully this will let you choose your own adventure with this project, depending on your needs and how it will function.
Psst… In addition to the original house bed plans, we now also have plans for a twin sized house bed and a full sized version that all sit on the floor with a platform base and a chimney, as well as a toddler size bed rail that works with this plan, to help keep those little in the bed!
With all of our plans, you are building at your own risk and you should have a firm understanding of building in general before you attempt many of our plans (some are easy as pie and perfect for beginners). With that, go forth, have fun, take lots of pictures and share them in a showcase or on social media with the hashtag #builtTDCtuff and we will share our faves! Be sure to tag @thedesignconfidential on Instagram / FB and @thedesconf on Twitter / Pinterest. Don’t forget… for all of our newer plans, clicking on the images will let them expand to enormous sizes with much greater clarity. The older plans may need updating so please let us know if you need one fixed!


- 5 – 1×4 at 8′
- 2 – 2×4 at 8′
- 5 – 2×3 at 8′
- 1 – 2×3 at 6′
- 1 – 2×2 at 6′
- 2″ Wood Screws
- 2 ½” Pocket Hole Screws
- 1 ¼” Brad Nails
- Pocket Hole Plugs – Paint Grade, Pine, Oak – optional
- Clamps
- Safety Gear
- Wood Filler
- Wood Glue
- Sanding Supplies
- Paste Wax
- Finishing Supplies
- 14 – 1×4’s at 27″ – Slats
- 2 – 2×4’s at 52″ – Lower Side Rails
- 2 – 2×4’s at 27″ – Head and Foot Rails
- 3 – 2×3’s at 49″ – Center and Side Boards
- 4 – 2×3’s at 36″ – Posts
- 2 – 2×3’s at 22 3/4″ – Roof
- 2 – 2×3’s at 21 1/4″ – Roof
- 2 – 2×3’s at 47″ – Upper Side Rails
- 1 – 2×3 at 5 1/2″ – Chimney
- 1 – 2×3 at 8 1/2″ – Chimney
- 1 – 2×3 at 4 1/2″ – Chimney
- 1 – 2×2 at 47″ – Pitch Rail
Before beginning to build, always check in on my site to make sure you have the most up to date set of plans, I occasionally update and change the plans to make the building process easier or to allow for less expensive purchasing of materials! Read through the entire set of instructions and all comments before beginning this project. If you print out or save plans, be sure to check in on my site to be sure you have the most up to date set of plans, as I occasionally update things for ease of building or buying. If you are new to building, read through the GETTING STARTED section and other articles found under the BUILD tab in the menu on my site, it has valuable information about how to get started, tools and techniques. If you are unfamiliar with the finishing process, visit my Finishing school for some tips and tricks for painting like a pro and for special finishing practices. Use glue to secure your joints and Consider Painting or Staining individual sections prior to assembling. This makes the paint application virtually flawless. Coat with a spray on Poly or Wipe on Poly to protect your finish and your piece and it will last for ages. Adhere to all safety standards and guidelines, and be sure you follow safety protocol throughout your build. If you are unsure about whether you are building safely, run a quick online search for the tool or technique you are using, or contact me via email or post to the forum before you move ahead. My contact info can be found in the menu of my site.
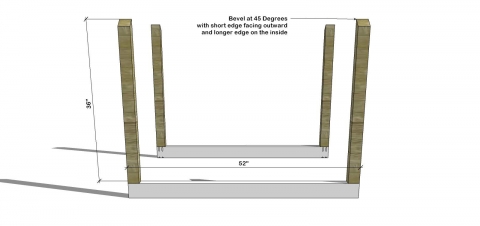
Cut all 6 boards to size and then bevel the 4 posts at a 45° angle, making sure to keep the length of your original cut. You will be making 2 units here and you can drill your pocket holes in the bottom rails as shown, and set your Pocket Hole Jig for 1 1/2″ material. Attach your posts to your Rails using glue and 2 1/2″ Pocket Hole Screws. Your posts will sit with the longer edge on what will be the inside and the same side as your pocket holes.
** When you bevel, you are simply cutting your board at an angle with your board laying flat and your miter saw tilting 45° rather than being turned at a 45° angle as it would be when you miter.
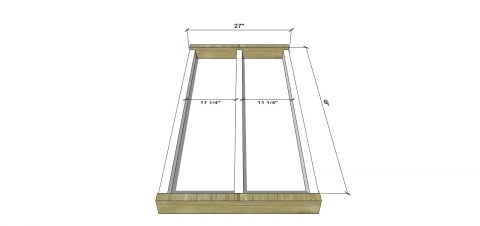
Create your inner frame by cutting your boards to length and attaching them to your Head and Foot Rails. If you prefer for your slats to sit flush with the rails, secure the Center and Side Boards 3/4″ down from the top edge of the Head and Foot Rails and 1/4″ up from the bottom edge. Secure the Center and Side Boards in place using your Kreg Jig set for 1 1/2″ material and 2 1/2″ pocket hole screws and glue. Attach the center board first for ease of securing with pocket hole screws and you can place the pocket holes on the outsides of the Side Boards since they won’t be seen.
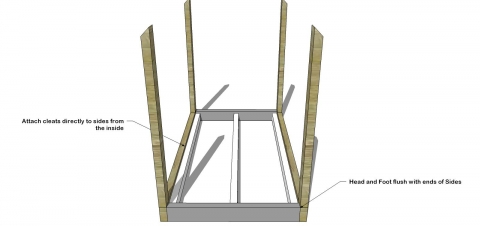
Now you will attach the 3 units you have built by securing the Side Boards to the Bottom Rails with 2″ wood screws and glue. Use your countersink drill bit to pre-drill for screws that will sit flush with your boards. Since you will secure the Side Boards directly to the Bottom Rails, you can simply glue the Head and Foot Rails to the Side Boards if you wish, but there is no need to worry about securing these with screws or pocket holes.
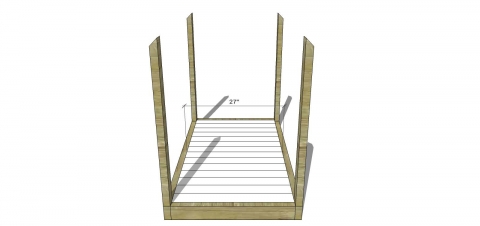
Fasten your slats in place using 1 1/2″ brad nails or finish nails. If you don’t have a nail gun at your disposal, you can opt to use 1 1/2″ screws, just be sure to countersink them using your countersink drill bit to pre-drill and then fasten your screws with a phillips head drill bit. The slats should fit perfectly with no spaces between them, but it would be wise to dry fit just to be sure!
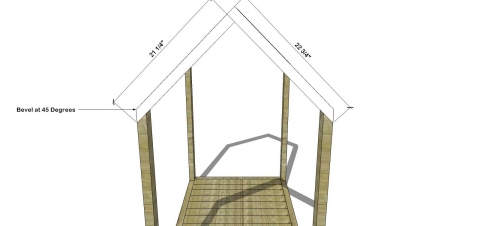
Now for the fun part! This looks so much more complicated than it actually is – promise! Cut your boards to length and note that you will be creating 2 units for the pitch of your roof and that the 2 boards that form one unit are not the same length. One side is going to be 1 1/2″ longer than the other. Once you have them cut to length, bevel one end of each board at 45°. Be sure to keep the length as directed when you do this. Once you have beveled the end of each board, you will create your pitch by securing the straight cut end of one long and one short piece together. Please be sure to set the short piece to the inside edge of the longer piece as you see in the diagram.
Once you have your 2 roof units created, you can secure them to your posts using glue and 2″ wood screws, downward from the top edge of your bevel down into your posts. Be sure to countersink and pre-drill so your screws are flush.
**Note that these pieces will sit flat for beveling as well as when you secure them to create your pitch. The face of your roof boards should match that of your posts and both will have the face side of your board (the 2 1/2″ side) run the length of the bed (the longer sides) rather than the width (the shorter head and foot). This means that when you look at your bed from the side, your boards will appear slightly bigger than they do when you look at your bed from the head or foot, but all should match.

Secure the rails in place using 2 1/2″ pocket hole screws and glue. Cut your rails to length, noting that the top rail that runs the between the 2 roof units is a 2×2 while the Upper Side Rails are 2×3’s. The 2×3’s will sit with the face of your boards (the 2 1/2″ side) facing outward. Place pocket holes for 1 1/2″ material on either end of one face of the 2×3’s and secure to the Posts and Roof Units from the inside of your bed. Note that the top edge of your Rails will actually sit flush with the top edge of your roof board bevel. Place your pocket holes for 1 1/2″ material on either end of your 2×2 Pitch Rail and secure this sitting flush to the very top of the pitch of your Roof. Place your pocket holes on the underside of your Pitch Rail so they aren’t visible.
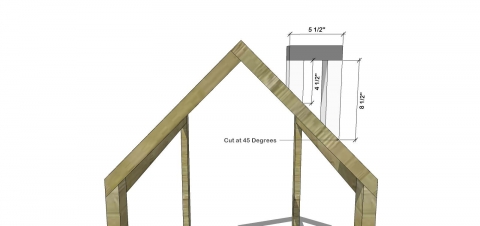
This last step is optional, but pretty adorable. To create a chimney, you will simply cut all 3 pieces to length, and then bevel the legs at 45°. Secure all 3 pieces together using 2″ wood screws and glue and be sure your beveled edges face the same direction and note that this chimney unit will also sit with the face of your board (the 2 1/2″ side) sitting the same way your posts and your roof sit (along the sides) with the sides of your board (the 1 1/2″ side) facing the front and back.
Fill any Screw, Nail or Pocket Holes, Sand and Finish as Desired.
// Disclaimer: Some rights reserved. Private use only. Feel Free to link to any of my plans so long as you ONLY use 1 image and provide an ADEQUATE link back to the original source and appropriate plan! Plans from this page are not to be used for commercial purposes or republished without the express written consent of Rayan Turner, The Design Confidential. By accessing or using any part of the web site, you agree to become bound by the terms and conditions of this website as outlined under Terms of Use. If you do not agree to all the terms and conditions of this agreement, then you may not access the Website or use any services. The information contained in this website is for general information purposes only. The information is provided by The Design Confidential.com and while we endeavor to keep the information up to date and correct, we make no representations or warranties of any kind, express or implied, about the completeness, accuracy, reliability, suitability or availability with respect to the website or the information, products, services, or related graphics contained on the website for any purpose. Any reliance you place on such information is therefore strictly at your own risk. In no event will we be liable for any loss or damage including without limitation, indirect or consequential loss or damage, personal injury or death, or any loss or damage whatsoever arising from loss of information or profits arising out of, or in connection with, the use of this website. I hope to provide accurate plans, however, I cannot guarantee each plan for accuracy. Not every plan that I post has been built and tested, so you are building at your own risk. It is recommended that you have a clear understanding of how the project works before beginning any project. Please contact me if you find an error or inaccuracy so that I might fix it. The Design Confidential.com is inspired by but does not replicate exact designs, any similarities between these plans and items sold at specialty retailers is coincidential and not endorsed by or related to any said retailers. // Post May Contain Affiliate Links

My husband and I have been using your plans to build the twin sized version but that URL is no longer working. Help! We need to finish the last part and can’t get the plans to pull up.
Not to worry I am on it! The url is working now, is it not? Is it just the images that are out of whack? Want to make sure we are seeing the same things! I will fix it asap!
No, the TWIN sized version URL is still not working. Thanks for your help!!
yes i understand what you mean! if you search in the search bar or go to the plans link in the sidebar and find the twin house bed, it will all be in working order. it is just the old url’s that aren’t working properly. the new url’s use https at the beginning and have a / at the end. no clue why, but i will get it sorted out!
I searched but still can’t find the one we were using. It was the twin.m version with the hardware on the corners. My husband especially liked that one because he felt it was sturdier.
dang, i don’t what the problem is… so sorry. here is the link for it! https://www.thedesignconfidential.com/2014/09/free-diy-furniture-plans-how-to-build-an-indoor-outdoor-house-bed-playhouse-outdoor-daybed-lounge/
Twin sized one still isn’t working, even with the link you posted at the bottom of this thread. Would love to start building this weekend. Could you update the link? thanks!
the original link you were using should be up and running now. i figured out what the problem was (eek) so the link i provided above will not work now (sorry – clearly i’m dim witted these days). just in case you don’t have the original link, i believe it is this: https://www.thedesignconfidential.com/2014/09/free-diy-furniture-plans-how-to-build-indoor-outdoor-house-bed-playhouse-outdoor-daybed-lounge/
Any chance you can have the design in metric sizes?
I don’t have that capability just yet, BUT if all goes as planned, it will be coming very soon! Stay tuned…
Hi i was wondering if you could give me the plans for the toddler house bed in cm & mm ??
maybe? i can certainly give it a whirl but it will be just a little bit while i finish ‘fixing’ everything else i broke in the recent move! hang tight and let me see what i can whip up!
Awesome thank you so much. Im wanting to make the toddler house bed for my son ???
Hi did you manage to convert these plans to metric?
Thanks 🙂
Hi, thank you very much for the plans for this toddler´s house. I have a question concerning dimensions in the picture for Step 2: it seems that the width of the boards needs to be 1 and 1/2 inches to match the numbers (3 * 1.5 + 2 * 11.25 = 27). Nonetheless, the lumber is supposed to be 2” thick according to the cut list. Am I looking at it the wrong way?
Thanks again!
Nope you are exactly right! The tricky thing here is that lumber listed as 2″ (2×3, 2×4 etc) is actually 1 1/2″x2 1/2″ or 1 1/2″ x 3 1/2″. This article should help explain things! https://www.thedesignconfidential.com/2010/09/build-it-lumber-and-the-raw-deal/
The article made it very clear. Thank you very much!!
Hi! I was wondering if you possibly had the dimensions for a full size house bed?
Sure do! If you do a search in the search bar for full house bed you should find it. Also you can click on plans in the sidebar and it is on the first or second page!
Is this for a crib mattress size?
it sure is!
Greetings from Romania (the European Union). We decided to make this bed or our toddler girl. Could you please write us back the lenght of the lumber ? I managed to figure out the nominal size vs. the actual size (mm) thing, but is there any standard lenght for the lumber you used as it doesn’t seem to be mentioned in the tutorial. Many thanks for this wonderful playhouse.
Many thanks,
Alexandra
Hi there,
Thank you for posting these plans it is very helpful.
Any suggestions on the best way to do side rails so that our little one doesn’t roll out of the bed?
Thanks so much!
Jennifer
It just so happens we have plans for that very thing! There should be a link at the top of this plan for the toddler rail!
Thanks so much for the plan! I’ve created a slightly edited (bigger) version which I’m planning to build next weekend but I have a few questions before I delve in.
1. What would you recommend to use for clamping the long pieces and right angle of the roof when the glue dries/to stabilise when fixing? The Kreg right-angle clamp looks good but the jaw isn’t wide enough to accommodate 94mm wood (I’m in the UK). I’ve seen ratchet straps used but I’m worried the strain will be unevenly distributed.
2. How do you suggest I connect the top of the roof together? You say ‘secure them’ but don’t mention how. I assume I can either use a countersunk 2″ wood screw from the top edge of the long piece into the meeting edge of the short piece? Alternatively, would two pocket hole screws from the inside of the short edge into the inside edge of the long side work?
3. Also, you say to connect the roof to the posts ‘downward’. Does that mean the wood screws will be vertical and the countersink hole will cut across the 45 degree angle of the roof? Would an alternative be to pocket hole from the inside of the post up in to the roof?
Thanks for your help in advance! Really loving your site and can’t wait to get on with this project.
Hello,
Thanks so much for these instructions – we’re making this for our 2 year old and are so excited. We have 2 questions:
1) How many screws for attaching rails to sideboards – e.g., one screw every 12 inches?
2) is there another way to secure roof unit to posts because I’m not confident in my ability to drill straight down freehand? Can we use pocket holes in the posts instead?
Thanks so much!
melissa
I️ am looking for a material list and of course dimensions for a queen bed with a rail system
With the house peak and railing
Hi! Do you happen to have plans for a queen size mattress? My almost 2 yr old old has a queen size and I’m not having any luck finding plans !
Thank you:)