
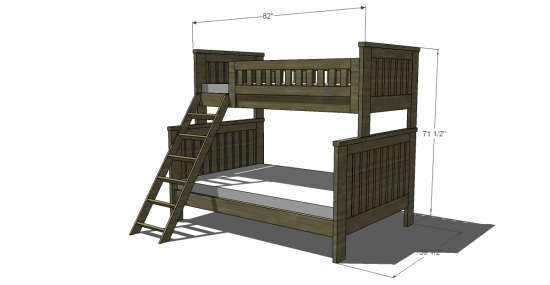
We covered the twin over twin Kenwood Bunk, and now we give you the Twin over Full… enjoy…
$100-$150
- 4 – 2×6 at 8′
- 3 – 2×6 at 6′
- 2 – 2×4 at 8′
- 2 – 2×3 at 8′
- 4 – 2×2 at 8′
- 26 – 1×4 at 8′
- 2 – 1×3 at 8′
- 1- 7/8″ Round Dowel at 2′
- 2-1/2″ Pocket Screws
- 2″ Wood Screws
- 1-1/4″ Pocket Screws
- 1-1/4″ Wood Screws
- Pocket Hole Plugs – Paint Grade, Pine, Oak– optional
- Clamps
- Safety Gear
- Wood Filler
- Wood Glue
- Sanding Supplies
- Paste Wax
- Finishing Supplies
- 4 – 2×6 at 38 1/4″ Lower Legs
- 4 – 2×6 at 30 1/4″ Upper Legs
- 4 – 2×6 at 76″ Bed Rails
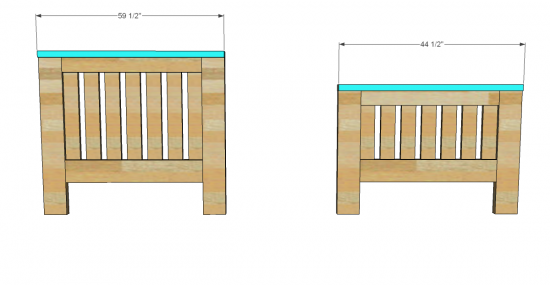
- 2 – 2×6 at 33 1/2″ Head/Foot Bottom Board
- 2 – 2×6 at 48 1/2″ Head/Foot Bottom Board
- 2 – 2×4 at 33 1/2″ Head/Foot Top Board
- 2 – 2×4 at 48 1/2″ Head/Foot Top Board
- 2 – 2×3 at 44 1/2″ Upper and Lower Head/Foot Top
- 2 – 2×3 at 59 1/2″ Upper and Lower Head/Foot Top
- 4 – 2×2 at 76″ Bed Cleats
- 4 – 1×4 at 18 1/2″ Short/Long Rail Guard Legs
- 2 – 1×4 at 69″ Long Rail Rails
- 2 – 1×4 at 51″ Short Rail Rails
- 2 – 1×4 at 65 5/8″” Ladder Rails
- 6 – 1×4 at 16″ Ladder Rungs
- 26 – 1×4 at 13 1/4″ Upper Head/Foot Slats
- 26 – 1×4 at 21 1/4″ Lower Head/Foot Slats
- 11 – 1×4 at 39″ Bed Slats
- 11 – 1×4 at 54″ Bed Slats
- 26 – 1×3 at 6″ Rail Bars
- 4 – 7/8″ Round Dowel at 5″ – Dowels
Before beginning to build, always check in on my site to make sure you have the most up to date set of plans, I occasionally update and change the plans to make the building process easier or to allow for less expensive purchasing of materials! Read through the entire set of instructions and all comments before beginning this project. If you print out or save plans, be sure to check in on my site to be sure you have the most up to date set of plans, as I occasionally update things for ease of building or buying. If you are new to building, read through the GETTING STARTED section and other articles found under the BUILD tab in the menu on my site, it has valuable information about how to get started, tools and techniques. If you are unfamiliar with the finishing process, visit my Finishing school for some tips and tricks for painting like a pro and for special finishing practices. Use glue to secure your joints and Consider Painting or Staining individual sections prior to assembling. This makes the paint application virtually flawless. Coat with a spray on Poly or Wipe on Poly to protect your finish and your piece and it will last for ages. Adhere to all safety standards and guidelines, and be sure you follow safety protocol throughout your build. If you are unsure about whether you are building safely, run a quick online search for the tool or technique you are using, or contact me via email or post to the forum before you move ahead. My contact info can be found in the menu of my site.

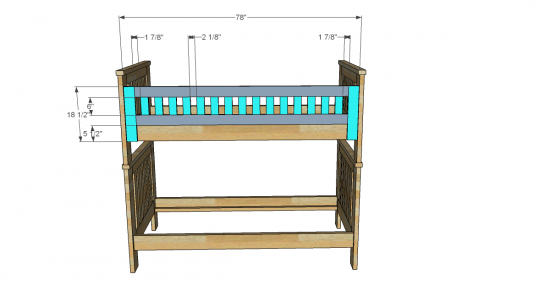
Frame out the Head and Foot Boards: You will need 2 of each pictured here. Use your Kreg Jig set for 1 1/2″ stock and your 2 1/2″ pocket hole screws and glue to secure.
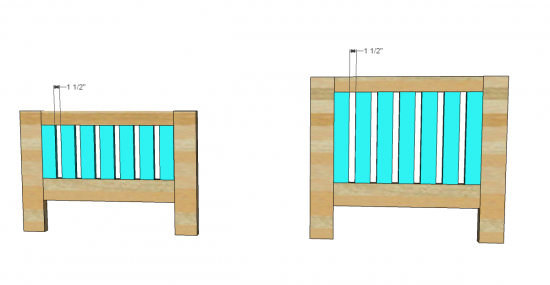
Secure the Slats for one side of Each Head/Foot Board: Use your Kreg Jig set for 3/4″ stock and your 1 1/4″ pocket hole screws and glue. This first round of slats will sit flush with the Legs and Rails on one side of the Head/Foot Boards, leaving space on the other side for the remaining slats. You will ultimately end up with 2 rows of slats here that stagger.
Tack on the Top Boards: Use 2″ Wood Screws and Glue to secure the top boards to each Head/Foot Board for both the upper and lower units. Be sure to countersink these screws.
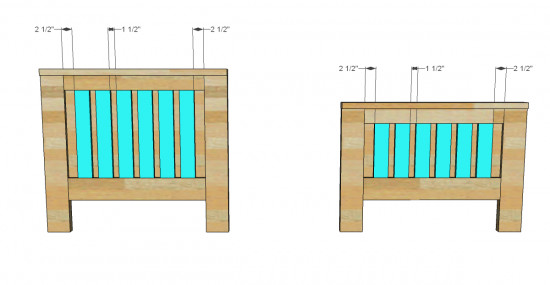
Fasten the Remaining Slats in Place: These will stagger in comparison to the slats you have already fastened in place and to secure you will use your Kreg Jig set for 3/4″ stock and your 1 1/4″ pocket hole screws and glue.
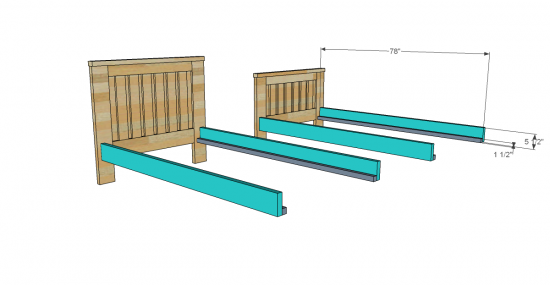
Create the Bed Rails and Then Secure: The Bed Rails will be 2×6’s with 2×2 cleats fastened along the bottom edges. Secure in place using 2″ wood screws and glue, and be sure both pieces sit flush on the bottom edge. To fasten the Bed Rails to the Head/Foot Boards use your Kreg Jig set for 1 1/2″ stock and your 2 1/2″ pocket hole screws and glue to secure. The bottom edge of the Rails will sit 8″ up from the bottom of the legs and will sit flush with the bottom boards on the Head/Foot boards.
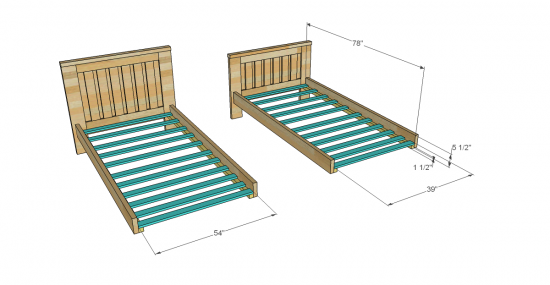
Tack down your Slats: Use 1 1/4″ wood screws and glue to fasten the supporting slats to the cleats. This will act as a box spring of sorts for your mattresses, so you won’t be needing box springs for this project.
Add the Long Guard Rail to the Top Bunk Unit (the one with shorter head/foot boards): Build the Guard Rail using your Kreg Jig set for 3/4″ stock and your 1 1/4″ pocket hole screws and glue. You will place your pocket holes in the horizontal Rails, fastening them to the Vertical Legs of the unit, and also in the Slats fastening them to the Horizontal Rails. Then fasten the Guard Rail Unit to the Bed by securing it to the Bed Rails and to the Head/Foot Board. Use your 2″ wood screws and glue to secure to the Rail and your Kreg Jig set for 3/4″ stock and your 1 1/4″ pocket hole screws and glue to fasten to the Head/Foot Boards.
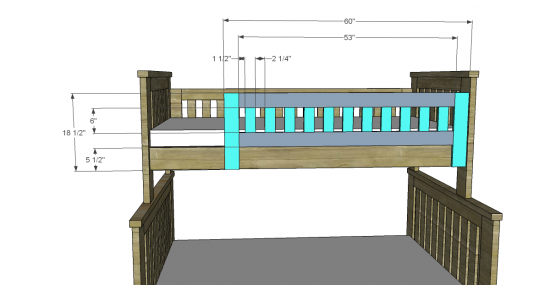
Add the Short Guard Rail to the Top Bunk Unit (the one with shorter head/foot boards): Build the Guard Rail using your Kreg Jig set for 3/4″ stock and your 1 1/4″ pocket hole screws and glue. You will place your pocket holes in the horizontal Rails, fastening them to the Vertical Legs of the unit, and also in the Slats fastening them to the Horizontal Rails. Then fasten the Guard Rail Unit to the Bed by securing it to the Bed Rails and to the Foot Board. Use your 2″ wood screws and glue to secure to the Rail and your Kreg Jig set for 3/4″ stock and your 1 1/4″ pocket hole screws and glue to fasten to the Foot Board.
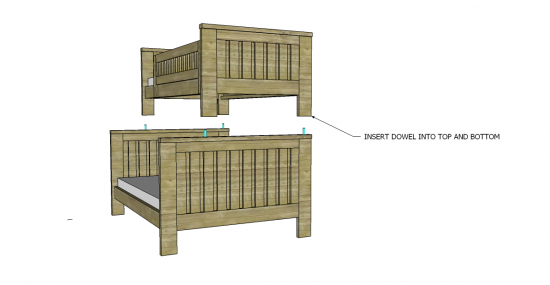
Stack the Units: To do this you will need to bore a hole in the Top of the Bottom Unit Legs and in the Bottom of the Top Unit Legs that is 1″ in diameter and 2 1/2″ deep. Set your dowels into the bottom unit hole, then lift (carefully) the Top unit on top of the bottom unit and set onto the dowels that are sticking out. This is how you keep them stacked, but note that you can, at any time, un-stack them and use them as 2 individual beds.
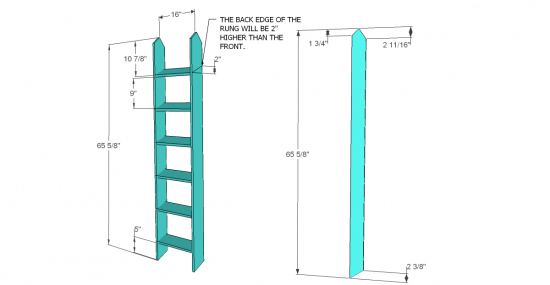
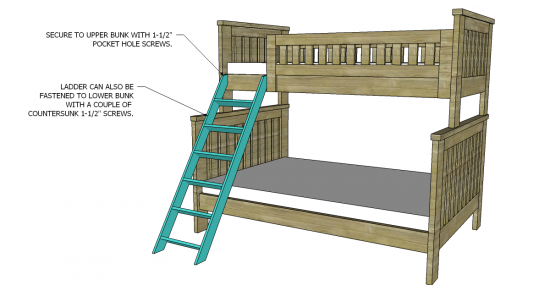
Build the Ladder: Note that the outer corners of the ladder are angled for safety. You can use your Kreg Jig set for 3/4″ stock and your 1 1/4″ pocket hole screws and glue. Secure the Ladder to the Bunk in the same manner by using your Kreg Jig to secure the ladder to both the Top and Bottom Unit Rails. You can also use your 2″ wood screws and glue to secure from the inside of the Rails.
Fill any Screw, Nail or Pocket Holes, Sand and Finish as Desired. For Finishing Tips and Tricks visit my Finishing School
**Disclaimer: Some rights reserved. Private use only. Feel Free to link to any of my plans so long as you provide an adequate link back to the appropriate post! Plans from this page are not to be used for commercial purposes or republished without the express written consent of Rayan Turner, The Design Confidential I hope to provide accurate plans, however, I cannot guarantee each plan for accuracy. Not every plan that I post has been built and tested, so you are building at your own risk. It is recommended that you have a clear understanding of how the project works before beginning any project. Please contact me if you find an error or inaccuracy so that I might fix it.

Hi! We are looking at your plans and thinking of building this design. Do you have the modified plans for a twin over queen bed design? We have never attempted this before but your plans seem very descriptive. Will we need to buy the Krueger jig set or can they be rented? Thank you for the assistance.
i don’t have twin over queen, but i would be happy to draft plans as soon as i get all of the missing links and images on all the other plans all fixed (they got lost in the move)! OR if you are feeling brave and you are in a hurry, you can simply alter these plans to add about 8″ to every piece (for the bottom bed, not the top) that runs width-wise. This plan is for a mattress that is 52″ wide, so actually if you know the dimensions of your personal mattress, you can add that number of inches to every board that runs parallel to the headboard and footboard and you will be good to go. for this design, you will add more vertical boards to the head and foot sections till you have added the width you need!
Also, I am not sure if you can rent Kreg Jigs. You may be able to. You can also purchase a smaller jig if you don’t think you will use it much beyond this project (like the Kreg Jig Jr.) it is definitely doable, just a bit more tedious to do this way with so many pieces that need pocket holes. Hope that helps :/ Probably not that helpful!
What is the maximum weight load you would put on the full and twin in a stacked orientation?
Hi! I’m so glad I found your site! We’d like to make this into a full over full for our boys. Would you suggest using 4×4 for the legs and the 2×4 for the top of the head/footboards? We will also change the ladder, and follow the twin over twin plan you posted. Thanks!
Yep that sounds perfect! You will also want to add a center joist for the top bunk so that it supports the slats up there but otherwise modifying the ladder and swapping out the legs would be perfect!
Also like Patrick was asking what is the maximum weight for the top bunk we have teenagers
Your lumber list states 2-2×3’s – 8′ long.
The cut list calls for 2-2×3’s at 44 1/2″ and 2-2×3’s at 59 1/2″. I am curious how to get those 4 boards out of the 2-8’x2x3’s?
It would have been handy to know how far the side rails are inset on the head/foot boards, Depending on the illustration you’re looking at, they appear to be flush with the edges of the head/foot boards and not inset.
Hi, this looks great. What is the maximum weight that the top bunk can withstand? Also, do you have a plans for double over double? Thanks!
Hi,
I used your toddler bed plans and we loved it. We stayed in a beach condo in Mexico and they had a similar design but with a trundle twin bed at the bottom. Do you have any plans for a trundle bed, Ideally double too but I think a twin sie would work.
Thanks