
We have such a special treat today my lovely fellow builders! I’ve teamed up with one of my favorite sweet friends, Lindsay of Makely Home to bring you a gorgeous set of plans and a fabulous showcase all in one! She has worked so very hard on building and finishing this beauty so I hope you will head over to visit her and gush over her build! She will be sharing more beautiful images, details about their experience building from my plans, as well as a bit about how this collaboration came to be! It was so much fun working with her on this and I adore having the chance to mix business with pleasure – so to speak. It isn’t all that often that I have the chance to work on a project for this site with someone I adore in real life, so yahoo for that.
- Brad Nailer or Nail Gun
- Safety Gear
- Tape Measure
- Saw – Jig Saw, Circular, Table, or Miter Saw
- Drill
- Square
- Sander
- Kreg Jig – if you build frequently, invest in this one
- 1 1/2 sheets of ¾” plywood (2nd sheet – only need 2’x2′ area)
- 1 sheet 1/2″ plywood
- 1 sheet 1/4″ plywood (or if your store will sell you a 1/2 sheet at 2’x8′ then awesome)
- 1- 2×6 at 6′
- 2- 2×3 at 8′ (1 front/back + 2 side per board)
- 4- 1×6 at 8′ (3 at 26 1/2 + 1 at 16 1/4 per board for 2 boards, then 5 at 16 1/4 per board)
- 2- 1×8 at 8′ (3 per board)
- 1-1/4″ Pocket Hole Screws
- 2 ½” Pocket Hole Screws
- 1-1/4” Brad Nails
- 6- pair of 16″ side mount drawer glides that have 1/2″ clearance
- Drawer pulls
- Anti Tip Kit
- 3/4″ Edge Banding – optional
- Pocket Hole Plugs – Paint Grade, Pine, Oak – optional
- Clamps
- Safety Gear
- Wood Filler
- Wood Glue
- Sanding Supplies
- Paste Wax
- Finishing Supplies
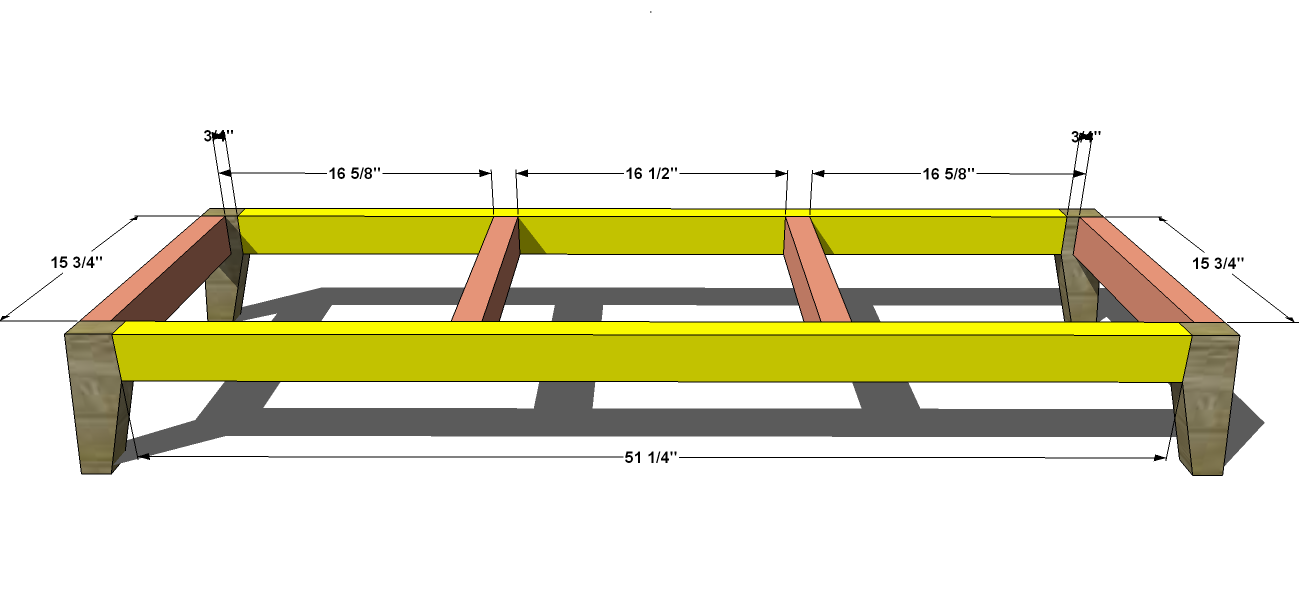
- 4- 2×6 at 7 3/4″ legs
- 4- 2×3 at 15 3/4″ frame rails
- 2- 2×3 at 51 1/4″ frame front/back
- 6- 1×6 at 26 1/2″ drawer backs
- 12- 1×6 at 16 1/4″ drawer sides
- 6- 1×8 at 27 11/16″ drawer front
- 2- 3/4″ ply at 20″x22 1/4″ sides
- 2- 3/4″ ply at 20″x57 1/4″ top/bottom
- 1- 3/4″ ply at 19 1/4″ x 22 1/4″ center
- 6- 1/2″ ply at 26 1/2″ x 5 3/4″ drawer faces
- 6-1/2″ ply at 26 1/2″ x 17″ drawer bottoms
- 1- 1/4″ ply at 57 1/4″ x 22 1/4″ back
Before beginning to build, always check in on my site to make sure you have the most up to date set of plans, I occasionally update and change the plans to make the building process easier or to allow for less expensive purchasing of materials! Read through the entire set of instructions and all comments before beginning this project. If you print out or save plans, be sure to check in on my site to be sure you have the most up to date set of plans, as I occasionally update things for ease of building or buying. If you are new to building, read through the GETTING STARTED section and other articles found under the BUILD tab in the menu on my site, it has valuable information about how to get started, tools and techniques. If you are unfamiliar with the finishing process, visit my Finishing school for some tips and tricks for painting like a pro and for special finishing practices. Use glue to secure your joints and Consider Painting or Staining individual sections prior to assembling. This makes the paint application virtually flawless. Coat with a spray on Poly or Wipe on Poly to protect your finish and your piece and it will last for age

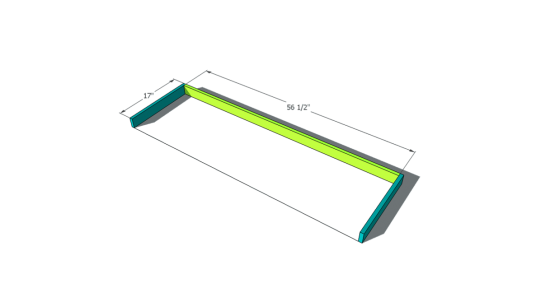
Use a 2×6 to cut your leg pieces. Create your guidelines as seen in the second image below and cut as indicated. Use a circular saw if possible.

Build your Box. The side panels will sit inside the top and bottom panels and they will sit flush on the front, yet set in ¼” on the back side. This will allow for the back panel later. The bottom of your box will overhang your base by ¾” all the way around. Use 1 ¼” pocket hole screws with your pocket hole jig set for ¾” material and your pocket holes along the top and bottom of the panel (on the inside), and glue to fasten.

Fasten the Center Panel in Place. The center panel will sit back ¾” on the front side and ¼” on the back side and should be centered as precisely as possible between the side panels. Use 1 ¼” pocket hole screws with your pocket hole jig set for ¾” material and your pocket holes along the top and bottom of the panel, and glue to fasten.

Build Your Drawer Boxes. You will make of these 6 exactly the same way. In step 9, your drawer fronts will differ in their placement for 3 of your 6 drawers, but in this step and the next they are identical. The bottom will sit flush with the outside perimeter of the sides and back and can be secured using your brad nails and glue or 1” wood screws with a countersink bit to predrill and glue.

Secure your Drawer Faces and Attach Drawer Glides. The faces will be cut to size from your ½” plywood, and will sit flush with the drawer box on the top, sides, and bottom. The drawer glide should sit 3” up from the bottom of the box and 1” back from the front edge once the face has been attached.

Cut and Notch Your Drawer Fronts. Cut your fronts to size and then notch out the handle area using a jig saw. Do not attach Drawer Fronts to the drawers themselves yet.

Attach Drawer Glides to Side and Center Panels. Attach Glides in locations indicated below. Work from the back for your measurements so they all end up at the same location (the center panel is set back farther than the sides from the front edge, so the dimensions are different from that side). There will be 1/8” spacing around all edges of each drawer front and the placement of the drawer glides takes this into consideration. For the bottom and center pair of drawer glides, measurements are from the bottom and back edge of the side and center panels and line up with the bottom edge of the drawer glides. For the top pair 2 of drawer glides the measurements are either from the top and back edge of the side and center panels or the bottom and back edges if you prefer, BUT they should still align with the bottom edge of the drawer glide. All glides should sit 2 ¼” in from the back edge.
**Also noted on the diagram below is the relative space each drawer will occupy including the 1/8” spacing on the bottom for each drawer, except for the top drawers which will have an additional 1/8” spacing on the top as well.

Insert Drawers. Line up the drawer glides and insert drawers in their respective locations. In the diagram below, the drawer front is attached, however you will actually attach the drawer front once the drawers have been inserted into the unit so you can adjust for any amount you might be ‘off’.

Attach Drawer Fronts. You can do this after you have your drawers installed so that you can adjust for any slight discrepancies, but the location of the drawer fronts should be approximately what you see shown below in the diagram. There will be 1/8” spacing between the outside edge of the drawer front and the inside edge of the side panels on your box. There will also be 1/8” spacing above and below each drawer. There will be 1/8” spacing between the left and right drawers as well, but since they divide the space remaining, the overhang on the inside edges of your drawer fronts will be different than on the outside edges so I recommend using the outside edges as your guide. The Fronts will sit flush with the drawer on the bottom edge, will overhang 1 ½” on the top and 3/8” on the outside edge. The drawer shown below in the diagram would be a drawer for left hand side of your unit if you are facing your unit. These measurements for the overhang will be on the other side for the right hand side drawers. Attach drawer fronts with 1 1/4” brad nails and glue, where the front meets the sides of your drawer box (otherwise the nails will stick out the back of the drawer face).

Attach the Back Panel. Use 1 ¼” brad nails and glue to attach your back to the side and center panels.
Fill any Screw, Nail or Pocket Holes, Sand and Finish as Desired.
// Disclaimer: Some rights reserved. Private use only. Feel Free to link to any of my plans so long as you ONLY use 1 image and provide an ADEQUATE link back to the original source and appropriate plan! Plans from this page are not to be used for commercial purposes or republished without the express written consent of Rayan Turner, The Design Confidential. By accessing or using any part of the web site, you agree to become bound by the terms and conditions of this website as outlined under Terms of Use. If you do not agree to all the terms and conditions of this agreement, then you may not access the Website or use any services. The information contained in this website is for general information purposes only. The information is provided by The Design Confidential.com and while we endeavor to keep the information up to date and correct, we make no representations or warranties of any kind, express or implied, about the completeness, accuracy, reliability, suitability or availability with respect to the website or the information, products, services, or related graphics contained on the website for any purpose. Any reliance you place on such information is therefore strictly at your own risk. In no event will we be liable for any loss or damage including without limitation, indirect or consequential loss or damage, personal injury or death, or any loss or damage whatsoever arising from loss of information or profits arising out of, or in connection with, the use of this website. I hope to provide accurate plans, however, I cannot guarantee each plan for accuracy. Not every plan that I post has been built and tested, so you are building at your own risk. It is recommended that you have a clear understanding of how the project works before beginning any project. Please contact me if you find an error or inaccuracy so that I might fix it. The Design Confidential.com is inspired by but does not replicate exact designs, any similarities between these plans and items sold at specialty retailers is coincidential and not endorsed by or related to any said retailers. // Post May Contain Affiliate Links

I can not see the design plans. Something is wrong with the website.
Yep totally right, I am working on it as we speak! Hold tight and all will be well!
How do you attach the drawer fronts to the drawer and keep even spacing if you can’t screw the drawer fronts in position and you will only know if they are attached evenly once the drawer is shut?
If you are more comfortable calculating the overhang of the front and attaching it prior to placing it, please feel free. Otherwise most people find it easiest to use shims or tile spacers to ensure 1/8″ all the way around. Hope that helps!
I love this build and just finished it. Thank you ! Do you by chance have any plans for a tall dresser ? Im tempted to try to modify this build in to a tall one but it might be a little out of my skill level.
Yahoo! Can we showcase your build? So do you mean something like a highboy version of this dresser? If so, I don’t have anything in the steppe collection that is taller but I do have a few taller dressers in other collections. If you want the steppe to coordinate, I would be happy to draft plans, it would be a lovely piece for sure!
I would also love to see a taller version of this dresser! Were you thinking about stacking all drawers instead of having them side by side? That would be fabulous!
Is there a link to download the plans? I am looking forward to trying this out very soon.
Eek, yes and no. There should be a print/save feature but I don’t think I have turned it on. I will be home in a few hours and will get it sorted out!
Loving this design so much! Did you end up making it available to download? Thanks!!
Hello! I am also looking for these plans for download. Thank you!
Looks like the pictures on most of your plans have a broken link!
This is great! Do you have other plans? I would also be interested in a more stacked dresser
Did you use Birch Wood Veneer Edgebanding for the exposed edges? i’m really curious how you concealed the ply edges.
I would love to know this as well.
Should the center piece be 19″ instead of 19 1/4″? If you have a 1/4″ and 3/4″ insets on each side this would make the center piece 19″ instead of 19 1/4″ correct? Also, do you have a Google SketchUp of these plans? Really good stuff! Thanks for provide this guide!
Should the top/bottom depth be 20 1/4″ instead of 20″? This would allow 1/4″ to cover the back and the center piece dimensions and location would make more sense.
That is one of the few math errors (or alternatively the left/right panels should be 19.75″ deep). The others I’ve noticed:
– “the bottom of the box should overhand the frame by 3/4″ on all sides”, yet the stated measurements are 15.75″ for inner rail + 2″ foot + 2″ foot = 19.75″ depth and yet the box bottom is only 20″ deep.
– the center panel is set back only 3/4″ from the front, but the drawer fronts say 1″ lumber.
Not complaining, but if you started nailing things together cut everything and realized some of these after it would be hell to take it apart and correct.
the dimensions on the plan take into consideration the actual dimensions of the lumber. for example, 1″ lumber is usually only 3/4″ thick. this article will help explain: https://www.thedesignconfidential.com/2010/09/build-it-lumber-and-the-raw-deal/
Hi There… love the plan… I do have a small issue with the measurement of the drawers sides, backs and fronts… The cut list has them ‘6- 1×6 at 26 1/2″ drawer backs, 12- 1×6 at 16 1/4″ drawer sides and 6- 1×8 at 27 11/16″ drawer front’, but when i look at the drawings, i see no height for the sides and backs. Can you confirm what they are suppose to be? Should they be 5 3/4″?
Hi! You don’t see any height listed because this plan calls for using a 1×6 board for these pieces, so if you were to purchase a 1×6 board as outlined, all you need to do is cut it to length! BUT, if you plan to use plywood instead or have your pieces milled, the height would be 5 1/4″.
How do you cover the edge grain of the plywood, speaking about the top, bottom and side panels?