
We are slowly (very slowly) making our way through the outdoor pieces with cushions to accomodate less expensive cushion options, and today’s plan is our next victim! We covered the matching Free DIY Furniture Plans to Build an Outdoor Reef Chair with Modifications for Cushions from Target and now we do exactly the same for the sofa!
The cushion options here that will work best are either the Threshold Outdoor Cushion set or a less expensive option is a combination of the Outdoor Deep Seating Cushions and Outdoor Back Cushions.

- Tape Measure
- Saw – Jig Saw, Circular, Table, or Miter Saw
- Drill
- Multi-Square and Carpenter’s Square
- Sander
- Kreg Jig – if you build frequently, invest in this one.
- Nail Gun – optional
- Router with Patterning bit – or bit set – optional
- 5 – 2×4 at 8’
- 6 – 1×4 at 8’
- 4 – 2×4 at 27 1/4″ – Legs
- 2 – 2×4 at 33 3/4” – Side Frames
- 2 – 2×4 at 36 3/4” – Top
- 1 – 2×4 at 73” – Top
- 2 – 2×4 at 66” – Seat Support
- 1 – 2×4 at 66” (ripped to 2-3/4” wide) – Seat Support
- 1 – 2×4 at 9” – Center Leg
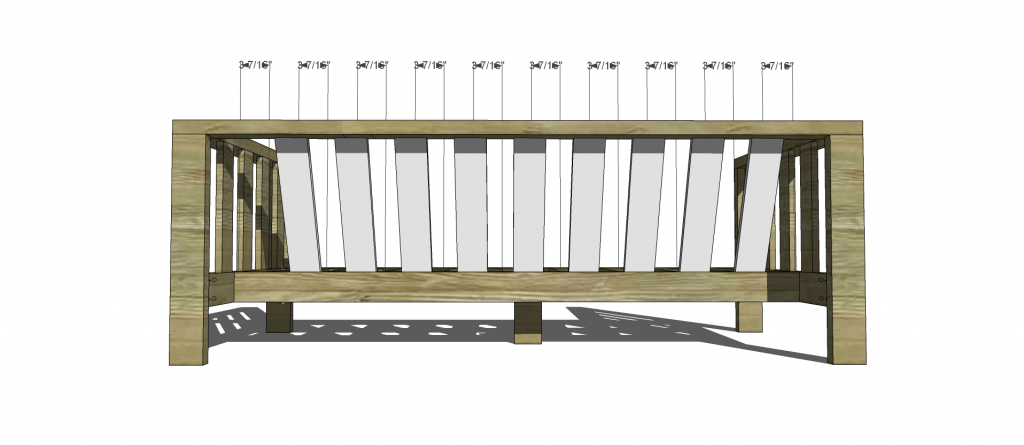
- 9 – 1×4 at 24” – Seat Slats
- 8 – 1×4 at 14-3/4” – Side Slats
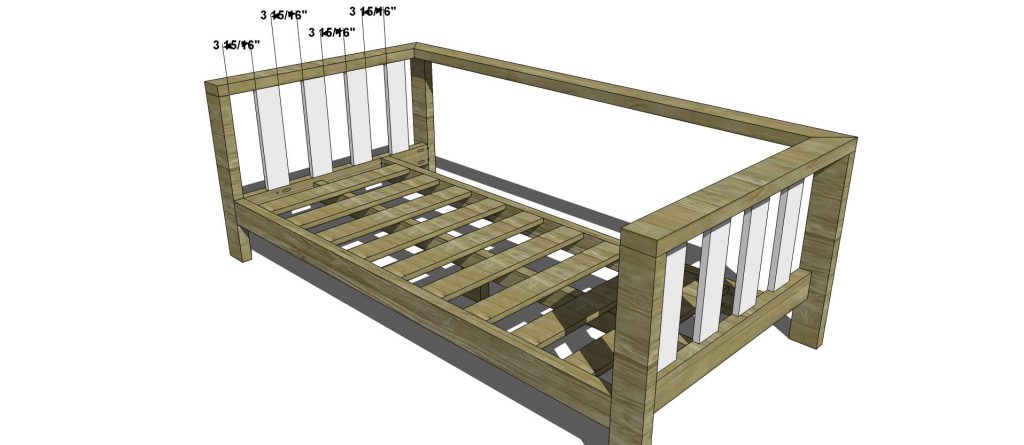
- 9 – 1×4 at 16-3/4” – Back Slats
Before beginning to build, always check in on my site to make sure you have the most up to date set of plans, I occasionally update and change the plans to make the building process easier or to allow for less expensive purchasing of materials! Read through the entire set of instructions and all comments before beginning this project. If you print out or save plans, be sure to check in on my site to be sure you have the most up to date set of plans, as I occasionally update things for ease of building or buying. If you are new to building, read through the GETTING STARTED section and other articles found under the BUILD tab in the menu on my site, it has valuable information about how to get started, tools and techniques. If you are unfamiliar with the finishing process, visit my Finishing school for some tips and tricks for painting like a pro and for special finishing practices. Use glue to secure your joints and Consider Painting or Staining individual sections prior to assembling. This makes the paint application virtually flawless. Coat with a spray on Poly or Wipe on Poly to protect your finish and your piece and it will last for ages. Adhere to all safety standards and guidelines, and be sure you follow safety protocol throughout your build. If you are unsure about whether you are building safely, run a quick online search for the tool or technique you are using, or contact me via email or post to the forum before you move ahead. My contact info can be found in the menu of my site.
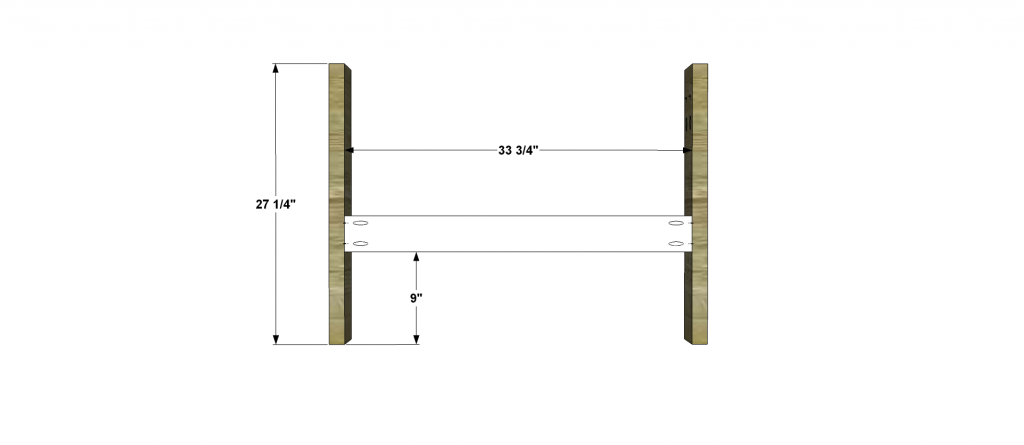
Cut the pieces for the sides. Set the Kreg jig for 1-1/2” material and drill pocket holes in each end of the 33 3/4” piece as well as the top only of the legs. Assemble using glue and 2-1/2” pocket hole screws.
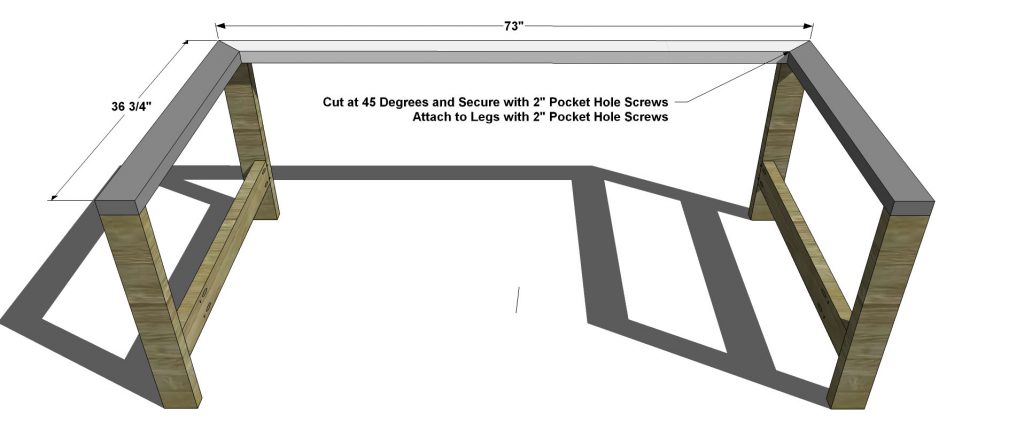
Cut the pieces for the top. Cut 45 deg. angles in each end of the long piece as well as one end of the short pieces (there will be a left and right). Drill pocket holes in the mitered ends and assemble with glue and 2” pocket hole screws. Place on the side assemblies and attach using glue and 2” pocket hole screws through the top of the legs into the top piece.
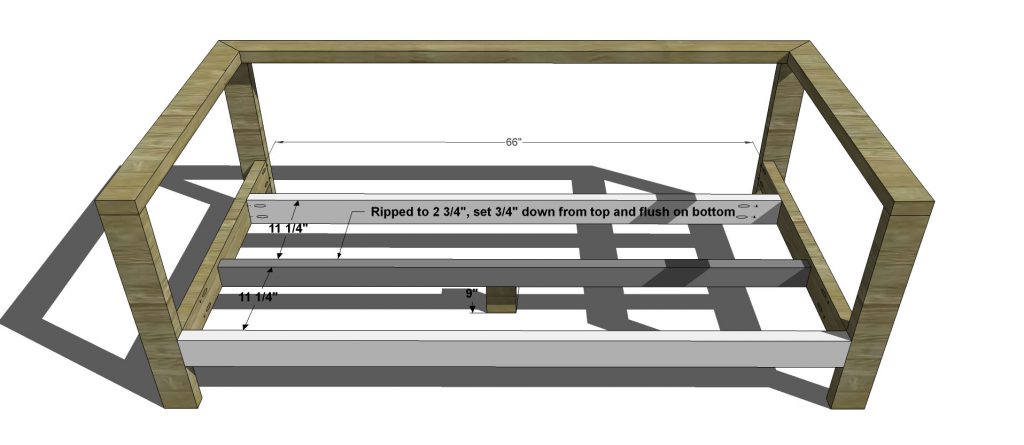
Cut the pieces for the seat supports. The center support will be a 2×4 ripped to 2-3/4” wide and will be located ¾” down from the top of the side stretcher piece to allow for the seat slats. Attach the leg piece at the center using glue and 2-1/2” pocket hole screws. Attach all pieces at the spacing indicated (with the front piece flush with the front of the side frame) to the side frames using glue and 2-1/2” pocket hole screws.
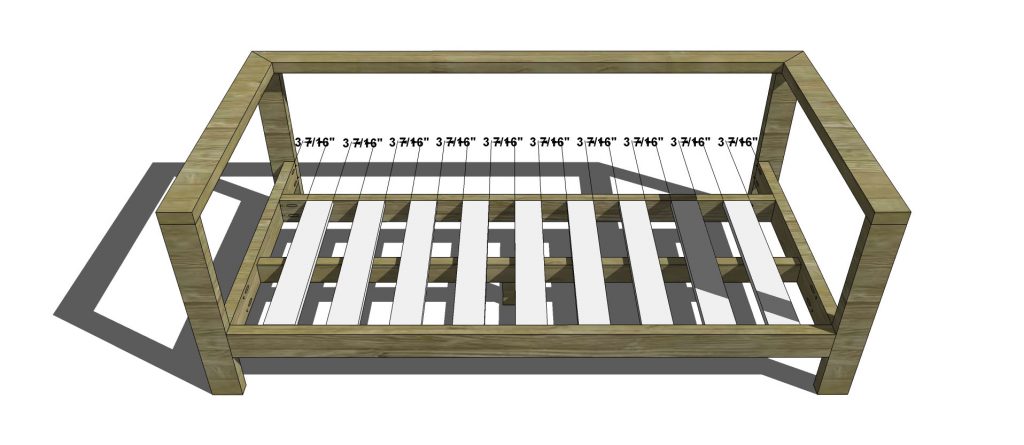
Cut the pieces for the seat slats. Set the Kreg jig for ¾” material and drill pocket holes in each end. Attach to the seat supports using glue and 1-1/4” pocket hole screws. Secure the center of the slats to the center of the support with 1-1/4” brad nails.
Cut the pieces for the side slats. Drill pocket holes in each end. Attach to the side frames at the spacing indicated with glue and 1-1/4” pocket hole screws.
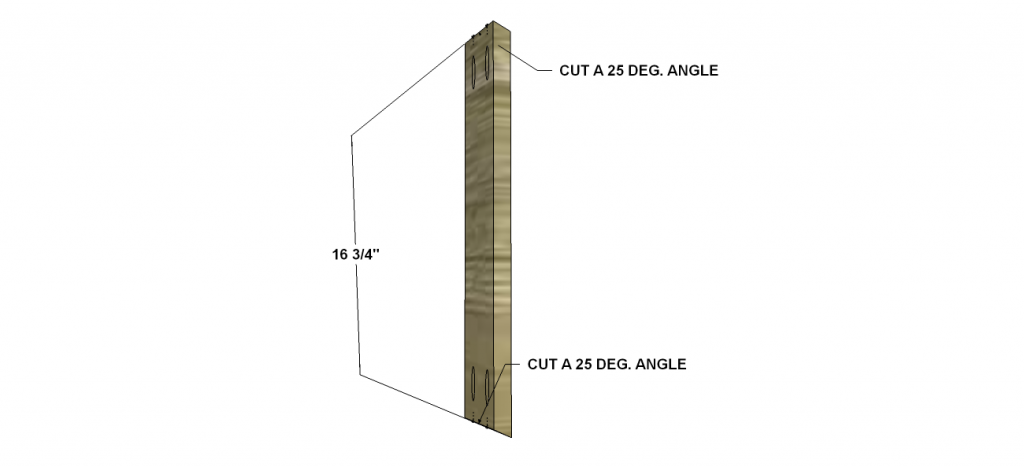
Cut the pieces for the back slats. The angles may be a little tricky but they should be cut at approximately 25 deg. (see drawing). Once the angles are cut, drill pocket holes in the end of each slat. Attach to the back support and top with glue and 1-1/4” pocket hole screws.
Fill any Screw, Nail or Pocket Holes, Sand and Finish as Desired. For Finishing Tips and Tricks visit my Finishing School
// Disclaimer: Some rights reserved. Private use only. Feel Free to link to any of my plans so long as you ONLY use 1 image and provide an ADEQUATE link back to the original source and appropriate plan! Plans from this page are not to be used for commercial purposes or republished without the express written consent of Rayan Turner, The Design Confidential I hope to provide accurate plans, however, I cannot guarantee each plan for accuracy. Not every plan that I post has been built and tested, so you are building at your own risk. It is recommended that you have a clear understanding of how the project works before beginning any project. Please contact me if you find an error or inaccuracy so that I might fix it. // Post May Contain Affiliate Links

I really like this plan for a sofa and the reef chair. I’m having trouble looking at the pictures. Is there a PDF link I can download? Thanks in advance! Btw you have an awesome collection of stuff to build!
i’m on it. i will have them up and running by days end! so glad you like our plans, we love when you guys build things!
Thank you! But it looks like there’s only steps 1 and 2 🙁
yep i didn’t get the remaining steps! but it is all fixed and pretty now! yahoo
Yes!! Just in time for the weekend too! This is probably my favorite site right now, thanks for sharing all these great ideas!
Do your cushions overhang the front of the outdoor sofa? I am looking at 24″ x 24″ cushions and not sure exactly how to modify the plans to fit them.
i actually just updated the cushion links for this plans so you can get dimensions for them. no the depth of your cushions is the same as the cushions i used to draft this plan. the only difference is that yours are 2″ wider. so in theory all you need to do is add 2 inches for each cushion, to all of your horizontal boards (probably 4 inches total). this would likely mean one additional back slat and your spacing would change a bit, but if you just space them evenly you will be good to go!
I really like this pattern but I’m considering making it so that it accommodates 4 of the target cushions. Would you recommend adding an additional leg piece?
Hi,
Good plans. Can you make sure the required lumber is correct? After adding up all the cuts, it will take more than 5 2×4’s complete according to the cut list. Also, for the 1×4’s, you are using actual 0.75″ x 3.5″ lumber?
Hi I know this is an older post but probably a silly question. I’m doing all the cutting ahead of time and wanted to know for the back slacks are those 16 3/4 on the shorter side (the 25 angle) or the loger side of the board?
Beautiful plans! Thank you.
Do you have an approximate weight for the couch, chair and armless chair? Just curious how heavy they are.
I made the sofa and it came out great. I used pressure treated deck boards for mine ripped down to 4 inch. Should last a long time! Materials cost me $100 from Lowes. Thanks for the plans!
fantastic! if you would like to send me some pictures via email, i would love to showcase your hard work!!
Not sure how to send photos…pls advise
If you are able to email them to me, that will work just fine! rayanturner@gmail.com