DIY Plans for a Steppe Tallboy Dresser have been high on my project request list for quite some time. Many of you have been asking and we are finally bringing you a few matching pieces to coordinate with our ever popular Steppe Dresser! I love a good chest of drawers, and when those drawers are stylish… well that is simply my fave! We have so many DIY Dresser Plans for you to choose from and of course you can browse our entire Plan Index for coordinating pieces!
As with all of our plans, you are building at your own risk and you should have a firm understanding of building in general before you attempt many of our plans (some are easy as pie and perfect for beginners). With that, go forth, have fun, take lots of pictures and share them in a showcase or on social media with the hashtag #builtTDCtuff and we will share our faves! Be sure to tag @thedesignconfidential on Instagram / FB and @thedesconf on Twitter / Pinterest. Don’t forget… for all of our newer plans, clicking on the images will let them expand to enormous sizes with much greater clarity. The older plans may need updating so please let us know if you need one fixed!
$100-$150
- Tape Measure
- Saw – Jig Saw, Circular, Table, or Miter Saw
- Drill
- Multi-Square and Carpenter’s Square
- Sander
- Kreg Jig – if you build frequently, invest in this one.
- Nail Gun – optional
- Router with Patterning bit – or bit set – optional
- Iron – if using Edge Banding
- 1 – 2×4 at 8’
- 1 – 3/4” plywood at – 4’x8’
- 1 – 1/2” plywood at – 4’x8’
- 2-1/2″ Pocket Hole Screws
- 1-1/4″ Pocket Hole Screws
- 1″ Pocket Hole Screws
- 1-1/2” Wood Screws
- 1-1/4″ Wood Screws
- ¾” Brad Nails
- Anti-Tip Kit
- Countersink Drill Bit
- Pocket Hole Plugs – Paint Grade, Pine, Oak – optional
- Clamps
- Safety Gear
- Edge Banding – optional
- Wood Filler
- Wood Glue
- Sanding Supplies
- Paste Wax
- Finishing Supplies
- 2 – 3/4” plywood at 14-1/2”x33” – Chest Sides
- 2 – 3/4” plywood at 14-1/2”x26” – Chest Top and Bottom
- 1 – 3/4” plywood at 26”x31-1/2” – Chest Back
- 4 – 2×4 at 5” – Legs
- 3 – 2×4 at 10″ – Leg Base Frame
- 2 – 2×4 at 21 1/2″ – Leg Base Frame
- 10 – 3/4” plywood at 1”x12” – Drawer Guides
- 6 – 1/2” plywood at 11-1/2”x24-1/2” – Drawer Bottoms
- 12 – 1/2” plywood at 4”x11-1/2” – Drawer Sides
- 6 – 1/2” plywood at 3-1/2”x24-1/2” – Drawer Backs
- 6 – 1/2” plywood at 5”x25-1/2” – Plain Drawer Fronts
- 6 – 1/2” plywood at 5”x25-1/2” – Steppe Drawer Fronts
Before beginning to build, always check in on my site to make sure you have the most up to date set of plans, I occasionally update and change the plans to make the building process easier or to allow for less expensive purchasing of materials! Read through the entire set of instructions and all comments before beginning this project. If you print out or save plans, be sure to check in on my site to be sure you have the most up to date set of plans, as I occasionally update things for ease of building or buying. If you are new to building, read through the GETTING STARTED section and other articles found under the BUILD tab in the menu on my site, it has valuable information about how to get started, tools and techniques. If you are unfamiliar with the finishing process, visit my Finishing school for some tips and tricks for painting like a pro and for special finishing practices. Use glue to secure your joints and Consider Painting or Staining individual sections prior to assembling. This makes the paint application virtually flawless. Coat with a spray on Poly or Wipe on Poly to protect your finish and your piece and it will last for ages. Adhere to all safety standards and guidelines, and be sure you follow safety protocol throughout your build. If you are unsure about whether you are building safely, run a quick online search for the tool or technique you are using, or contact me via email or post to the forum before you move ahead. My contact info can be found in the menu of my site.
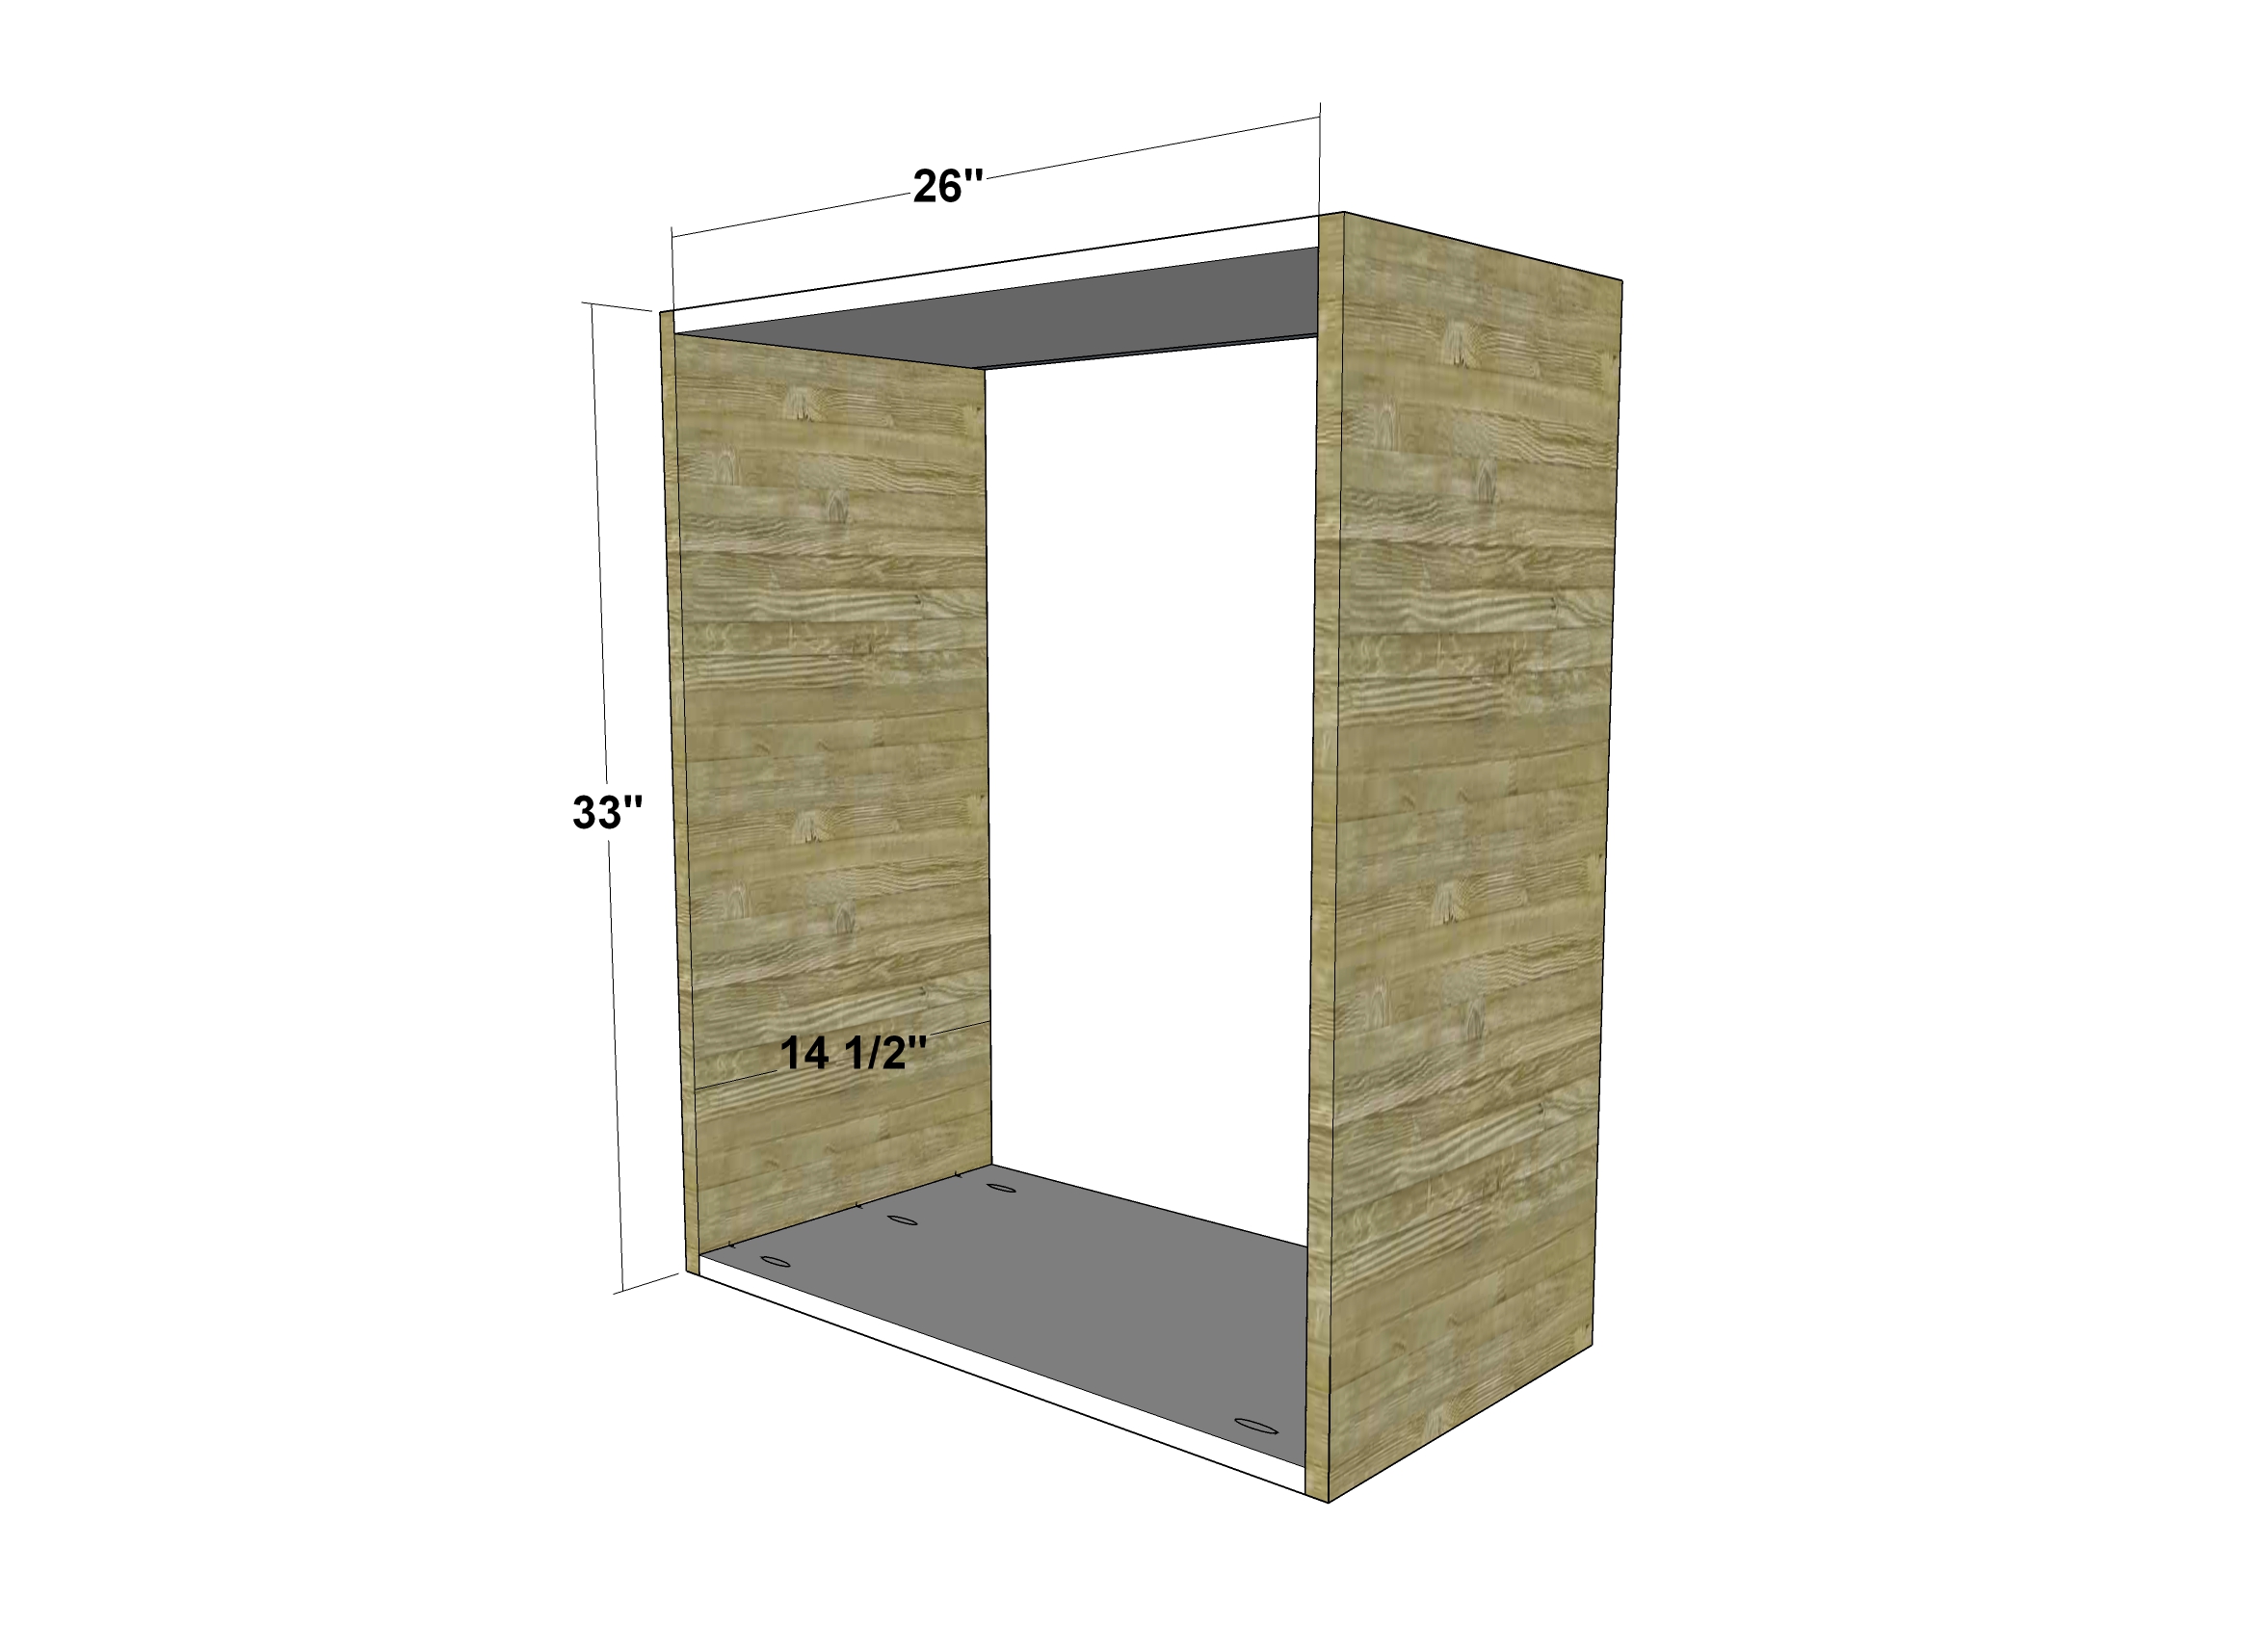
Cut the pieces for the Sides, Top, and Bottom. Apply edge banding to front edges of all pieces, if desired. Set the Kreg jig for 3/4” material and drill pocket holes in the ends of the Top and Bottom pieces. Make sure the pocket holes will face the inside of the Chest. Assemble pieces as shown with glue and 1-1/4” pocket hole screws.
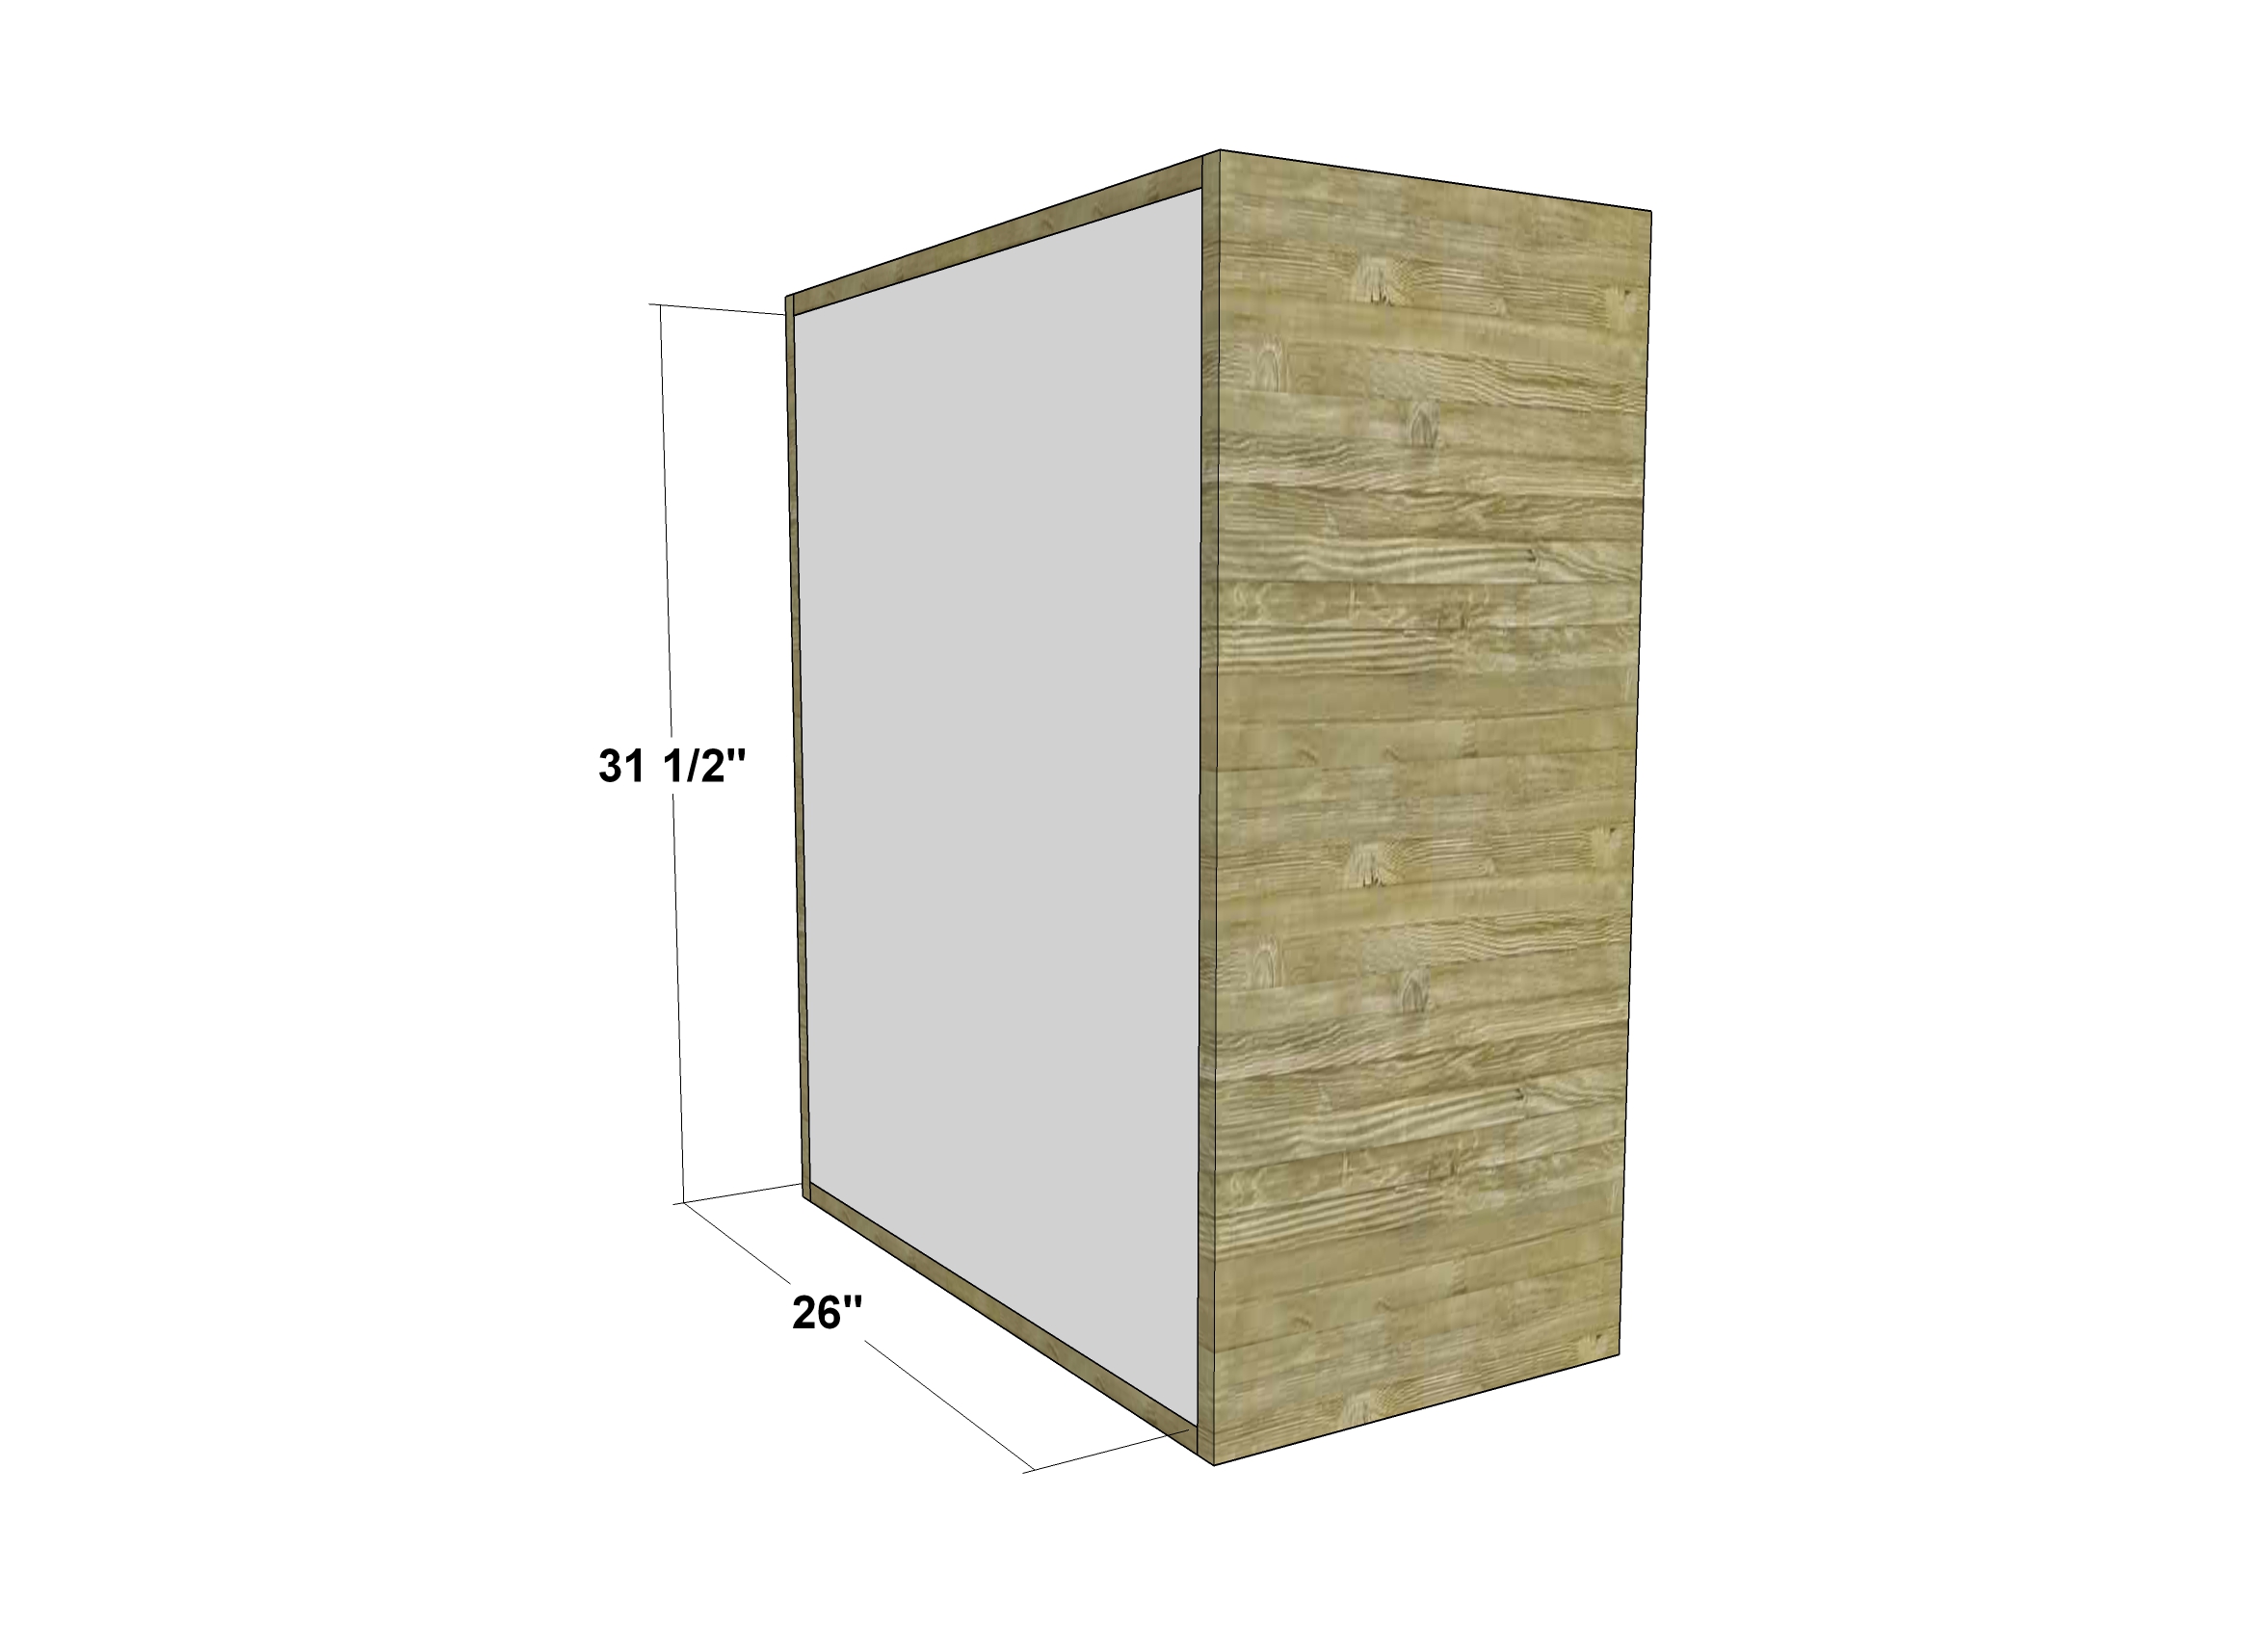
Cut the piece for the Back. Drill pocket screws in each edge of the Back. Attach the back as shown with glue and 1-1/4” pocket screws. Make sure that the pocket holes face the inside of the Chest.
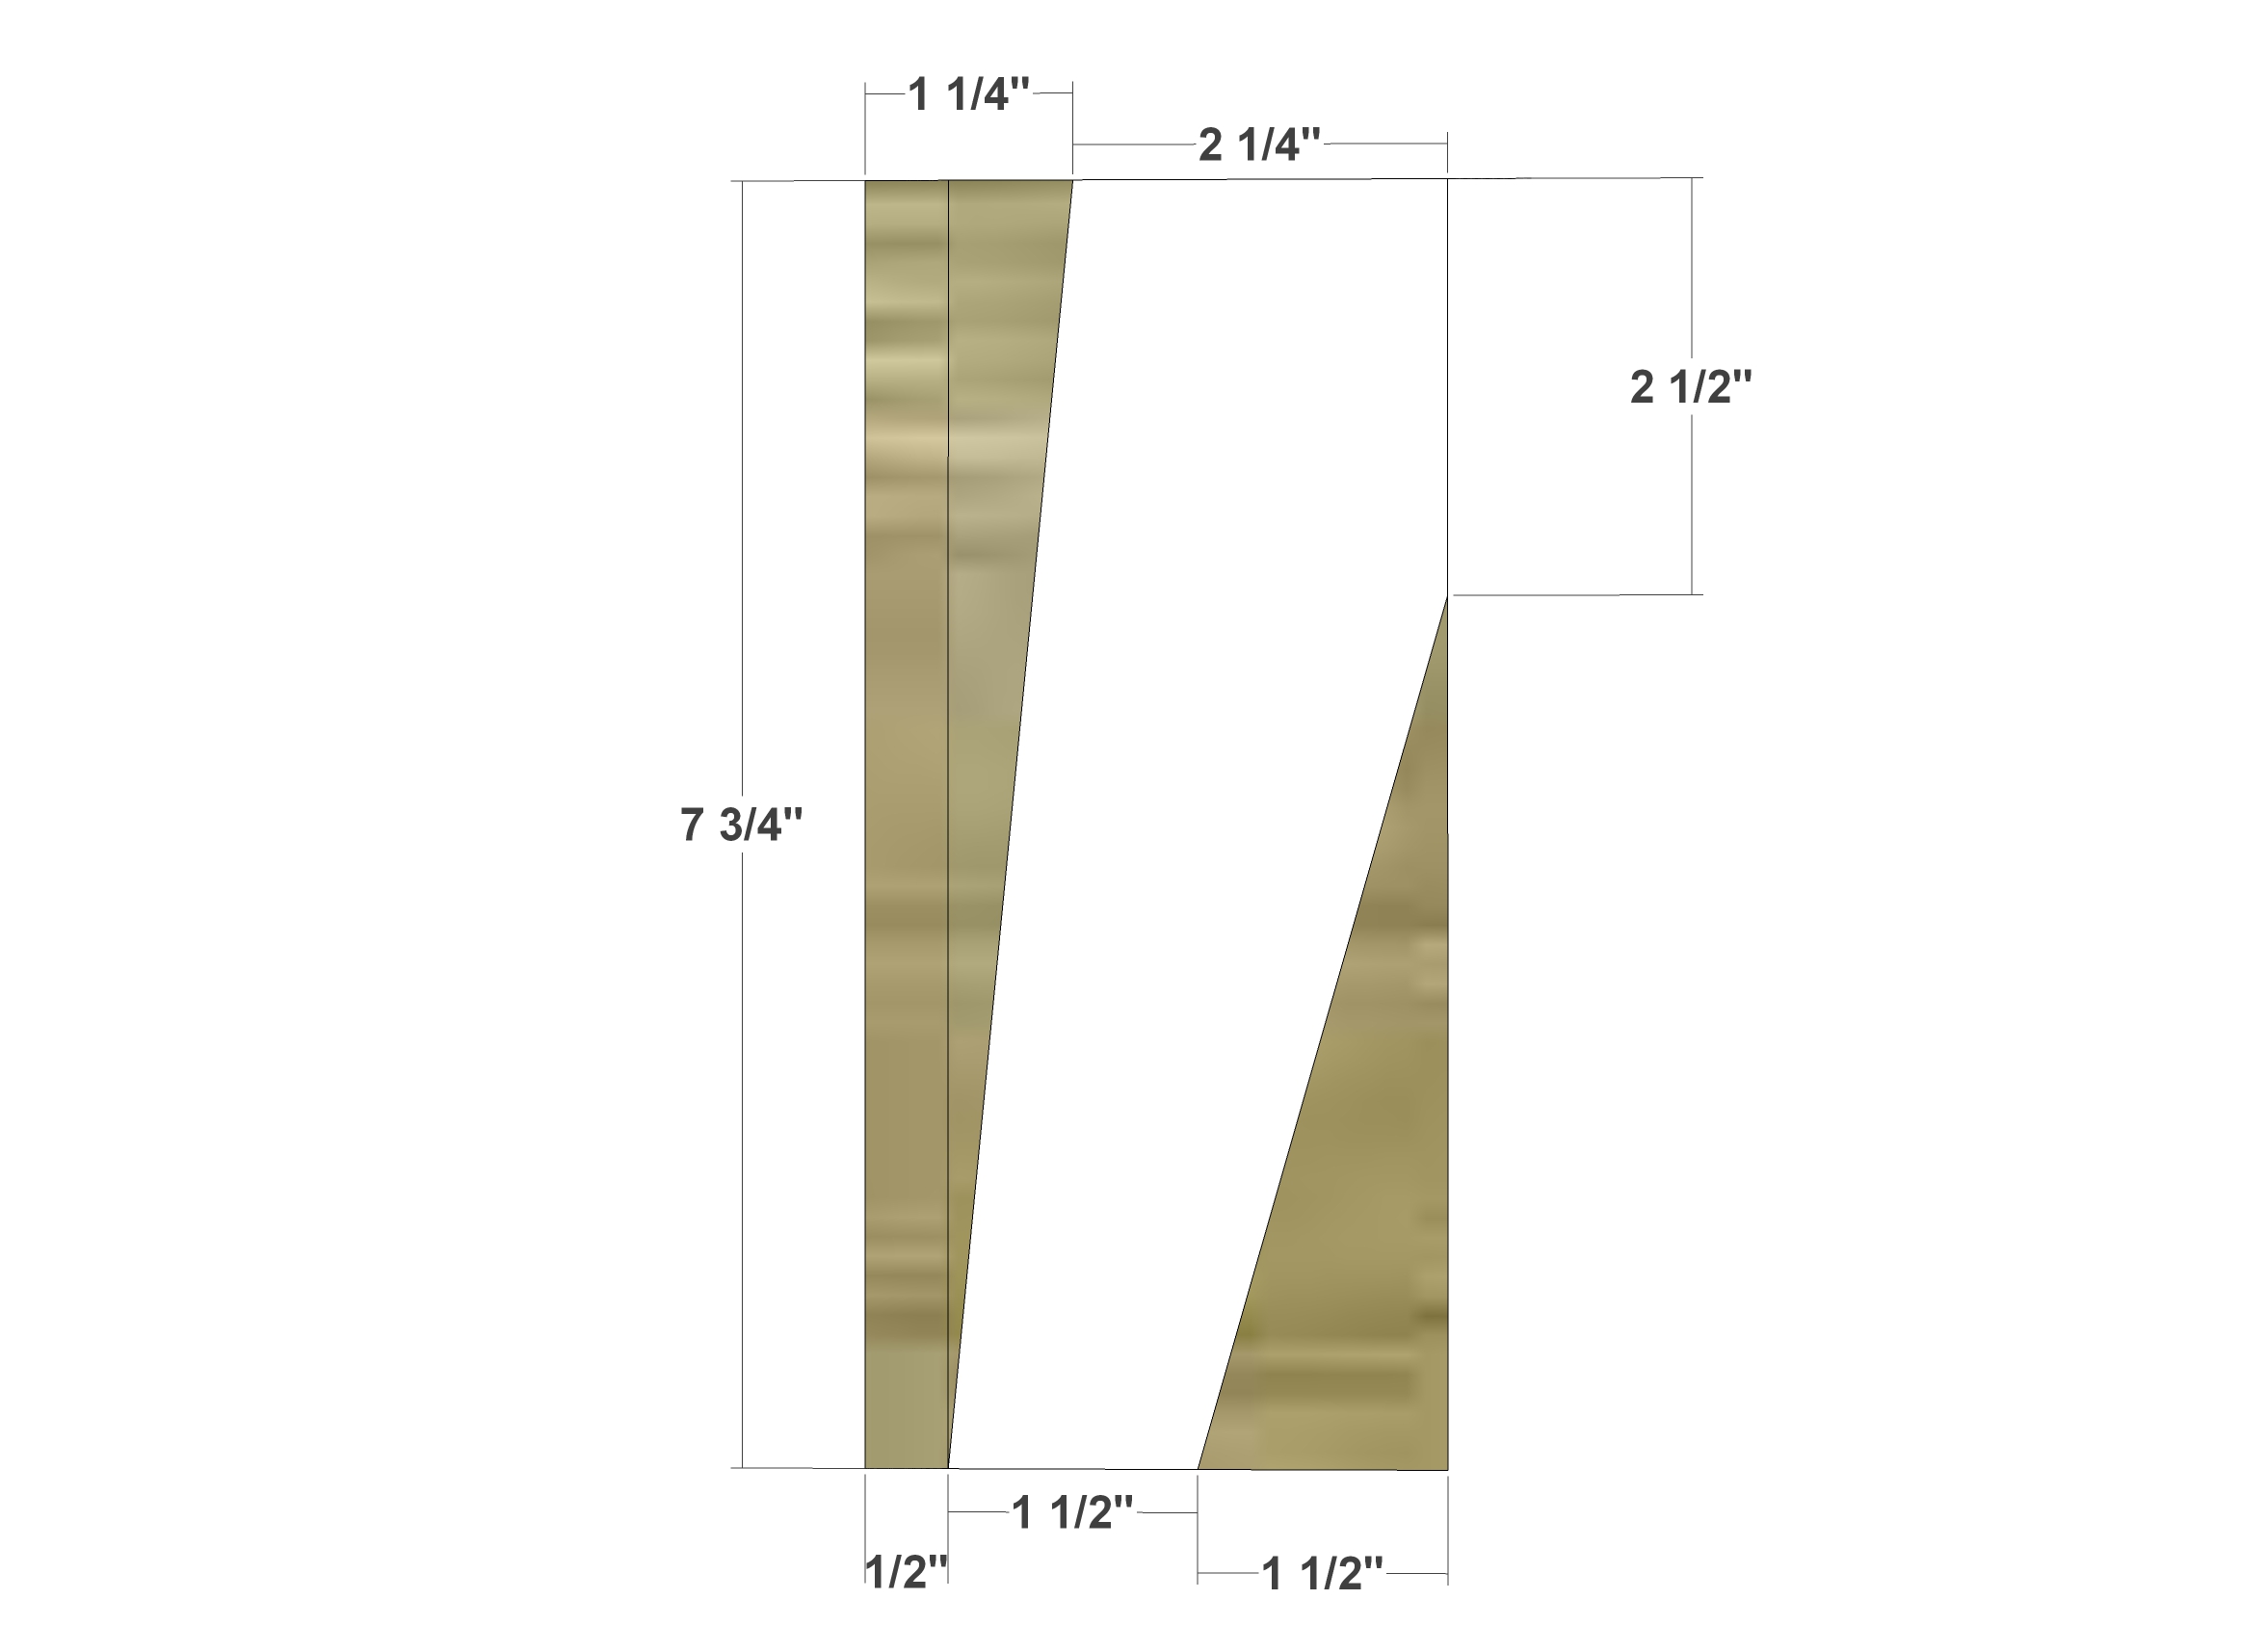
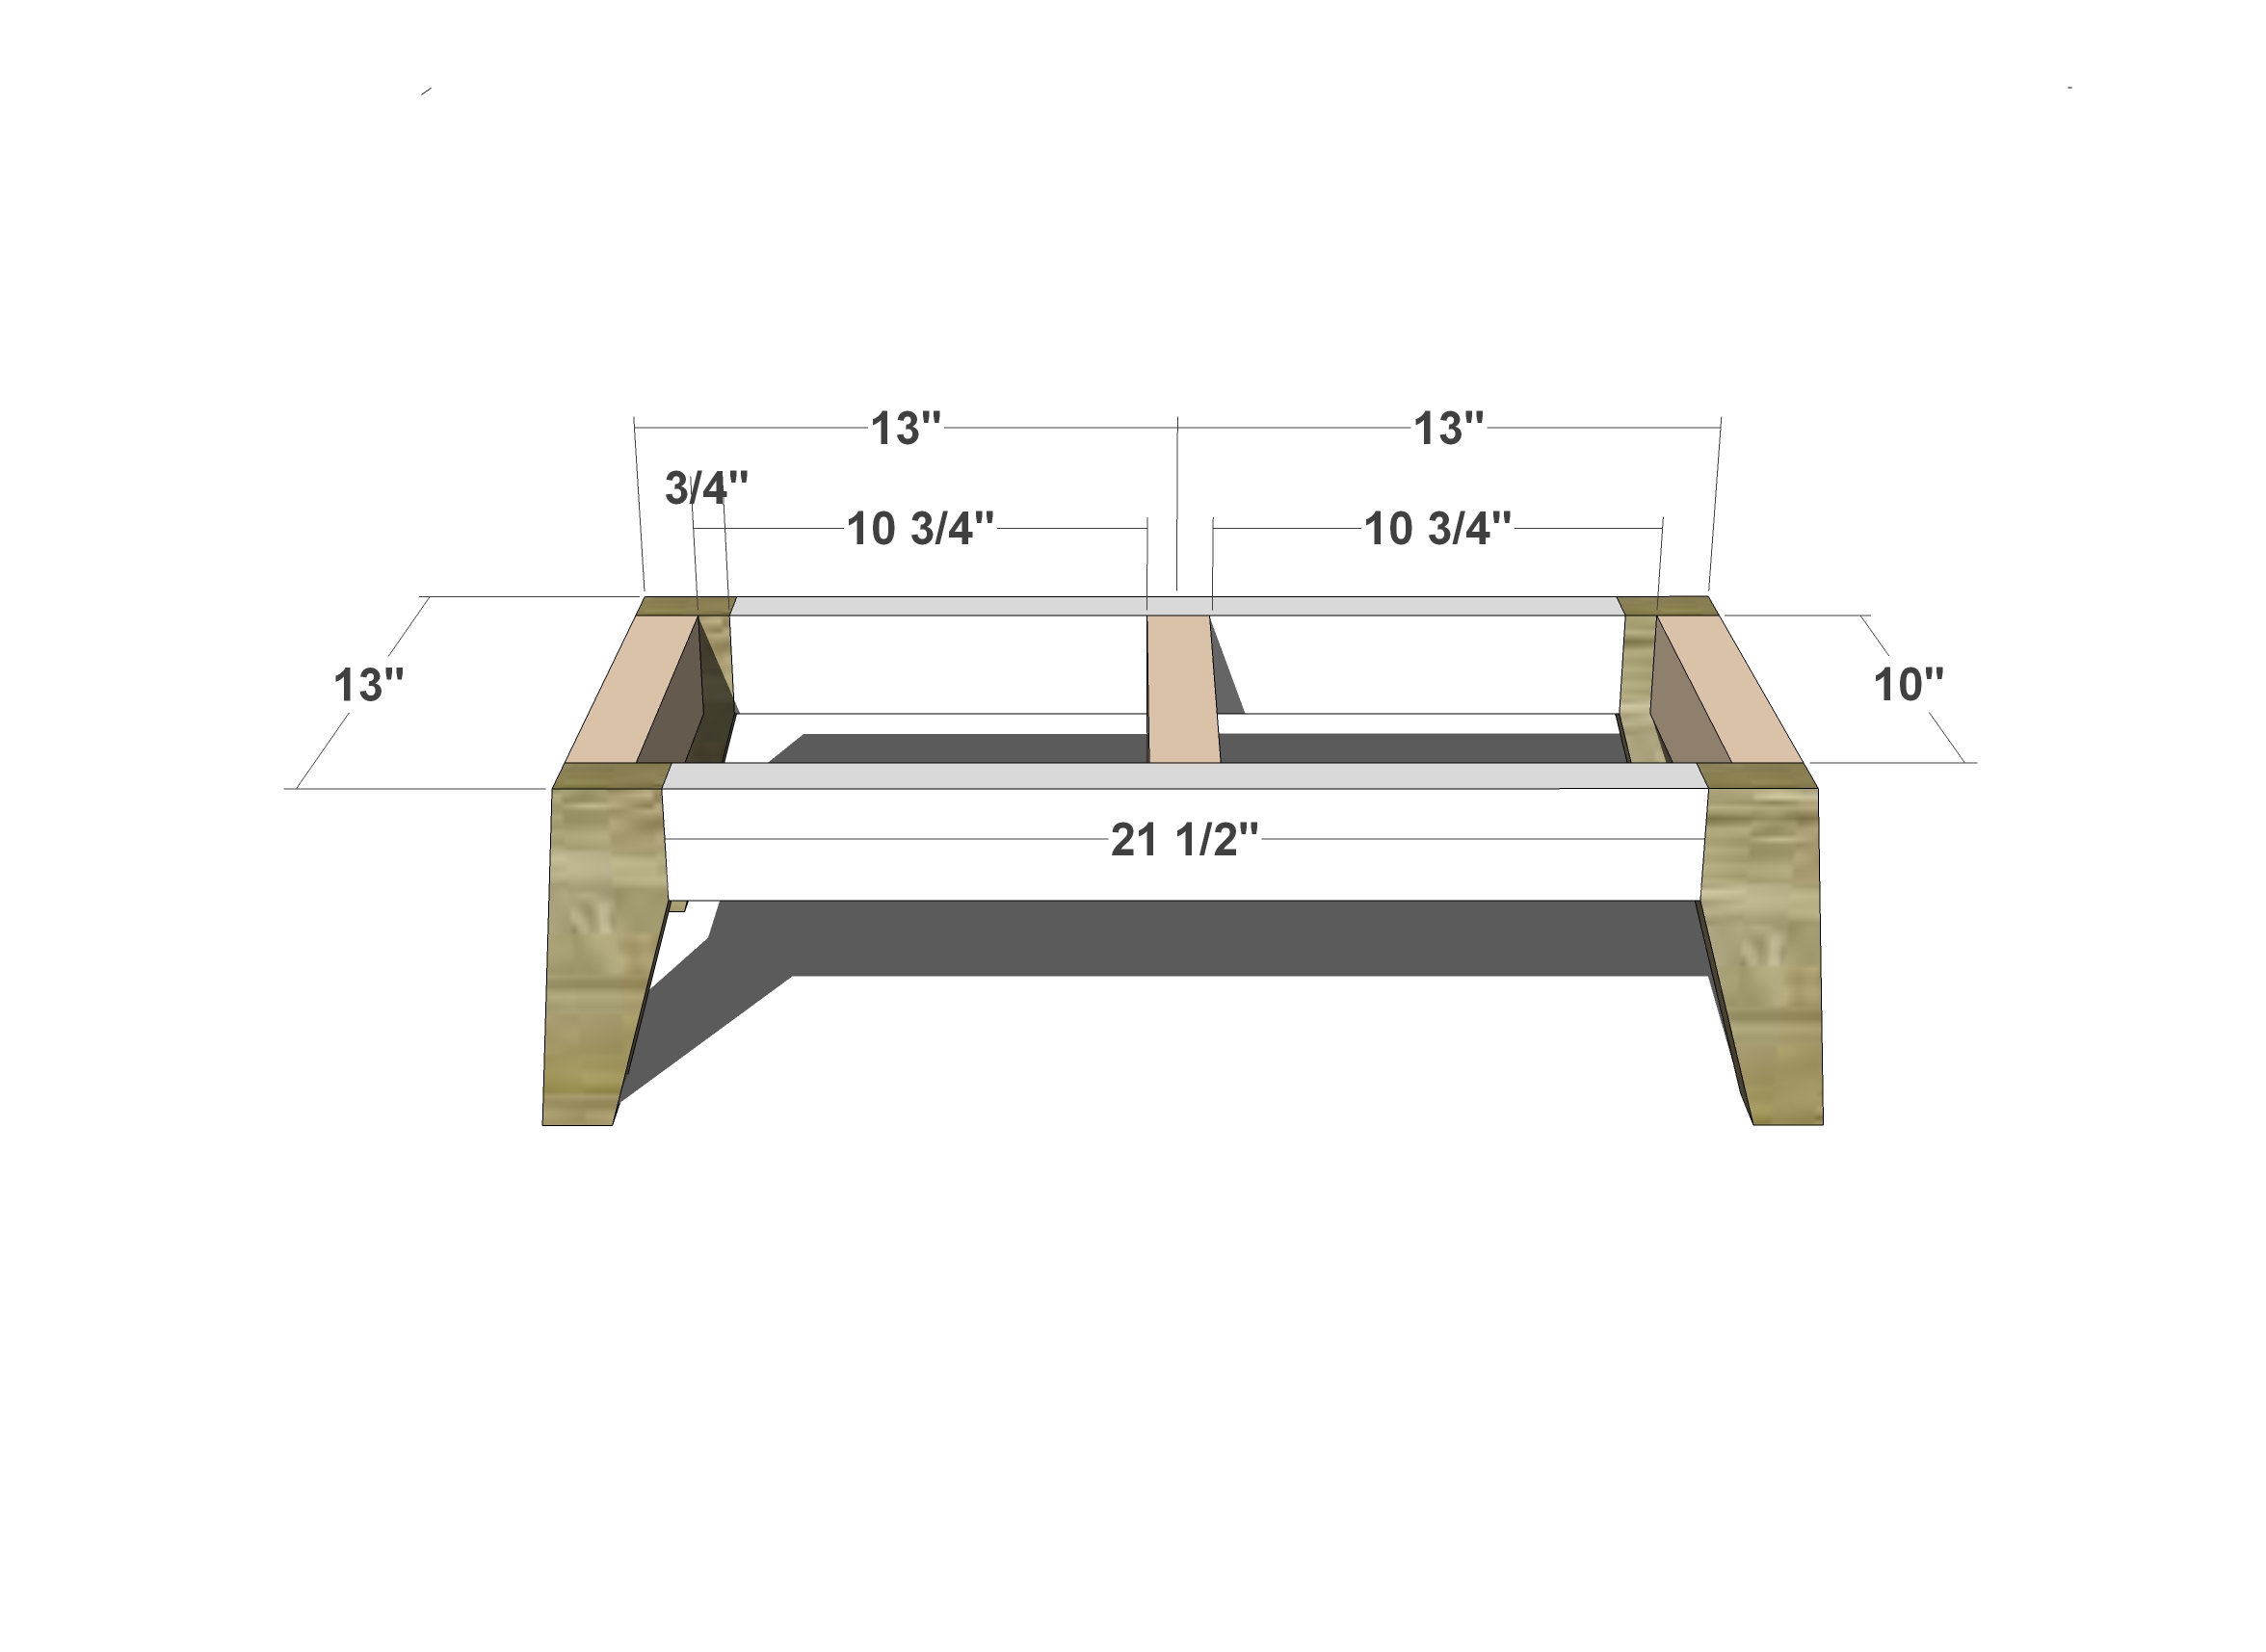
Cut out the Legs as shown. Then attach them to the leg base frame using your Kreg Jig set for 1 1/2″ material and 2 1/2″ pocket hole screws and glue.
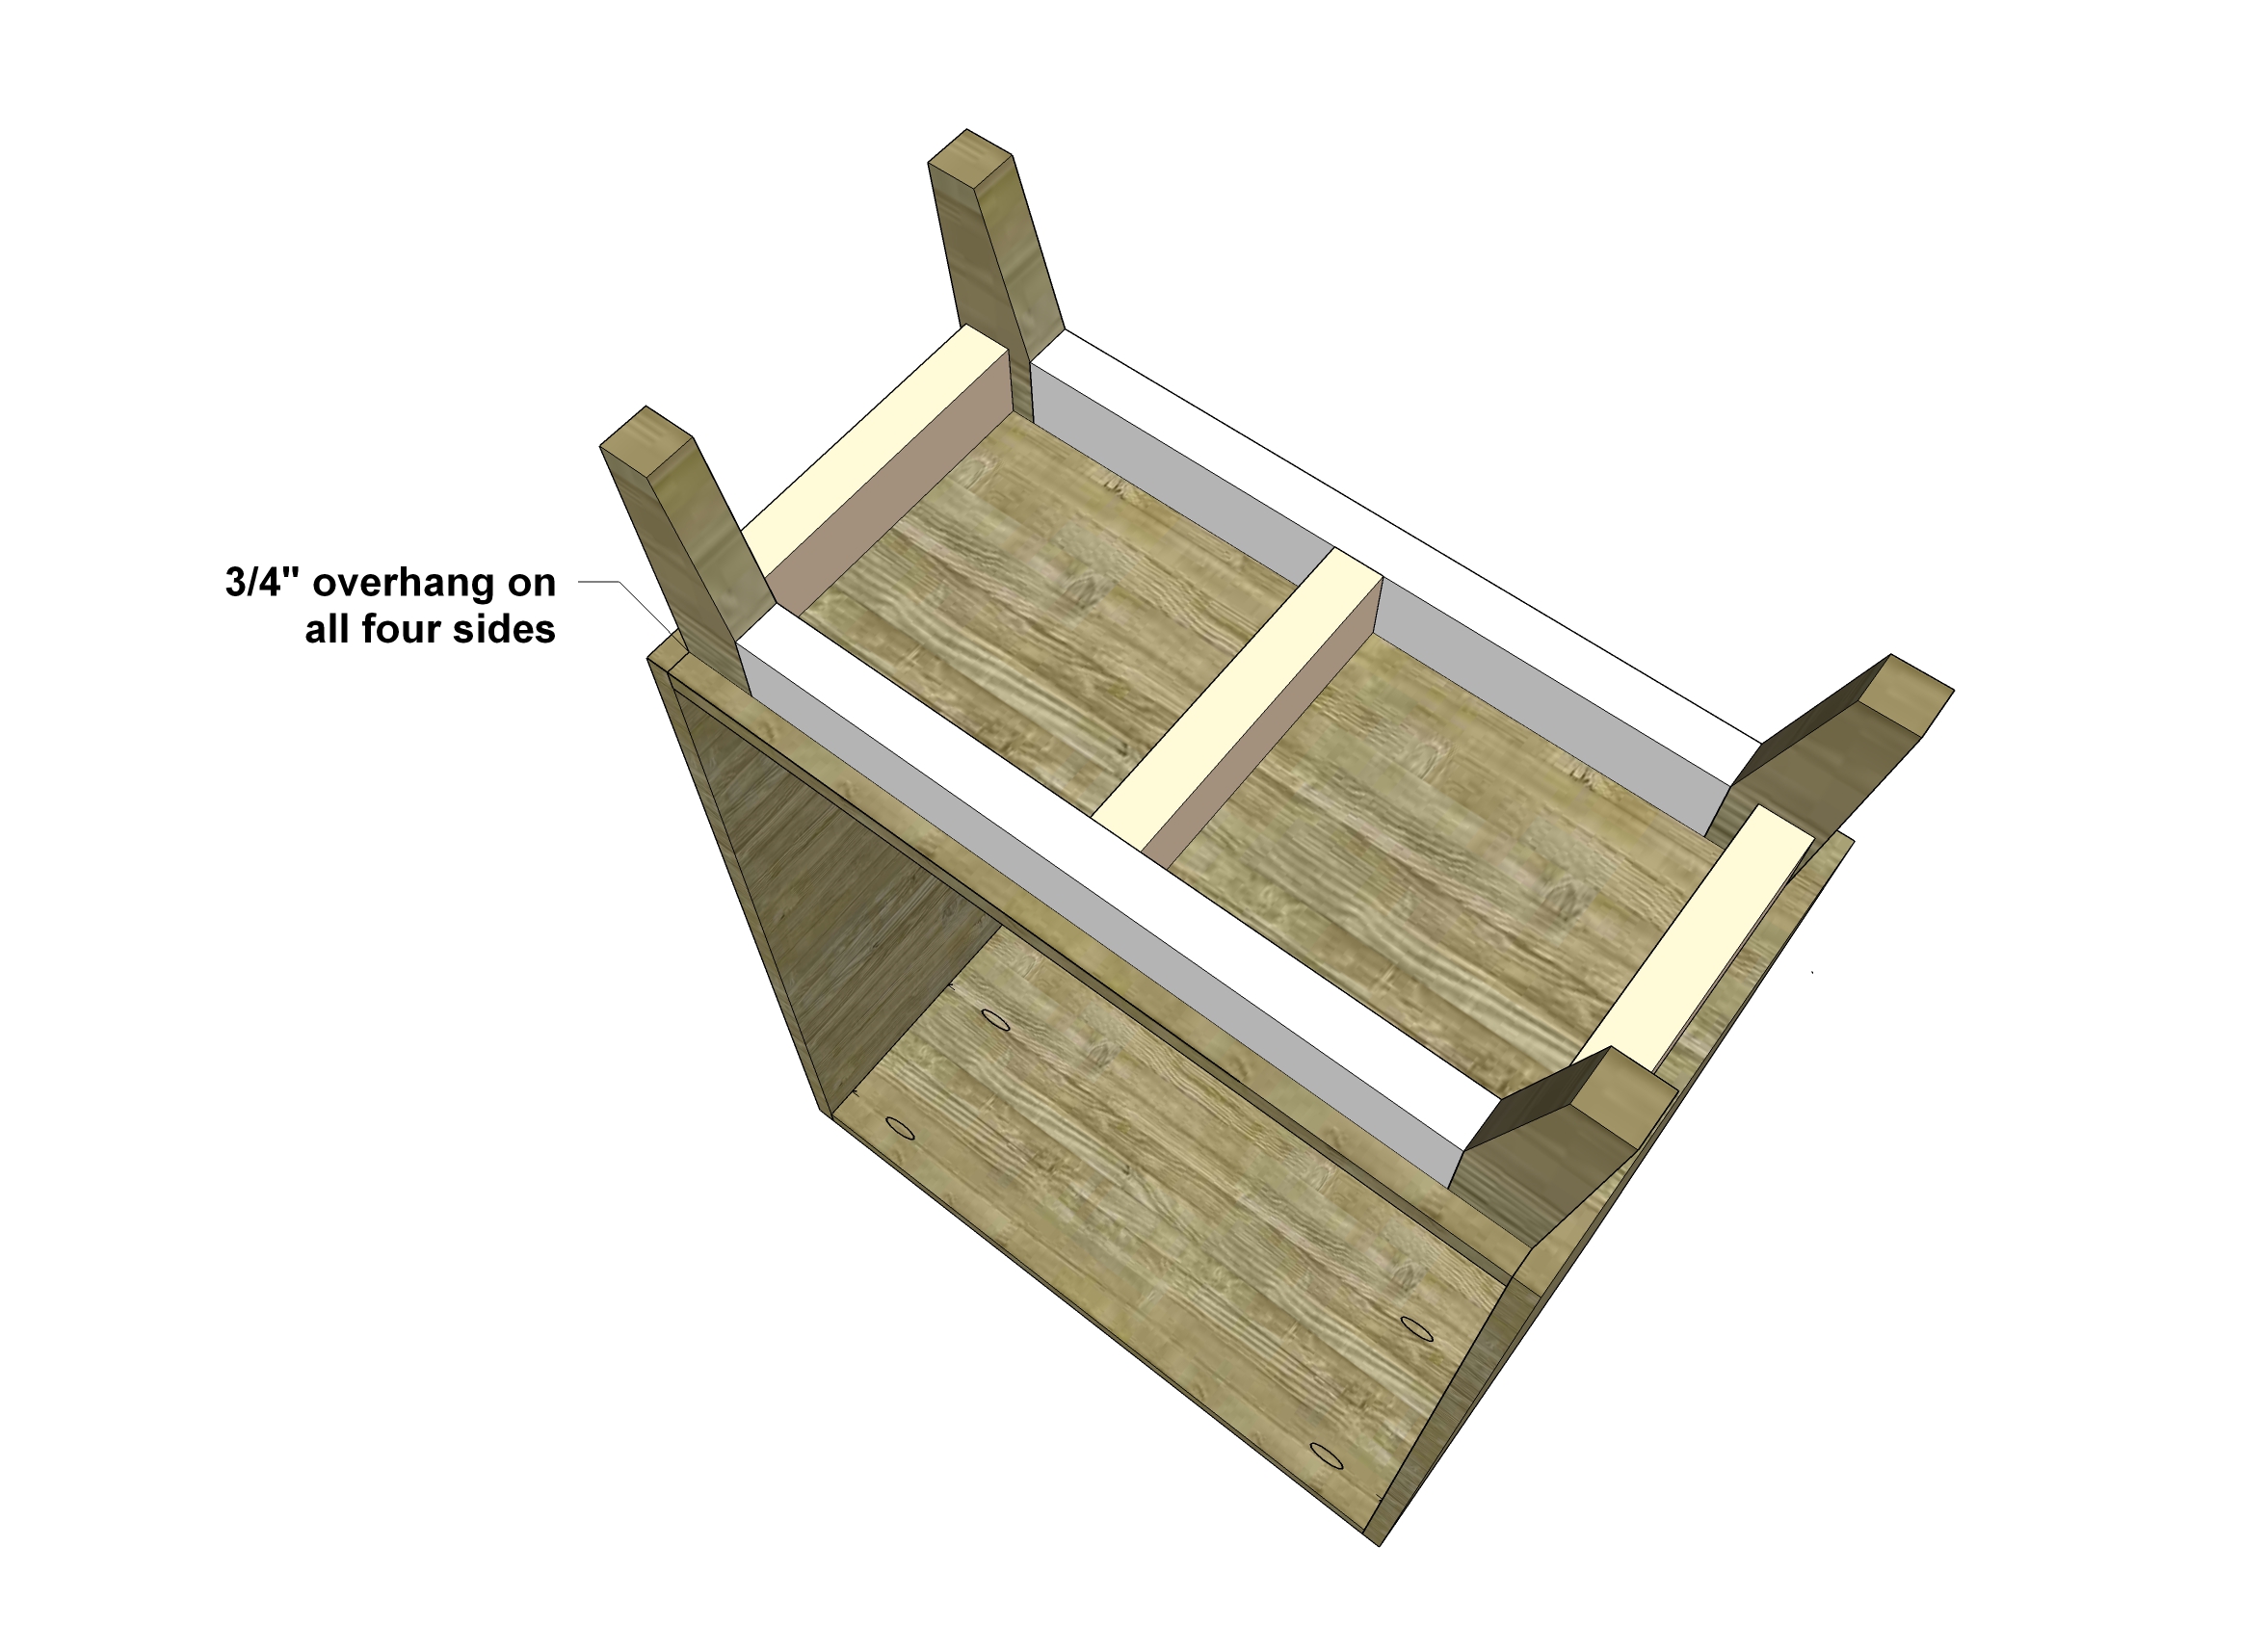
Attach Legs to the bottom of the Chest as shown with glue and 1-1/2” wood screws. The Leg Base should be placed 3/4” from the edges of the Chest and at a 45-degree angle. Insert the wood screws down through the Chest Bottom into the Legs so that the screws are hidden. Also, make sure that the screws are countersunk so that they do not interfere with the Drawer.
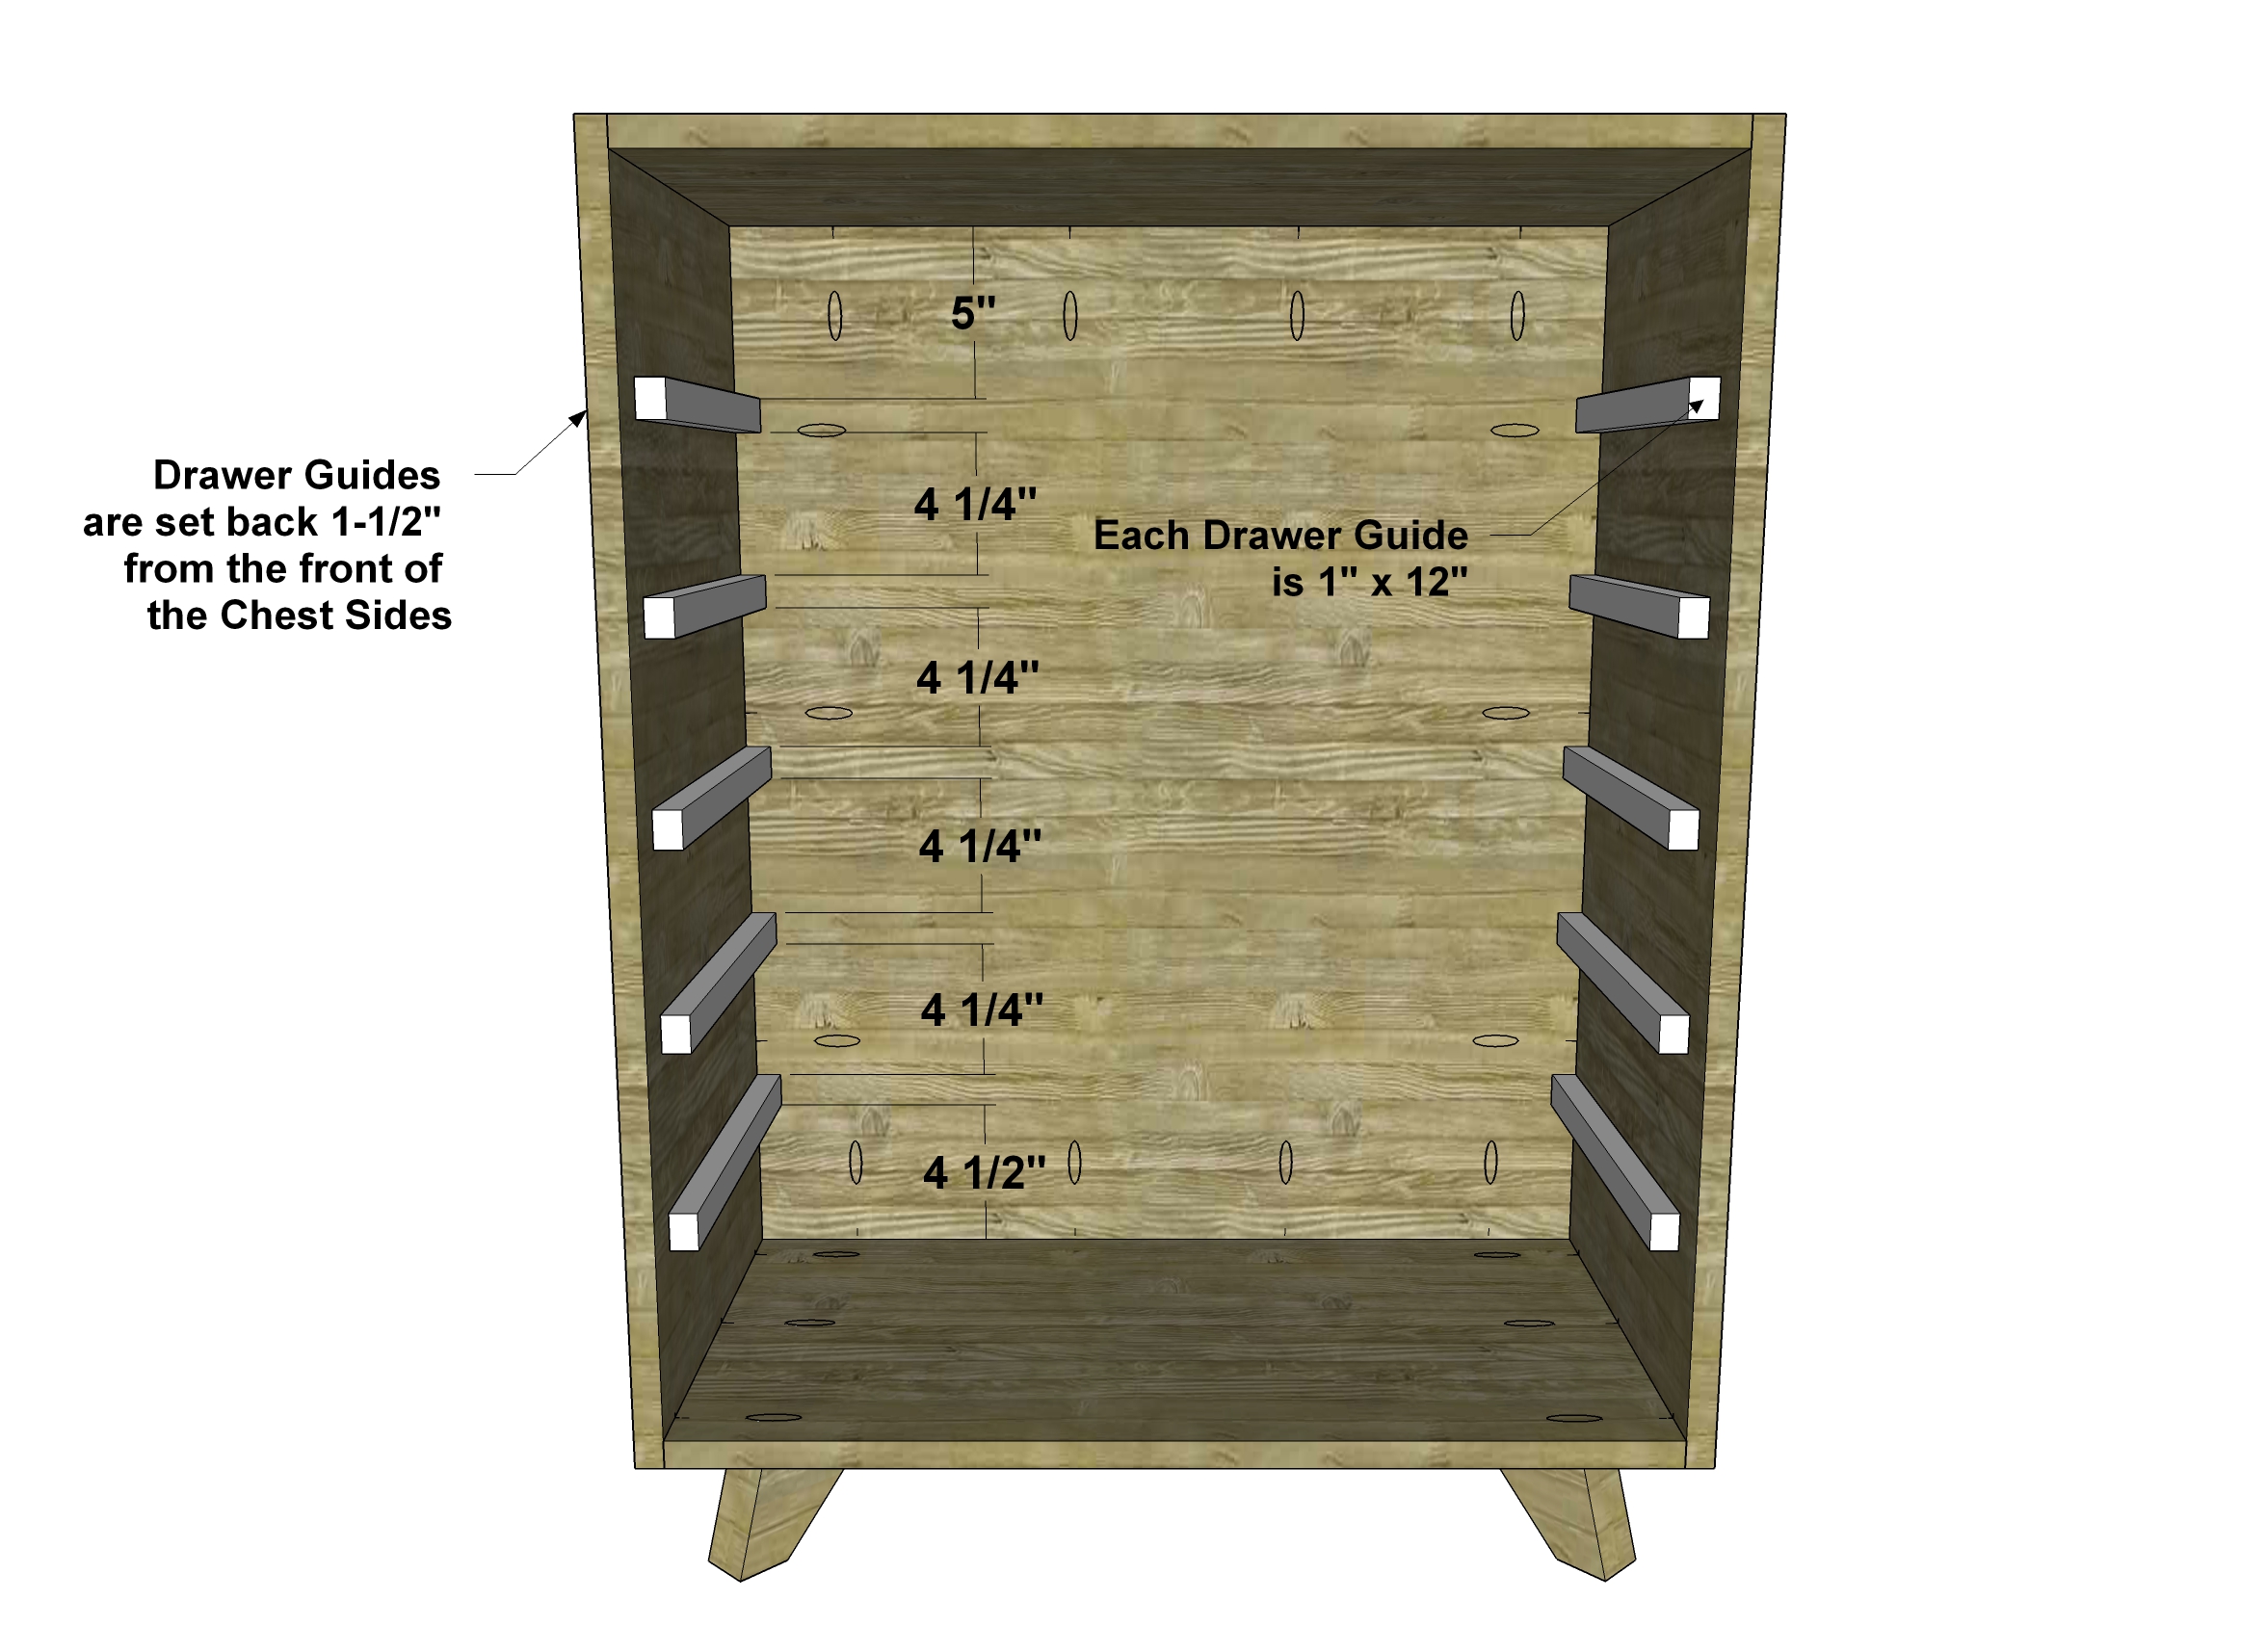
Cut the pieces for the Drawer Guides. Assemble as shown with glue and 1-1/4” wood screws. Insert the wood screws from the inside of the Chest, through the Drawer Guides, into the Chest Sides so that the screws are hidden. The Guides will be 1-1/2” set back from the front of the Chest, and have approximately a 1/4” gap in the back.
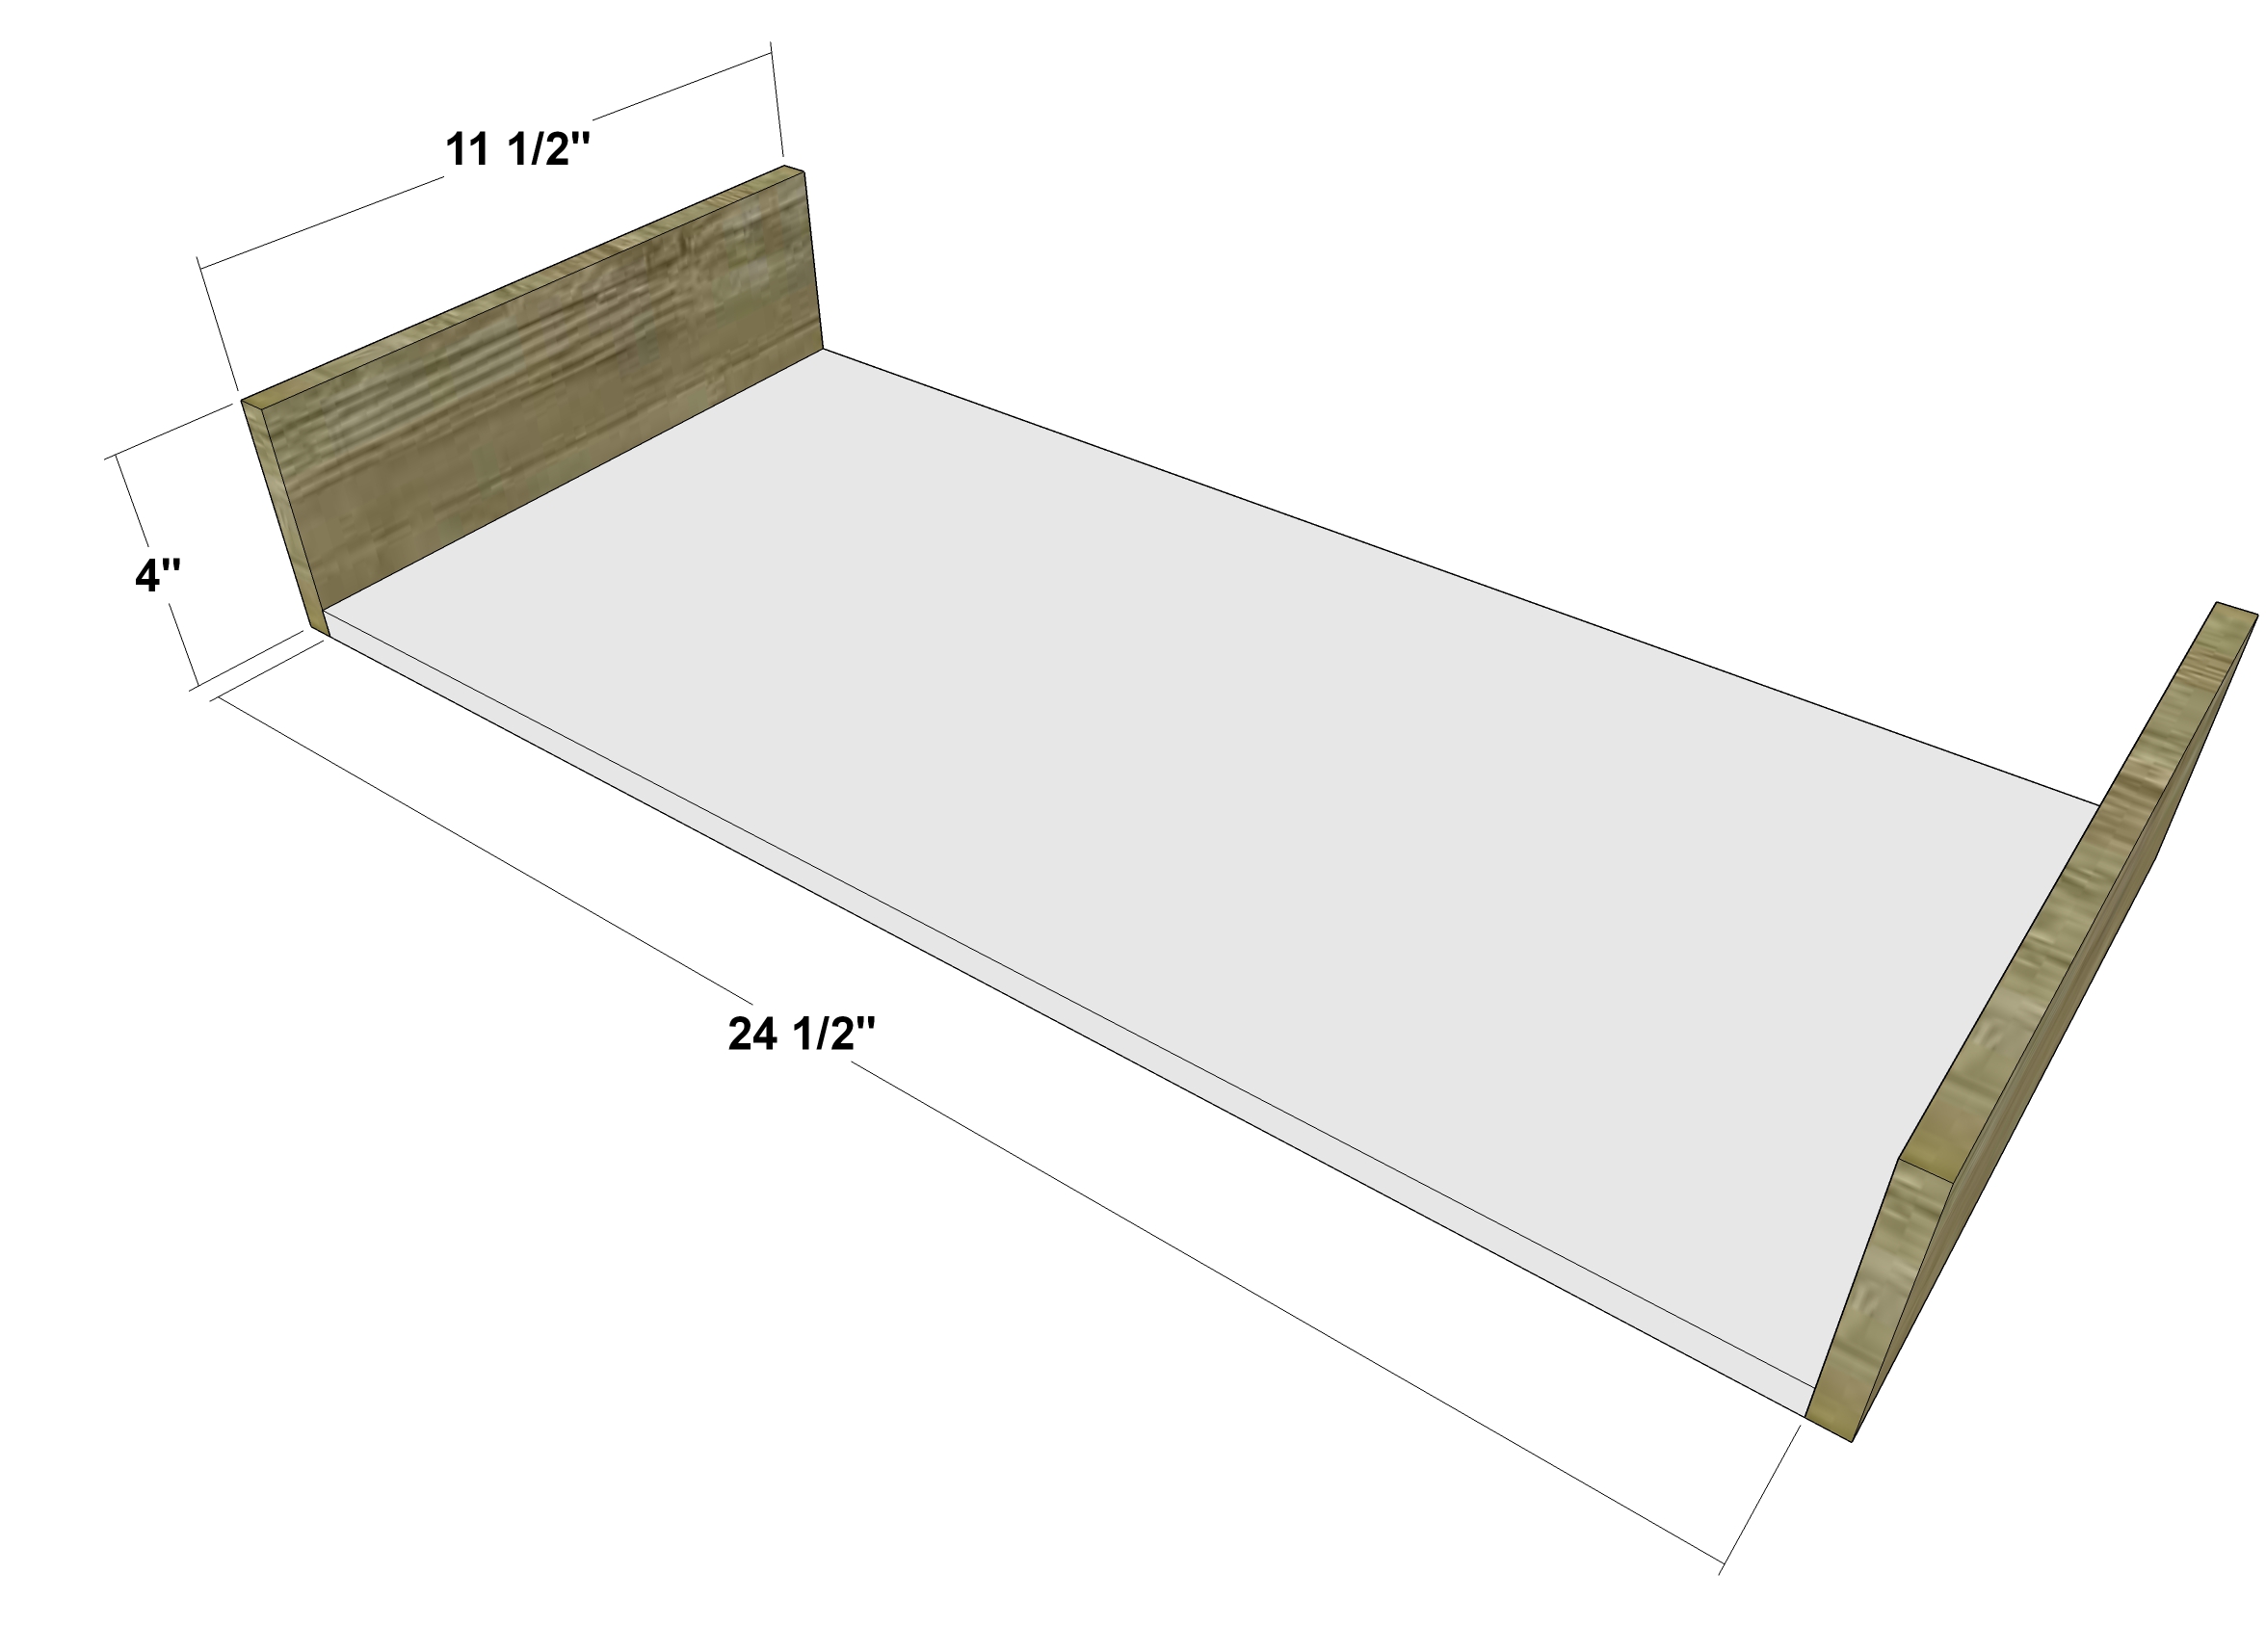
Cut the pieces for the Drawer Sides, Bottoms, Backs, and Plain Fronts for all Drawers. Set the Kreg jig for 1/2” material and drill pocket holes in the ends of the underside of the Bottoms and on the outside front ends of the Sides. Attach as shown with glue and 1” pocket screws.
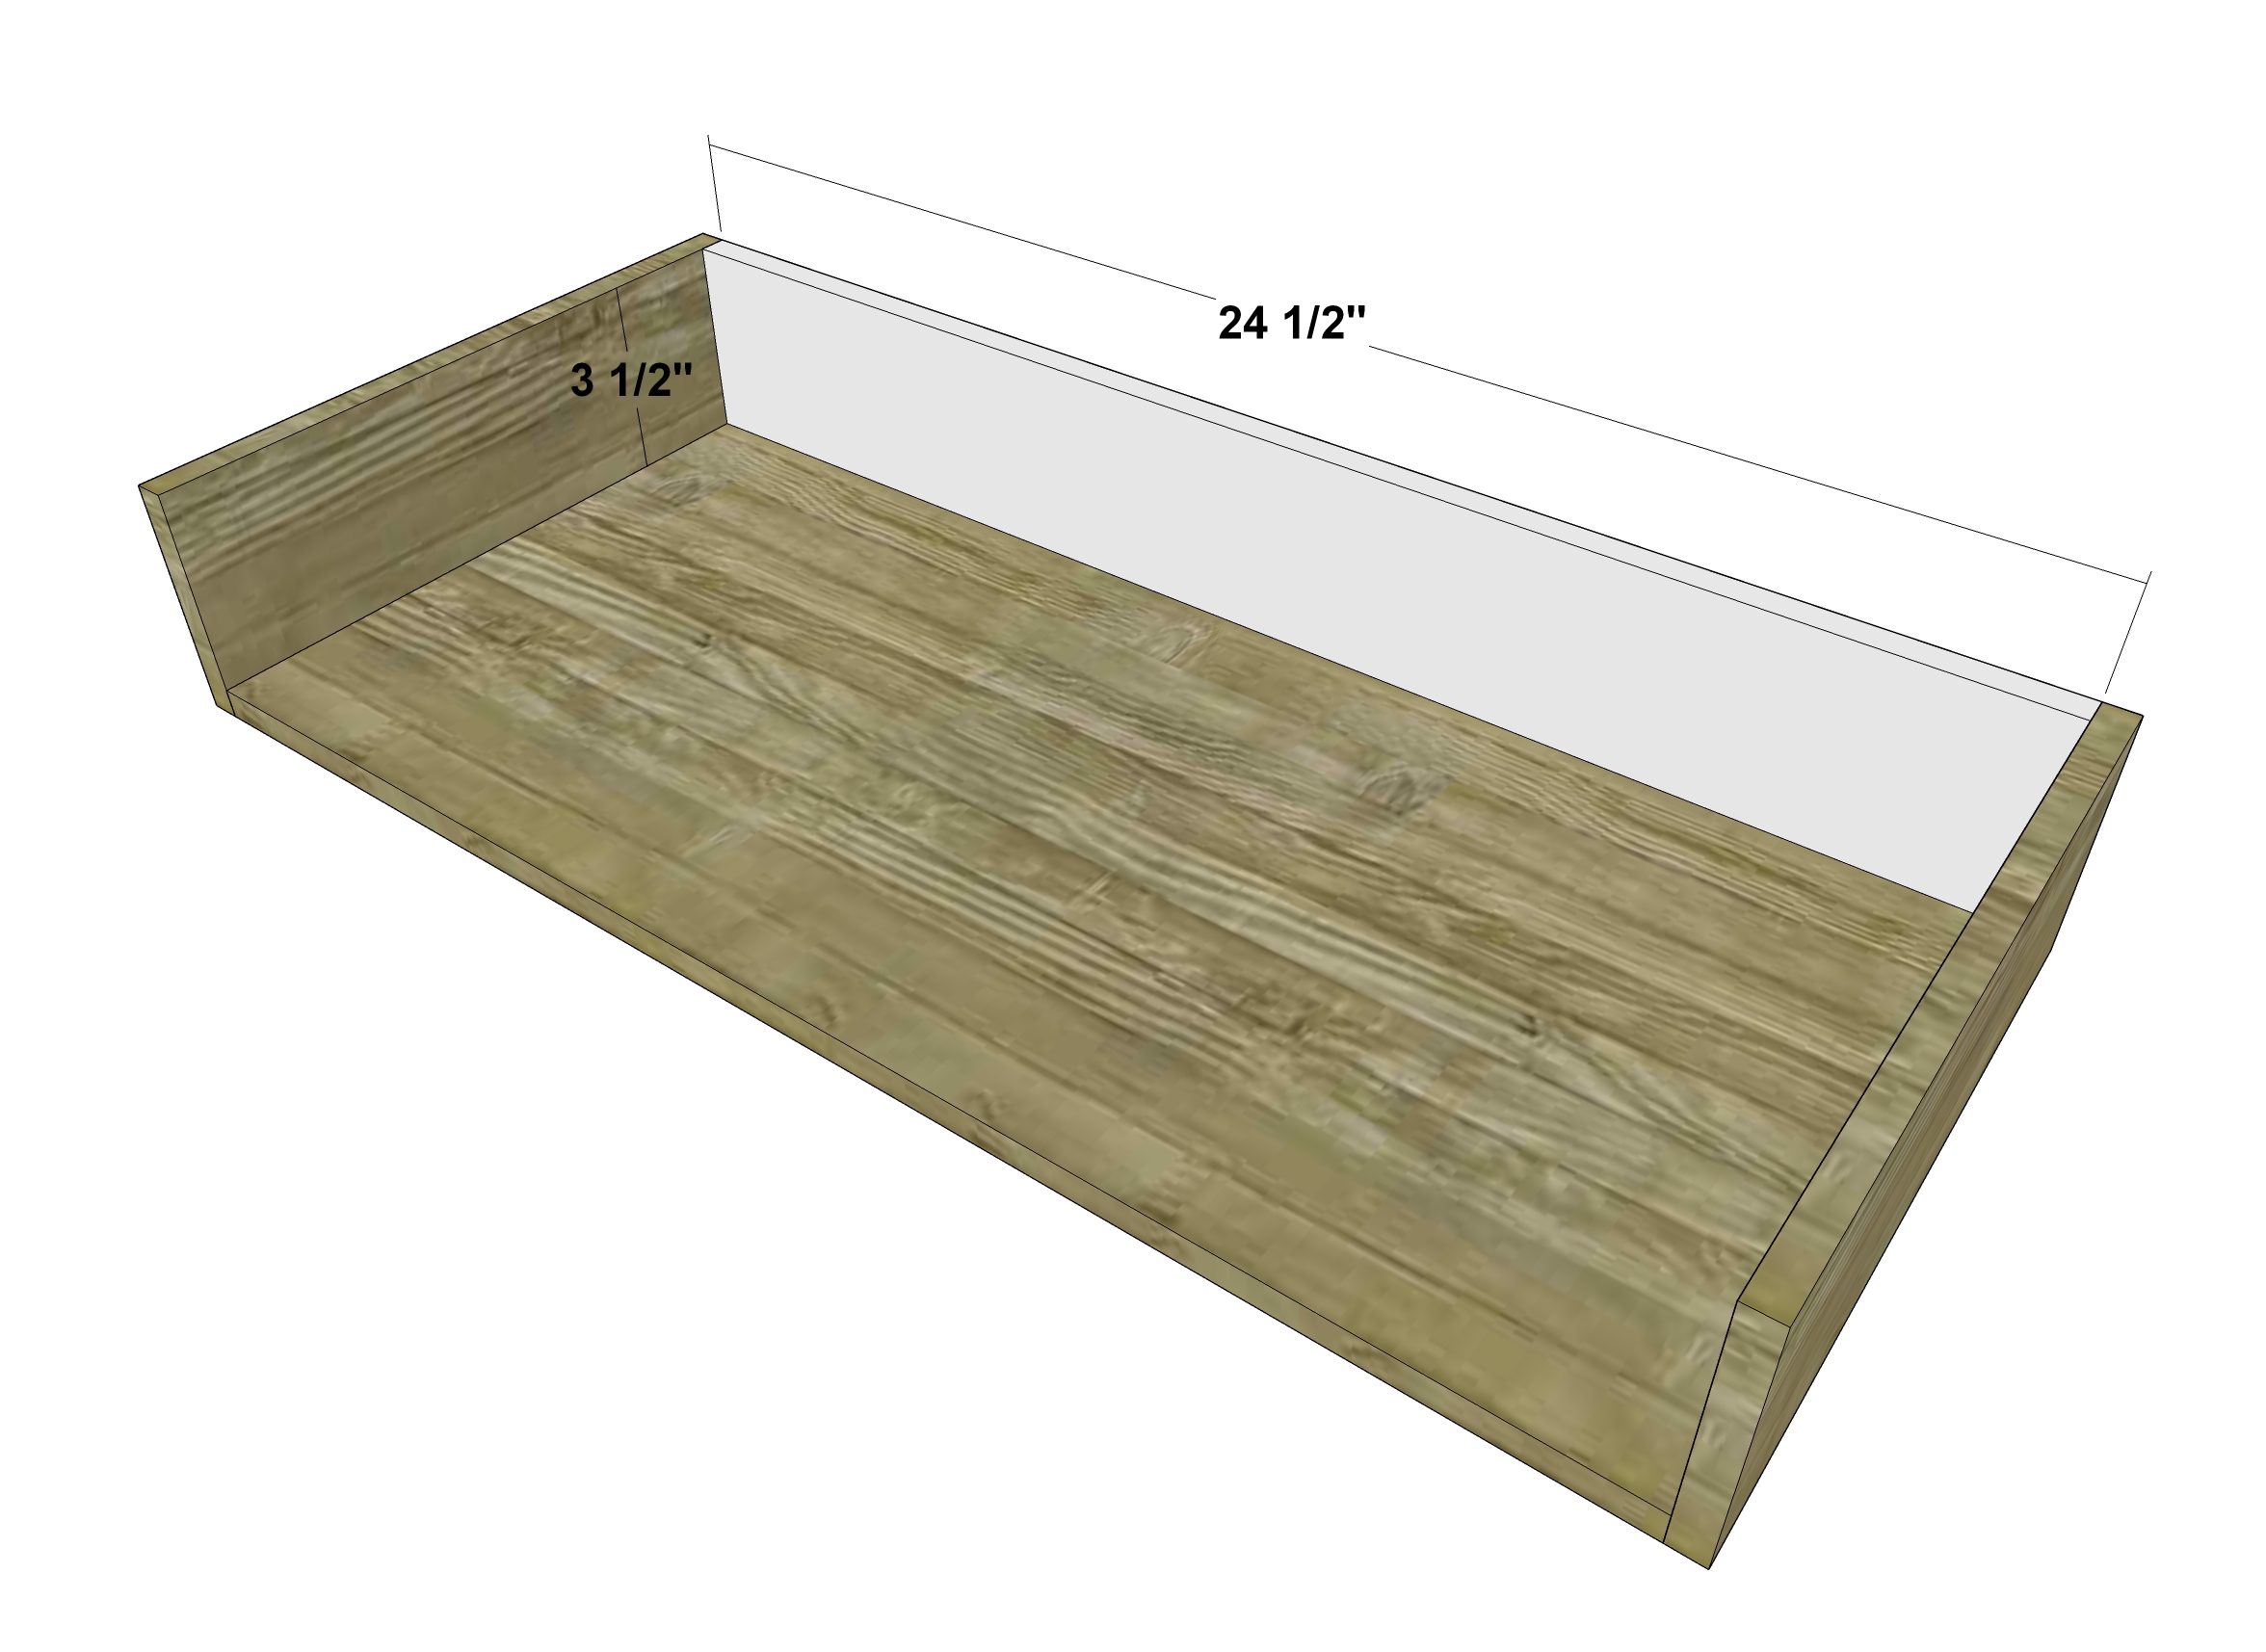
Drill pocket holes in the sides and bottoms of the Drawer Backs. Attach as shown with glue and 1” pocket hole screws.

For Drawers 1 through 5, only, attach the Plain Fronts as shown with glue and 1” pocket hole screws. The top of the Plain Fronts for Drawers 1 through 5 will extend 3/4” above the Sides. The bottoms of the Plain Fronts will extend 1/4” below the Sides.
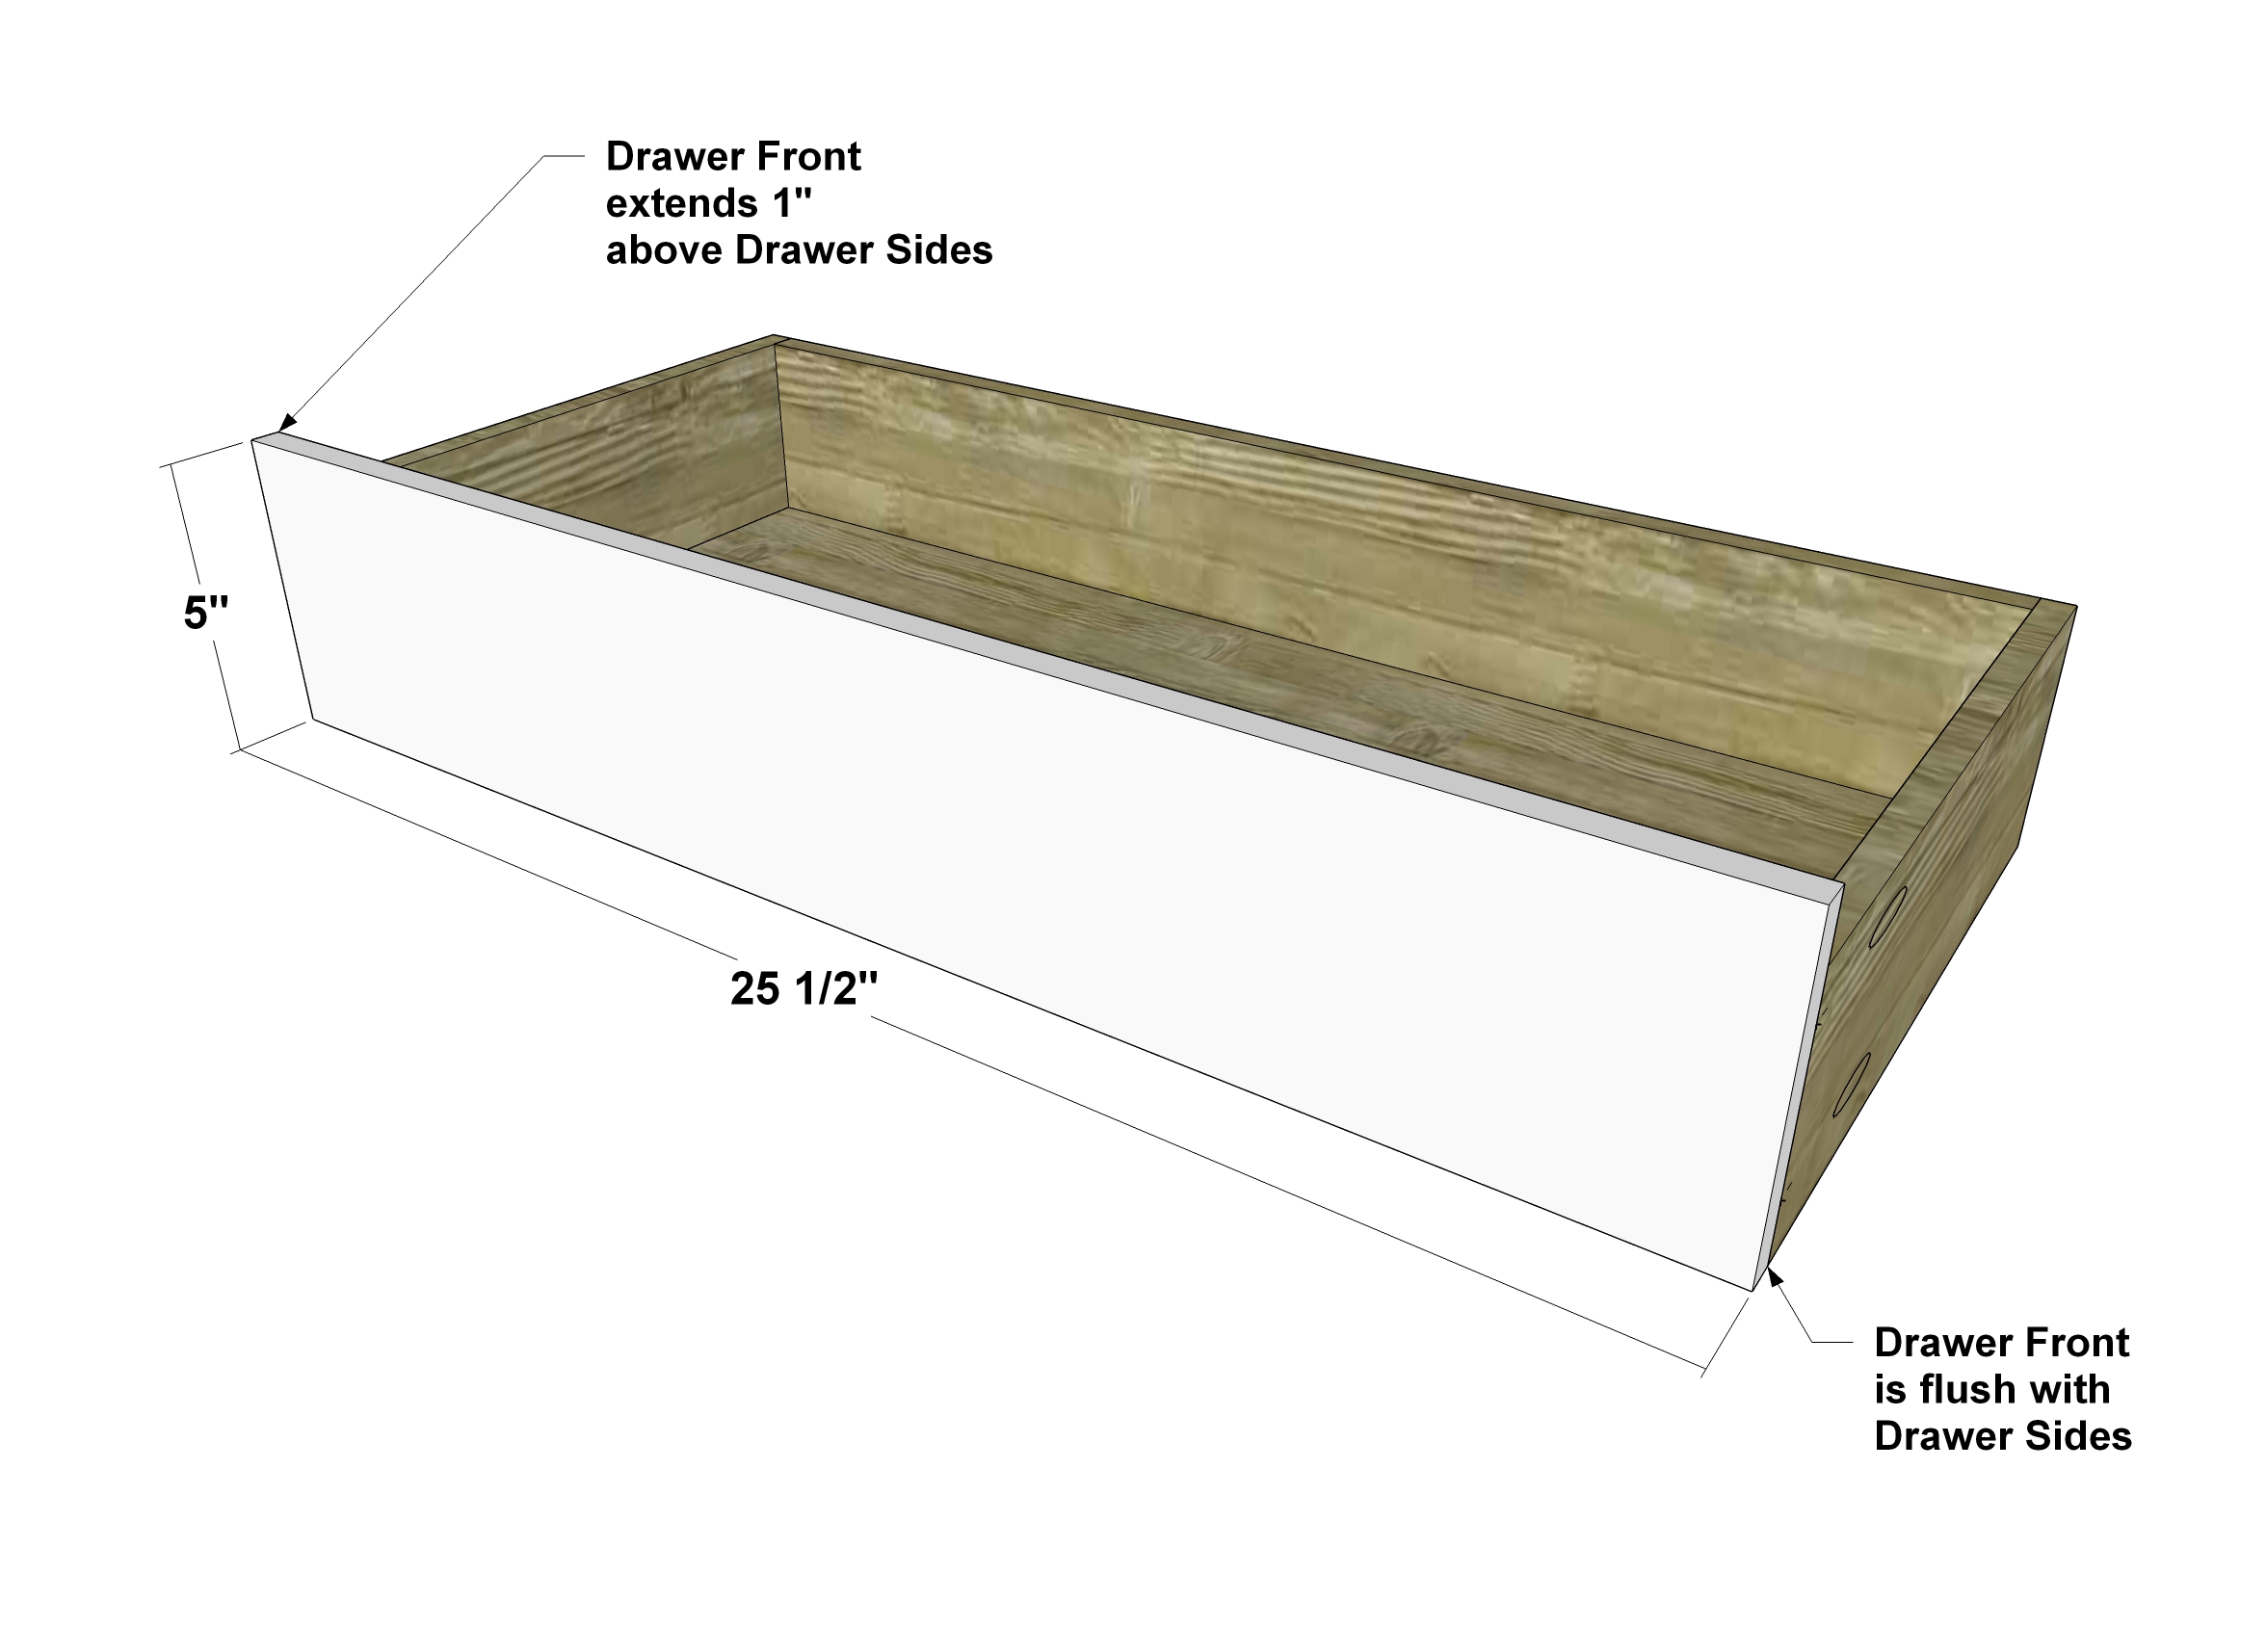
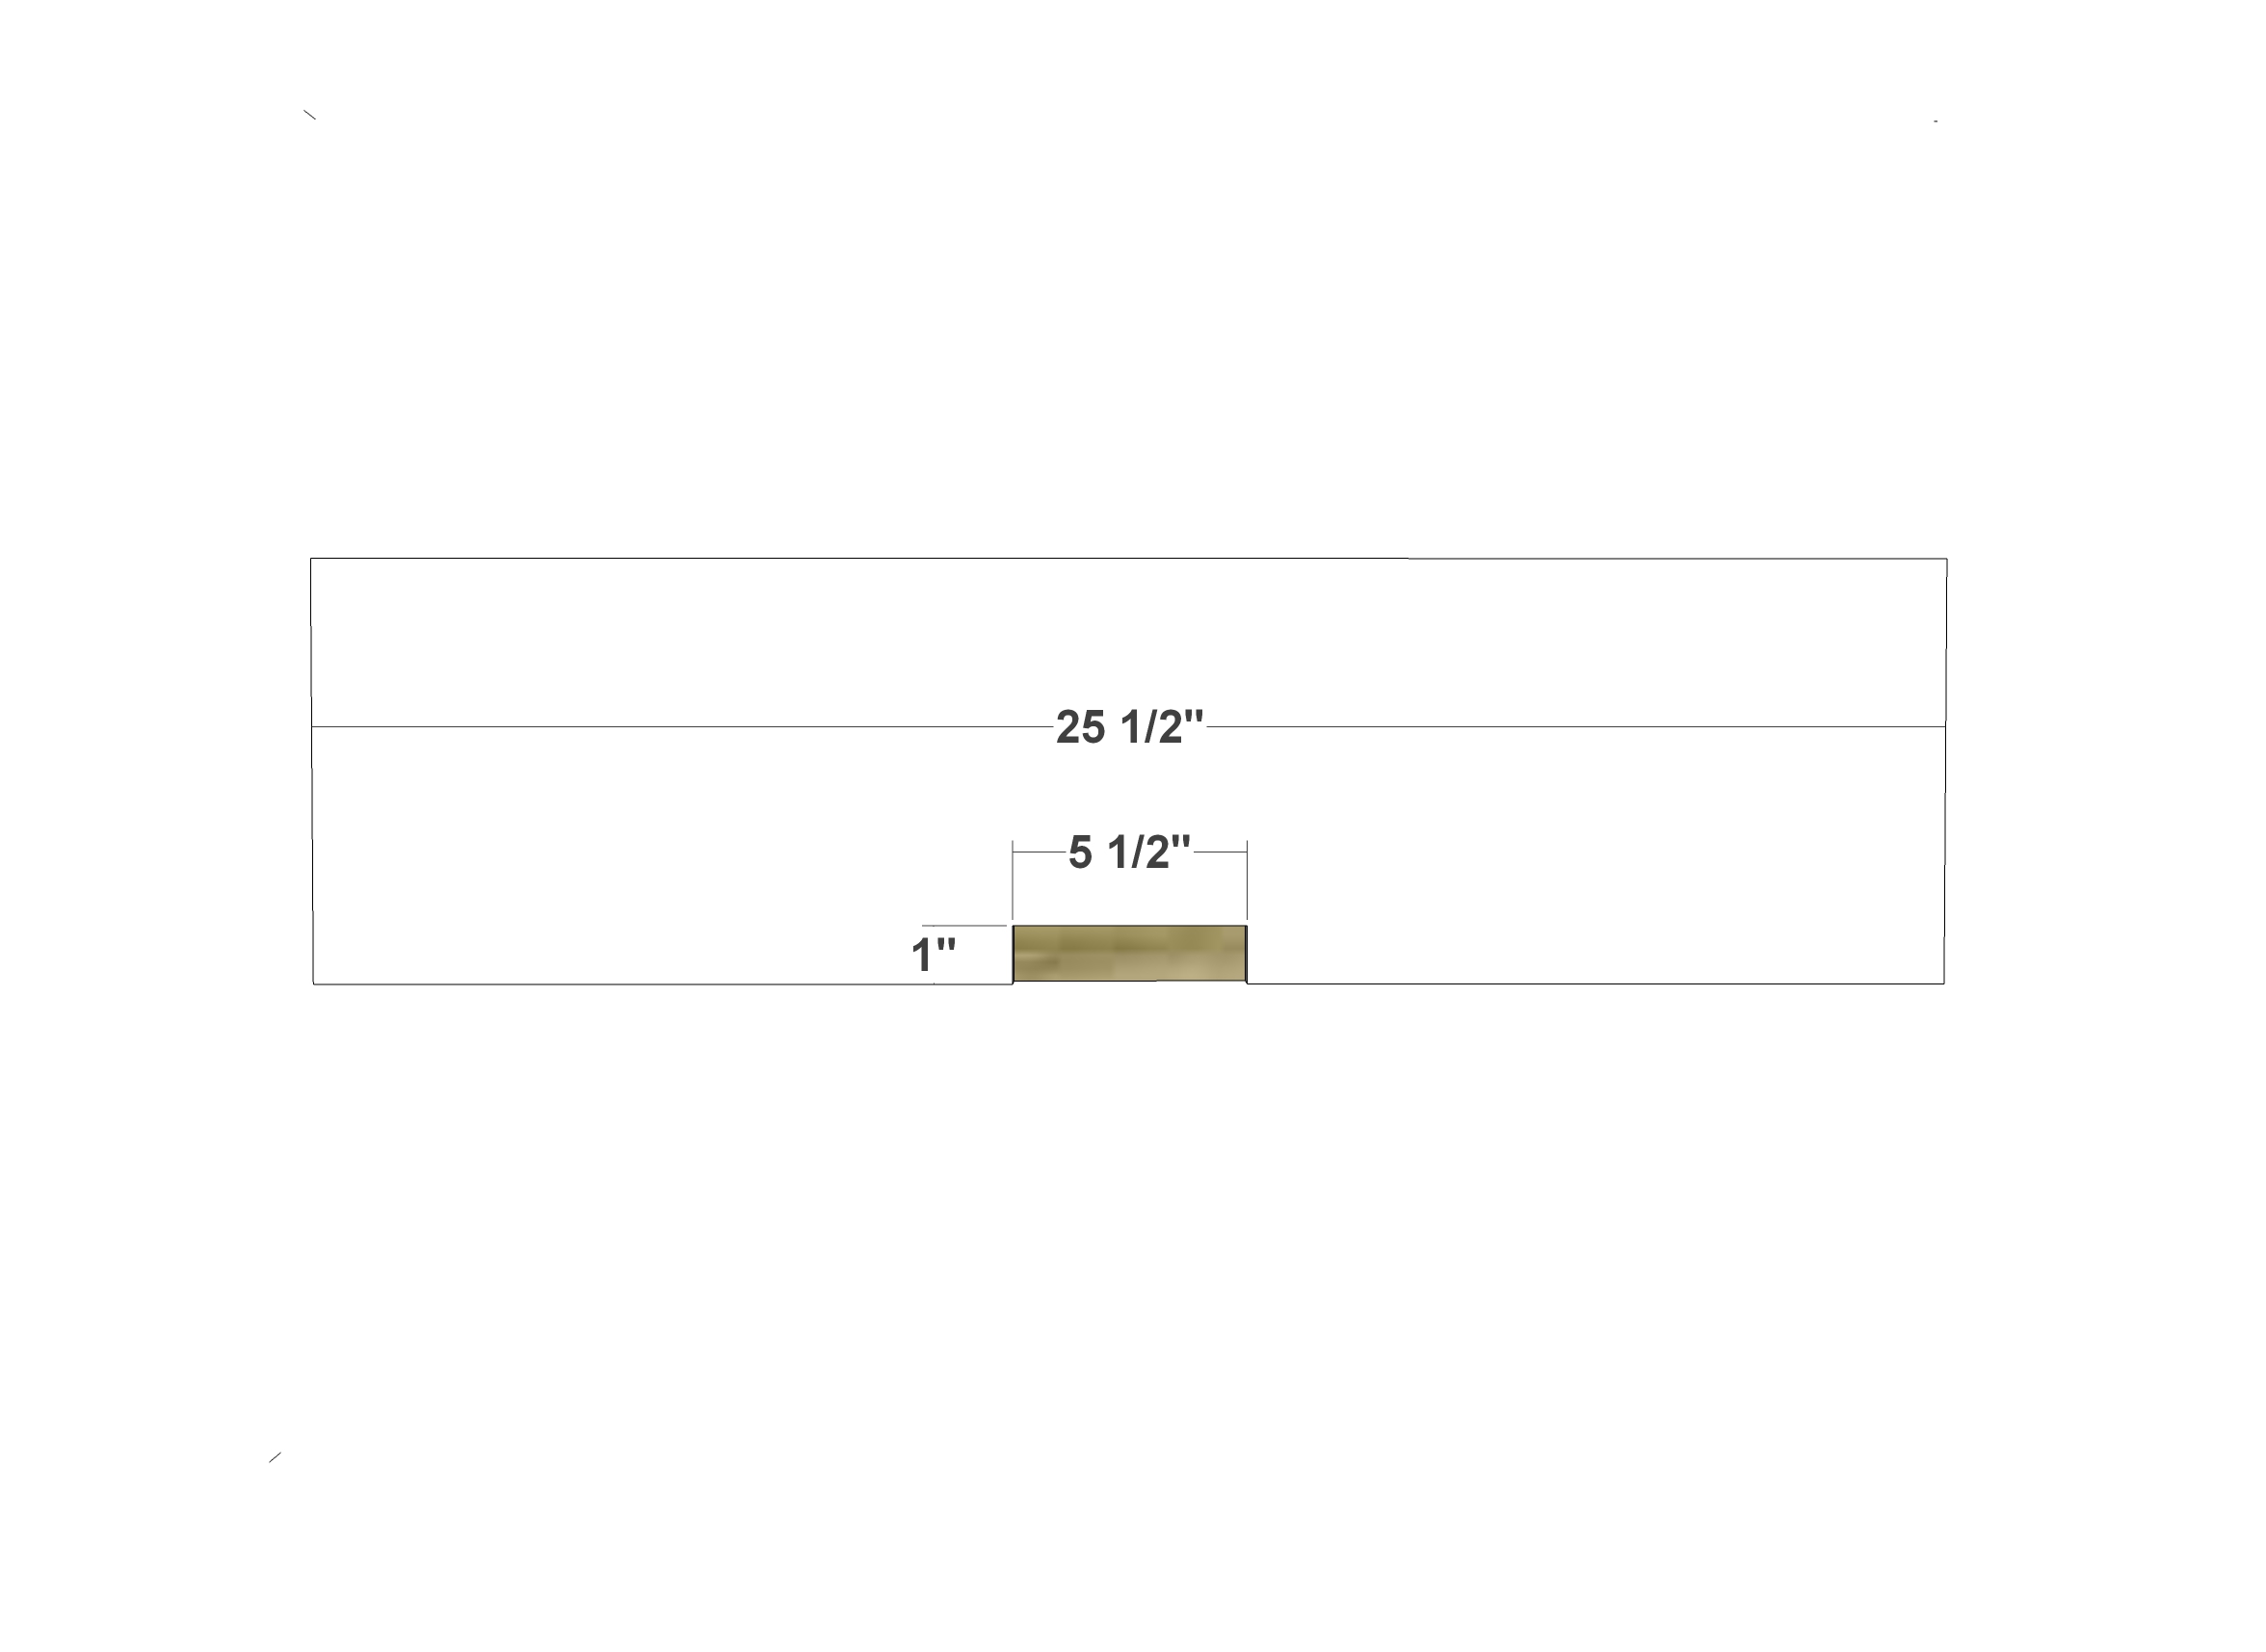
Next, cut out the Steppe Fronts for Drawers 1 through 6 as shown. Attach to the Plain Fronts of Drawers 1 through 5 with glue and 3/4” brad nails. The Steppe Fronts for these upper drawers will line up exactly with the Plain Fronts.
Tip: Paint the fronts and tops of the Plain Drawer Fronts in a darker color to add a really cool effect to this piece.
After sanding, staining, and sealing, you may want to apply a coat of paste wax to the bottoms of the Drawers and tops of the Drawer Guides to help them slide smoothly. Add drawer hardware such as a pull or knob if desired.
Fill any Screw, Nail or Pocket Holes, Sand and Finish as Desired. For Finishing Tips and Tricks visit my Finishing School
If painting, I like to sand the entire piece with 100 grit, then 220 grit, prime with any latex primer, sand again with 220 grit, and paint. Sanding the primer gives an extra-smooth finish! Finish with water-based polyurethane for added durability.
If staining, sand the entire piece with 60 grit, then 100 grit, and then 220 grit. Stain as desired. For the finish, use wipe-on poly or brush-on poly.
// Disclaimer: Some rights reserved. Private use only. Feel Free to link to any of my plans so long as you ONLY use 1 image and provide an ADEQUATE link back to the original source and appropriate plan! Plans from this page are not to be used for commercial purposes or republished without the express written consent of Rayan Turner, The Design Confidential. By accessing or using any part of the web site, you agree to become bound by the terms and conditions of this website as outlined under Terms of Use. If you do not agree to all the terms and conditions of this agreement, then you may not access the Website or use any services. The information contained in this website is for general information purposes only. The information is provided by The Design Confidential.com and while we endeavor to keep the information up to date and correct, we make no representations or warranties of any kind, express or implied, about the completeness, accuracy, reliability, suitability or availability with respect to the website or the information, products, services, or related graphics contained on the website for any purpose. Any reliance you place on such information is therefore strictly at your own risk. In no event will we be liable for any loss or damage including without limitation, indirect or consequential loss or damage, personal injury or death, or any loss or damage whatsoever arising from loss of information or profits arising out of, or in connection with, the use of this website. I hope to provide accurate plans, however, I cannot guarantee each plan for accuracy. Not every plan that I post has been built and tested, so you are building at your own risk. It is recommended that you have a clear understanding of how the project works before beginning any project. Please contact me if you find an error or inaccuracy so that I might fix it. The Design Confidential.com is inspired by but does not replicate exact designs, any similarities between these plans and items sold at specialty retailers is coincidential and not endorsed by or related to any said retailers. // Post May Contain Affiliate Links
