
The Low Loft Bunk Bed Series is hands down our most popular series of project plans to date. Many of you have asked for a queen sized version of this fabulous sleeper and I am finally obliging! Yahoo. I have made a modification to the ladder in this plan, for both the orientation as well as the method of construction, to be more accomodating to adults and to allow for a more compact footprint. You can refer to this if you prefer it, when you are building any of the other sizes, and can adjust the width for the person who will use it. Easy to build, and extremely budget friendly, this Free Woodworking plan to build a queen sized low loft bunk bed is the perfect project for those of you who need to go up rather than out in your furniture layout. Upward and onward, as they say.
The other amazing plans in this collection are below!


- 4 – 4×4 at 6′ Fence Posts – UNTREATED
- 2 – 2×6 at 8′
- 2 – 2×6 at 6′
- 14 – 2×4 at 8′
- 15 – 1×4 at 6′ – if 8′ boards are cheaper, buy those – you will have leftover scrap.
- Qty 8 – 5/16″ Carriage Bolts at 7″ length
- Qty 8 – 5/16″ Washers
- Qty 8 – 5/16″ Cap Nuts (rounded top)
- 3” Wood Screws
- 2″ Wood Screws
- 2-1/2″ Pocket Screws
- 1-1/4″ Pocket Screws
- Countersink Drill Bit
- Pocket Hole Plugs – Paint Grade, Pine, Oak– optional
- Clamps
- Safety Gear
- Wood Filler
- Wood Glue
- Sanding Supplies
- Paste Wax
- Finishing Supplies
- Anti-Tip Kit
- 4 – 4×4 at 59″ – Legs
- 2 – 2×6 at 81″ – Side Rails
- 2 – 2×6 at 70″ – Head / Foot Rails
- 2 – 2×4 at 81″ – Cleats
- 4 – 2×4 at 81″ – Upper Side Rails and Center Support Joists
- 4 – 2×4 at 70″ – Upper Head / Foot Rails
- 1 – 2×4 at 59″ – Front Guard Rai Ladder Leg
- 4 – 2×4 at 8 3/4″ – Lower Front Guard Rail Ladder Supports
- 1 – 2×4 at 18″ – Upper Front Guard Rail Ladder Supports
- 2 – 2×4 at 55″ – Guard Rail Side Upper Rails
- 4 – 2×4 at 27″ – Ladder Rungs
- 15 – 1×4 at 67″ – Slats
Before beginning to build, always check in on my site to make sure you have the most up to date set of plans, I occasionally update and change the plans to make the building process easier or to allow for less expensive purchasing of materials! Read through the entire set of instructions and all comments before beginning this project. If you print out or save plans, be sure to check in on my site to be sure you have the most up to date set of plans, as I occasionally update things for ease of building or buying. If you are new to building, read through the GETTING STARTED section and other articles found under the BUILD tab in the menu on my site, it has valuable information about how to get started, tools and techniques. If you are unfamiliar with the finishing process, visit my Finishing school for some tips and tricks for painting like a pro and for special finishing practices. Use glue to secure your joints and Consider Painting or Staining individual sections prior to assembling. This makes the paint application virtually flawless. Coat with a spray on Poly or Wipe on Poly to protect your finish and your piece and it will last for ages. Adhere to all safety standards and guidelines, and be sure you follow safety protocol throughout your build. If you are unsure about whether you are building safely, run a quick online search for the tool or technique you are using, or contact me via email or post to the forum before you move ahead. My contact info can be found in the menu of my site.
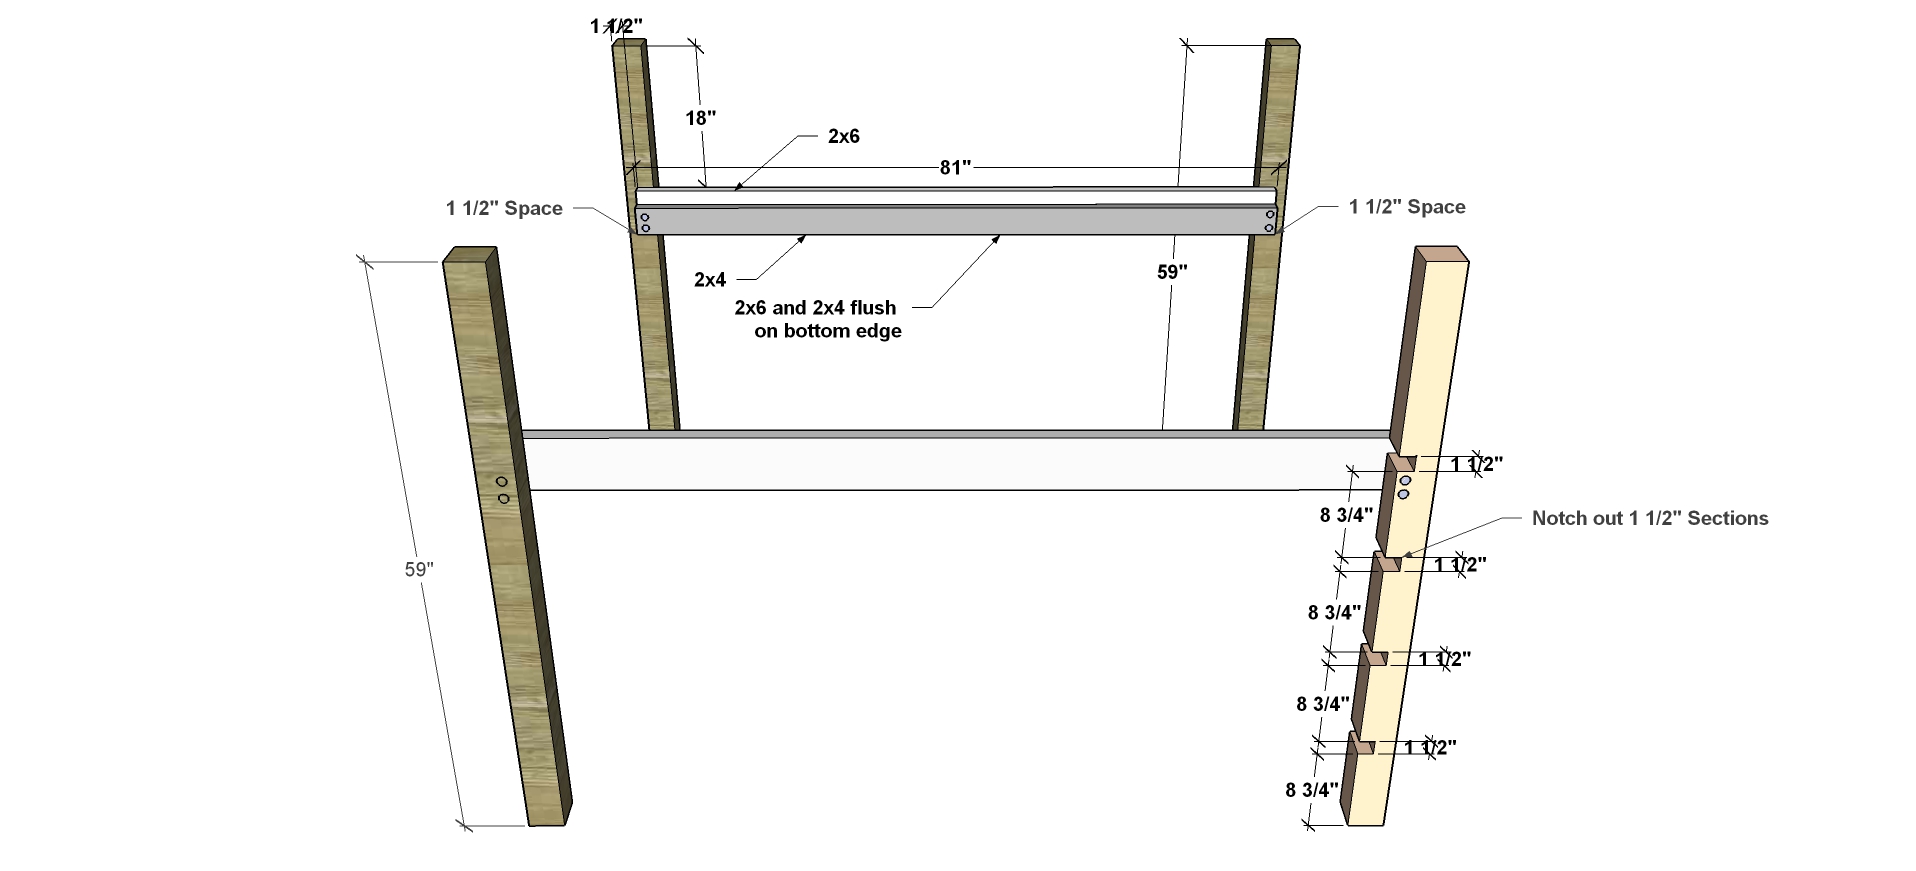
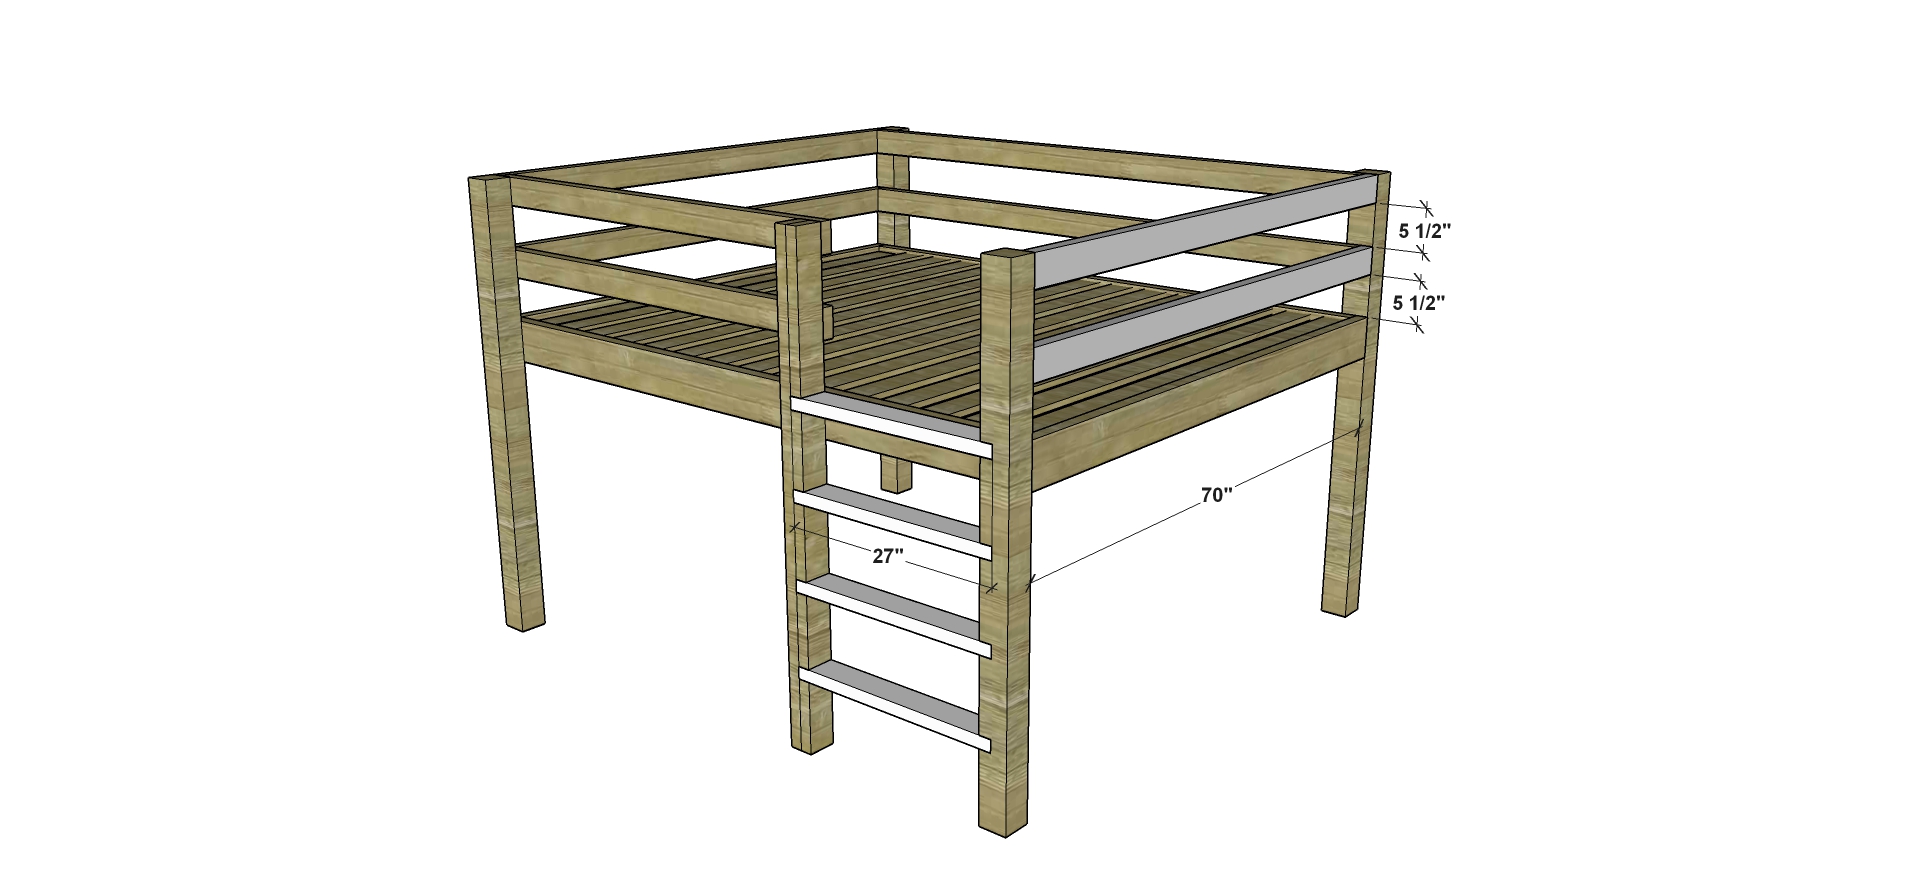
Cut all 4 Legs to size and then notch out the sections shown in the image on one of the legs. You can use a jig saw, table saw or a circular saw to do this. Then attach the Cleats to the Side Rails using 2″ Screws and be sure the bottom of the Side Rail and the Cleat are flush. You
To attach the Rails to the Legs you will arrange the pieces as shown in the diagram below, making sure to leave 1 1/2″ on either side of the ends of the Rails to allow for the Head and Foot Rails later. Clamp together making sure everything is completely square before you proceed. Once square and aligned as needed, you will use a 7/16″ Drill Bit and drill through all 3 pieces on each side (the leg, rail and cleat), creating 2 holes on either side for the bolts that will secure this.
Fasten with your Carriage Bolts and tighten.

Attach the Lower Head and Foot Rails to the Side Rails so that they sit flush with the outside of the Legs and with the Lower Side Rails. Use 3″ Screws to secure these to the Side Rails. Use your Kreg Jig set for 1 1/2″ material, to secure the Center Support Joists to the Head and Foot Rails and 2 1/2″ Pocket Hole Screws. Then fasten the Upper Side Rails one one side (not the side that will have your ladder) to the Back Legs using 3″ Screws.
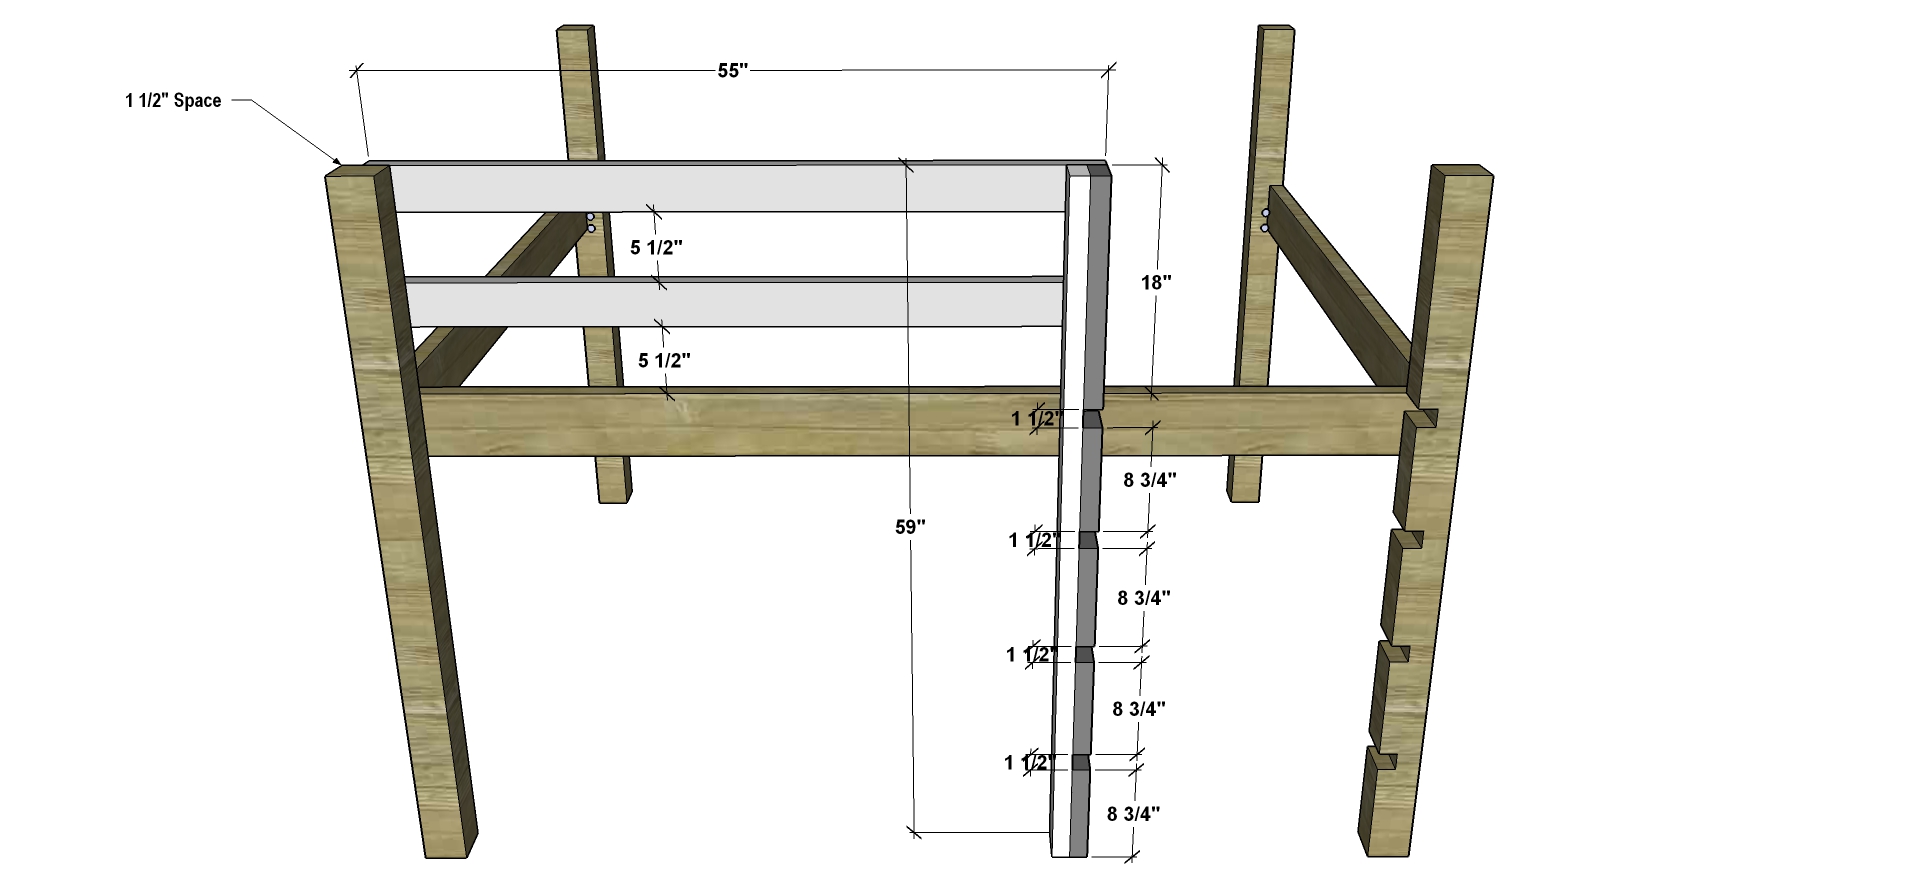
Create your Guard Rail Leg Unit. This will be 2 – 2×4’s, one long and the other cut into sections with spacing and dimensions as shown in the image. This will hold your ladder rungs later so just be sure that the separation between your shorter ladder supports will actually fit a 2×4 nice and snug. You need to fit it in place but you don’t want any wiggle room so a tight fit is better than a slightly loose fit. Attach the Front Upper Side Rails to the Leg using 3″ screws and attach to the Guard Rail Leg Unit using 2″ Screws.
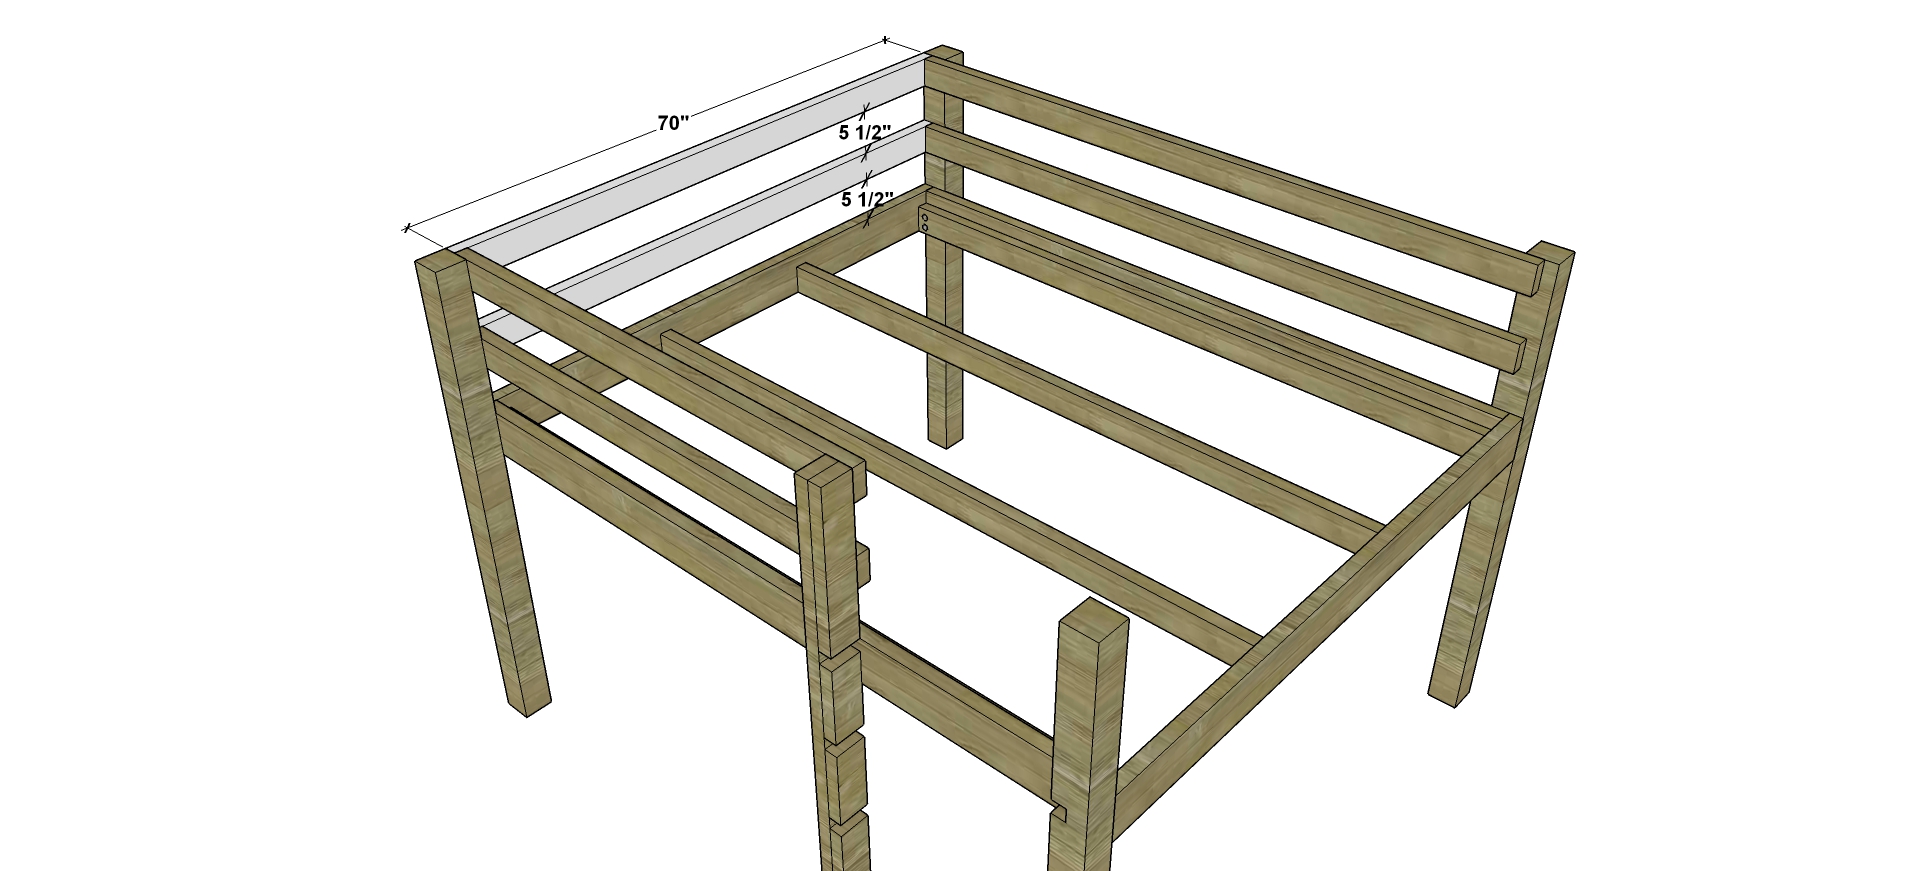
Attach the Upper Head Rails on the side opposite where you choose to put the ladder, in my example this would be the left side. Use 3″ Screws and secure into the ends of the Upper Side Rails.
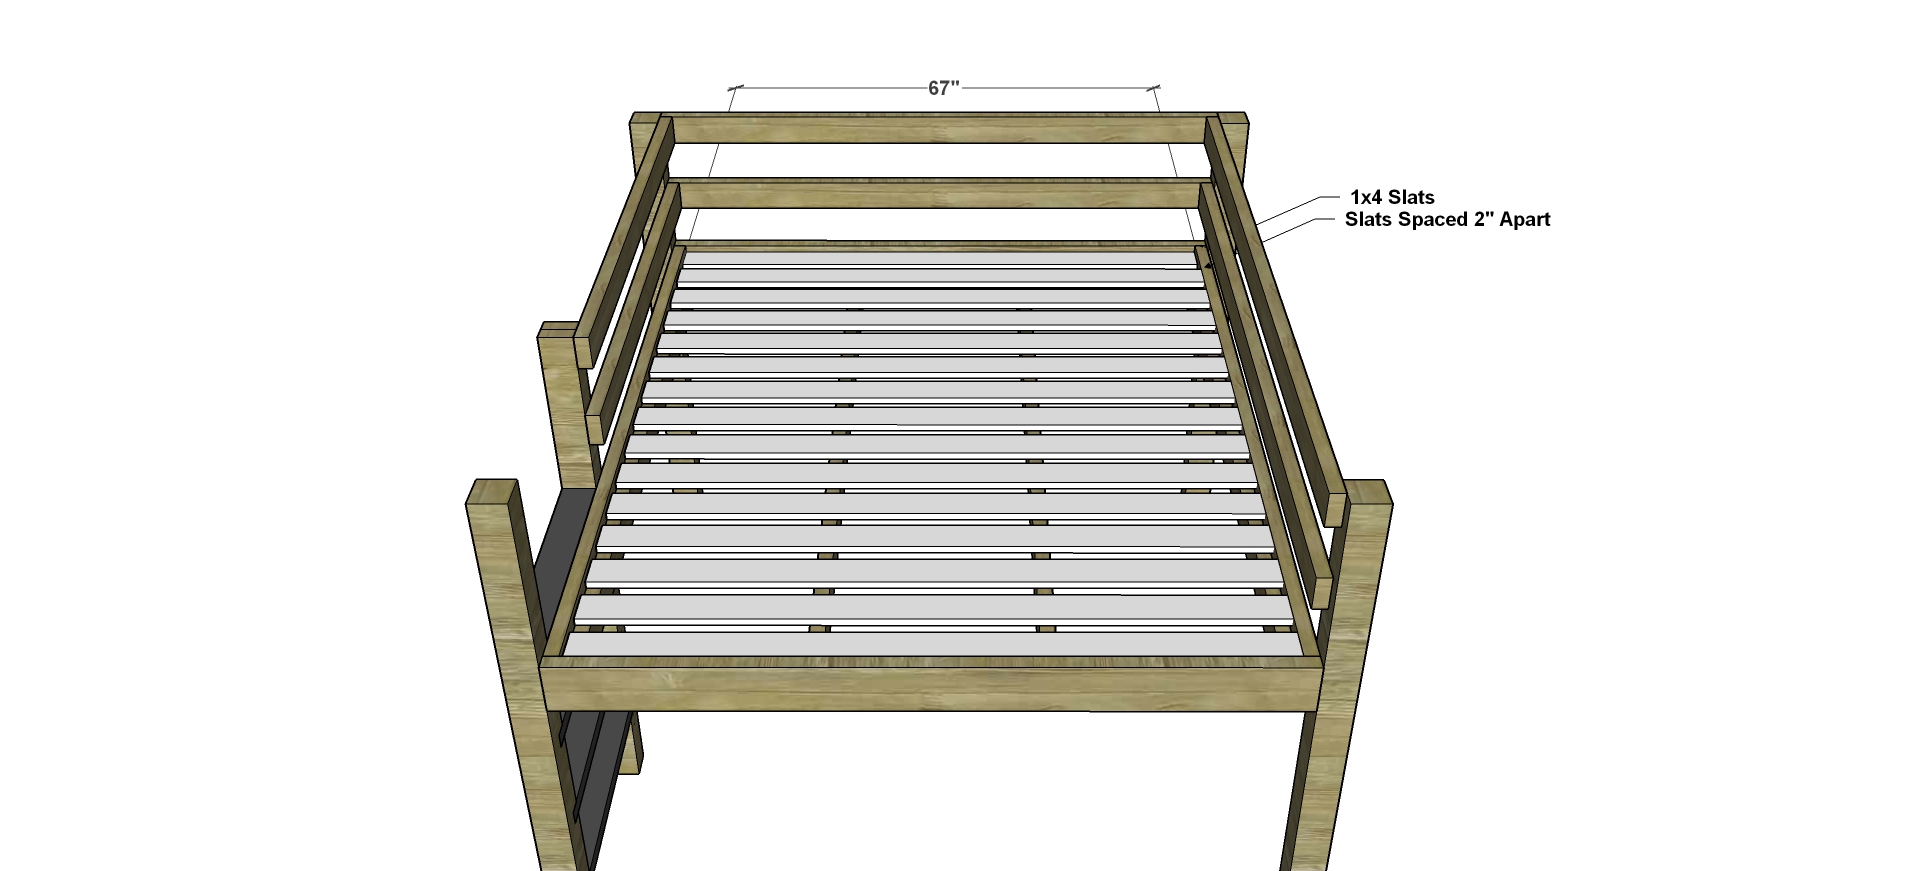
Lay your Slats approximately 2″ apart. Be sure the 2 on the outside edges are flush in both corners. Screw down using 1 1/4″ Screws or Nails and fasten to both cleats and both support joists.
Attach the remaining 2 upper Foot Rails to the Back Upper Side Rails and the Front Leg using a Pocket hole System (Kreg Jig) set for 1 1/2″ materials and 2 1/2″ pocket hole screws and glue to fasten the Rails to the front Leg. To fasten the Foot Rails to the Back Side you can either use Pocket Hole Screws and glue to connect them to the Back Leg or 3″ Wood Screws and Glue, with a countersink bit to predrill and secure directly to the end of the Upper Side Rails.
Slide the Ladder Rungs into place and secure with glue. You can choose to secure with 3″ Wood Screws from the legs into the ends of the rungs, but this is optional and you can absolutely secure with glue and call it a day!
Fill any Screw, Nail or Pocket Holes, Sand and Finish as Desired.
// Disclaimer: Some rights reserved. Private use only. Feel Free to link to any of my plans so long as you ONLY use 1 image and provide an ADEQUATE link back to the original source and appropriate plan! Plans from this page are not to be used for commercial purposes or republished without the express written consent of Rayan Turner, The Design Confidential. By accessing or using any part of the web site, you agree to become bound by the terms and conditions of this website as outlined under Terms of Use. If you do not agree to all the terms and conditions of this agreement, then you may not access the Website or use any services. The information contained in this website is for general information purposes only. The information is provided by The Design Confidential.com and while we endeavor to keep the information up to date and correct, we make no representations or warranties of any kind, express or implied, about the completeness, accuracy, reliability, suitability or availability with respect to the website or the information, products, services, or related graphics contained on the website for any purpose. Any reliance you place on such information is therefore strictly at your own risk. In no event will we be liable for any loss or damage including without limitation, indirect or consequential loss or damage, personal injury or death, or any loss or damage whatsoever arising from loss of information or profits arising out of, or in connection with, the use of this website. I hope to provide accurate plans, however, I cannot guarantee each plan for accuracy. Not every plan that I post has been built and tested, so you are building at your own risk. It is recommended that you have a clear understanding of how the project works before beginning any project. Please contact me if you find an error or inaccuracy so that I might fix it. The Design Confidential.com is inspired by but does not replicate exact designs, any similarities between these plans and items sold at specialty retailers is coincidential and not endorsed by or related to any said retailers. // Post May Contain Affiliate Links

I am mid-project using your plans for both the low loft twin and full sized beds, but they seem to have disappeared from the site. Is there another place I can access? Thanks in advance!
if you search for the plans on the site, you will find them! the url’s have gotten all crazy on me for a quick minute. the images may be broken on the plans, so if so, i will be fixing them all up shortly! so sorry about all that!
ok these are all fixed and should be good to go!
I want to make this bed, but I want to make it higher (63inch height under the bed). Can I still use this plan or do I need to look for a different one?
You can still use this plan for sure, in fact it is likely better than some others that won’t be quite a sturdy. BUT, with that added height, I would make sure to add some bracing around the bottom so that it isn’t so top heavy. If you plan to secure it to something or place a dresser under it etc., then you can skip the bracing if you simply attach them together.