
The twin sized version of this bed has been such a hit! And I am so glad because I absolutely love the loft bunk I built for my boy… and while I shared plans for a twin sized low loft bed (it’s most common for a loft bed) I actually built mine in a toddler size (I wasn’t ready to move up in mattress size in Monster Mash’s tiny room). So now, you have asked and I shall comply… Plans for the Toddler Size that I ACTUALLY built!
Below are the plans for this bed in other sizes! Something for everyone!
$75-$100
- 2 – 4×4 at 10′ Can use Fence Posts – untreated
- 2 – 2×6 at 8′
- 6 – 2×4 at 8′
- 4 – 1×4 at 8′
- 1 – 1×4 at 6′
- Qty 8 – 5/16″ Carriage Bolts at 6 1/2″ length – *if you can’t find 6 1/2″ Bolts 7″ Bolts will also work
- Qty 8 – 5/16″ Washers
- Qty 8 – 5/16″ Cap Nuts (rounded top)
- 3” Wood Screws
- 2″ Wood Screws
- 2-1/2″ Pocket Screws
- 1-1/4″ Pocket Screws
- Countersink Drill Bit
- 5/16″ Drill Bit
- Pocket Hole Plugs – Paint Grade, Pine, Oak– optional
- Clamps
- Safety Gear
- Wood Filler
- Wood Glue
- Sanding Supplies
- Paste Wax
- Finishing Supplies
- Anti-Tip Kit
- 4 – 4×4 at 54″ (Legs)
- 2 – 2×6 at 54″ (Front and Back Rails)
- 2 – 2×6 at 31″ (Side Rails)
- 2 – 2×4 at 54″ (Upper Back Rails)
- 4 – 2×4 at 31″ (Upper Side Rails)
- 1 – 2×4 at 23 1/2″ (Front Guard Rail)
- 2 – 2×4 at 35″ (Front Upper Rails)
- 2 – 2×4 at 60″ (Ladder Rails)
- 4 – 2×4 at 14″ (Ladder Rungs)
- 7 – 1×4 at 28″ (Slats)
- 2 – 1×4 at 54″ (Cleats)
Before beginning to build, always check in on my site to make sure you have the most up to date set of plans, I occasionally update and change the plans to make the building process easier or to allow for less expensive purchasing of materials! Read through the entire set of instructions and all comments before beginning this project. If you print out or save plans, be sure to check in on my site to be sure you have the most up to date set of plans, as I occasionally update things for ease of building or buying. If you are new to building, read through the GETTING STARTED section and other articles found under the BUILD tab in the menu on my site, it has valuable information about how to get started, tools and techniques. If you are unfamiliar with the finishing process, visit my Finishing school for some tips and tricks for painting like a pro and for special finishing practices. Use glue to secure your joints and Consider Painting or Staining individual sections prior to assembling. This makes the paint application virtually flawless. Coat with a spray on Poly or Wipe on Poly to protect your finish and your piece and it will last for ages. Adhere to all safety standards and guidelines, and be sure you follow safety protocol throughout your build. If you are unsure about whether you are building safely, run a quick online search for the tool or technique you are using, or contact me via email or post to the forum before you move ahead. My contact info can be found in the menu of my site.
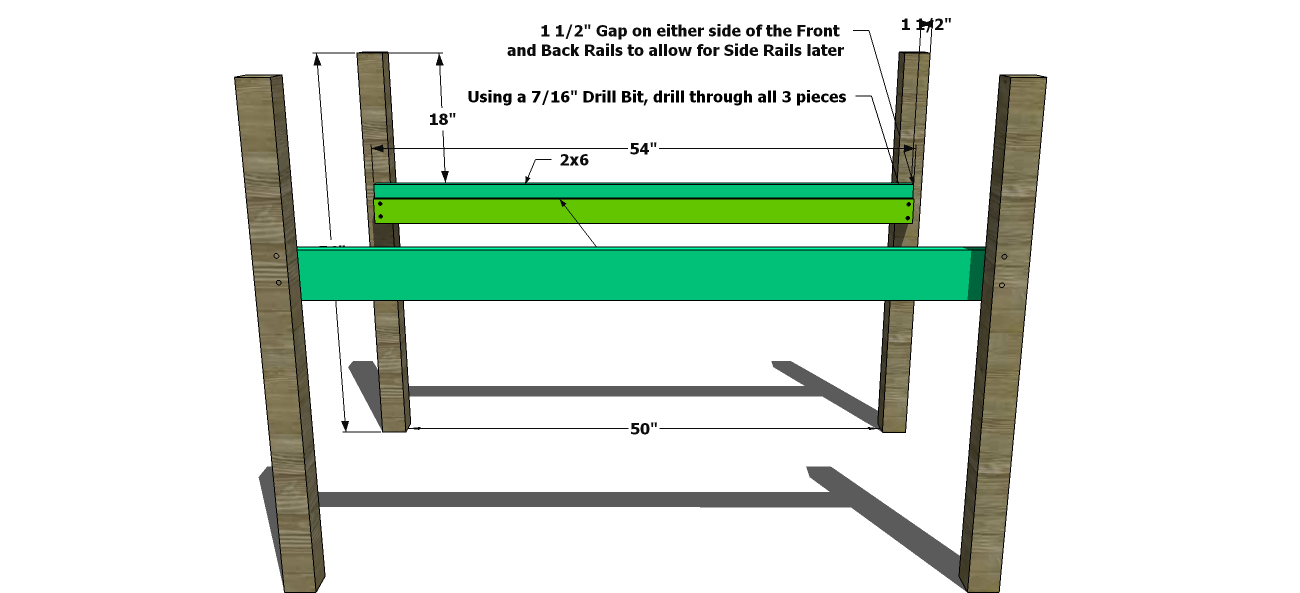
Cut the Legs to size and attach the Cleat to the Front and Back Rails using 2″ Screws.
To attach the Rails to the Legs you will arrange the 4 pieces as shown in the diagram below, making sure to leave 1 1/2″ on either side of the Rails to allow for the Side Rails later, and clamp together making sure everything is completely square before you proceed. Once square and aligned as needed, you will use a 7/16″ Drill Bit and drill through all 3 pieces on each side, creating 2 holes on either side for the bolts.
Fasten with your Carriage Bolts and tighten.

Attach the Side Rails to the Front and Back Rails then fasten the Upper Back Rails to the Back Legs. Use 3″ Screws
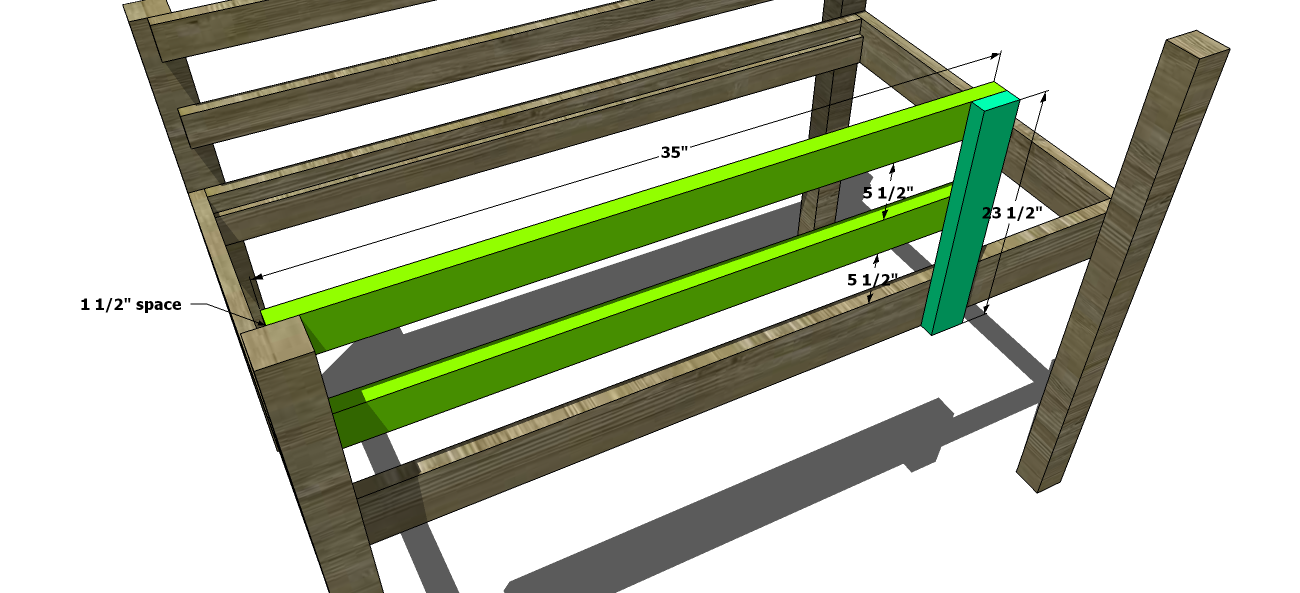
Attach the Front Vertical Guard Rail, use 2″ Screws. Then fasten the Front Upper Rails to it and the Front left or right Leg. Use 3″ Screws to attach to the Leg.
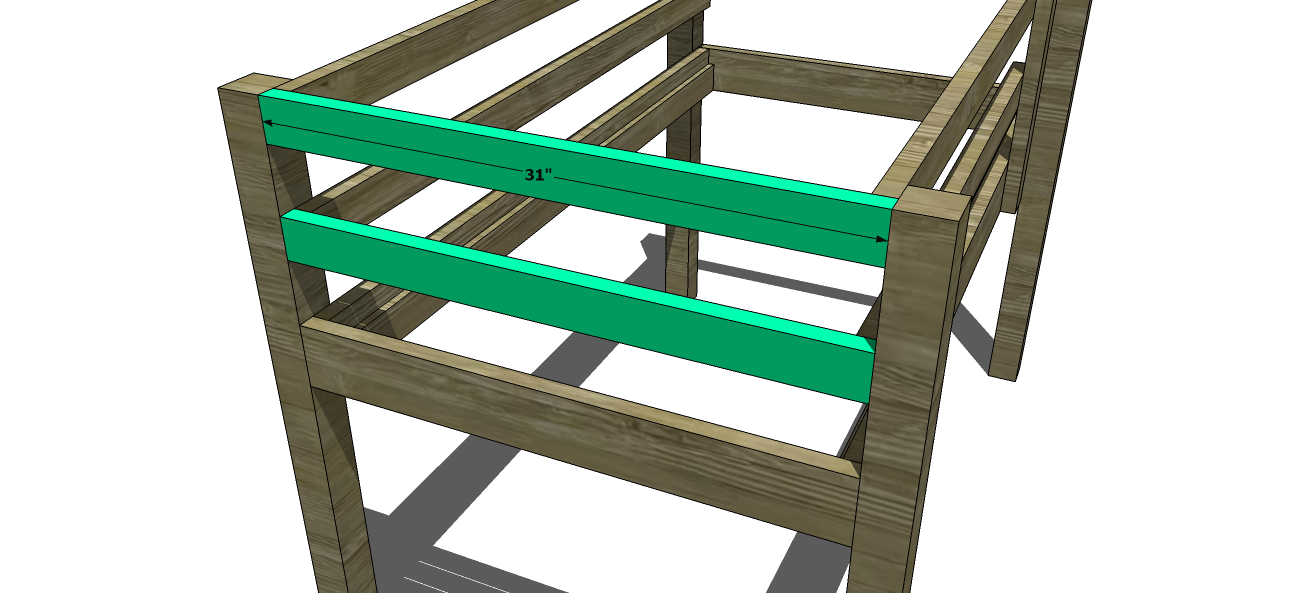
Attach the Upper Side Rails on the side opposite where you choose to put the ladder, in my example this would be the left side. Use 3″ Screws.
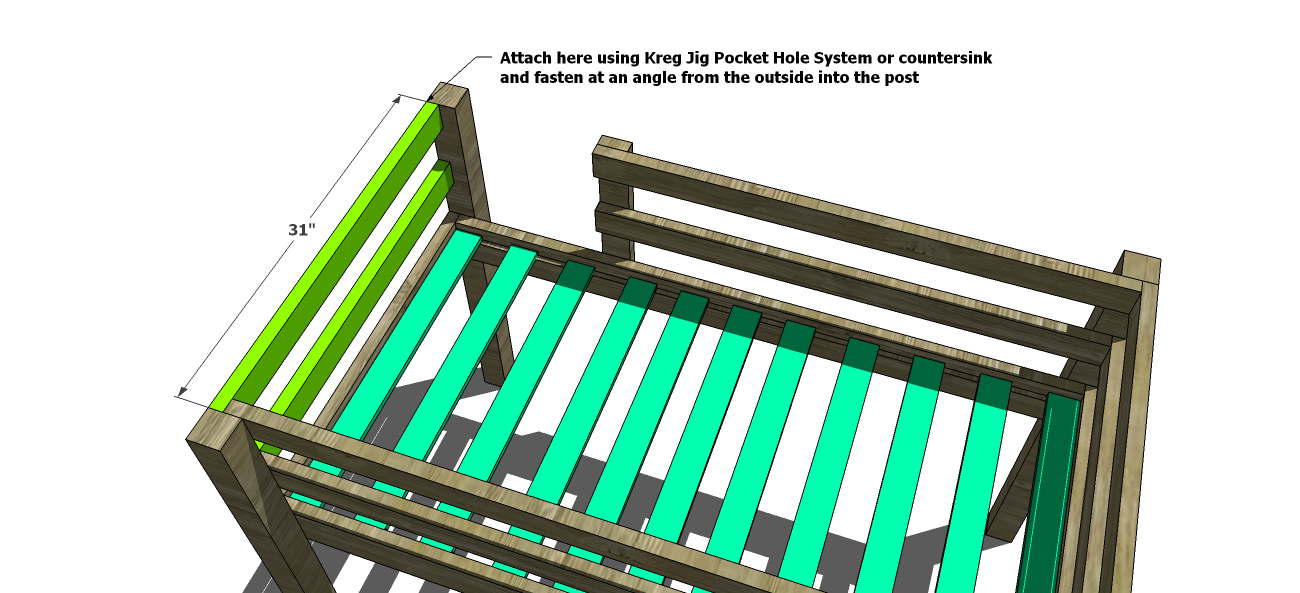
Lay your Slats approximately 4″ apart. Be sure the 2 on the outside edges are flush in both corners. Screw down using 1 1/4″ Screws. Attach the remaining 2 upper Side Rails to the Back Rails and then either use a Pocket hole System (Kreg Jig) to create pocket holes and fasten to the front leg. If you don’t own a Kreg Jig you can also countersink and predrill at an angle from the outside edge into the leg. Use 3″ Screws
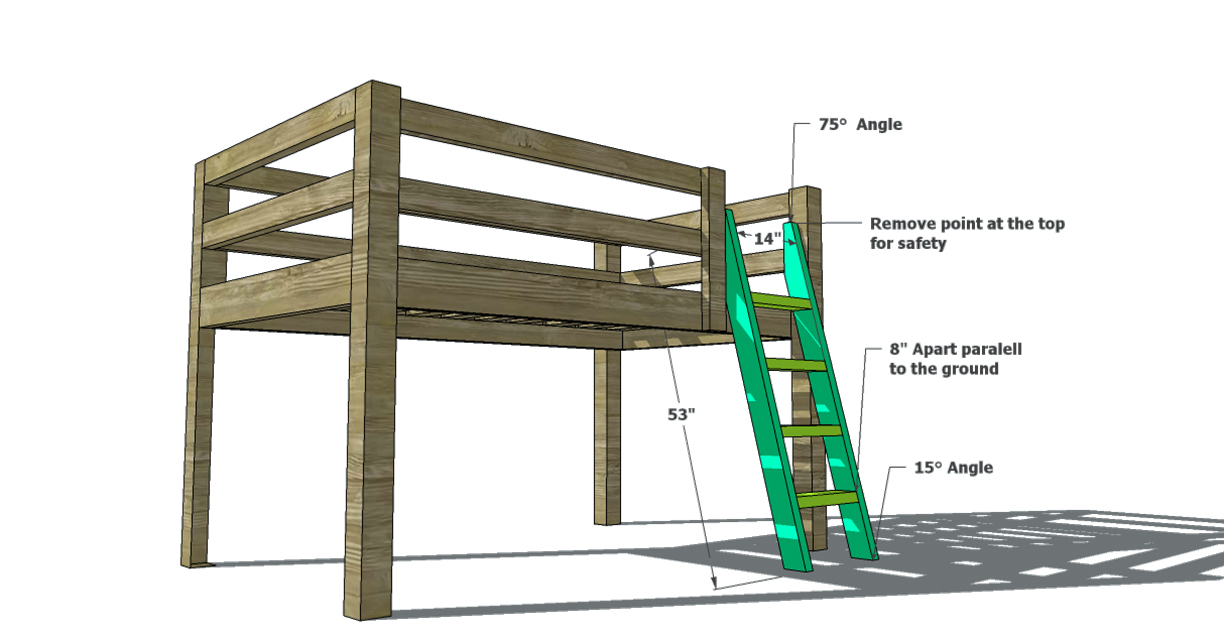
Create the Ladder. I give approximate dimensions for the height below, but the important aspect to focus on is the angle you will cut the top and bottom. The top of the ladder rails will be at a 75°angle and the bottom of the rails will be a 15°angle where the boards will rest on the ground.
Attach the rungs at approximately 8″ apart (this will depend on the age of your kiddo, the smaller and younger, the closer together these should be, you need to consider how easy it will be for them to climb down) and parallel to the ground. Use 3″ Screws to fasten the rungs to the rails and to fasten the rails to the Leg and Front Guard Rail. I suggest cutting away the point you will create at the very top, when you cut the 75°angle, for added safety. This will also give your ladder a bit of a hand grip up top.
Fill any Screw, Nail or Pocket Holes, Sand and Finish as Desired. For Finishing Tips and Tricks visit my Finishing School
**Disclaimer: Some rights reserved. Private use only. Feel Free to link to any of my plans so long as you provide an adequate link back to the appropriate post! Plans from this page are not to be used for commercial purposes or republished without the express written consent of Rayan Turner, The Design Confidential I hope to provide accurate plans, however, I cannot guarantee each plan for accuracy. Not every plan that I post has been built and tested, so you are building at your own risk. It is recommended that you have a clear understanding of how the project works before beginning any project. Please contact me if you find an error or inaccuracy so that I might fix it.

Thank you for the plan and instructions. It’s just what I was looking for!
Wondering if there are weight restrictions for the loft part?
I was hoping it could become a tween/teen hangout space as my child grows older… perfect nook for listening to music, using a tablet, reading… plus would make for better longevity of the piece in the house.
Thanks in advance 🙂
Yay! no concerns with the weight of tweens and teens. this baby is built with more sturdy lumber than many houses are. just keep an eye on the slats. if they get a lot of jumping or crazy tween monkey business, you can double up and add more slats. the more slats you have, the more the weight will be distributed and the greater the longevity of that portion of the bed!
I absolutely cannot get untreated lumber where I live. The only option for untreated is 2×4’s. I want to build this bed but lower to the ground. Is it safe to adjust these plans in a way to use only 2×4’s?
absolutely! just sub 2 – 2×4’s (face glued together) and it comes pretty darn close to a 4×4. the only difference is it will only be 3″ thick when you put two together rather than the 3.5″ of a 4×4. you can also probably adjust the carrage bolt to a 5.5″ carriage bolt and it won’t protrude more than necessary. otherwise, that is the only modification you need to make if i am remembering correctly off the top of my head!
Hi i was wondering if i can build this and add a bottom bunk i have 2 toddlers thank you
I think if you look through the showcase projects you should find an example where someone did exactly that. i would raise the top bunk up by a foot (not much more since they are still little) and you can construct the lower bed exactly as the top. also you can move the ladder to the side (actually the foot of the bed) and simply construct it as a vertical ladder that is attached directly to the leg and/or both legs and it should be a wonderful bunk option for the little people!
How would I adjust the cuts if I plan to use an IKEA extendable mattress (at the mid size) which is 38 1/4 inches wide & 61 inches long?
ok so you would just want to add 11″ to every single piece that runs parallel to the head and foot (the width of a bed and be sure to add this to the slats as well) and add 9″ to every single piece that runs the length (sides etc). conversely, you could use the twin loft bed plans and simply subtract 14″ from the length of the bed (sides, etc) as the width would stay the same for the most part.
Thank you! I will attempt it this weekend. I’m actually making 2 which I will put end to end. I’m also going to make it a little higher so they have about 48inches of clearance underneath.
We built this!
Some notes:
There was a lot of leftover material after making our cuts (and I mean a good $25 of 2x4s). I assume the list over-estimates the need in case of warped boards or mistakes. If you select the wood carefully and make use of the cut ends, you can buy less 2×4 to save money.
We also chose to use quality 3″ screws rather than the carriage bolts. My grandpa assured me that it would produce a more sturdy frame and save us the money. (A 6 1/2 in carriage bolt is an unusual size that wasn’t carried in our local store. They didn’t carry 7s either.)
We used our leftover pieces to build four gussets for added stability. The end result is a beautiful bed that we adults could probably jump on without breaking. Wonderful plans and easy to follow directions.
We also deviated from the directions to make the ladder straight for space reasons.
Pictures of the final product here, after staining: https://imgur.com/a/1O2gXYY