Now, I am going to assume most of you have kiddos…or will have kiddos…or your kiddos have grown and have their own kiddos..either way I know this will excite you because the project I will share with you retails for more than $1300 when you add up all of the extras. Can I tell you how much I spent on this from start to finish? $118 TOTAL including an entire gallon of Zinc by Martha Stewart for Home Depot (we all know that isn’t the cheapest…) That’s right, barely over $100 with screws, bolts, wood, paint, EVERYTHING! Even sandpaper..
Below are the plans for this bed in other sizes! Something for everyone!

- 2 – 4×4 at 10′ Can use Fence Posts – untreated
- 3 – 2×6 at 8′
- 5 – 2×4 at 10′
- 2 – 2×4 at 8′
- 1 – 2×4 at 6′
- 6 – 1×4 at 10′
- Qty 8 – 5/16″ Carriage Bolts at 6 1/2″ length – *if you can’t find 6 1/2″ Bolts 7″ Bolts will also work – you simply need to use a standard nut rather than a cap nut.
- Qty 8 – 5/16″ Washers
- Qty 8 – 5/16″ Cap Nuts (rounded top)
- 3” Wood Screws
- 2″ Wood Screws
- 2-1/2″ Pocket Screws
- 1-1/4″ Wood Screws
- Countersink Drill Bit
- 5/16″ Drill Bit
- Pocket Hole Plugs – Paint Grade, Pine, Oak– optional
- Clamps
- Safety Gear
- Wood Filler
- Wood Glue
- Sanding Supplies
- Paste Wax
- Finishing Supplies
- Anti-Tip Kit
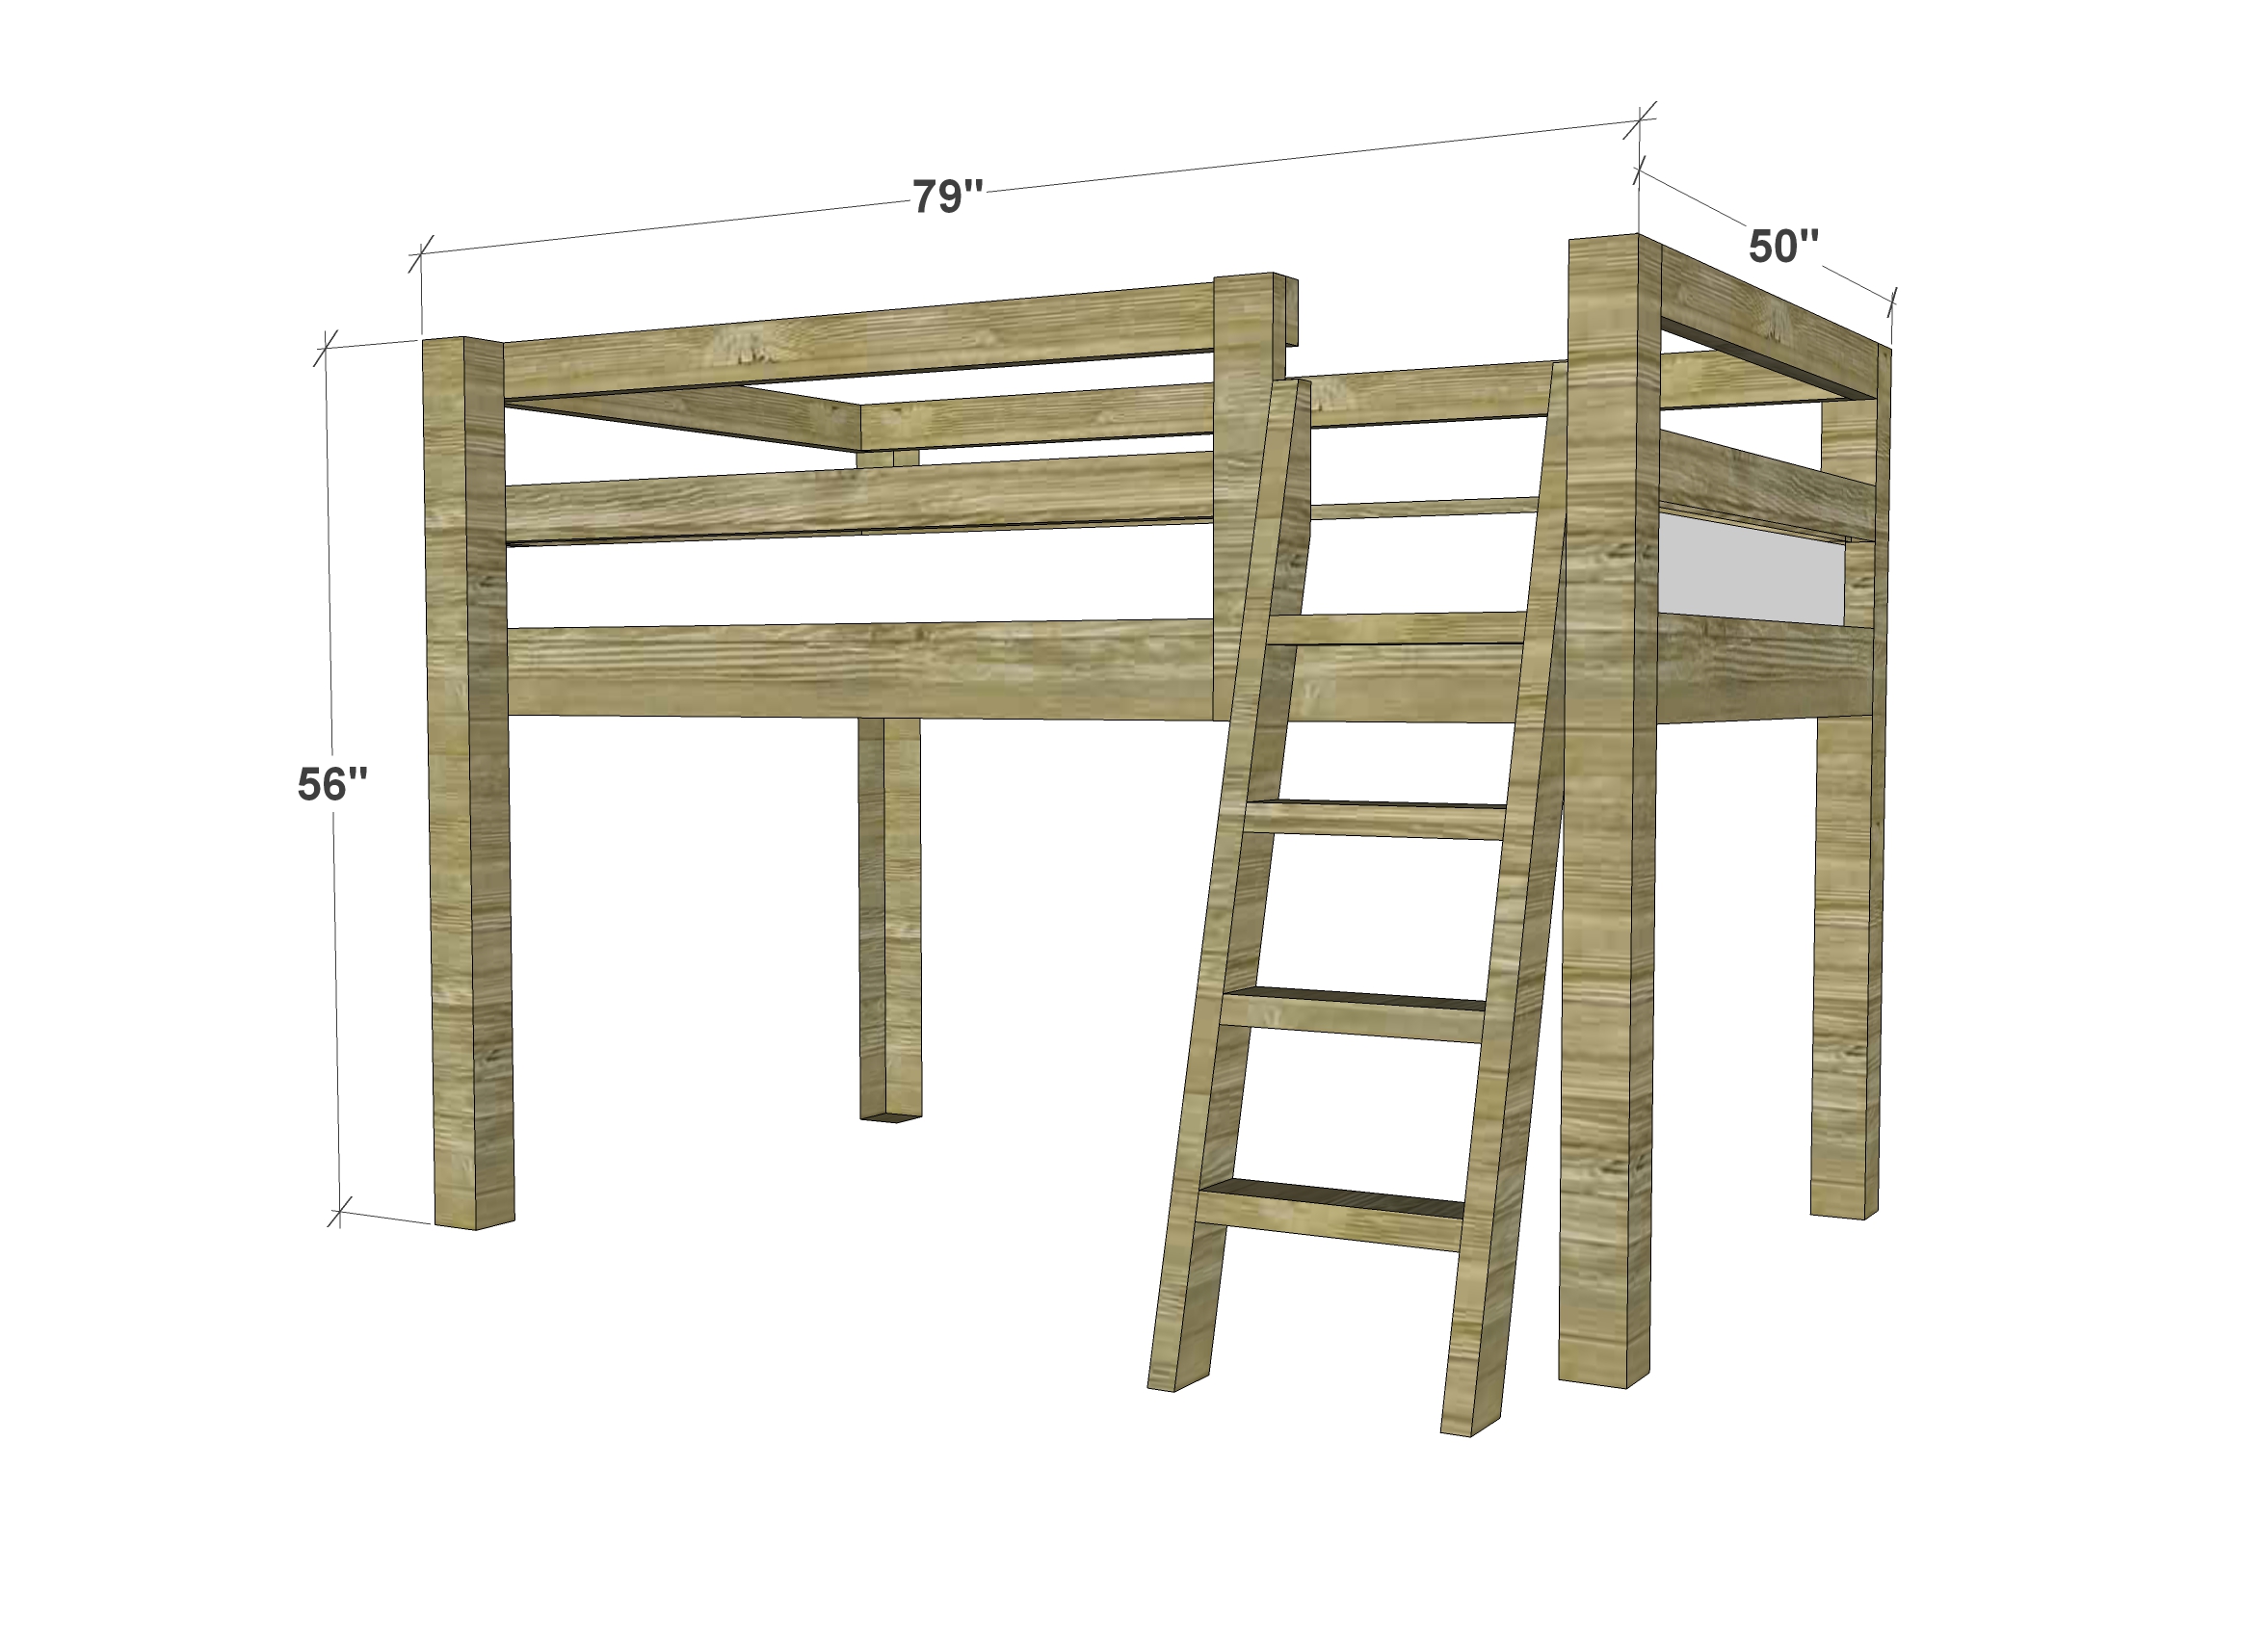
- 4 – 4×4 at 56″ (Legs)
- 2 – 2×6 at 76″ (Front and Back Rails)
- 2 – 1×4 at 76″ (Cleats)
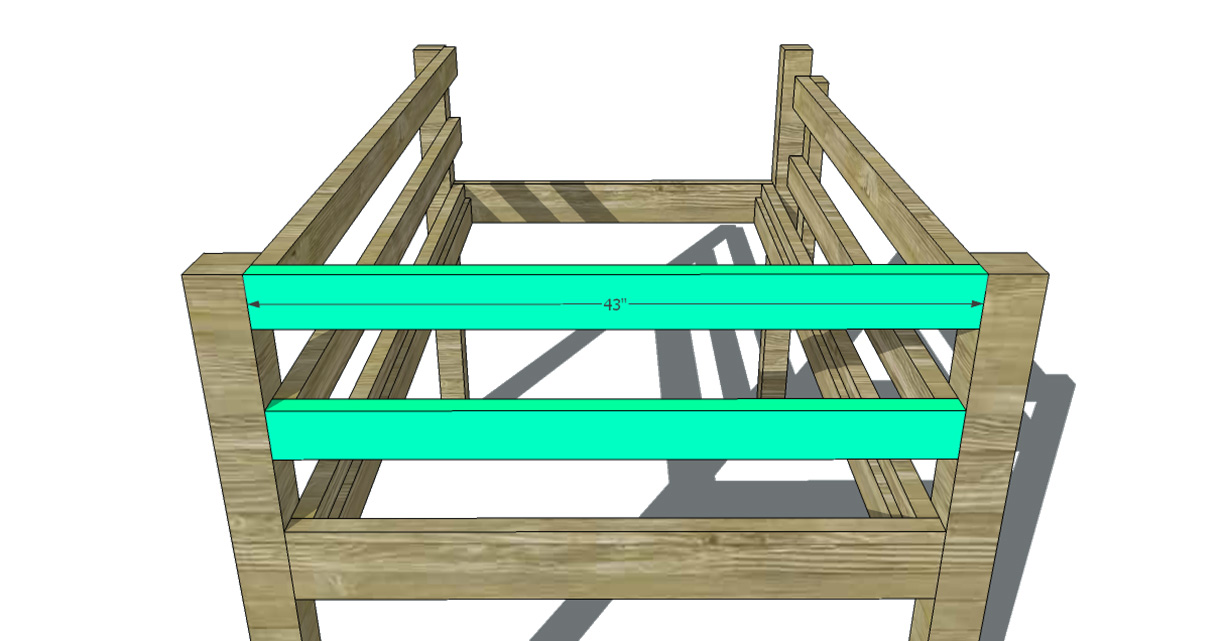
- 2 – 2×6 at 43″ (Side Rails)
- 2 – 2×4 at 76″ (Upper Back Rails)
- 4 – 2×4 at 43″ (Upper Side Rails)
- 1 – 2×4 at 23 1/2″ (Front Guard Rail)
- 2 – 2×4 at 57″ (Front Upper Rails)
- 11 – 1×4 at 40″ (Slats)
- 2 – 2×4 at 60″ (Ladder Rails)
- 4 – 2×4 at 14″ (Ladder Rungs)
**I recommend finishing your boards and posts prior to assembling and simply touching up later. This will make for easier painting and will keep you from having to paint this wherever this piece will actually live (bedroom) since you will have to assemble it in the area it will be placed (at 45 or more inches wide this will not fit through a doorway after it’s assembled). ** I also recommend using Wood Filler to fill in any knots or uneven areas on your boards prior to painting if you are NOT going for a rustic look. Please also consider giving each post and board slightly rounded edges as you sand, for added comfort for your kiddos. Before beginning to build, always check in on my site to make sure you have the most up to date set of plans, I occasionally update and change the plans to make the building process easier or to allow for less expensive purchasing of materials! Read through the entire set of instructions and all comments before beginning this project. If you print out or save plans, be sure to check in on my site to be sure you have the most up to date set of plans, as I occasionally update things for ease of building or buying. If you are new to building, read through the GETTING STARTED section and other articles found under the BUILD tab in the menu on my site, it has valuable information about how to get started, tools and techniques. If you are unfamiliar with the finishing process, visit my Finishing school for some tips and tricks for painting like a pro and for special finishing practices. Use glue to secure your joints and Consider Painting or Staining individual sections prior to assembling. This makes the paint application virtually flawless. Coat with a spray on Poly or Wipe on Poly to protect your finish and your piece and it will last for ages. Adhere to all safety standards and guidelines, and be sure you follow safety protocol throughout your build. If you are unsure about whether you are building safely, run a quick online search for the tool or technique you are using, or contact me via email or post to the forum before you move ahead. My contact info can be found in the menu of my site.
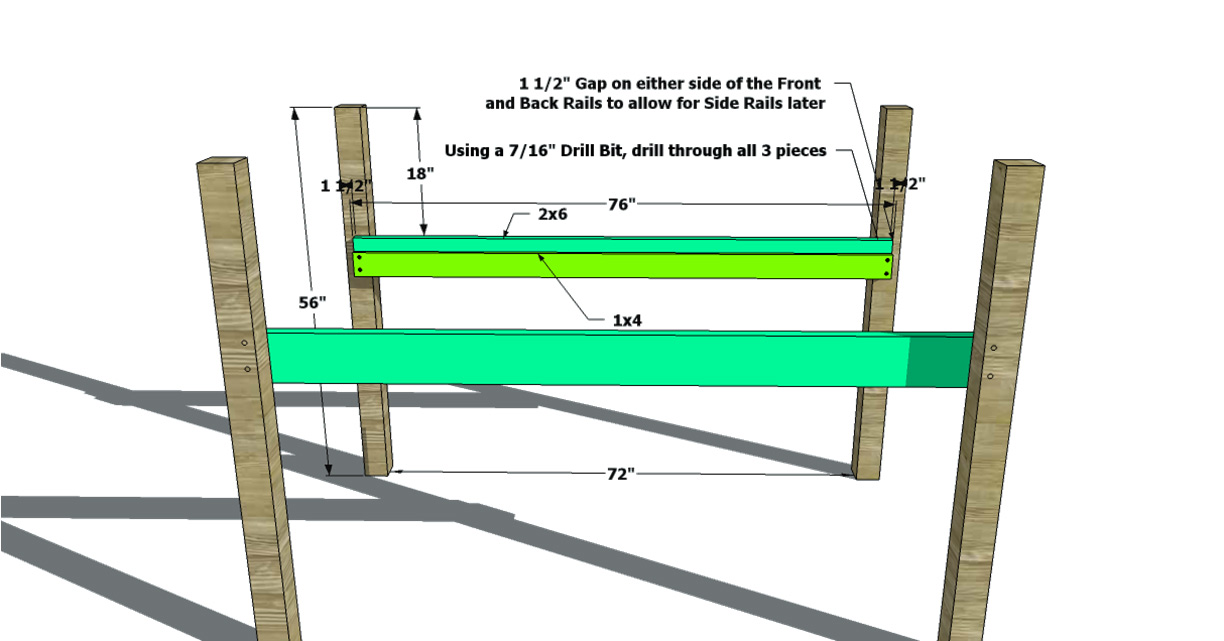
Cut the Legs to size and attach the Cleat to the Front and Back Rails using 2″ Screws. To attach the Rails to the Legs you will arrange the 4 pieces as shown in the diagram below, making sure to leave 1 1/2″ on either side of the Rails to allow for the Side Rails later, and clamp together making sure everything is completely square before you proceed. Once square and aligned as needed, you will use a 5/16″ Drill Bit and drill through all 3 pieces on each side, creating 2 holes on either side for the bolts. Fasten with your Carriage Bolts and tighten.
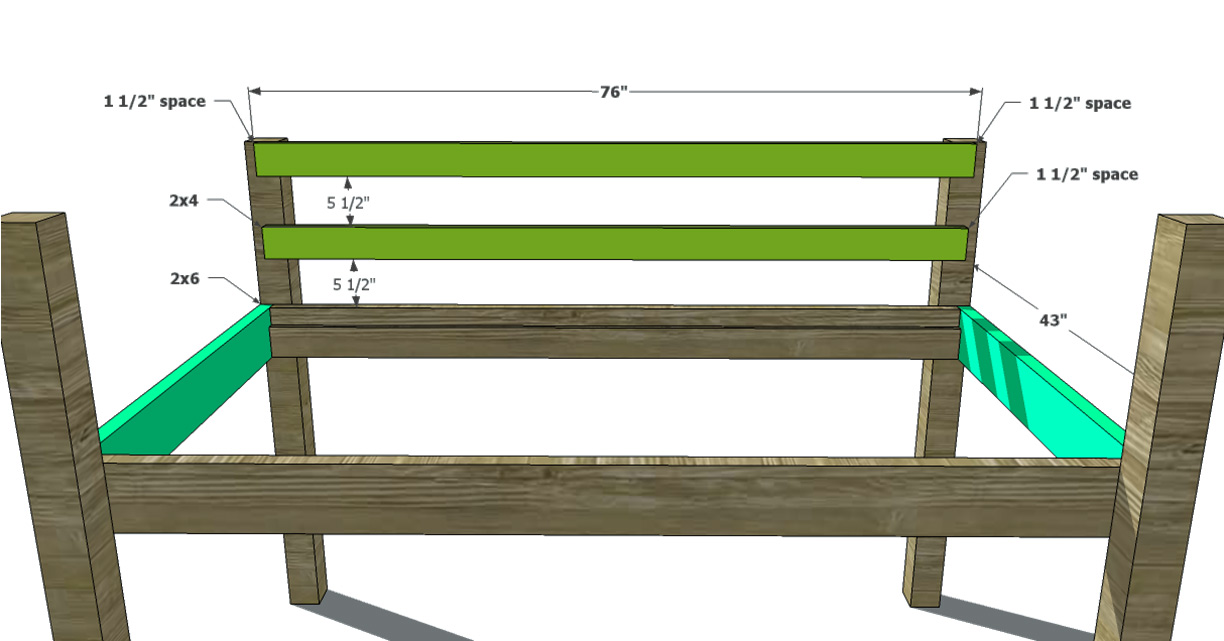
Attach the Side Rails to the Front and Back Rails then fasten the Upper Back Rails to the Back Legs. Use 3″ Screws
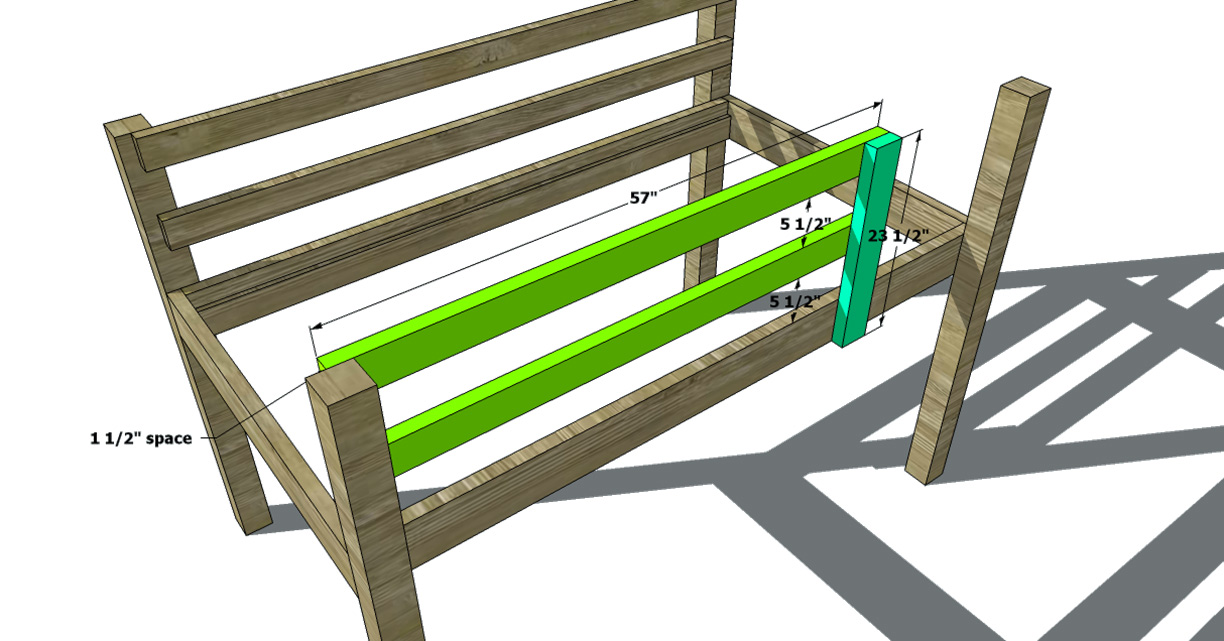
Attach the Front Vertical Guard Rail, use 2″ Screws. Then fasten the Front Upper Rails to it and the Front left or right Leg. Use 3″ Screws to attach to the Leg.
Attach the Upper Side Rails on the side opposite where you choose to put the ladder, in my example this would be the left side. Use 3″ Screws.
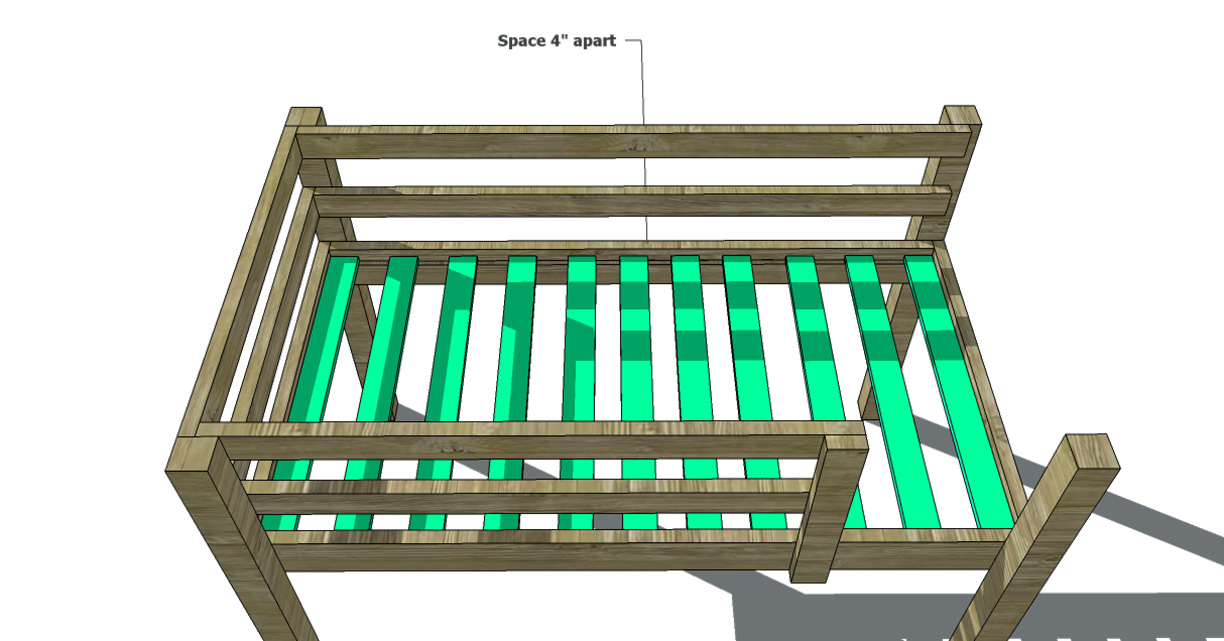
Lay your Slats approximately 4″ apart. Be sure the 2 on the outside edges are flush in both corners. Screw down using 1 1/4″ Screws.
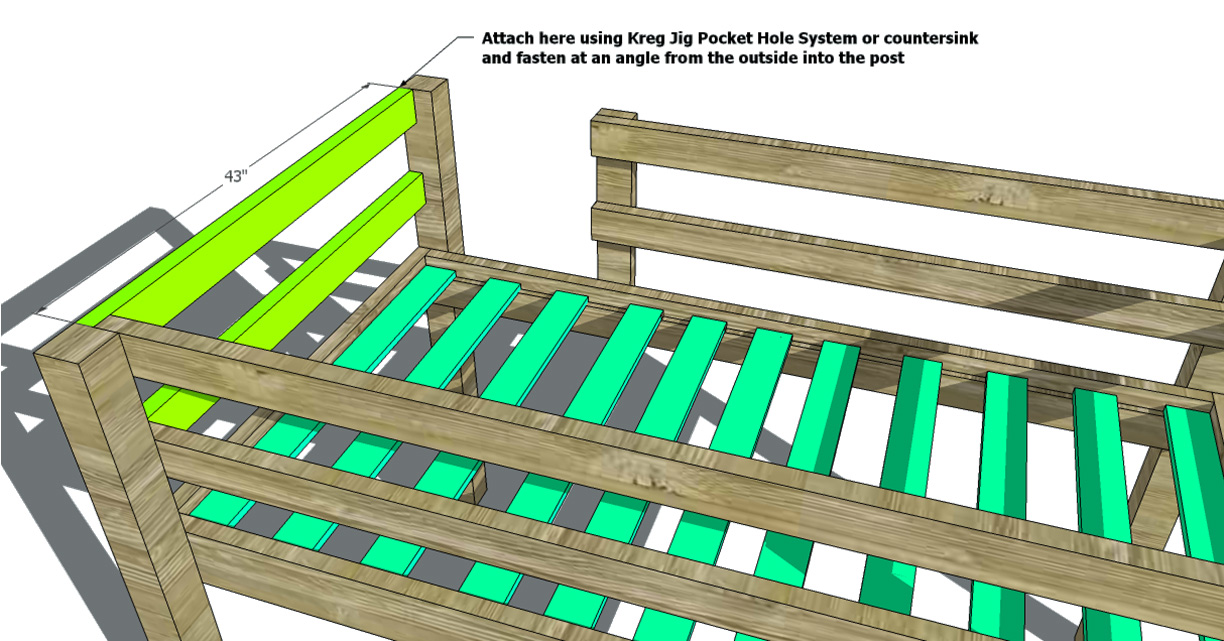
Attach the remaining 2 upper Side Rails to the Back Rails and then either use a Pocket hole System (Kreg Jig) to create pocket holes and fasten to the front leg. If you don’t own a Kreg Jig you can also countersink and predrill at an angle from the outside edge into the leg. Use 3″ Screws
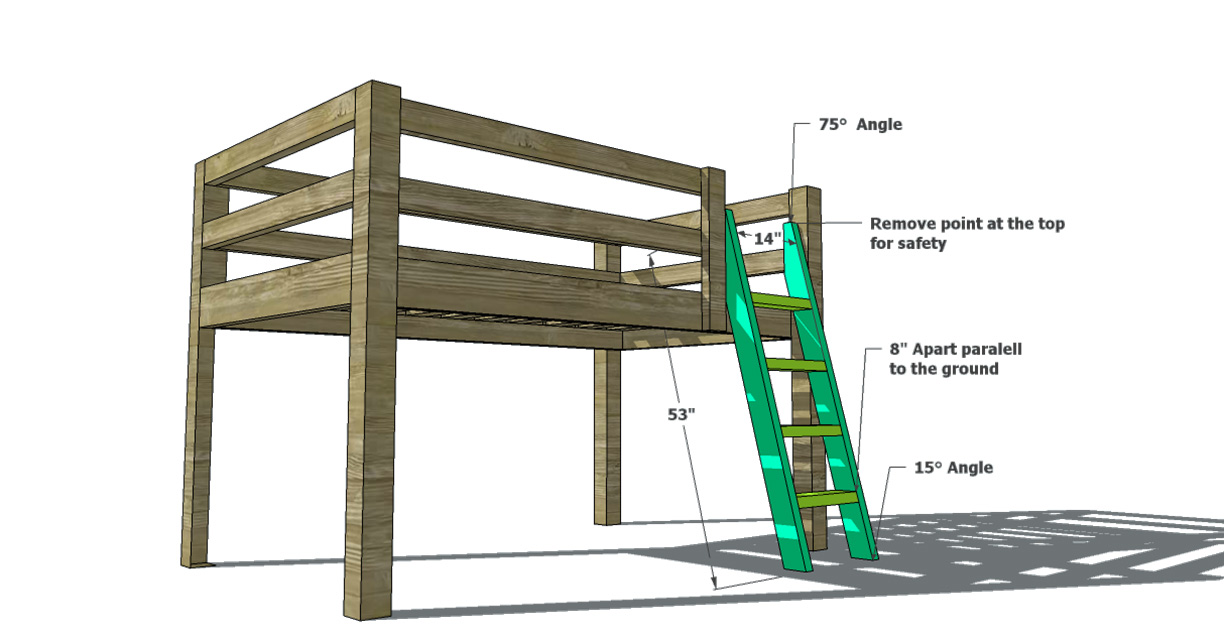
Create the Ladder. I give approximate dimensions for the height below, but the important aspect to focus on is the angle you will cut the top and bottom. The top of the ladder rails will be at a 75°angle and the bottom of the rails will be a 15°angle where the boards will rest on the ground. Attach the rungs at approximately 8″ apart (this will depend on the age of your kiddo, the smaller and younger, the closer together these should be, you need to consider how easy it will be for them to climb down) and parallel to the ground. Use 3″ Screws or 2 1/2″ Pocket Hole Screws to fasten the rungs to the rails and to fasten the rails to the Leg and Front Guard Rail. I suggest cutting away the point you will create at the very top, when you cut the 75°angle, for added safety. This will also give your ladder a bit of a hand grip up top.
Fill any Screw, Nail or Pocket Holes, Sand and Finish as Desired. For Finishing Tips and Tricks visit my Finishing School
**Disclaimer: Some rights reserved. Private use only. Feel Free to link to any of my plans so long as you provide an adequate link back to the appropriate post! Plans from this page are not to be used for commercial purposes or republished without the express written consent of Rayan Turner, The Design Confidential I hope to provide accurate plans, however, I cannot guarantee each plan for accuracy. Not every plan that I post has been built and tested, so you are building at your own risk. It is recommended that you have a clear understanding of how the project works before beginning any project. Please contact me if you find an error or inaccuracy so that I might fix it.

Hi, I just wanted to check and be sure that this is the most recent up to date plan for this loft bed? Thanks!
yes indeedy doll! go forth and build away!
Hey, want to make it higher, so a futon can go underneath. Any issues with just going higher?
Thanks!
Nah, should be fine. if you raise it up by 2 feet though, just Make a judgement call as to whether or not you might need to add bracing around the lower part of the legs. It isn’t likely but every situation is different so just keep your eyes open to anything unstable.
Wow, thanks for the quick reply! Will probably be less than a foot and I was going to add bracing anyway! Great simple plans, thanks!
fantastic! you probably won’t even need bracing with under a foot of extra height. when i built mine, i actually built it with a 4 foot clearance so that my boy could stand up under it and i could put an activity table there. i probably didn’t actually need that extra foot, but i can say that there were zero stability issues with the added height and i am fairly certain he used it as a play structure – eek!
Do you know what the change in dimensions would be for a Twin XL?
& what is the height just to the platform? Wanting to modify with no rails or posts above the mattress.
Hi! What’s the weight limit for this bed?
I notice that on your supplies list that you have 2 sizes of pocket screws but you only refer to one of them in the directions. Can you please clarify. Thanks
Hi, I was wondering if you could forgo the ladder and not damage/interfere with stability? Also, how much weight do you think this design could stand?
Great questions! So the ladder itself doesn’t provide stability, per se… so forgoing it would not cause a problem on it’s own. My concern would be in how you would plan to board the bunk without said ladder. This bed is not that high from ground level, but it is certainly high enough that it makes simply stepping up on to it a bit of a tricky thing. I would be worried more about how the activity of pulling oneself up onto this beauty might affect the overall integrity of it over time and if it would become a tipping hazard because of the play it might receive. Now if you plan to simply use another method to climb on up, then by all means, it should not be an issue at all because the ladder isn’t required for stability but it would in fact help with tipping if there will be substantial movement, so it might result in a bit of a trade off depending on your intended solution. As for weight, I can certify that my boy, myself and my husband have all been on this loft bed at the same time, with no issue. This is a sturdy piece of furniture. If you plan to really put it through the wringer, you can always beef up the slats and add a center joist if you feel like it takes a toll. Otherwise I can’t imagine you will run into an issue with weight. Hope that helps!
Sorry if I missed this, but what is the weight limit?
Just a question. In your opinion…. I know some planes suggest to put down a solid sheet of wood on top of the slats since you are not using a box spring. This is to help the mattress stay firmer. Do you suggest this also?
Well I am certainly not a mattress expert, BUT seems to me, I recall hearing many mattress manufacturers mention airflow being important to the longevity of a mattress. This would mean slats are better in this regard. I typically only recommend a solid sheet of ply under a mattress where slats would create a cleaning nightmare that isn’t easily remedied.
I can only find carriage bolts that are 1/2 in x 6 1/2 in. Do you think these would work?
absolutely, just adjust your drill bit to be 1/2″ as well and you will be good to go!
1st I want to say I am LOVING your designs and plans. I have every intention of making this bed, with a few modifications, for my (will be) 3-1/2, almost 4 year old next summer. Just wanted to pick your brain if you don’t mind, for a couple modifications I am considering:
1. I’m looking at maybe doing this in oak. Little nicer, little stronger, something to last years and years and maybe even have some resale when he grows out of it, or be a great gift to someone else with a young one. Due to this, I am struggling with finding 4×4’s for the legs, at least at any cost resembling reasonable. In researching online, I saw someone mention using sistered 2×4’s, with one shorter than the other (Jack/king) to allow the side rails to actually sit on the top of the shorter 2×4, removing the sheer stress from the bolts, and making it more structurally sound. IF I do this, I’d glue and clamp the 2x4s, and probably drive in a screw or three to keep them together while the glue sets up. Do you see any issue with doing this from a safety standpoint. Conventional wisdom seems to say that the sistered boards would be actually stronger than a single 4×4 (don’t know if this would even matter for the weights involved with a childs bed…), but with every answer saying it is, I find 2 dozen arguing it isn’t, or that there are better methods.
2. For the center beam supports, I was thinking about adding 2 additional ones for stability and raw strength. My kid is a little on the extreme side of energy, and I think any additional strength would be a good thing. Was considering going 1 dead center, then one more on each side of that, splitting the distance from the center rail to the side rails. For this, I found some decorative joist hanger type hardware from OWT, claiming that the weight limit of their product would exceed that of the materials. Have you ever seen/used products such as these, and if so, have you any opinion I should consider before using?
Lastly, for anyone else looking to do this. Google “Decorative hardware” or “decorative carriage bolts” if you don’t mind spending a few extra dollars per for not only some beautiful hardware, but also in the harder to find sizes mentioned in the instructions.
Just a note, I purchased the materials list in Dec of 2017 and it’s about $175 now. I thought I’d post for those considering building.
Thanks for sharing your plans. I recently finished this project and it turned out great and my 9 year old daughter loves it. I changed the ladder placement and made the legs taller and a few other small changes, but the original plans are easy to follow and made the project fun.
Any suggestions on a slight change in design to make it so that the bed can easily be moved? It’s my understanding that this would be hard to get through a doorway. An idea I had is to cut the legs straight through a few inches below the slats for the bed, and then reconnect each leg with some bored in screw of some sort. As you can probably tell, I am certainly not an experienced wood worker.
For an XL Twin, which is 80″ long, do I just add 5″ to the length? I assume that this is the outside length. Thanks
yes absolutely, you will add 5″ to every single piece that runs the length of the bed. that’s all and it is a super simple modification.