When I have entertaining on the horizon and the event isn’t related to a specific holiday, I love to create an experience that draws inspiration from a faraway place. For me a party is like a vacation, a place you can go for a brief period of time where you don’t have to focus on meals or cleaning and where you can and should get swept up in the moment and enjoy your time.
The Louvre in Neon – Paris
As the host, creating this experience for other people can be stressful and tedious. Rather than a vacation, it has the potential to feel more like a chore, especially for those of us who are tasked with thinking of the details and implementing them. Most of the time, this stress doesn’t end until the party itself has ended. After a recent trip to Europe, my entertaining frame of mind has forever been changed. I now view simple and indulgent as being far more chic than any elaborate spread might be.
On my recent trip overseas, I had the distinct pleasure of spending time in Paris and London. It was magical and unforgettable in every possible way. Both cities had such an extreme mix of old and new, opulent and rich in history, right alongside and mingling marvelously with minimal and modern. I was smitten and it was glorious. Since both countries were heavily invested in many of the tropical nations we know and love today, a celebration of the exotic can be seen everywhere you turn. From décor to cuisine, the wonder of the West Indies and a love of all things from the Far East, it was spectacular to see how these things have been incorporated in every aspect of life for both cultures.
Le Bon Marche, Paper Koi + Crane Installation – Paris
For this event, I hoped to incorporate a bit of inspiration from both the places I visited along with some of the more exotic places that have inspired them throughout the ages. Luckily, an eclectic mix of design styles is always amazing, don’t you think? With the vast amount of super stylish goods available at Target, I was able to bring this wild and varied look to the table (literally) in a far more inspired way than I could have imagined and with so much less stress from beginning to end.
Having the opportunity to travel always leaves me full of inspiration and a completely new outlook on the type of lifestyle I would like to lead. It certainly brings light to all the ways I might enjoy the everyday moments so much more. Vacations are amazing like that, aren’t they? In London, they celebrate a way of life that is steeped in tradition. Meals are often elaborate and indulgent with a great many options on the menu. It’s beautiful and delicious, and such a big focus of the day.
Modern Gold Chainmail Ceiling Installation – Palace of Versailles
In contrast, the Parisian way of life is simplified and indulgent with far fewer options and much less fuss. While meals are also a large focus of the day in Paris, it is less about the process and more about the experience and enjoying the people you are with. The latter of these ideas is something that truly stuck with me and for this event I sought to recreate the ambiance I adored from both places with the more simplified sentiment of Parisian dining. The simple and chic sensibility that permeates every aspect of Parisian life was definitely contagious and I think in replicating a bit of it here, it made for a more relaxing setup and likely a more pleasant experience for my guests. I kept the food easy and paired down, yet sumptuous and delicious, with a few baked goods that work beautifully with either cheese or dark chocolate. An overabundance of fresh fruits was scattered about, to celebrate a bit of the exotic and of course bring that vacation-esque feel to the table that we all long for come spring.
I am a firm believer in the fact that if you love it, it will work – as long as you ground it within your design and repeat it more than once. The same goes for entertaining. Mastering the Mix is often more about letting your guard down and taking risks than a set guideline for pairing patterns and colors. When done right, I often end up with elements that I wouldn’t otherwise choose to put together but in the end I am typically so very glad I did. This is precisely how the style direction for this spring event happened for me and the challenge of trying to create a feeling and an experience rather than directly placing the focus on the design elements themselves, gave me a whole new freedom in setting the table and choosing the menu. It was glorious.
Modern Stairway Model – Victoria & Albert Museum – London
I walked the aisles at Target and chose individual items that reminded me of London and Paris. Rustic cheeseboards, global patterns, handcrafted ceramics, pineapples (a constant motif in London architecture), modern neon acrylic trays and a wide array of colors all reminiscent of the tropics and all grounded in a healthy dose of white, black and gold – just like these ancient cities themselves. It was so easy to find no less than one million items that would have been perfect and so chic, and oh so hard to narrow it down to what might actually fit on the table.
My table is a melting pot of eras, materials and styles and somehow that made choosing the pieces carefree, fun and fabulous. With a theme that was based in variety and more about the ambiance, I had more options for décor and entertaining than I could actually cart home with me and a very low stress experience in the process of choosing the pieces to use. There were no rules to consider or strict choices to be adhered to – I just went for it and let the vacation vibe and carefree state of mind I was hoping to create, take the lead.
Target knocks it out of the park every single season and this spring is no exception. If you have entertaining on the calendar in the near future, you can be sure that you will find everything you need (and more – always more) to create an experience for your guests that you can enjoy right along with them. Let them do the heavy lifting and simply mix and mingle styles from their collections as you please.
Several months ago, I had a really interesting experience trying to find a pair of shoes that I had my heart set on. I must not have been the only one since they were basically sold out everywhere and weren’t expected to be back in stores for another several months. I haven’t had this happen before and it was driving me insane because… I wanted those damn shoes. Ridiculous, I know. I haven’t even had this experience with toys for my boys since I generally shop online and tracking things down on the interwebs is a challenge I don’t take lightly. I live for it, my friends… So when I continued to strike out at every turn and started to think these shoes might get the better of me, I had the genius idea to look for them in my equivalent youth boys size (duh, I should have started here the minute I hit my first several roadblocks). Naturally there was more than enough stock in kids shoes to keep my feet happy for the next 20 years. Lesson learned – and to top it all off, they were twenty dollars less! Hell to the Ya!
While this may seem like a completely irrelevant bit of rambling, I am pretty sure it relates to a general state of mind I have adopted lately and think you should too! You see I have had children’s furniture and decor on my mind lately, since I have been trying to finish up the boys shared space. Finding pieces that suit their very different ages and stages while still working as part of the general design plan has been challenging, to say the least. Plus, I don’t exactly have a concrete direction for the design plan this time around, so there is also that… Any time I have a free minute, I scour the wares at a few of my go-to kiddo spots online and hope (pray) that something jumps out at me and suddenly the perfect path will become clear – you know – like divine design intervention. Totally a thing – promise.
Well that hasn’t precisely happened just yet, but I know it will at some point. What has happened however, is an immense amount of inspiration for other projects I have been working on – none of which have anything to do with children and all of which have everything to do with spaces for the adults in this house. But it got me thinking… once again there is much amazing-ness to be found in the fab wares designed for kiddos – and often these things are a slightly less pricey version of something nearly identical for grownups. So why the hell not? Why not buy my desk accessories, or even my desk, at Land of Nod or the kids section of Target. I mean, it isn’t like those items are actually even miniature – in fact they are the almost always exactly the same. Though let’s be real for a minute, since I am miniature in height anyhow, would it reallybe such a bad thing if I bought a children’s version that was actuallysmaller? Maybe I would simply appear to be the super model height I see myself as in my dreams? It’s totally possible, right? Just say yes…
So in true to me form – here is a round up of some of the gorgeous things I am totally crushing on (obsessing is more like it), that should absolutely go home with you (me) the next time you are in the market for a little design update! The scrolling lookbook underneath each layout has a whole lot more than is shown – so don’t be shy and click on through. There is some seriously good stuff in there!
A couple of them even have a bit of nostalgia working in their favor and will take you right back to a time where roller skates ruled the roost. Because that time will always be a better time and I promise if my boys weren’t boys – their room would be rocking some of this awesome-sauce peachy pink color – hell, maybe it still will. I have been known to take that leap in the past.
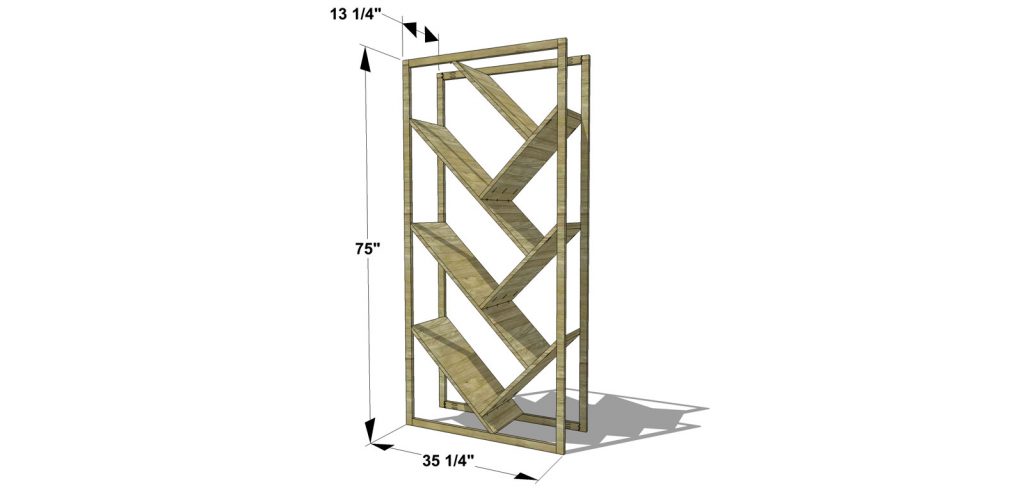
This is definitely a new slant on the traditional bookshelf! This piece has several nooks to place all of those great reads that you want to display. All you need are a few 1x2s, a piece of plywood, and a few hours and you’ve got yourself a beautiful and functional piece of furniture.
As with all of our plans, you are building at your own risk and you should have a firm understanding of building in general before you attempt many of our plans (some are easy as pie and perfect for beginners). With that, go forth, have fun, take lots of pictures and share them in a showcase on the site or on social media with the hashtag #builtTDCtuff and we will share our faves! Be sure to tag @thedesignconfidential on Instagram / FB and @thedesconf on Twitter / Pinterest. If you are a blogger and you post about your build, don’t forget to include a link to your post on your showcase here. Don’t forget… for all of our newer plans, clicking on the images will let them expand to enormous sizes with much greater clarity. The older plans may need updating so please let us know if you need one fixed!
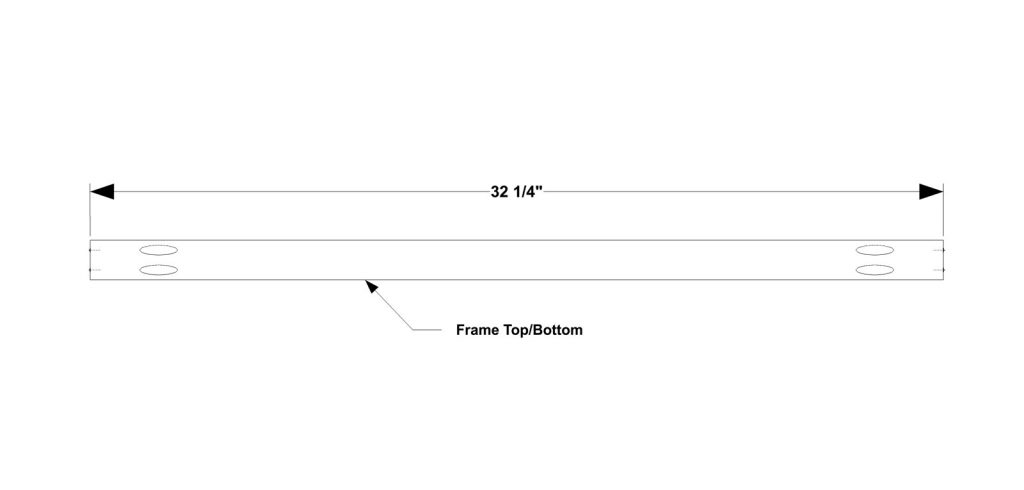
4 – 1×2 at 32-1/4” – Frame Tops/Bottoms
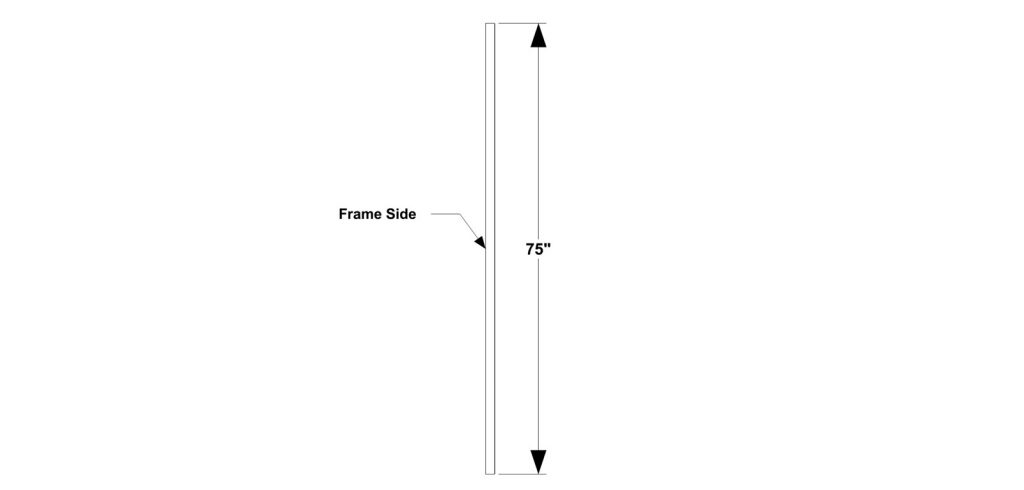
4 – 1×2 at 75” – Frame Sides
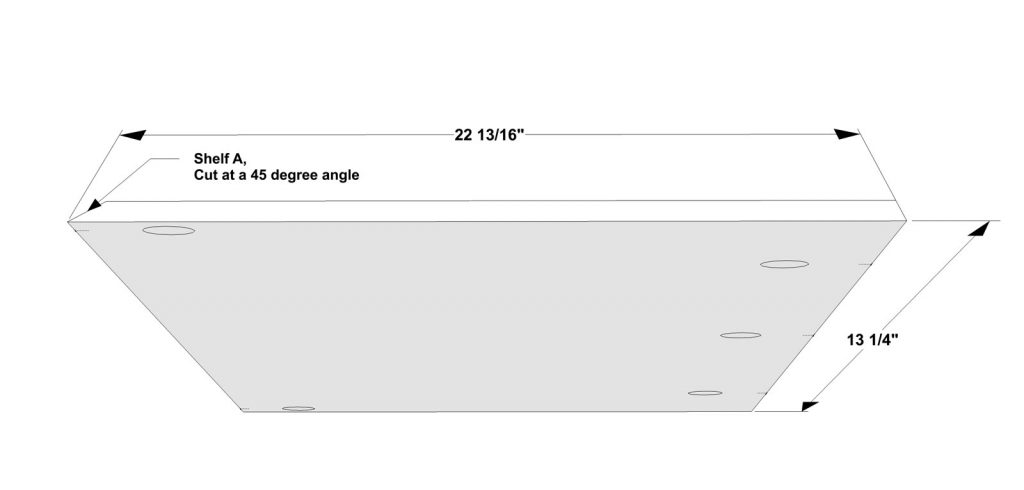
1 – 3/4” plywood at 13-1/4” x 22-13/16” – Shelf A
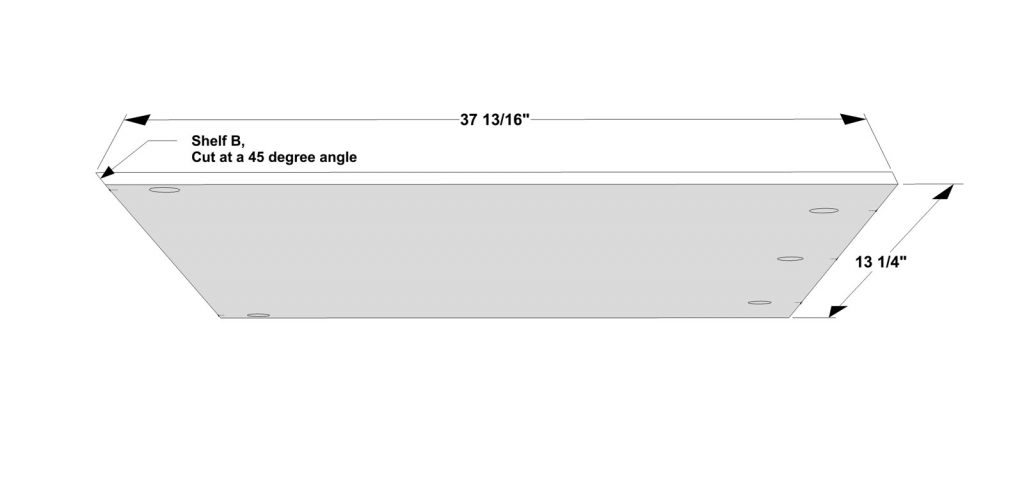
2 – 3/4” plywood at 13-1/4” x 37-13/16” – Shelf B
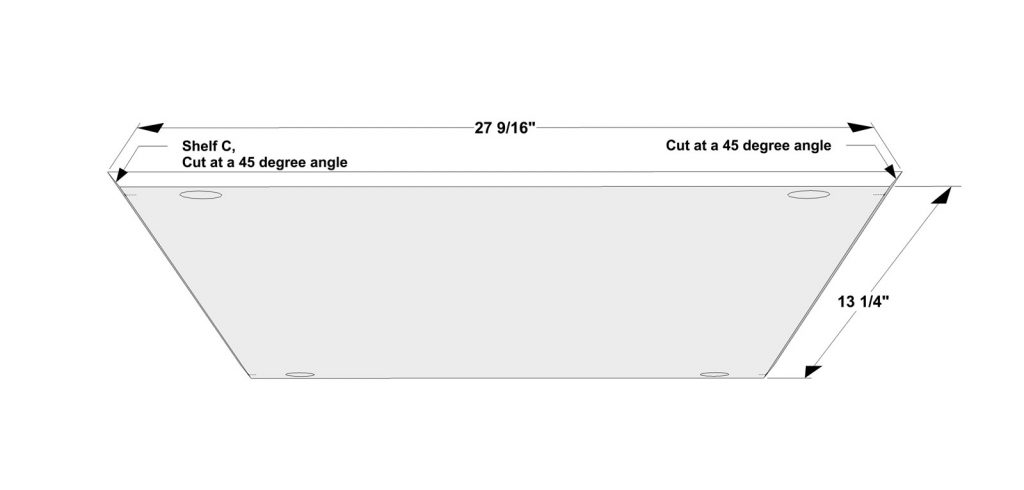
1 – 3/4” plywood at 13-1/4” x 27-9/16” – Shelf C
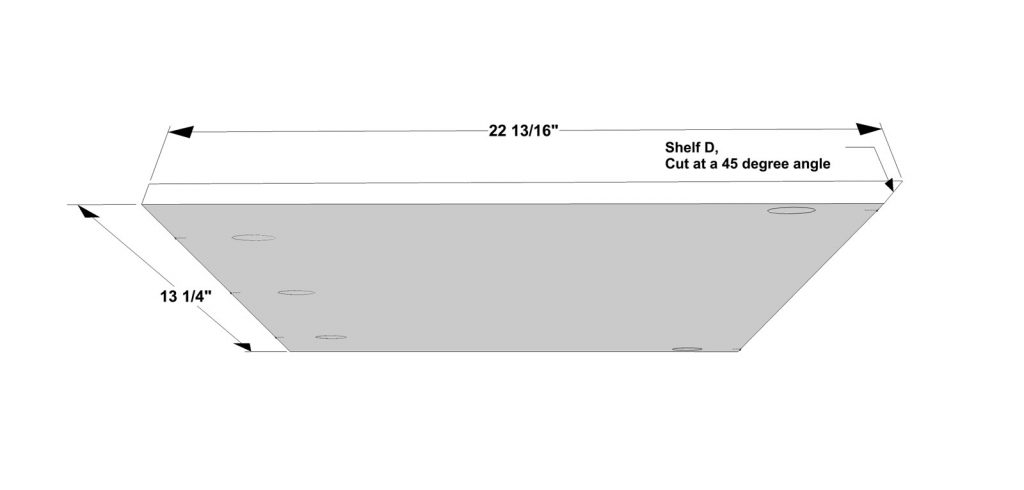
3 – 3/4” plywood at 13-1/4” x 22-13/16” – Shelf D
Before beginning to build, always check in on my site to make sure you have the most up to date set of plans, I occasionally update and change the plans to make the building process easier or to allow for less expensive purchasing of materials! Read through the entire set of instructions and all comments before beginning this project. If you print out or save plans, be sure to check in on my site to be sure you have the most up to date set of plans, as I occasionally update things for ease of building or buying. If you are new to building, read through the GETTING STARTED section and other articles found under the BUILD tab in the menu on my site, it has valuable information about how to get started, tools and techniques. If you are unfamiliar with the finishing process, visit my Finishing school for some tips and tricks for painting like a pro and for special finishing practices. Use glue to secure your joints and Consider Painting or Staining individual sections prior to assembling. This makes the paint application virtually flawless. Coat with a spray on Poly or Wipe on Poly to protect your finish and your piece and it will last for ages. Adhere to all safety standards and guidelines, and be sure you follow safety protocol throughout your build. If you are unsure about whether you are building safely, run a quick online search for the tool or technique you are using, or contact me via email or post to the forum before you move ahead. My contact info can be found in the menu of my site.
Cut the pieces for the Frame Tops and Bottoms. With the Kreg jig set for 3/4” material, drill pocket holes in each end of the Frame Tops and Bottoms.
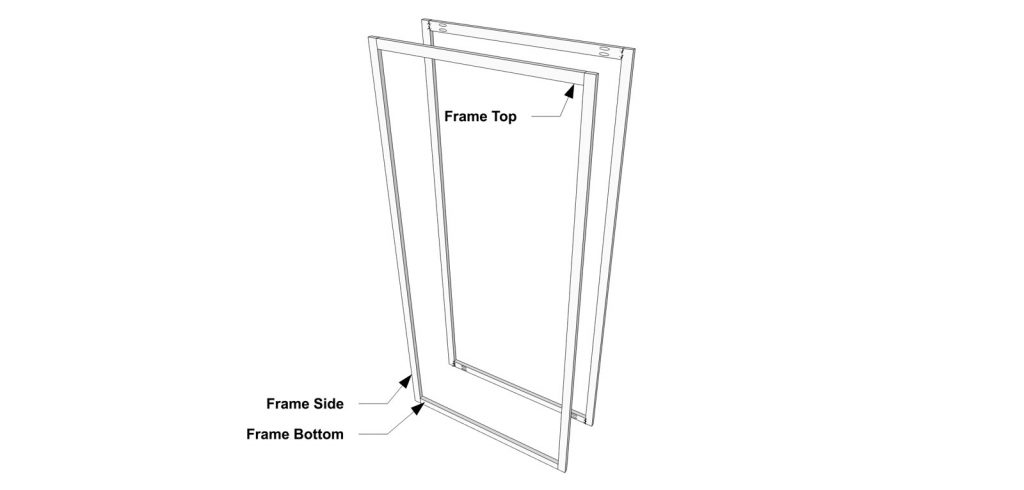
Cut the pieces for the Frame Sides. Attach the Frame Tops and Bottoms (with pocket holes facing the each other/the inside) to the Frame Sides as shown with glue and 1-1/4” Pocket Screws.
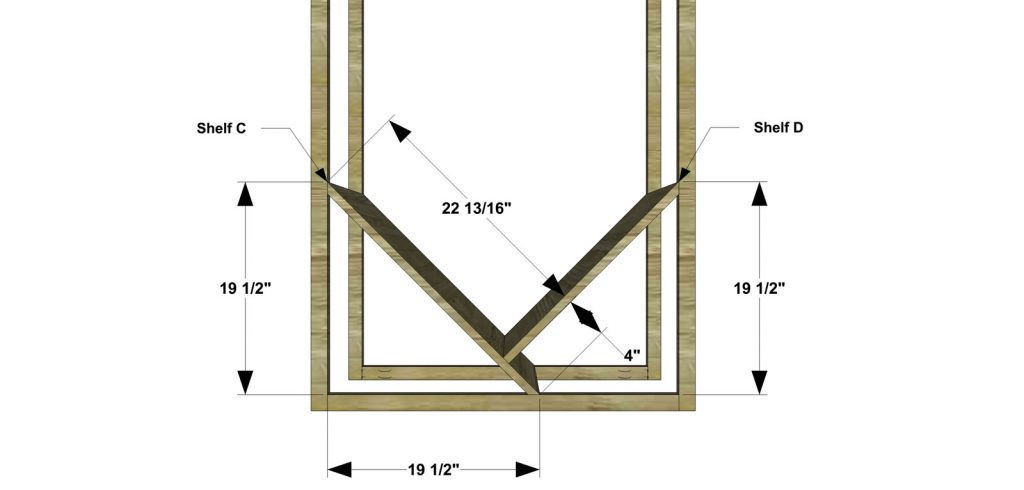
Cut the pieces for the Bookshelves A, B, C, and D. With the Kreg jig set for 3/4” material, drill pocket holes in the ends of each piece as shown. Pay attention to the location of the pocket holes in the images. Some holes will need to line up with the Frame Tops, Bottoms, and/or Sides. Apply Edge Banding to all of the plywood edges if desired.
Attach one of the Bookshelf Ds to Bookshelf C as shown with glue and 1-1/4” pocket screws. Position the pair of Bookshelves on the Frame Assembly as shown and attach with glue and 1-1/4” pocket screws.
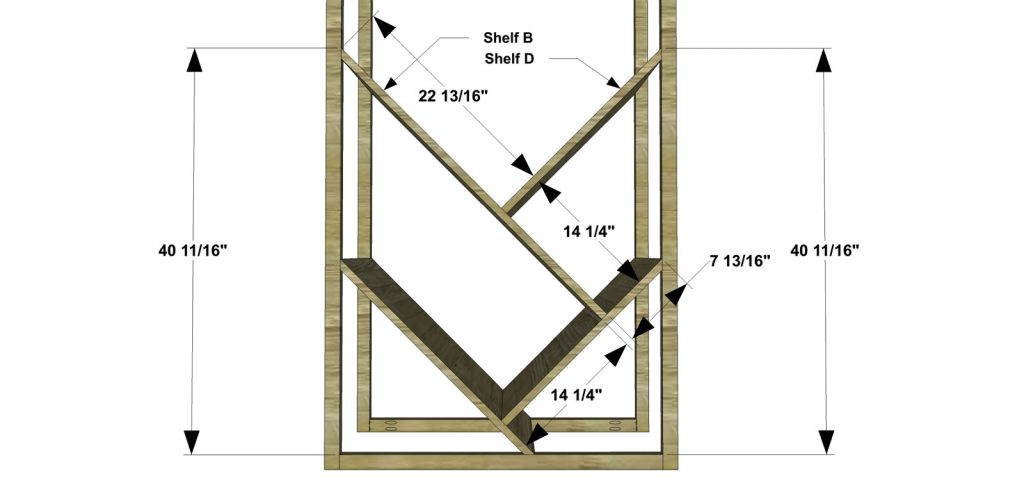
Next, attach one of the Bookshelf Ds to one of the Bookshelf Bs as shown with glue and 1-1/4” pocket screws. Position the pair of Bookshelves on the Frame Assembly and on Bookshelf D as shown with glue and 1-1/4” pocket screws.
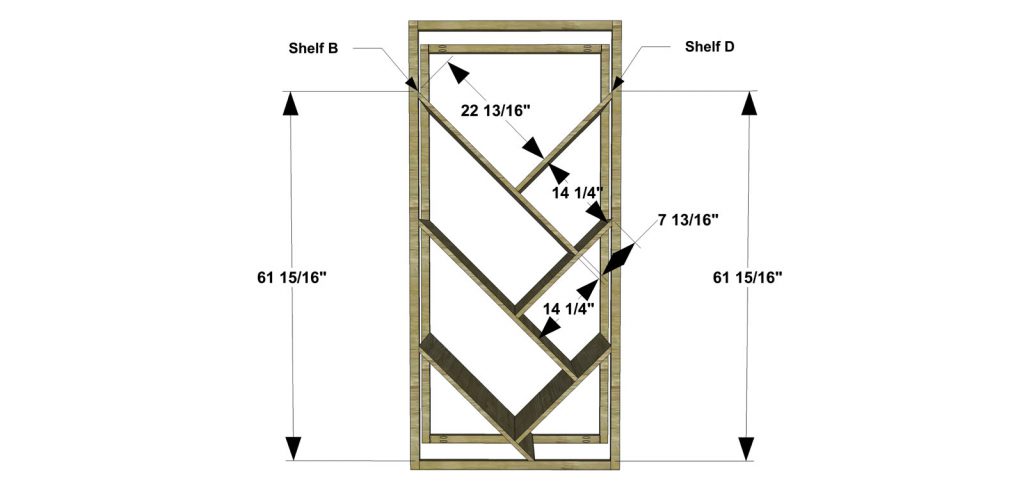
Next, attach the last Bookshelf D to the last Bookshelf B as shown with glue and 1-1/4” pocket screws. Position the pair of Bookshelves on the Frame Assembly and on Bookshelf D as shown with glue and 1-1/4” pocket screws.
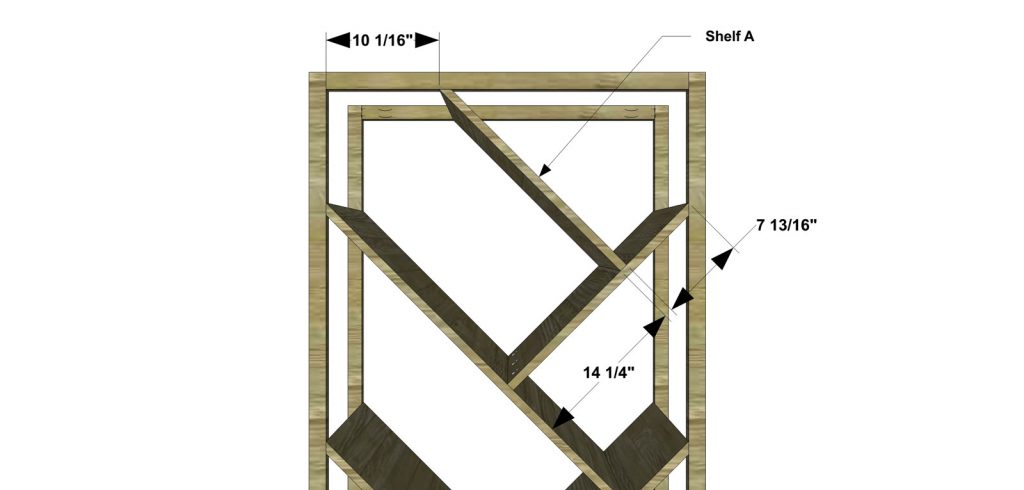
Lastly, attach Bookshelf A to Bookshelf D as shown with glue and 1-1/4” pocket screws. Attach to the Frame Assembly as shown with glue and 1-1/4” pocket screws.
Fill any Screw, Nail or Pocket Holes, Sand and Finish as Desired. For Finishing Tips and Tricks visit my Finishing School
// Disclaimer: Some rights reserved. Private use only. Feel Free to link to any of my plans so long as you ONLY use 1 image and provide an ADEQUATE link back to the original source and appropriate plan! Plans from this page are not to be used for commercial purposes or republished without the express written consent of Rayan Turner, The Design Confidential. By accessing or using any part of the web site, you agree to become bound by the terms and conditions of this website as outlined under Terms of Use. If you do not agree to all the terms and conditions of this agreement, then you may not access the Website or use any services. The information contained in this website is for general information purposes only. The information is provided by The Design Confidential.com and while we endeavor to keep the information up to date and correct, we make no representations or warranties of any kind, express or implied, about the completeness, accuracy, reliability, suitability or availability with respect to the website or the information, products, services, or related graphics contained on the website for any purpose. Any reliance you place on such information is therefore strictly at your own risk. In no event will we be liable for any loss or damage including without limitation, indirect or consequential loss or damage, personal injury or death, or any loss or damage whatsoever arising from loss of information or profits arising out of, or in connection with, the use of this website. I hope to provide accurate plans, however, I cannot guarantee each plan for accuracy. Not every plan that I post has been built and tested, so you are building at your own risk. It is recommended that you have a clear understanding of how the project works before beginning any project. Please contact me if you find an error or inaccuracy so that I might fix it. The Design Confidential.com is inspired by but does not replicate exact designs, any similarities between these plans and items sold at specialty retailers is coincidential and not endorsed by or related to any said retailers. // Affiliate links are used for tools and materials. The Design Confidential will earn a small commission for any items purchased using these links. Thank you for your support – every little bit counts!
You guys! I have been around the world and back and I have missed you so… Well maybe not quite around the world, but at least as far as Paris and London and I have so much to tell share with you – but first a fabulous and easy DIY project that is just the thing for those Moms out there who appreciate home decor, architecture or photography of any variety, and of course memory making at its finest. This month Michael’s asked us to share a project that would be perfect for a Mothers Day gift. Since my recent travels included my maja and seester, what could be better than a gift that celebrates that very thing?
To complete your own version of this project, track down a few of your fave pictures and print them out in black and white, on fine art paper or matte photo paper. Make sure you have your print settings set to high quality printing so your images are crisp and sharp. I chose one image from Paris – my Hugo moment (if you have seen that movie, you will get the reference) looking out from the Musee D’Orsay onto the gorgeous and very immense grounds and buildings of the Lourve.
Embellish your images with embroidery, faux florals, gold wire, glitter, beads… you name it – so many things you can choose for this. I think it will be easiest if you choose your embellishments based on your image and what might really bring it to life. For mine, I thought some embroidery and a bit of gold leaf like dimensional paint would be just the thing.
Once you are finished embellishing your images, you can choose a frame type. If you chose to embellish with 3 dimensional items, you can choose a shadowbox frame or simply remove the glass from the front and let it all hang out there. My picture was printed at 8×10 on an 8 1/2 x 11″ sheet, so I chose a frame that was 11 x 14 and matted to an 8×10 size. It was the perfect choice I think! I love the extra matted space around the photo. Much more elegant than with an 8×10 frame.
What do you think? Does your mama love photos and other memory making paraphenalia? I don’t know a mom who doesn’t…
Michaels has everything you need to craft the perfect handmade gift that will make Mom’s day.
If you don’t know where to begin, you can always take a look at some of the fun projects on Michaels.com or the other 49 Makers’ ideas on The Glue String for to see how they personalized their crafts!
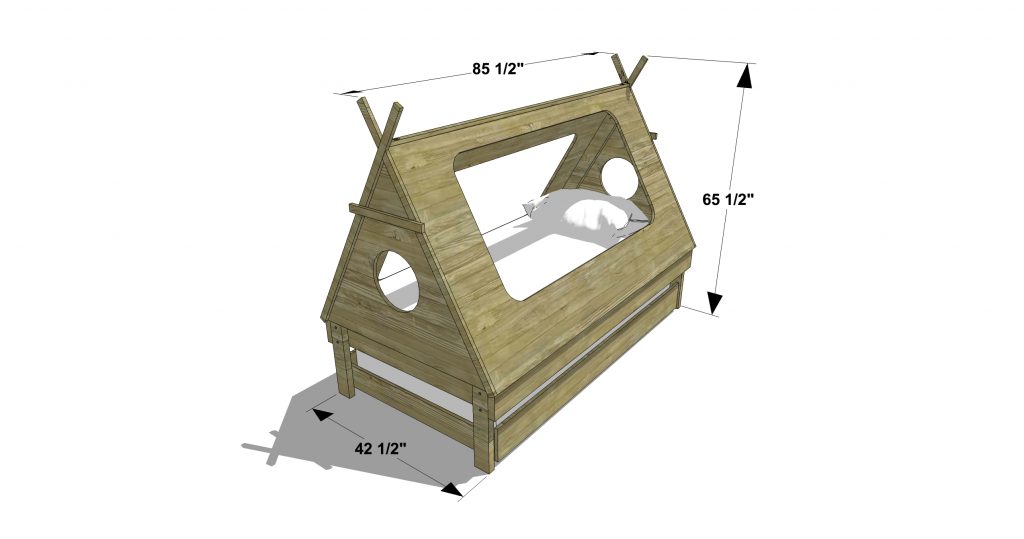
Is your little warrior begging for a room upgrade? This Kid’s Teepee Trundle Bed is a good looking build with plenty of added features – cutouts for making sure the coast is clear, cute trim details, and of course that trundle that tucks perfectly under the teepee! Go ahead and invite a friend – it’s time for a camp out!
As with all of our plans, you are building at your own risk and you should have a firm understanding of building in general before you attempt many of our plans (some are easy as pie and perfect for beginners). With that, go forth, have fun, take lots of pictures and share them in a showcase on the site or on social media with the hashtag #builtTDCtuff and we will share our faves! Be sure to tag @thedesignconfidential on Instagram / FB and @thedesconf on Twitter / Pinterest. If you are a blogger and you post about your build, don’t forget to include a link to your post on your showcase here. Don’t forget… for all of our newer plans, clicking on the images will let them expand to enormous sizes with much greater clarity. The older plans may need updating so please let us know if you need one fixed!
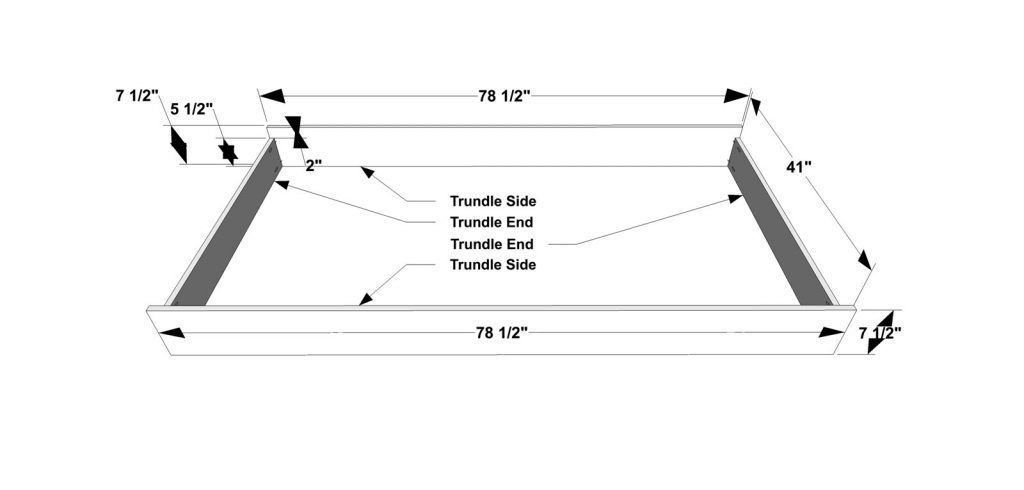
2 – 3/4” plywood at 7-1/2” x 78-1/2” – Trundle Sides
2 – 3/4” plywood at 5-1/2” x 41” – Trundle Ends
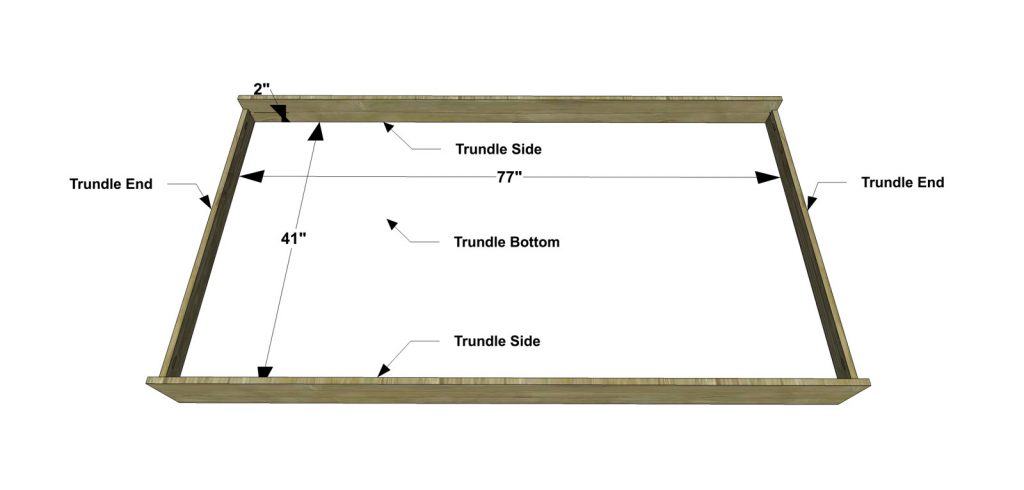
1 – 3/4” plywood at 41” x 77” – Trundle Bottom
4 – 2×4 at 18” – Legs
2 – 2×4 at 42-1/2” – Bed Ends
2 – 2×4 at 84” – Bed Sides
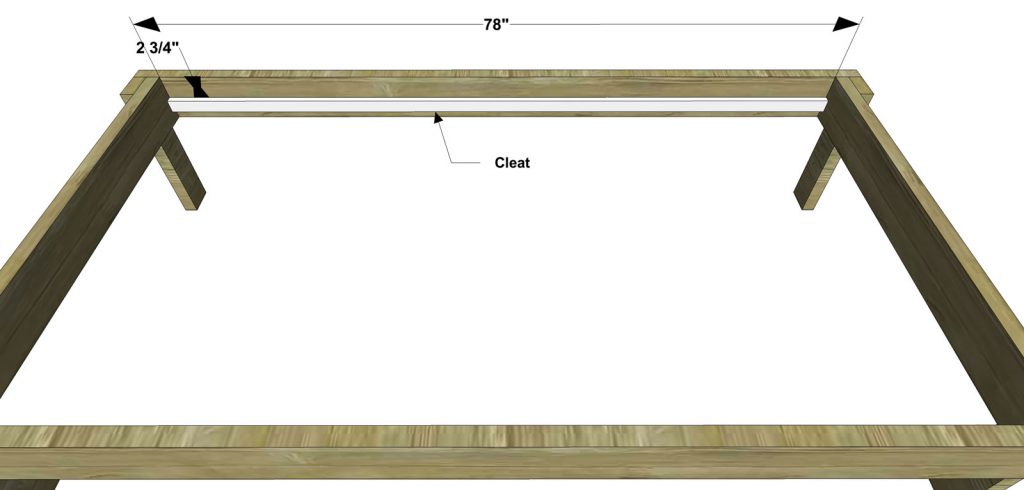
2 – 1×2 at 78” – Cleats
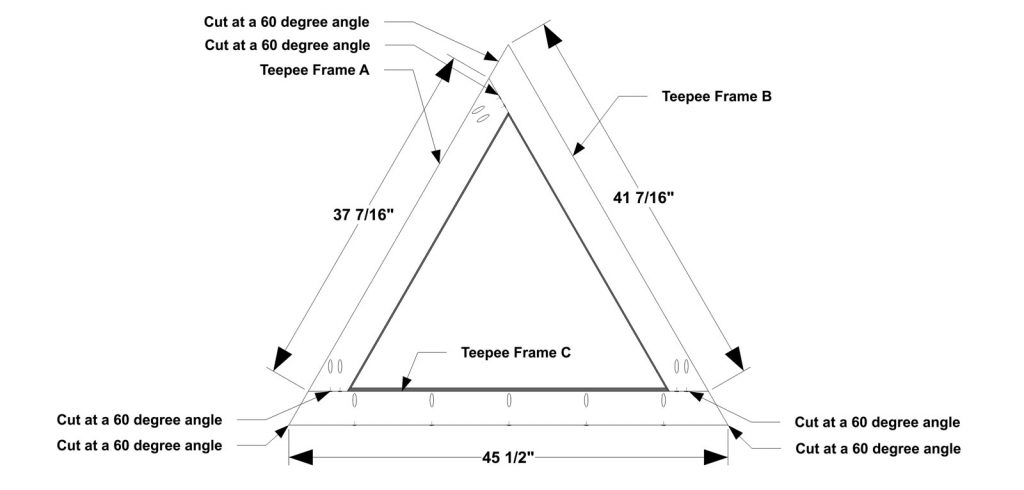
2 – 2×4 at 37-7/16” – Teepee Frame A
2 – 2×4 at 41-7/16” – Teepee Frame B
2 – 2×4 at 45-1/2” – Teepee Frame C
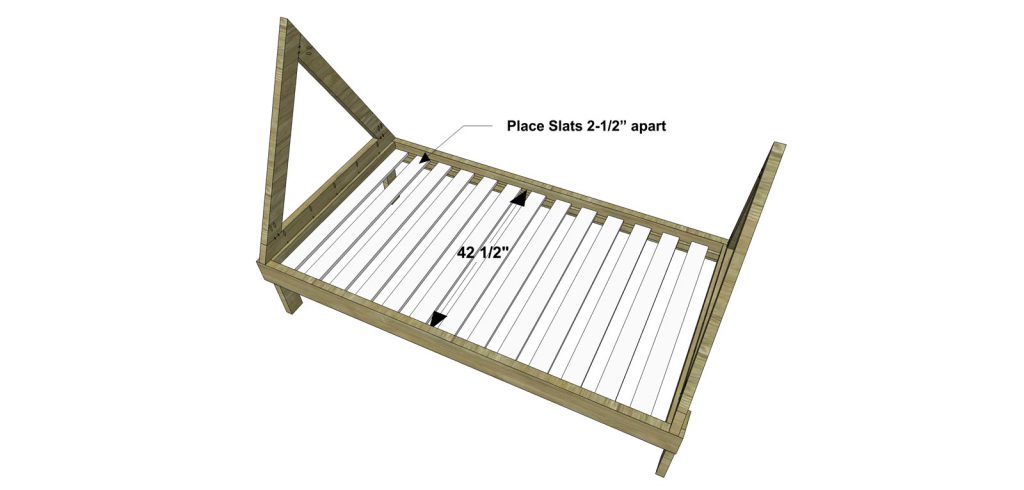
13 – 1×4 at 42-1/2” – Slats
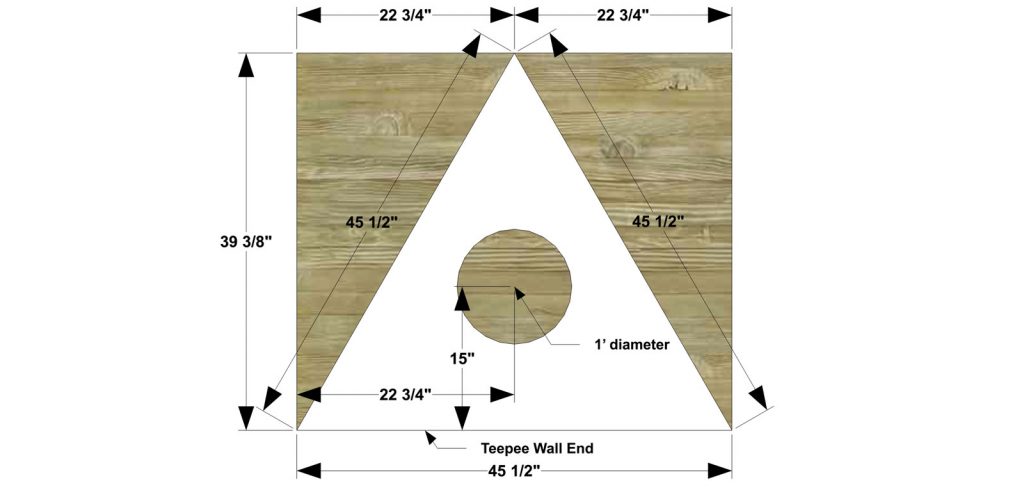
2 – 3/4” plywood at 39-3/8” x 45-1/2” – Teepee Wall Ends
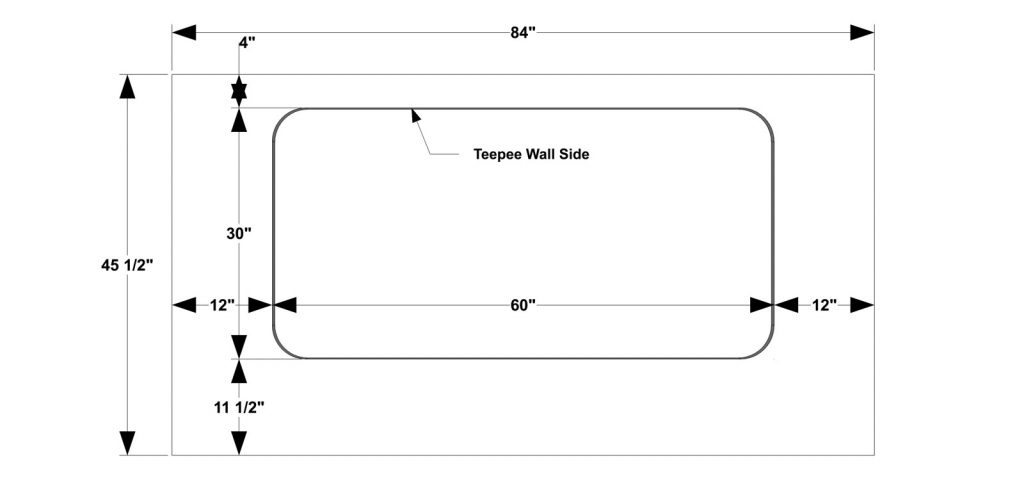
2 – 3/4” plywood at 45-1/2” x 84” – Teepee Wall Sides
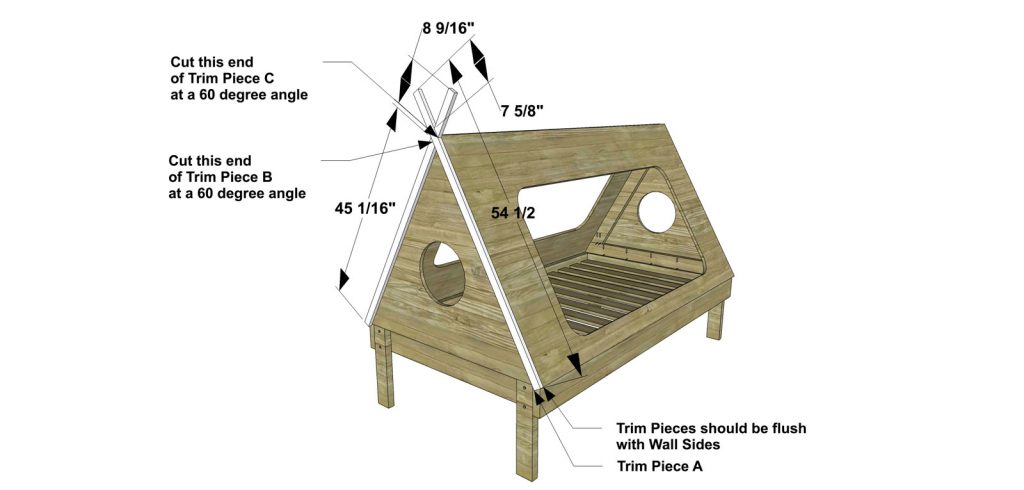
2 – 1×2 at 54-1/2” – Trim Piece A
2 – 1×2 at 45-1/16” – Trim Piece B
2 – 1×2 at 8-9/16” – Trim Piece C
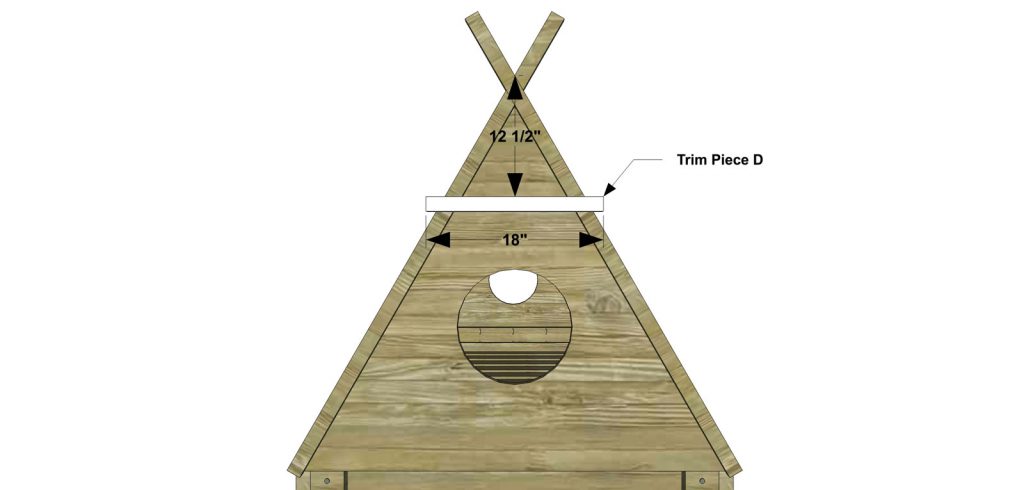
2 – 1×2 at 18” – Trim Piece D
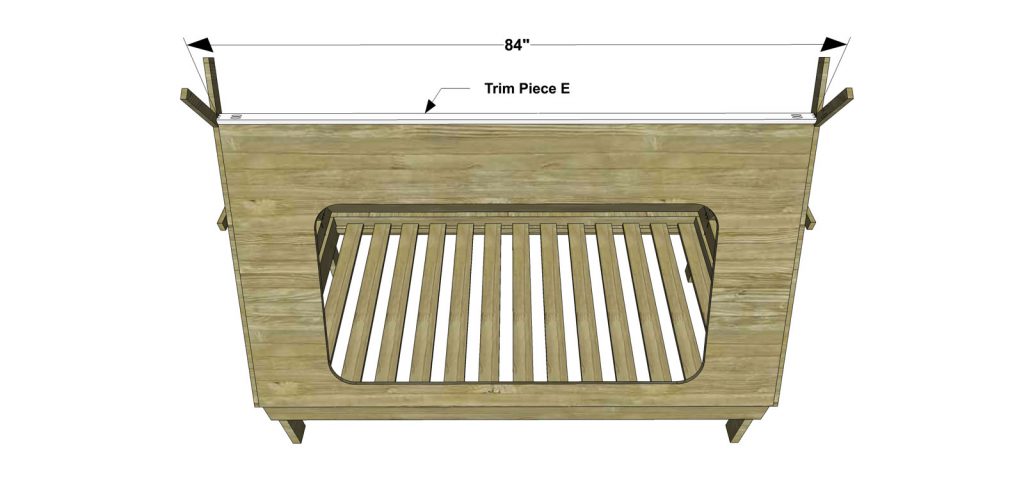
1 – 1×2 at 84” – Trim Piece E
Before beginning to build, always check in on my site to make sure you have the most up to date set of plans, I occasionally update and change the plans to make the building process easier or to allow for less expensive purchasing of materials! Read through the entire set of instructions and all comments before beginning this project. If you print out or save plans, be sure to check in on my site to be sure you have the most up to date set of plans, as I occasionally update things for ease of building or buying. If you are new to building, read through the GETTING STARTED section and other articles found under the BUILD tab in the menu on my site, it has valuable information about how to get started, tools and techniques. If you are unfamiliar with the finishing process, visit my Finishing school for some tips and tricks for painting like a pro and for special finishing practices. Use glue to secure your joints and Consider Painting or Staining individual sections prior to assembling. This makes the paint application virtually flawless. Coat with a spray on Poly or Wipe on Poly to protect your finish and your piece and it will last for ages. Adhere to all safety standards and guidelines, and be sure you follow safety protocol throughout your build. If you are unsure about whether you are building safely, run a quick online search for the tool or technique you are using, or contact me via email or post to the forum before you move ahead. My contact info can be found in the menu of my site.
Cut the pieces for the Trundle Sides and Ends. With the Kreg jig set for 3/4” material, drill pocket holes in each end of the Trundle Ends. Assemble as shown with glue and 1-1/4” Pocket Screws.
Cut the piece for the Trundle Bottom. With the Kreg jig set for 3/4” material, drill pocket holes along each side of the Trundle Bottom. Attach the Trundle Bottom (with pocket holes facing the ground) to the Trundle Sides and Ends as shown with glue and 1-1/4” Pocket Screws.
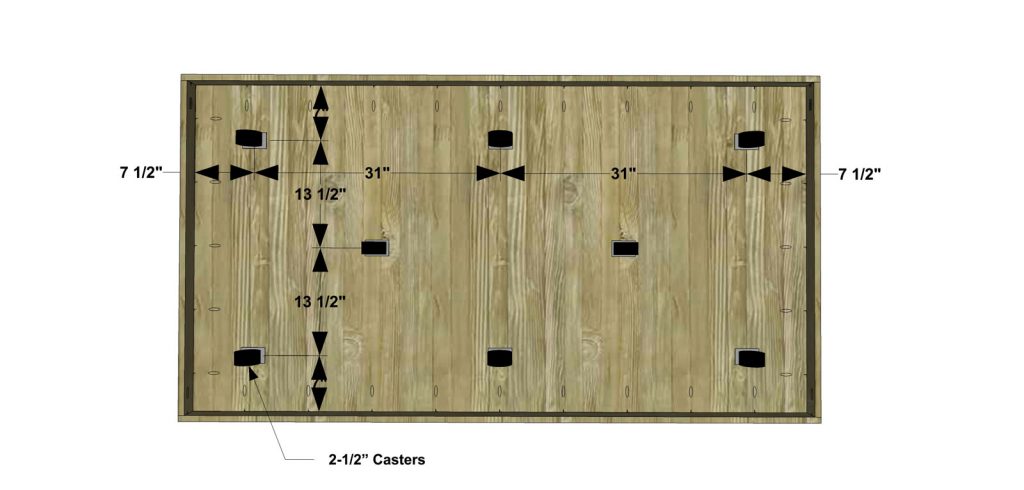
Flip over the Trundle Assembly and attach the 2-1/2” Castor Wheels as shown. Make sure to use screws that are short enough so that they do not go completely through the Trundle Bottom.
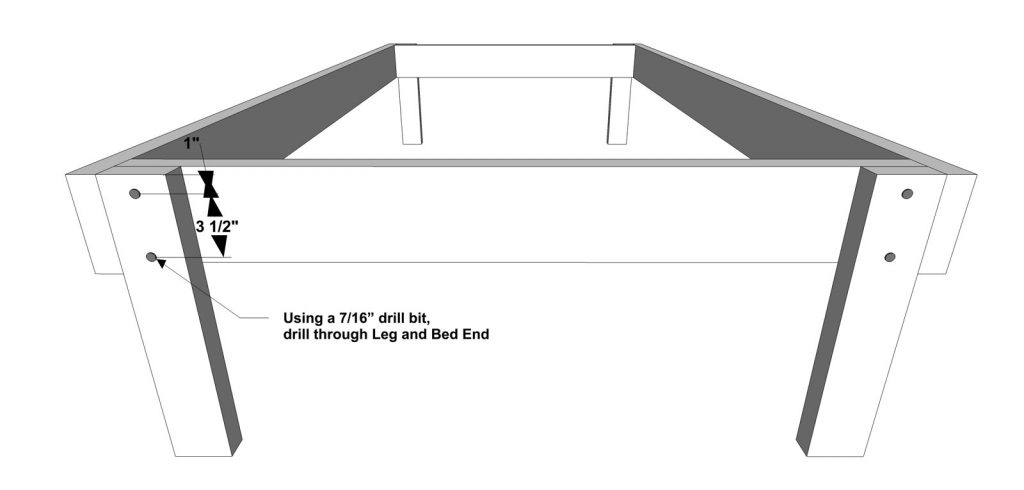
Cut the pieces for the Legs, Bed Sides and Bed Ends. Clamp the Leg and Bed Ends together as shown. With a 7/16” drill bit, drill through the Legs and Bed Ends. Release the clamps. Next, with the Kreg jig set for 1-1/2” material, drill pocket holes at each end of the Bed Ends. Attach the Bed Sides to the Bed Ends with glue and 2-1/2” pocket screws, leaving a 1-1/2” space at the end for the Legs. Assemble the Legs to the Bed Ends as shown with 5/16” carriage bolts, washers, and nuts. For added stability, install corner brackets at each inside corner of the bed.
Cut the pieces for the Cleats. Attach the Cleats to the Bed Sides as shown with 2” wood screws. If you chose to install corner brackets at each inside corner of the Bed, adjust Cleat length to accommodate.
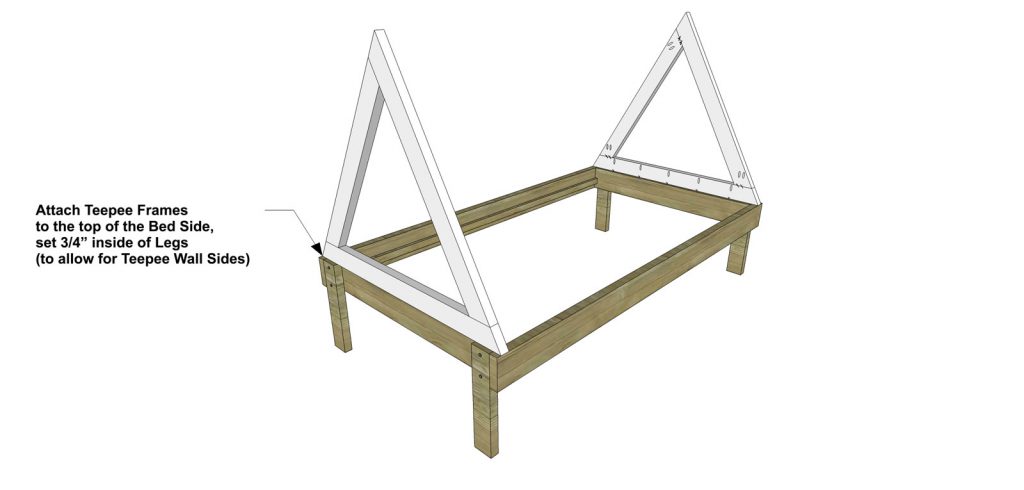
Cut the Teepee Frame pieces. With the Kreg jig set for 1-1/2” material, drill pocket holes at each end of Teepee Frame A, one end of Teepee Frame B, and along the bottom edge of Teepee Frame C. Assemble as shown with glue and 2-1/2” pocket screws. Repeat this step twice, once for each end of the bed. Attach the Teepee Frame assemblies to the Bed assembly as shown with glue and 2-1/2” pocket screws.
Cut the pieces for Slats. Attach the Bed Slats to the Cleats with 1-1/2” wood screws. Space the Slats approximately 2-1/2” apart from one another.
Cut the piece for the Teepee Wall End. Cut the opening for the Teepee Wall End. Remember to drill pilot holes slightly larger than your jigsaw blade for these inside cuts. Repeat this step twice, once for each end of the bed. Attach the Teepee Wall Ends as shown with glue and 1-1/2” wood screws.
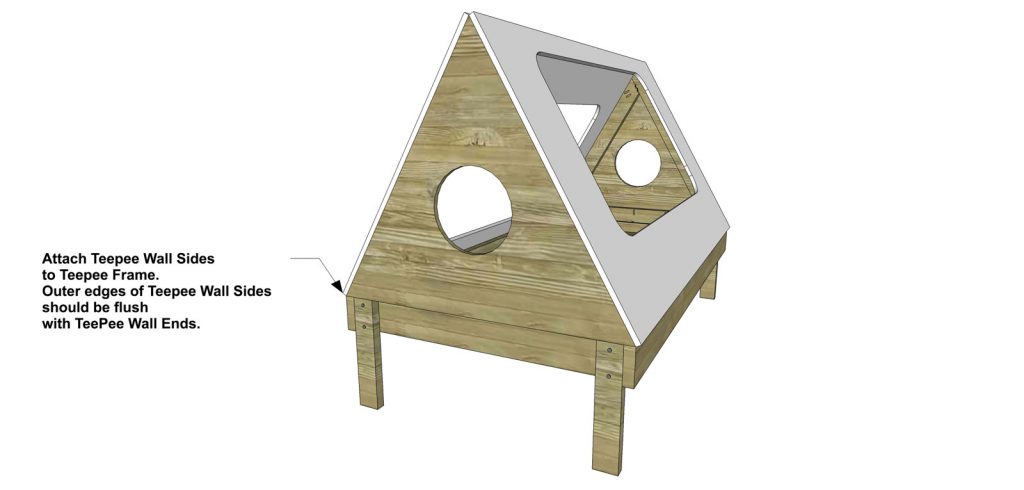
Cut the piece for the Teepee Wall Side. Cut the opening for the Teepee Wall Side. Remember to drill pilot holes slightly larger than your jigsaw blade for these inside cuts. Repeat this step twice, once for each side of the bed. Attach the Teepee Wall Sides as shown with glue and 1-1/2” wood screws. Note that one side is installed upside down from the other.
Cut the pieces for the Trim. With the Kreg jig set for 3/4” material, drill pocket holes at the angled end of Trim Piece C. Attach the Trim Pieces to the Wall Sides and Ends as shown with glue and 1-1/4” brad nails. Attach Trim Piece C to Trim Piece A as shown with glue and 1-1/4” pocket screws. Repeat this step twice, once for each end of the bed.
Cut Trim Piece D. Attach Trim Piece D to the Trim Pieces as shown with glue and 1-1/4” brad nails. Repeat this step twice, once for each end of the bed.
Cut Trim Piece E. With the Kreg jig set for 1-1/2” material, drill pocket holes at each end of Trim Piece E. Attach Trim Piece E to the Teepee Bed as shown with glue and 1-1/4” brad nails. This Trim Piece may do just fine with only the use of brad nails – you may be able to skip the pocket holes here.
Fill any Screw, Nail or Pocket Holes, Sand and Finish as Desired. For Finishing Tips and Tricks visit my Finishing School
// Disclaimer: Some rights reserved. Private use only. Feel Free to link to any of my plans so long as you ONLY use 1 image and provide an ADEQUATE link back to the original source and appropriate plan! Plans from this page are not to be used for commercial purposes or republished without the express written consent of Rayan Turner, The Design Confidential. By accessing or using any part of the web site, you agree to become bound by the terms and conditions of this website as outlined under Terms of Use. If you do not agree to all the terms and conditions of this agreement, then you may not access the Website or use any services. The information contained in this website is for general information purposes only. The information is provided by The Design Confidential.com and while we endeavor to keep the information up to date and correct, we make no representations or warranties of any kind, express or implied, about the completeness, accuracy, reliability, suitability or availability with respect to the website or the information, products, services, or related graphics contained on the website for any purpose. Any reliance you place on such information is therefore strictly at your own risk. In no event will we be liable for any loss or damage including without limitation, indirect or consequential loss or damage, personal injury or death, or any loss or damage whatsoever arising from loss of information or profits arising out of, or in connection with, the use of this website. I hope to provide accurate plans, however, I cannot guarantee each plan for accuracy. Not every plan that I post has been built and tested, so you are building at your own risk. It is recommended that you have a clear understanding of how the project works before beginning any project. Please contact me if you find an error or inaccuracy so that I might fix it. The Design Confidential.com is inspired by but does not replicate exact designs, any similarities between these plans and items sold at specialty retailers is coincidential and not endorsed by or related to any said retailers. // Post May Contain Affiliate Links
There is nothing quite like bringing a little life into your home, after a long winter filled with anything but. If you are like me, then a busy schedule and an overactive allergy season don’t always allow for fresh flowers and freshly cut stems to grace my surfaces without major repercussions. But that isn’t too say that you shouldn’t try – I adore fresh flowers and plants even more so, but I always know going into it that more often than not, they are quickly forgotten, left to wither and turn into more allergies, and this brings a fairly decent mess to deal with. Does this happen to you too? Pretty sure I still have Valentine’s Day flowers on my counter – yep just keeping it real folks.
Speaking of real… you may remember back in July when I attended the Michael’s Maker Summit with 49 other insanely talented folks from around the country? Well if you make it through to the end of this article there are details about how you might win a chance to attend the Summit this year, right along side us! It was so crazy fun and we spent the entire time in the most beautiful setting (Sonoma) learning how to paint with watercolor and weave and other crafty things from some of the most talented artists in the world! It was amaze!
This year we have had weird weather and many of the plants and trees in my yard have had multiple blooming periods, being that they are so confused an all, so I took the opportunity to trim some of the branches from my tulip tree just as they were about to put on a good show. You can see them above. Aren’t they glorious? They are so good they look fake. And also like a floral still life painting. So I will hang on for dear life, since I may not see the sunshine for a while with all of the projects happening behind the scenes here at TDC.
Michael’s has a crazy good selection of vases and vessels and I managed to grab up a few beauties with a 40% off coupon. Yahoo. Remembering to use a coupon is a bit like spotting a unicorn around these parts, so I figure I should put it out there to the universe and pay it forward. If you are looking to spruce things up for spring, run, don’t walk, and snatch things up like it’s a sample sale for bridal gowns during wedding season. Just don’t forget to check your email and bring those coupons – they are also on their website and you can use them from your phone!
The last decade or so have really done a number on our impression of faux florals, don’t you think? Silk ficus trees graced many an entryway in the area I grew up, and aside from collecting dust in a way I never knew was possible, there isn’t much that sort of faux really brings to the table – other than a good sprinkling of that dust. But faux florals have come a long way since then and when you can’t have real, freshly cut flower arrangements arrive at your doorstep every week, there is indeed a place for faux to shine. It’s likely in a shiny new vase you found for under $10.
If you don’t have access to glorious blooms and blossoming branches, fear not… you can rock a bit of faux and keep it from looking phony with a few simple tricks. Promise.
Keep it simple
By sticking to stems that replicate plants that already tend to look fake in real life, I run far less risk of having my arrangement look more phony than not. Succulents are a great example of this and anything in that family will be easy to pull off. Tropicals like Monstera leaves and palm fronds are a good choice if they are made of a thick plastic type material and not silk. Anything in the Lamb’s Ear or Dusty Miller family, with that fuzzy layer and silvery sage color also look incredibly real, as you can see in the image below.
If you don’t come from a family of florists, and you aren’t sure which stems look real and which might be a bit of a stretch, it’s best you just steer clear of big bold colorful stems that imitate flowers that most of us wouldn’t be able to keep alive if our lives depended on it. Orchids and hydrangea are occasionally on point and as long as you aren’t choosing something that runs more toward a decorative color than a realistic one, you can likely pull these off.
Branches are realistic all year long and flowering or ornate stems like forsythia and pussy willow (no one can say that with a straight face – amiright?) are difficult to tell apart from their real life counterparts.
Fight the urge to mix and mingle. You may just find yourself marching to the beat of that age old adage and planter technique of needing a ‘thriller, a filler and a spiller’ – but fight the feeling my friends and stick with one thing. If you want your arrangement to look realistic, think about your story… is it likely you are going to waltz out to your garden of glory and cut a variety of glorious specimens to artfully arrange in a vase? Not likely at all. Besides, how often do you find those glorious things all in full bloom at the same time? Pretty much never. You may, on the other hand, saunter out and cut a few unnecessary branches from your flowering cherry tree and place them proudly on their own in an over sized vase on your table.
Know when to fold ’em
Stems are often jointed near the end so that you can conceivably cut them to size without having to whip out the chain saw. Use this to your advantage if you simply need to shorten your stem. A heavy duty pair of scissors will often do the trick, but if you struggle, a few bends back and forth will help get the job done.
Sometimes you need to shorten the length of your stem, but you also need it to stand or sit differently than it is. Folding the base of the stem rather than cutting it will help you build volume at the base of your vase and will have your beauties standing tall or at an angle if you prefer, and you won’t need to buy as many stems to fill your space.
Choose the right vessel
Speaking of vases – If your vessel is too tall, too short, has a narrow opening or perhaps even a rather large one, you will need to choose a stem that will not look out of place or just plain wrong and you will take your secret to the grave and the true nature of your faux florals will be far less obvious. It’s like when you see a large person with an itty bitty hairdo, or a skinny little thing with more hair than their tiny face can handle. It’s weird, so don’t do it. Always make sure you have enough of the stems to fit the vase so that everything is in proportion to the opening and height.
If you are working with stems that have that crazy looking plastic section at the base, don’t use a vase that you can see into.
Think outside the box
The flower box that is… if you just can’t quite bring yourself to go with the faux in a traditional sense, try adding faux greenery to a set of string lights or bright blossoms to a portrait for an artsy take on spring decor. Faux is expected in this type of medium and choosing well-made floral stems will simply elevate your project rather than bring it down a notch.
How do you dress things up for Spring? Or maybe after months of holidays you prefer to dress things down? I know I do!
So if you think it would suit you quite well to join us at the Maker’s Summit, we completely agree and here is your chance! Win a Trip to the Makers Summitby visitingMichaels.com/madewithmichaels and upload a photo of your personalized project. If you can instagram, or FB, you can do this! Just to get you excited… check out this video from last year’s Summit!
Michaels new Floral Market has over 500 new blooms and freshly picked projects make this the prettiest spring ever.
Just by swapping out a few décor pieces or adding a lovely floral arrangement can completely transform your home for the fresh, new season.
If you don’t know where to begin, you can always take a look at some of the fun projects on Michaels.com or the other 49 Makers’ ideas on The Glue String for to see how they personalized their crafts!
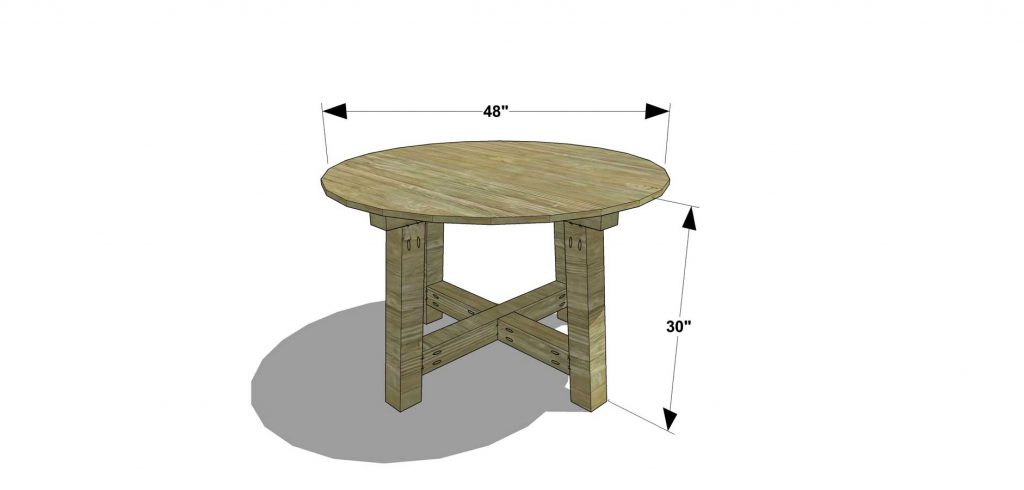
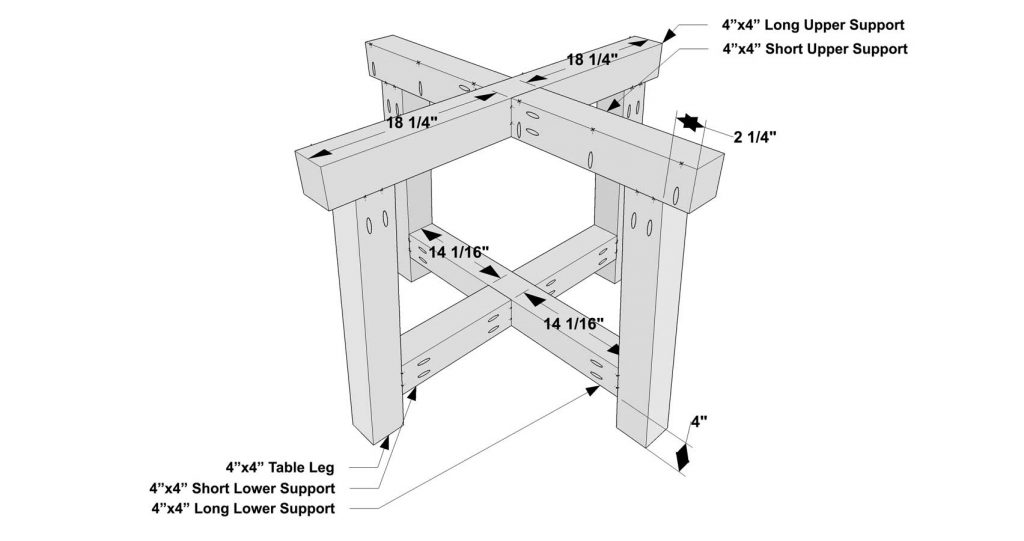
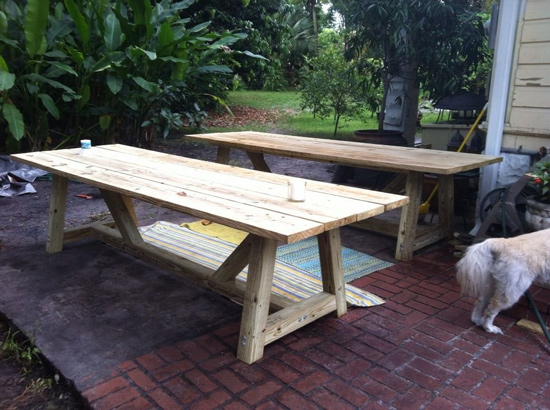
This Salvaged Round Table is a super easy build that you can knock out in just a few hours. You can honor the salvaged look, or just go for that clean and simple look of fresh cut lumber- the choice is yours! Either way, make sure you let us see your work!
As with all of our plans, you are building at your own risk and you should have a firm understanding of building in general before you attempt many of our plans (some are easy as pie and perfect for beginners). With that, go forth, have fun, take lots of pictures and share them in a showcase on the site or on social media with the hashtag #builtTDCtuff and we will share our faves! Be sure to tag @thedesignconfidential on Instagram / FB and @thedesconf on Twitter / Pinterest. If you are a blogger and you post about your build, don’t forget to include a link to your post on your showcase here. Don’t forget… for all of our newer plans, clicking on the images will let them expand to enormous sizes with much greater clarity. The older plans may need updating so please let us know if you need one fixed!
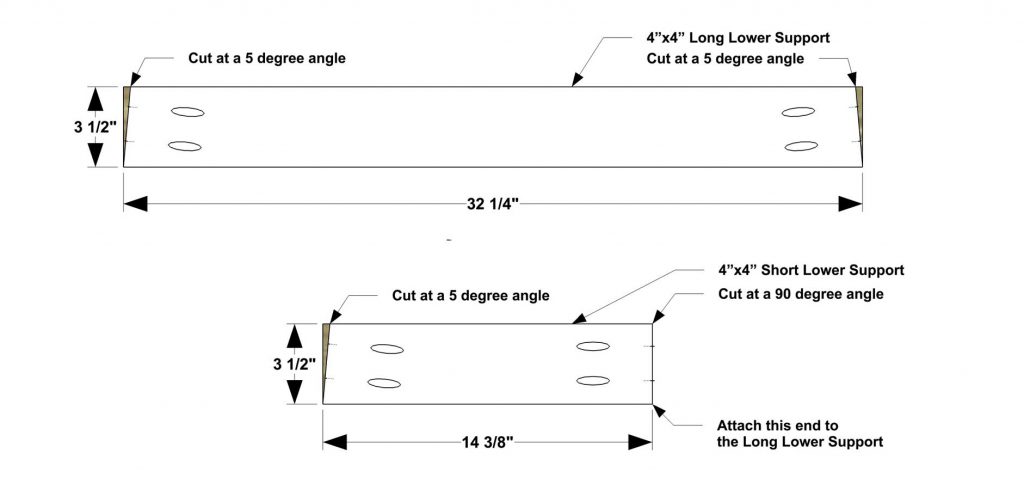
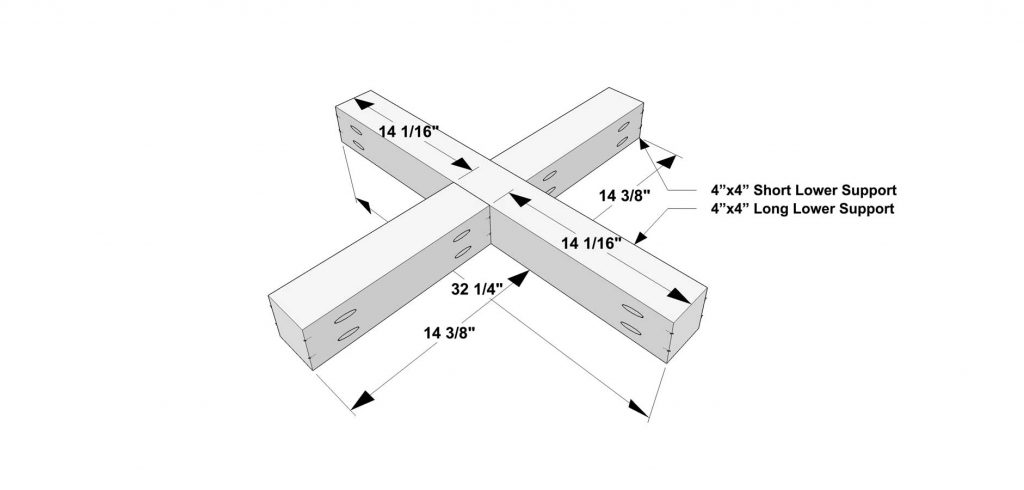
1 – 4×4 at 32-1/4” – Long Lower Support
2 – 4×4 at 14-3/8” – Short Lower Supports
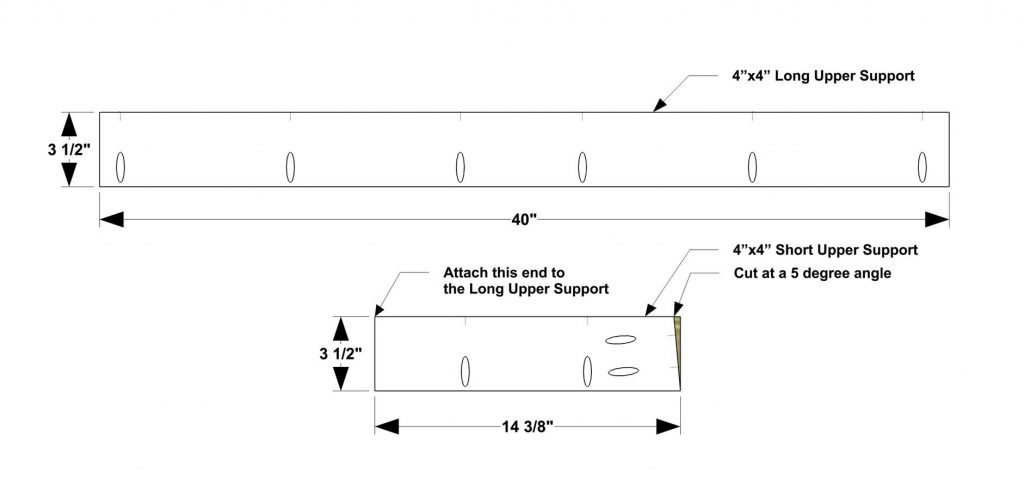
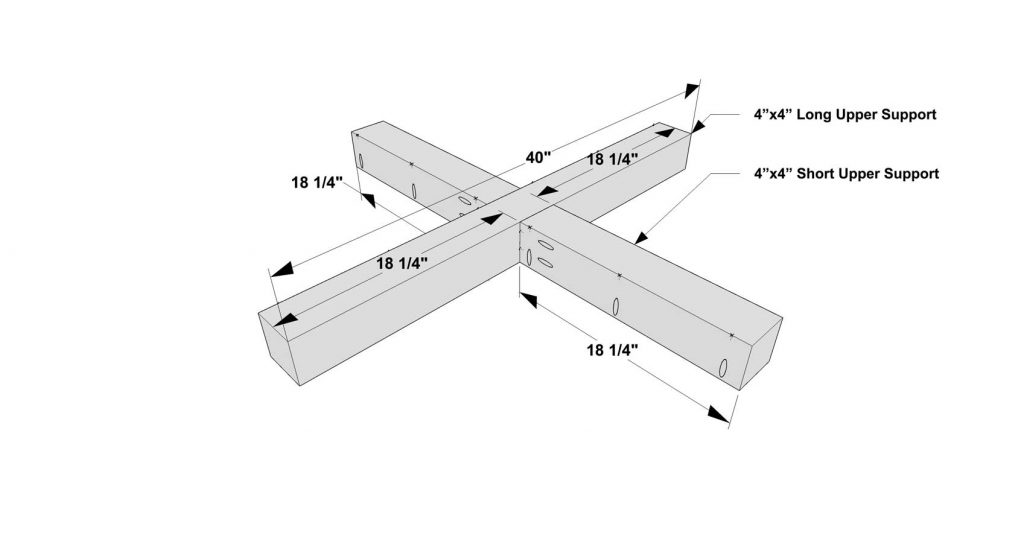
1 – 4×4 at 40” – Long Upper Support
2 – 4×4 at 14-3/8” – Short Upper Supports
4 – 4×4 at 26-1/8” – Table Legs
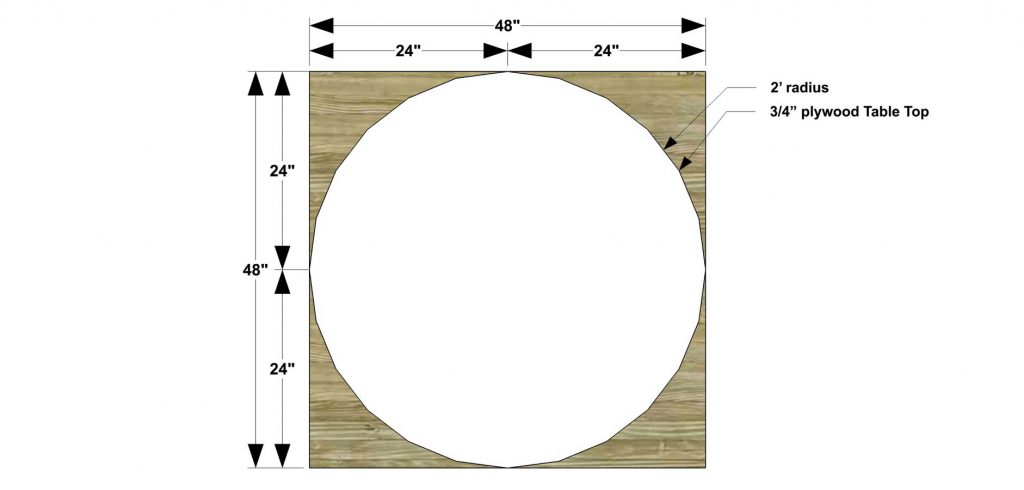
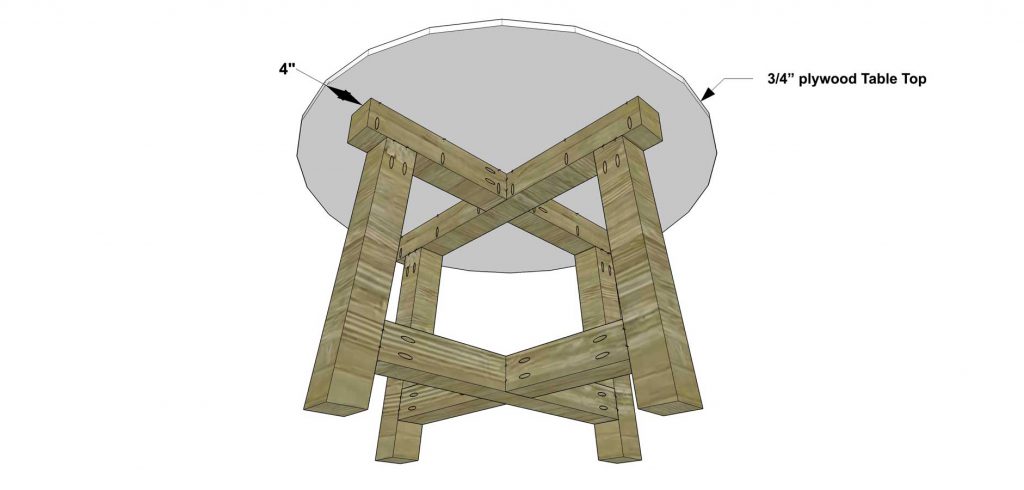
1 – 3/4” plywood at 48” diameter – Table Top
Before beginning to build, always check in on my site to make sure you have the most up to date set of plans, I occasionally update and change the plans to make the building process easier or to allow for less expensive purchasing of materials! Read through the entire set of instructions and all comments before beginning this project. If you print out or save plans, be sure to check in on my site to be sure you have the most up to date set of plans, as I occasionally update things for ease of building or buying. If you are new to building, read through the GETTING STARTED section and other articles found under the BUILD tab in the menu on my site, it has valuable information about how to get started, tools and techniques. If you are unfamiliar with the finishing process, visit my Finishing school for some tips and tricks for painting like a pro and for special finishing practices. Use glue to secure your joints and Consider Painting or Staining individual sections prior to assembling. This makes the paint application virtually flawless. Coat with a spray on Poly or Wipe on Poly to protect your finish and your piece and it will last for ages. Adhere to all safety standards and guidelines, and be sure you follow safety protocol throughout your build. If you are unsure about whether you are building safely, run a quick online search for the tool or technique you are using, or contact me via email or post to the forum before you move ahead. My contact info can be found in the menu of my site.
Cut the pieces for the Short and Long Lower Supports. With the Kreg jig set for 1-1/2” material, drill pocket holes in each end and on both sides of the Short Lower Supports and the Long Lower Support. Assemble as shown with glue and 2-1/2” Pocket Screws. Make sure that the angled pieces are positioned so their bottoms are longer than their tops (i.e the angle tapers inward as it moves upward).
Cut the pieces for the Short and Long Upper Supports. With the Kreg jig set for 1-1/2” material, drill pocket holes in each end and on both sides of the Short Upper Supports.
With your Kreg Jig set for 3/4″ material, drill pocket holes along the long edge of the Short and Long Upper Supports as shown.
Attach the Short Upper Supports to the Long Upper Support as shown with glue and 2-1/2” Pocket Screws. Opposite of the Lower Support Assembly, make sure that the angled pieces are positioned so their tops are longer than their bottoms (i.e the angle tapers outward as it moves upward).
Cut the pieces for the Table Legs. With the Kreg jig set for 1-1/2” material, drill pocket holes on both sides of the top ends of each Table Leg.
Assemble the Short and Long Lower Support assembly and the Short and Long Upper Support assembly to the Table Legs as shown.
Cut the piece for Table Top as shown. Apply Edge Banding to the plywood edge if desired. Place on top of the Short and Long Upper Supports as indicated and secure with glue and 1-1/4” Pocket Screws. If you really want to rock the “salvaged” look, be sure to manually distress the Dining Table before finishing it!
Fill any Screw, Nail or Pocket Holes, Sand and Finish as Desired. For Finishing Tips and Tricks visit my Finishing School
// Disclaimer: Some rights reserved. Private use only. Feel Free to link to any of my plans so long as you ONLY use 1 image and provide an ADEQUATE link back to the original source and appropriate plan! Plans from this page are not to be used for commercial purposes or republished without the express written consent of Rayan Turner, The Design Confidential. By accessing or using any part of the web site, you agree to become bound by the terms and conditions of this website as outlined under Terms of Use. If you do not agree to all the terms and conditions of this agreement, then you may not access the Website or use any services. The information contained in this website is for general information purposes only. The information is provided by The Design Confidential.com and while we endeavor to keep the information up to date and correct, we make no representations or warranties of any kind, express or implied, about the completeness, accuracy, reliability, suitability or availability with respect to the website or the information, products, services, or related graphics contained on the website for any purpose. Any reliance you place on such information is therefore strictly at your own risk. In no event will we be liable for any loss or damage including without limitation, indirect or consequential loss or damage, personal injury or death, or any loss or damage whatsoever arising from loss of information or profits arising out of, or in connection with, the use of this website. I hope to provide accurate plans, however, I cannot guarantee each plan for accuracy. Not every plan that I post has been built and tested, so you are building at your own risk. It is recommended that you have a clear understanding of how the project works before beginning any project. Please contact me if you find an error or inaccuracy so that I might fix it. The Design Confidential.com is inspired by but does not replicate exact designs, any similarities between these plans and items sold at specialty retailers is coincidental and not endorsed by or related to any said retailers. // Affiliate links are used for tools and materials. The Design Confidential will earn a small commission for any items purchased using these links. Thank you for your support – every little bit counts!
Just realized today is Super Bowl Sunday? Well if you are still scrambling to make something special before kickoff, fear not… here are 3 last minute ideas that you can finish in under 15 minutes! Seriously – so run to the store and hustle on back! This round up of tasty treats will elevate your game day soiree, big time with a grownup take on some game day classics… because who doesn’t love lemonade, popcorn and potato chips? No one, that’s who.
For other fun cocktail ideas and fabulous game day spreads, click here to read up on this series!
Simple Syrup – optional and can be substituted for sugar or left out entirely
Lemon to Garnish
// If you love a good Arnold Palmer, then this tipsy version is perfect for a game day refreshment. Fill a tall glass with ice, add 4 ounces of iced tea, and 4 ounces of Smirnoff Ice Original. Add 1/2 ounce of simple syrup if you like your tea more like sweet tea (which I do) and garnish with a lemon slice.
HOT + SOUR CHIPS RECIPE
Salt + Vinegar Kettle Cooked Chips
Blue Cheese Dressing
Hot Chili Oil
Chili Flakes
Green Onions
// Pour Chips into a bowl and drizzle blue cheese dressing lightly over the top. Sprinkle several dashes of the hot chili oil on top of that along with a very light sprinkling of chili flakes. Chop 2-3 of your green onions and sprinkle over top of chips. If you want to make this as a dip, simply add blue cheese to a dipping bowl, add a few sprinkles of hot oil and chili flakes, then top with a light bit of your chopped green onions.
EASY POPCORN BALL RECIPE
14 Cups of Pre-popped Popcorn (Skinny Pop has a plain variety)
1 10 ounce Bag of Mini Marshmallows
4 TBSP Butter
// Melt butter and marshmallows on low to medium heat, in a large saucepan. Once melted, remove from heat and add popcorn. Stir until coated and form into small balls. (I do this with my hands inside plastic baggies that have been sprayed with coconut oil and it keeps me from having a sticky disaster.) Let these form up and cool completely on waxed paper.
This fun spread, brought to you in partnership with Smirnoff Ice. Please drink responsibly and thank you for supporting the awesome brands that help me create new content here for The Design Confidential! I heart you guys!
I’m back in the saddle my friends, and I have missed you guys and making our sawdust dreams come true. I have been busy with life of course but I have taken on a really fun side project and I can’t wait to tell you all about it! I think you will love it!
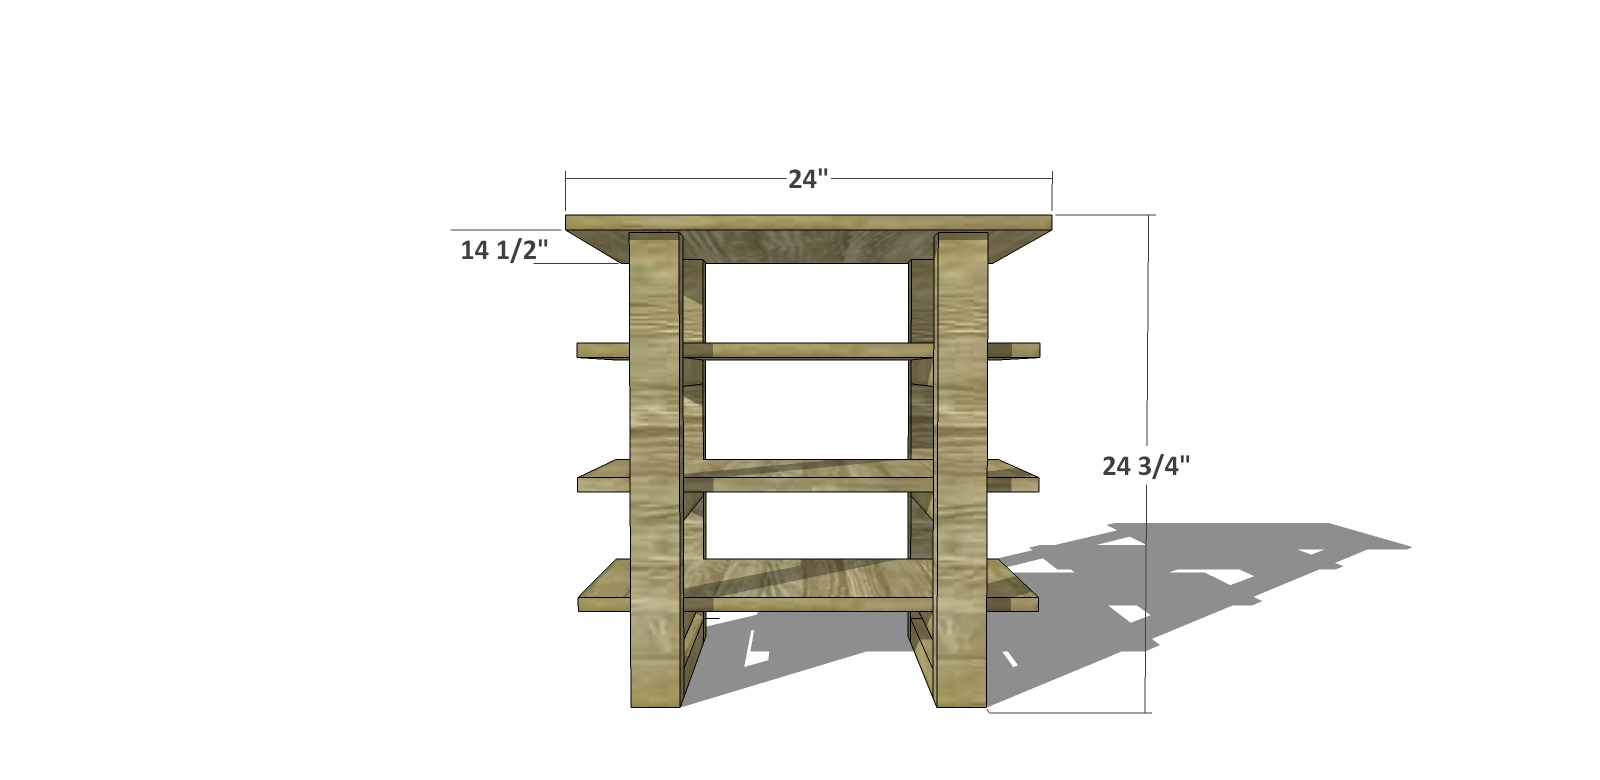
Today’s build is a simple yet statement making piece that is perfect for an end table or nightstand and would be fabulous as an accent table anywhere you need some display and storage.
As with all of our plans, you are building at your own risk and you should have a firm understanding of building in general before you attempt many of our plans (some are easy as pie and perfect for beginners). With that, go forth, have fun, take lots of pictures and share them in a showcase on the site or on social media with the hashtag #builtTDCtuff and we will share our faves! Be sure to tag @thedesignconfidential on Instagram / FB and @thedesconf on Twitter / Pinterest. If you are a blogger and you post about your build, don’t forget to include a link to your post on your showcase here. Don’t forget… for all of our newer plans, clicking on the images will let them expand to enormous sizes with much greater clarity. The older plans may need updating so please let us know if you need one fixed!
Read through the entire set of instructions and all comments before beginning this project. If you print out or save plans, be sure to check in on my site to be sure you have the most up to date set of plans, as I occasionally update things for ease of building or buying. If you are new to building, read through the GETTING STARTED section and other articles found under the BUILD tab in the menu on my site, it has valuable information about how to get started, tools and techniques. If you are unfamiliar with the finishing process, visit my Finishing school for some tips and tricks for painting like a pro and for special finishing practices. Use glue to secure your joints and Consider Painting or Staining individual sections prior to assembling. This makes the paint application virtually flawless. Coat with a spray on Poly or Wipe on Poly to protect your finish and your piece and it will last for ages. Adhere to all safety standards and guidelines, and be sure you follow safety protocol throughout your build. If you are unsure about whether you are building safely, run a quick online search for the tool or technique you are using, or contact me via email or post to the forum before you move ahead. My contact info can be found in the menu of my site.
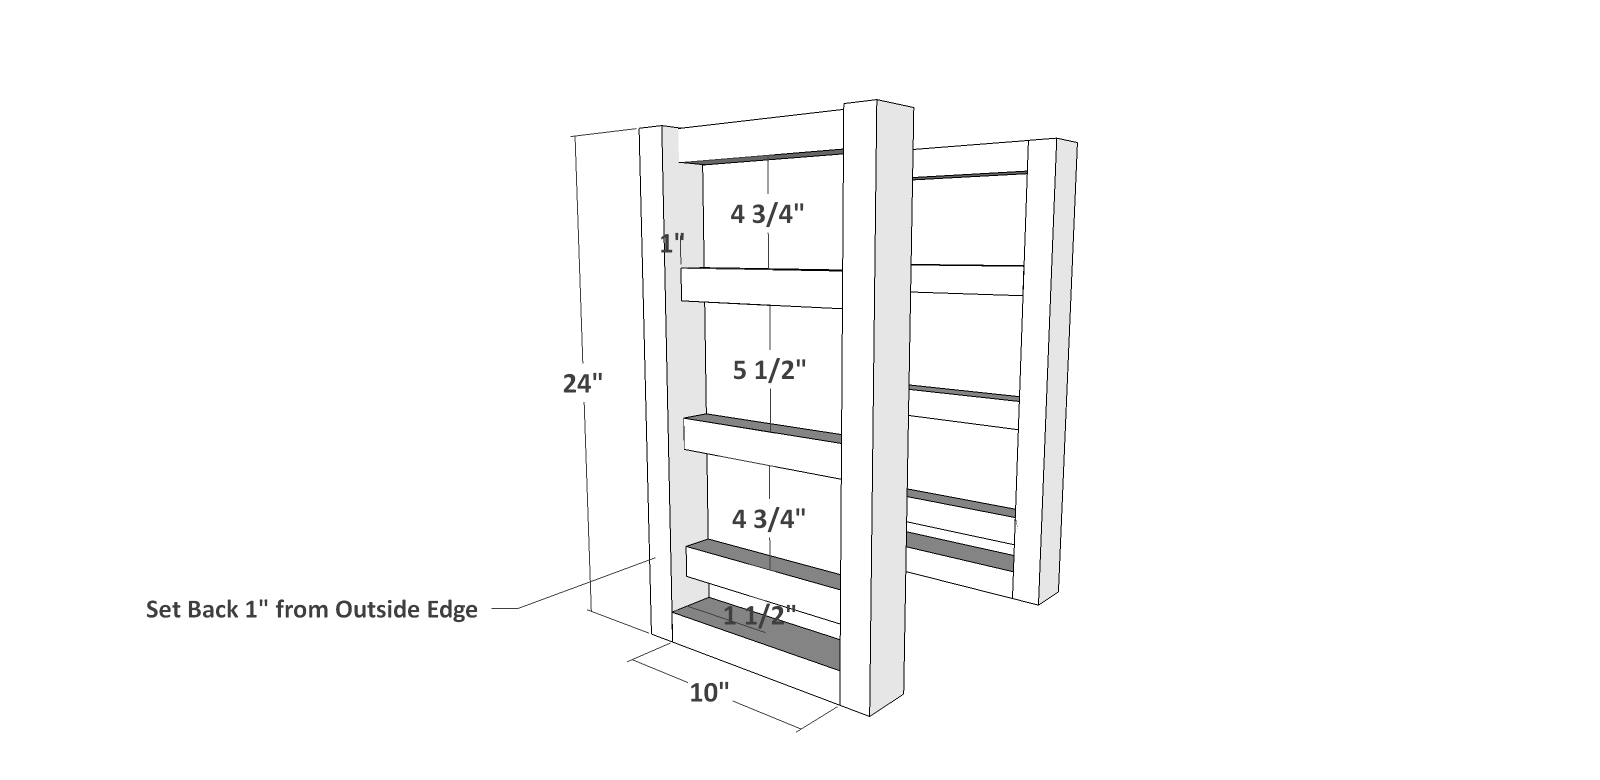
Create the Leg Base Units. Cut your boards to size and place pocket holes for 1 1/2″ material on both ends of each rail and both ends of each base. Secure in place using glue and 2 1/2″ pocket hole screws.
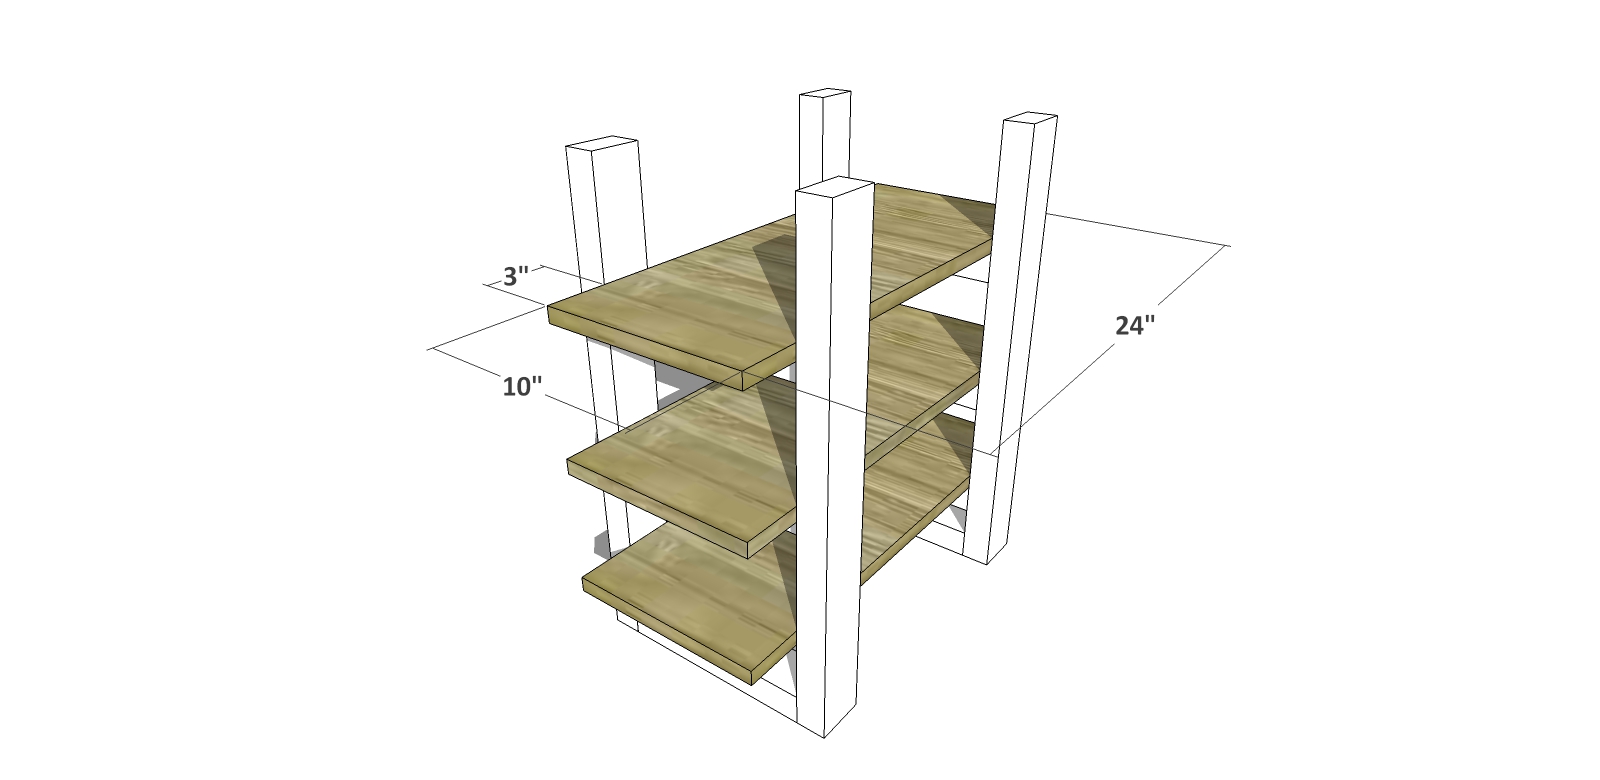
Cut your shelves and your top to size and sand, then place edge banding around all 4 sides if desired. If staining or painting your piece, you may want to do this step now for the shelves and leg units before you assemble them. Secure your shelves in place using glue and your 1 1/4″ brad nails or wood screws. If you are using wood screws rather than finish nails, use a countersink bit so your screws sit flush.
You might also secure from underneath using 2″ wood screws if you prefer, just keep in mind it will be tight quarters between the rails.
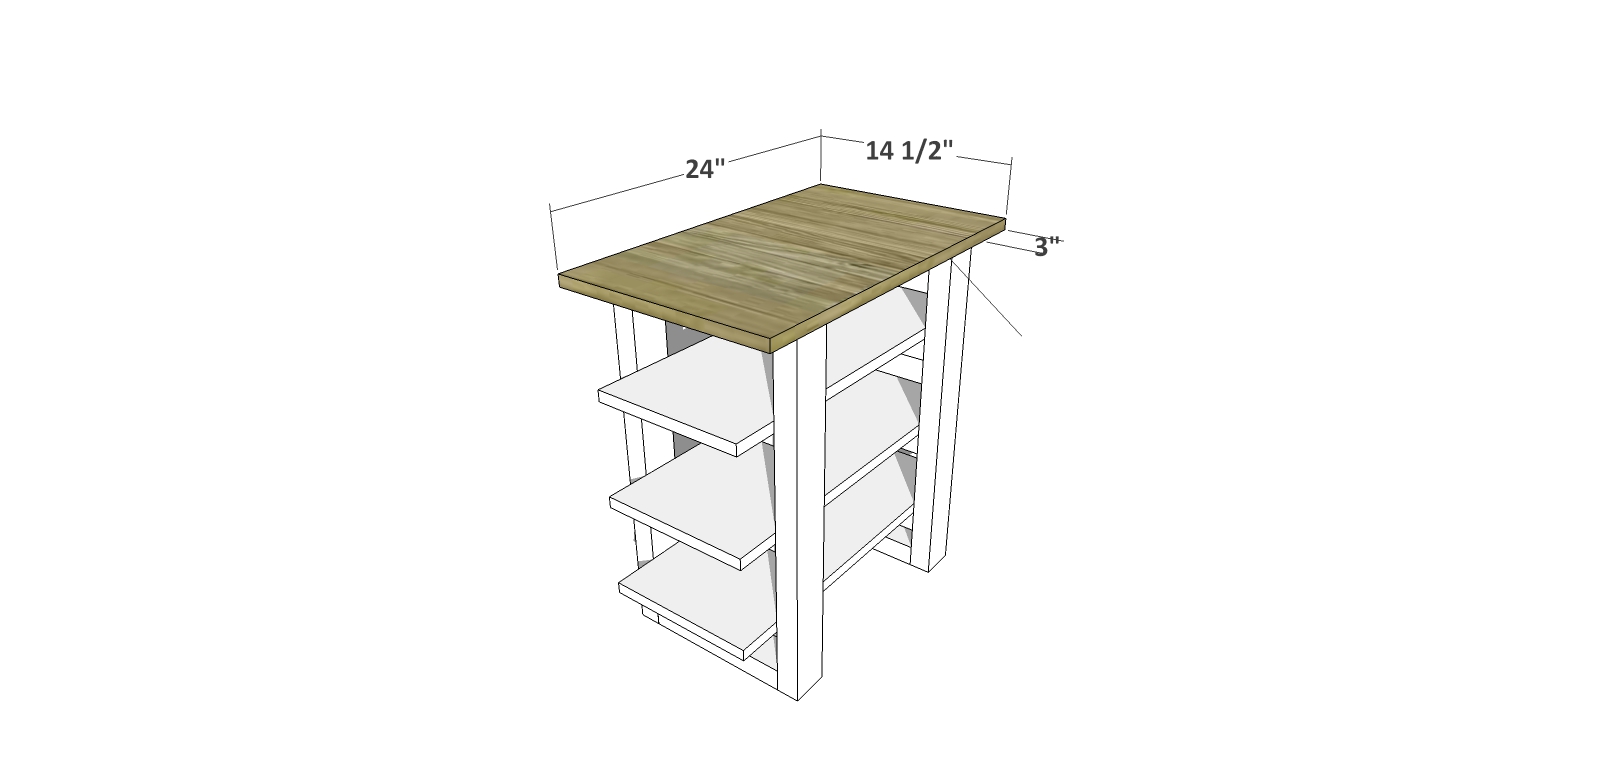
Secure your top in place using glue and your 1 1/4″ brad nails (preferred) or wood screws. You can also attempt to secure from underneath, coming up through the rails with 2″ wood screws or nails if you prefer, but it will be a bit tricky to get your drill or nailer in there.
Fill any Screw, Nail or Pocket Holes, Sand and Finish as Desired. For Finishing Tips and Tricks visit my Finishing School
// Disclaimer: Some rights reserved. Private use only. Feel Free to link to any of my plans so long as you ONLY use 1 image and provide an ADEQUATE link back to the original source and appropriate plan! Plans from this page are not to be used for commercial purposes or republished without the express written consent of Rayan Turner, The Design Confidential. By accessing or using any part of the web site, you agree to become bound by the terms and conditions of this website as outlined under Terms of Use. If you do not agree to all the terms and conditions of this agreement, then you may not access the Website or use any services. The information contained in this website is for general information purposes only. The information is provided by The Design Confidential.com and while we endeavor to keep the information up to date and correct, we make no representations or warranties of any kind, express or implied, about the completeness, accuracy, reliability, suitability or availability with respect to the website or the information, products, services, or related graphics contained on the website for any purpose. Any reliance you place on such information is therefore strictly at your own risk. In no event will we be liable for any loss or damage including without limitation, indirect or consequential loss or damage, personal injury or death, or any loss or damage whatsoever arising from loss of information or profits arising out of, or in connection with, the use of this website. I hope to provide accurate plans, however, I cannot guarantee each plan for accuracy. Not every plan that I post has been built and tested, so you are building at your own risk. It is recommended that you have a clear understanding of how the project works before beginning any project. Please contact me if you find an error or inaccuracy so that I might fix it. The Design Confidential.com is inspired by but does not replicate exact designs, any similarities between these plans and items sold at specialty retailers is coincidental and not endorsed by or related to any said retailers. // Affiliate links are used for tools and materials. The Design Confidential will earn a small commission for any items purchased using these links. Thank you for your support – every little bit counts!
Are you ready for some football? Get game day ready by crafting your own FANTail and celebrate your team by drinking in your team colors! I am celebrating my favorite team and football fans everywhere in collaboration with Smirnoff Ice and have handcrafted a delicious cocktail that changes from gorgeous gold to a roaring red, right before your eyes. This recipe is so simple to make, requires very little prep and very few ingredients.
Craft your own FANTail and simply choose a different garnish and if you prefer, change up the mixer and this recipe will work for many of the other teams as well! I will give you some suggestions below.
INSTRUCTIONS // Makes 1-2 servings – increase by the number of drinks desired.
Begin by crushing the peppermint candy and red hots into fine pieces. A plastic bag wrapped in a towel is helpful for this and the closer to being ‘sugar-like’, the better.
Brush the rim of your glass with sweetened lime juice using a pastry brush or clean fingertips and pour your crushed candy dust onto a flat saucer sized plate. Swirl your glass so that it coats the very top on both the inside and outside.
If you want to make a large batch, I suggest skipping the ice and instead place the ice into each glass as they are served. For individually made drinks, add several pieces of ice to your shaker.
Using a shaker, add 2- 3 ice cubes and pour in one bottle of Moscow Mule Smirnoff Ice.
Add a half jigger of mint syrup.
Give your drink a healthy swirl to mix… but do NOT shake – the Moscow Mule is carbonated.
Remove the top of the top of your shaker and strain into your glass. Add ice to your glass before serving if needed, though your drink will be very cold from being in the shaker.
Your FANTail will begin as a lovely shade of gold.
Garnish with several red hots candies and sprinkle a bit of your crushed red hots on top.
Watch your drink turn the most gorgeous shade of red. This is the Game Changer my friends… from gold to red and from sweet to spiced!
Suggestions for other candy garnish and mixer flavors //
Red // Strawberry, Watermelon or Cherry Jolly Ranchers / Dehydrated Strawberries
Orange // Mango / Peach / Ginger
Yellow // Lemon Drops / Pineapple
Green // Apple Jolly Ranchers / Mint or Lime Lifesavers
Blue // Blue Raspberry Jolly Ranchers
Purple // Grape Jolly Ranchers
This project is brought to you in partnership with Smirnoff Ice as part of an ongoing series here on The Design Confidential – designed to celebrate football fans everywhere and elevate your Game Day status from Bleak to Chic! Thank you for supporting the brands that support me! Yahoo.
Happy 2016 my friends! I am always surprised how quickly the end of the year sneaks up on me, but after 30 some odd years of being surprised, you would think I would have a better handle on things…
Now that the Holidays are officially over and a new year has begun, I am on a mission to cleanse and organize in the aftermath of all the chaos. I think after two weeks of sickness, and three months of holiday, work, and birthday crazy with hardly a step outside these doors except for said celebratory events… the chaos is getting to me even more than it normally does. Luckily this month’s Michael’s Makers challenge was to tackle a bit of DIY Organizing and it was just the kick in the pants I needed. Well that and the fact that I was completely out of my element this year in choosing not to bring the typical holiday mayhem out of storage and into the house. I was hoping it would keep a bit of the crazy at bay and instead it made it worse if that is even possible! I swear I am still trying to track down about seven of rolls of tape and several pairs of scissors. Scissors and tape are like socks in this house, and I can never find them when I need them, even when I just had them five minutes earlier. Don’t even get me started on pens and markers… I think Mike hordes them.
Michaels just launched a new line of storage and organization product called Cre8ted Spaces and it’s quite lovely. Tons of fabulous colorways and clever containers to help you contain your own crazy. While I need to give every single room in this house a complete overhaul, my gift wrap and other crafty supplies have been getting the better of me for the last couple of months so this is where I started. I tend to use gift wrap, tape, scissors and ribbon several times a month so it makes sense for me to keep these things close at hand but in a stored and controlled kind of way. I have a ton of organization for my crafty supplies already, but I’m finding that my need to have things out of sight also seems to put them out of mind. This makes for a lot of duplicate purchasing and wasted time and this year that irritation was allocated to gift tags and ribbon along with the usual tape and scissors ordeal. A sturdy box or two to keep my tags and other dangling bits is such a welcome thing. I gave my gift tag box a little make-under and changed the top part of the box from the stunning chartreuse color it was to the glossy white that it is, with just a few flicks of the paint brush. It just happens to be perfectly divided for my tags and that makes this little mama super duper happy.
A rolling cart for projects in progress and regularly used items has been on my list for days… Alas I have never gotten around to it since most of my time is spent creating the projects and not so much on the storage of the supplies for them. Naturally my work would be so much easier if everything I needed was beautifully organized and in its place. I think its that chicken and egg thing. I gave my mobile beauty a glimmering new outfit with a couple of coats of gold spray paint and I think that will make it easier for my mind to handle as it moves around the house as I work. The minty color it came in would have worked well in my office, but gold is a neutral and this baby will get around so she needs to blend in.
I have a large bin that holds my bulk supply of ribbon, and I am fairly certain I have more ribbon than any normal human should so I shall be remedying that asap. In the meantime, having a more mobile option to keep the rolls and spools under control while I am using them and that looks good too is absolutely dreamy. I gave a peachy wooden box a beautiful matte black finish using chalk paint and I love it so much I want to paint all the things in this gorgeous matte black color. I think you can guess what my future holds – painting, refinishing and general sprucing is certainly part of the plan. Why does the new year always kick my need for calm into high gear – and why does my version of calm require an insane amount of effort and organization?
Do you feel the need to minimize and downsize after the intense Holiday season and the addition of more of everything in your life and your home? I sure do. It is most peculiar how the gift of giving and the act of receiving makes me feel the need to shed most if not all of the things I no longer cherish and many of the things I still do. If you are feeling a bit like this too, check out the other 49 Maker’s organizing projects over on The Glue String… it will surely inspire you to go and do and whip into shape!
This crafty little organizing project was brought to you in partnership with Michaels and is part of an ongoing series of fun projects I will be creating as a Michaels Maker! Thank you for supporting the awesome peeps who help make this little corner of the blog-iverse fun and interesting! Heart you guys!