[carousel-horizontal-posts-content-slider]
DIY / Entertaining / Studio
Are you feeling like the Holiday paraphernalia can’t get gone fast enough, like I am? I am ready for some warmer temps and to be done with any and all evidence that the Holidays even happened. Every year we seem to start the new year with an enormous amount of leftover candy, beverages and random ingredients so to put me out of my own misery I came up with a few treats that put those things to good use.
Since we aren’t out of the woods yet on the celebratory front, I made these cute copper rimmed live edge serving platters from scrap wood that is taking up space in my garage. Yay for using up leftover supplies.
Here are the materials you will need to make the nesting platters…
MATERIALS //
ST500T 3-in-1 Micro Torch
Butane
Copper Soldering Tape – I found mine at Michaels in the jewelry making aisle.
4 feet of 1×6 poplar or other hardwood
I had two short pieces of 1×6 poplar board left over from another project and they happen to have a complimentary grain pattern. I lined them up side by side and drew out an organic shape with a slight carve out in the center. Since poplar is a relatively hard wood, it will wear well and take a beating before you see the evidence.
Carve out your shapes using a jig saw or router and sand smooth.
Copper soldering tape is the perfect size for two stacked strips to round the edges of each platter.
Starting in a less conspicuous spot, begin wrapping your platter with the first row of banding. Take care to press firmly as you go and smooth along the way.
Your second row should sit directly above the first so they appear as if they are one row.
Using my Micro Torch with soldering tip I gently gave the soldering foil a bit of heat in the places it wasn’t cooperating and along sections that had to make tricky curves. This helped activate the sticky side of the foil and forced it to bend and flex where I wasn’t able to smooth it out otherwise. To make your platter food safe you can give it a coat of mineral oil and keep in mind this isn’t a cutting board and merely a serving piece. No one would be the wiser if you carve it up, but avoiding this will keep the integrity of your piece intact for a much longer period.
CANDY DIP // Using any leftover candy from Santa, or any chocolate based candy that is your fave (a crispy crunchy type is fab), carefully melt in the microwave for 10-15 seconds at a time. Stir in between heating and take care not to over heat as chocolate is notorious for burning. You can also use the heat gun portion of your torch and melt it down as needed. Cover with a layer of marshmallows if you prefer and gently heat with your torch to melt the marshmallows down into fluff. Once you have them melted a bit, you can toast them with your torch on a slightly higher heat setting or with the actual flame of your torch and blow out carefully if you light that baby on fire – which you probably will – but that tastes amazing so who cares as long as you don’t burn the house down.
BUTTERED BEER // Cocktail or Mocktail – Makes 6 to 8 servings. Adapted from this recipe and adjusted for ease of ingredient finding and measurements.
48 Ounces – Good Quality British (or Scottish) Ale – I used this one and it was fantastic. If you have trouble finding something similar, just be sure to get a good quality cask conditioned ale.
1/4 tsp Ground Ginger
1/2 tsp Ground Nutmeg
1/2 tsp Ground Cloves
1 Cup Brown Sugar
5 Egg Yolks
7 TBSP Unsalted Butter
Follow the directions outlined here under recipe method. If you want to make this kid-friendly, you can! Instructions are outlined for this as well.
To make the modern chilled version, I recommend the delicious adaptation of using equal parts half and half with eggnog. Absolutely fabulous and if the half and half and eggnog are already chilled, you can skip the chilling process and it works beautifully.
To add a topper of toasted marshmallows to your warm buttered beer, layer onto your drink and follow the same process as for the candy dip. Melt gently then toast for the best flavor. Take caution when add heat or flame to anything with alcohol since you will more than likely end up with flambe if you don’t… eek.
This project brought to you as part of a partnership with Bernzomatic and an ongoing series of projects here on The Design Confidential! Thank you for supporting this fabulous brand, it is such fun to round out my projecting skill set and try new things! Heart you guys!
Entertaining / Home / Studio
This post is brought to you by Bertolli. Don’t just eat, Mangia!
Life with young children can be exceptionally wild, completely untamed and altogether unfiltered – ninety nine percent of the time. Parenting breeds uncertainty and a certain amount of insanity that you wouldn’t trade for anything in the world. Though our journeys may be different, we will all eventually arrive at the same conclusion in our lives. At some point along the way, when no one was looking, the days, months and years began to fly by at the speed of light. Those difficult parenting moments and struggles that seem so big at the time begin to melt away and what remains are the memories from many of life’s little moments. The moments we hardly consider important as they unfold, we only later realize just how special they truly were.
As parents who are both entrepreneurs and business owners in completely different fields, the time we have to spend unplugged and focused on our family is often limited and frequently conflicting. To say that those moments are more valuable than gold would be an understatement. It is important to us that we celebrate life’s little moments every chance we get and help create those special memories for our babies to cherish later on.
Having two boys who thoroughly dislike having to take time out of their day for eating, means that mealtime is often a struggle and can be time consuming, to put it mildly. There are very few foods that everyone agrees on at any given time and one or both are typically resigned to simply not eat if given the chance. Pasta is truly one of the only things that both boys adore and that happens to be easy to add protein and vegetables to without it being so obviously detestable. But this can be a bit of an undertaking and with limited time to enjoy these beautiful wild animals of mine… let’s just say it is a great day indeed when someone makes this easy for me, with a meal that is easy to prep, in no time at all and that happens to be absolutely fabulous. Because life should be spent making memories and not slaving away in the kitchen or arguing over what to eat.
When dinner begins to feel like a chore and I start to dread the entire endeavor, it helps to switch things up and do something different. I love to sit and eat a proper meal with these cute boys, and nothing says excitement like getting to do the things we normally don’t. Drinking out of real glasses, eating on real plates and buttering our own bread are the most exciting things to happen to a toddler and an eight year old who adores eating at fancy restaurants. We do these things on holidays and special events, but it isn’t the same when it requires hours of prep beforehand. With the Bertolli Skillet Meals, I can toss it into a pan and in ten minutes it is ready to eat. It takes less than a minute to get it started which leaves me free to fill the remaining 9 minutes with a few other special touches to make our time more enjoyable.
Warm bread with butter and Himalayan sea salt are a new family fave, and a balsamic dipping sauce comes together faster than you can say, ‘pass me the bread, please’! We are all lovers of olives and brussel sprouts so I take any chance I can to add those to the mix. Our favorite Chicken Florentine and Farfalle pairs well with a Pinot Grigio which is a lovely and light treat for the over 21 crowd – making it perfect for our somewhat early dinnertime and to help provide distraction from the chaotic but fun and funny process of trying actually accomplish sitting at a table with little boys.
We linger and chat when we sit down to eat. There is never any rush, and yet still there is much in the way of commotion and movement. The boys are generally abuzz and love to tell stories about things that happened during their day. I love listening to them talk with their wildly creative and interesting minds. They are each so different and yet they find an amazing amount of common ground despite their age difference. Oh how they adore each other, the greatest gift of all. It is so easy to slip out of the habit of slowing down and taking the time to have these adorable conversations. Before long their words will change from things they saw and ideas they have to what they are rushing off to do and who they have plans with later on. But for now, there is no end to the imagination that unfolds during something as simple as sharing a meal.
If only I could slow things down and freeze time for just a bit. I suppose I wouldn’t get half the workout I currently do, since we spend 80 percent of our time chasing one or more children out from under the table and one or more dogs away from the table.
I think life is meant to be lived and loved and there is no one on earth I would rather laugh and linger with than these crazies. I choose to enjoy it now and let them be kids. To live in the moment and cherish the crazy and the chaos as it comes… which is currently on rotation about every 4 minutes or so.
I am seriously grateful for such a fabulous and simple solution for a delicious meal that my boys will willingly eat. Bertolli Skillet Meals are truly one of the few meals they will eat anyhow, so while the convenience alone puts this at the top of my list, the fact that it’s a family favorite makes it idyllic. Because I would rather spend my time listening to these little beauties any day of the week than attempting to prepare an over the top meal that they won’t actually like. A home cooked meal with no interruption aside from the commotion of these young boys is always my favorite way to spend an evening.
Entertaining / Studio

The overabundance of merry making this time of year truly begins to saturate my every waking minute… yours too? I think a nice little reprieve for a day, to remind us of what life was like before the Holiday season began, is best filled with a return to America’s favorite pastime and a bit of tried and true home-gating. After all homegating is the new tailgating, because when you can’t get to the game… bring the game to your home and enjoy watching from the comfort of your couch! Maybe that gives you the perfect excuse for staying in pajamas all day and making merry in an altogether different sort of way! With some easy gluten free football watching food and the tastiest cocktail this side of the Mississippi, you can’t lose – and maybe your team won’t either!
Because football food doesn’t have to leave you riddled with guilt and suffering from a food coma – and it doesn’t need to require hours in the kitchen slaving away, either. Win-win… This week I am partnering with Smirnoff Ice to host a Home-Gating Party and to share some easy and fabulous ideas for making game-day extra special, without a lot of hassle or hussle.
Shopping for your home-gate party is the longest task you will undertake today – promise! Even that will be simple and straightforward, here is our lineup of snacks and drinks for whipping up the easiest and quickest Home-Gate Party ever!
BEVERAGES //
/ Tropic of Mule Cocktail
/ Party pack of Smirnoff Ice flavors
FOOD //
/ Veg Tray with Hummus
/ Chips and Salsa or Guacamole
/ Smoked Salmon Toast
/ Chicken Prosciutto Toast
/ Pretzels with Brownie Batter Dip
Buying items that are already prepped will save you so much time and energy. Removing said ingredients from their packaging and placing them on platters and in small bowls will make your pre-prepped food look homemade. Choose a corn chip or a more unique gluten free option like a bean and rice chip, to elevate this game day staple. Provide multiple dips for your guests to choose from and alternative cocktail options like you find in the celebration pack – everyone will find a fave and it will feel like you had your party catered. The only items that require a bit more prep are your cocktail which is 3/4 of the way done when you walk out of the store, the brownie batter dip and the two toast options.
All of these are so easy and take literally minutes, so roll up your sleeves and let’s get at it!
SHOPPING LIST //
/ Vegetable Tray / Hummus / Chips / Salsa + Guacamole / Gluten Free Pretzels – can sub regular pretzels / Gluten Free Rye Bread or Cocktail Toast – Can sub any other variety of gluten free bread or regular cocktail toast / Smoked Salmon / Creme Fraiche / Capers / Chicken Deli Sliced / Prosciutto / Mozzarella / Lemon Aioli / Cream Cheese / Butter / Powdered Sugar / Cocoa Powder / Mini Choc Chips / Milk / Gluten Free Flour / Vanilla / Smirnoff Ice Celebration Pack / Smirnoff Ice Moscow Mule / Canned or Diced Pineapple / Chambord
TROPIC OF MULE COCKTAIL //
This is such an easy way to make a signature cocktail for your party and give it a bit of that something special. You can make these individually or in bulk and it is so easy it’s practically a sin!
/ For every bottle of Smirnoff Ice Moscow Mule, you will add one jigger of Chambord.
This is a raspberry flavored liqueur and it adds a wonderful twist to a classic Moscow Mule and adds a lovely color as well. If you are making this in bulk, simply empty a bottle of Moscow Mule and add a jigger of Chambord until you feel as if you have plenty prepped (6-7 bottles should get you well into the first half of the game). Add ice to the container or each glass individually depending on preference. Add several chunks of pineapple to a glass before you fill with your delicious concoction and serve.
/ If you are making these individually, add several pieces of pineapple to each glass. Then pour in your Moscow Mule Smirnoff Ice and add your jigger of Chambord. You don’t even have to stir or shake as it is much more beautiful to watch the colors blend on their own.
SMOKED SALMON TOAST + CHICKEN PROSCIUTTO TOAST//
Pre-heat your oven to 400 degrees and lay your cocktail toast (for both) out in a single layer on a baking sheet. Once your oven is heated, let your toast – toast – for around 3-4 minutes depending on your oven. You just want a little crisp and a slight golden. Remove from the oven and separate out the toast that will be for the smoked salmon by placing them on a plate off to the side to cool. Leave the toast for the chicken prosciutto on the tray and add a layer of your deli sliced chicken and then a layer of prosciutto. Put a nice layer of mozzarella over the top of that and put the tray back in the oven and turn your temperature down to 250 degrees. You can let your toast melt and meld while the oven resets and remove when the cheese is fully melted, then let cool.
Once your toast for the smoked salmon has cooled, smear a nice layer of creme fraiche on each slice. Creme fraiche is usually found near the cream cheese or alongside the fancy cheeses. If you aren’t familiar with it, it’s a bit like a wonderful cross between cream cheese and sour cream (in my opinion) which makes it perfect for pairing with caviar or smoked salmon! Using a small spoon of some sort (I used a toddler spoon) add 6-7 capers and a tiny drop or two of the brine over the top of the creme fraiche. Layer on your smoked salmon and these are ready to serve.
Once your chicken prosciutto has cooled slightly, add a small dollop of aioli and spread just a bit. Now these are ready and you can serve them up too! Easy, right?
All that you have left is the tasty Brownie Batter Dip that comes together just as quickly as everything else! The recipe I used is found here and the only modification I made was using gluten free flour. You can also use almond flour or tapioca flour if you prefer and it would taste amazing! Maybe add some chopped walnuts to the dip for an extra little tasty bonus!
This project was brought to you in partnership with Smirnoff Ice and is part of an ongoing series to help celebrate female (and male) football fans everywhere! Are you Game Day ready? Thank you for supporting the brands that help bring fresh and fun new content like this to The Design Confidential! I heart you guys!
This project is brought to you in partnership with Smirnoff Ice as part of an ongoing series here on The Design Confidential – designed to celebrate football fans everywhere and elevate your Game Day status from Bleak to Chic! Thank you for supporting the brands that support me! Yahoo.
Home / Shopping / Studio
Decorating for the holidays multiple times throughout a holiday season, is something of a prerequisite around these parts… By the time the actual holidays roll around, I confess to having a pretty interesting mix holiday decor that consists primarily of the random and varied projects I have done during the season and leftovers from photo shoots that all wind up playing the role of my real life holiday decor. This year is no exception, and since the holiday decorating began way back in September, you can imagine the sheer amount of holiday cheer that is spread from stem to stern in this house.
When it came time to decorate my mantle, I literally jumped for joy at the chance to partner with Simon Pearce because their products align beautifully with what I am craving this time of year – which is a little less chaos and a lot more relaxation and calm. Let’s just say that my state of mind and their simple, timeless and elegant pieces feel like the perfect pairing. Just a few trees and a pair of gorgeous candlesticks add just the right amount of glimmer and glee and nothing will be worse for wear if I conveniently forget to un-decorate after the holidays. I am fairly certain I will find many a reason to keep them on display for as much of the year as possible… Because trees can say ‘winter’ and ‘nature inspired’ without feeling too Christmas-y, don’t you think? Please say yes… I want them to stay forever more.
If you love them as much as I do, read on… because you will have yourself a merry little chance to win some of your own, or any other item(s) of your choosing for up to $300 worth of gorgeousness from Simon Pearce! Yahoo.
But first let’s get back to the pretty stuff, shall we?
If you are looking for that unique piece to gift to someone special or to add to your home, you will have no problem finding something beautiful and uber-luxe on their site – it is filled to the brim with beauties that are made by their Master Craftsmen. This clock would be fabulous in any room in my home (and the homes of ever single person I know) and I will likely have to play a little rock-paper-scissors with my main squeeze to see who gets to choose where it lives permanently.
The glass block frames are stunning and would be lovely to receive alongside a gorgeous landscape print or fabulous family pictures of the grand kids. Isn’t it chic? Adore…
Add the perfect amount of organic, nature inspired, glow to your table with birch votive holders and their incredible votive candles. A fabulous hostess gift and the perfect little – extremely glamorous- stocking stuffer, you know – just in case Santa is listening…
From beautiful hand-blown ornaments to a fabulous array of the most beautiful entertaining and decorating staples, choose something amazing from Simon Pearce to send to your loved ones this year, and while you are at it, pick out something amazing for yourself… because you just might win this fabulous shopping spree – and you totally deserve it!
Gift and decorate your tree with purpose this year, as a portion of the proceeds for their ornaments support the LoveYourBrain Foundation.
I will keep my fingers crossed for all of you and here is to hoping that it’s you that wins this fabulous prize of up to $300 worth of gorgeousness from Simon Pearce. I will give you fine folks several ways to enter so no one need be left out, and the winner will be drawn at random from the entries below. I have a special place in my heart for the trees, frames and the adorable modern clocks (and the entertaining pieces, and drinkware, and pretty much everything), but there is much to browse and choose from. I can’t wait to hear which things are your faves!
a Rafflecopter giveaway
This project was brought to you in partnership with Simon Pearce! All opinions, decorating, styling, and holiday chaos is 100% my own – as per the usual. Thank you for supporting the fabulous brands that help bring fresh and fun new content and giveaways like this to The Design Confidential! I heart you guys!
Entertaining / Home / Shopping / Studio
 This post is brought to you by Pier 1 Imports.A party just isn’t a party without gorgeous décor and special treats for your guests to delight in. This wintry holiday season, I am partnering with Pier 1 to help spread some holiday cheer with inspiration for your next holiday shindig. With just a bit of prep and some stylish accessories, you can transform your party from bleak to chic and perhaps even leave yourself free to enjoy the party right alongside your guests.
Lay the foundation!
I like to use my existing home décor as the starting point for holiday décor. This gives me a direction for color and style and lets me build on that to create a beautiful and chic look that feels intentional and complete. I will scatter chic wintry details like faux snow and frosted pine branches throughout my home and then turn my focus toward creating those special entertaining moments that will excite my guests and delight their senses. The chic matte gold bar ware and tool set are absolutely perfect for a self-serve drink station and with their beautiful, subtle finish and amazing quality, these pieces absolutely top my list as a holiday party must-have! Truly. The faux fur table runner sets a stylish wintery scene and secretly catches drips for your rotating mixologists. Daring decorative touches like the metallic party crackers dangling from the glittery ornament tree, create a dual function focal point for your fabulous party station, and help your guests find their way to the fun – which is of course, both in the party crackers themselves and the surrounding setup. A perfect ice breaker, the party crackers help get the party started and set the tone with a wine charm, a joke, and party hat for each to don.
Put it all out there and leave no stone unturned!
I try to have everything set out and at arm’s length so I don’t need to play bartender or server throughout the evening. Single-serve and easy-serve food and drink options make it easy to grab, nibble and go. This leaves everyone more time to mingle with new friends and old. The gorgeous striped plates and adorable coasters are so chic you won’t want to toss them out, but naturally they help make the cleanup painless, which is always fabulous. I love to scatter about a set of stylish bowls and plates, filled to the brim with chic edibles. With the visual excitement already happening on the table, I chose to keep these neutral with gorgeous bowls and plates in the most perfect shade of gray. Adding a neutral to my color scheme is a fabulous way to ground the high contrast white, gold and black that are so prominent otherwise and should help entice my party goers to throw caution to the wind for one night of indulgence. These stylish paper products have celebration written all over them and together with the gorgeous bowls and plates in grey are simply the perfect party pairing for enjoying the sweets and nostalgic treats that only come around during the holidays.
Mix it up but keep it straight!
A glamorous mix of patterns on your drink ware is not only chic, it will help everyone keep tabs on their drinks throughout the evening. The Luna Double Old-Fashioned glasses, with their glamorous gold starbursts and gorgeous plaid stripes, are so fabulous you will want to work them into your entertaining regime forevermore. While you keep your champagne on ice, a monogrammed stopper is nice! The champagne flutes, each with a different worldly salutation, have an understated elegance that is sure to make your bubbly even more special with a fun reminder to toast to good health and a night well enjoyed. Cin Cin, Cheers and Salud!
Put it on ice, a signature cocktail is nice!
Along with champagne and chic treats to eat, no party is complete without a special cocktail creation. I try to choose a concoction I can prep easily beforehand and isn’t too difficult for my guests to recreate later. This is a great way to show off your skills as an entertaining genius and is such a fun addition to the standard beverage selection. Presentation is key, and with stylish and inspired glassware and bar ware, crafting a libation that is clever becomes fun (like my Naughty and Nice Holiday Mules – coming later this week!) and will add to the ambiance and get the conversation flowing like nothing else!
When seconds and thirds are in great demand, if you have everything your guests need to craft their own drinks at the ready, they will be mixing and mingling the jingle bell way in no time. The matte gold bar tools and accessories lay the foundation for your self-serve cocktail station and provide both a good looking and sophisticated way to measure, pour, and pop some bottles with glee. Fabulous small square bowls are a chic way to display a cocktail garnish or a mid-evening treat and look amazing surrounded by a sprinkling of snow and a smattering of frosted pine and eucalyptus branches.
Chic décor, stylish self-servebar ware, and party crackers galore –does indeed a fabulous party make. Add your favorite people and mix, for a wonderful evening, enjoyed by all – but especially by you, since you won’t be stuck behind the bar watching your guests have all the fun! Pier 1 is seriously knocking it out of the park this holiday season with fabulous and festive accessories that will elevate your party, no matter the occasion.
Plans
We shared plans for the stove and oven, and today the refrigerator, yahoo! We are well on our way to a full functioning gourmet kitchen!
As with all of our plans, you are building at your own risk and you should have a firm understanding of building in general before you attempt many of our plans (some are easy as pie and perfect for beginners). With that, go forth, have fun, take lots of pictures and share them in a showcase on the site or on social media with the hashtag #builtTDCtuff and we will share our faves! Be sure to tag @thedesignconfidential on Instagram / FB and @thedesconf on Twitter / Pinterest. If you are a blogger and you post about your build, don’t forget to include a link to your post on your showcase here. Don’t forget… for all of our newer plans, clicking on the images will let them expand to enormous sizes with much greater clarity. The older plans may need updating so please let us know if you need one fixed!
- 1 – 1×3 at 8′
- 2 sheets of 1/2″ plywood or mdf
- 1/2 sheet of 1/4″ plywood or luann
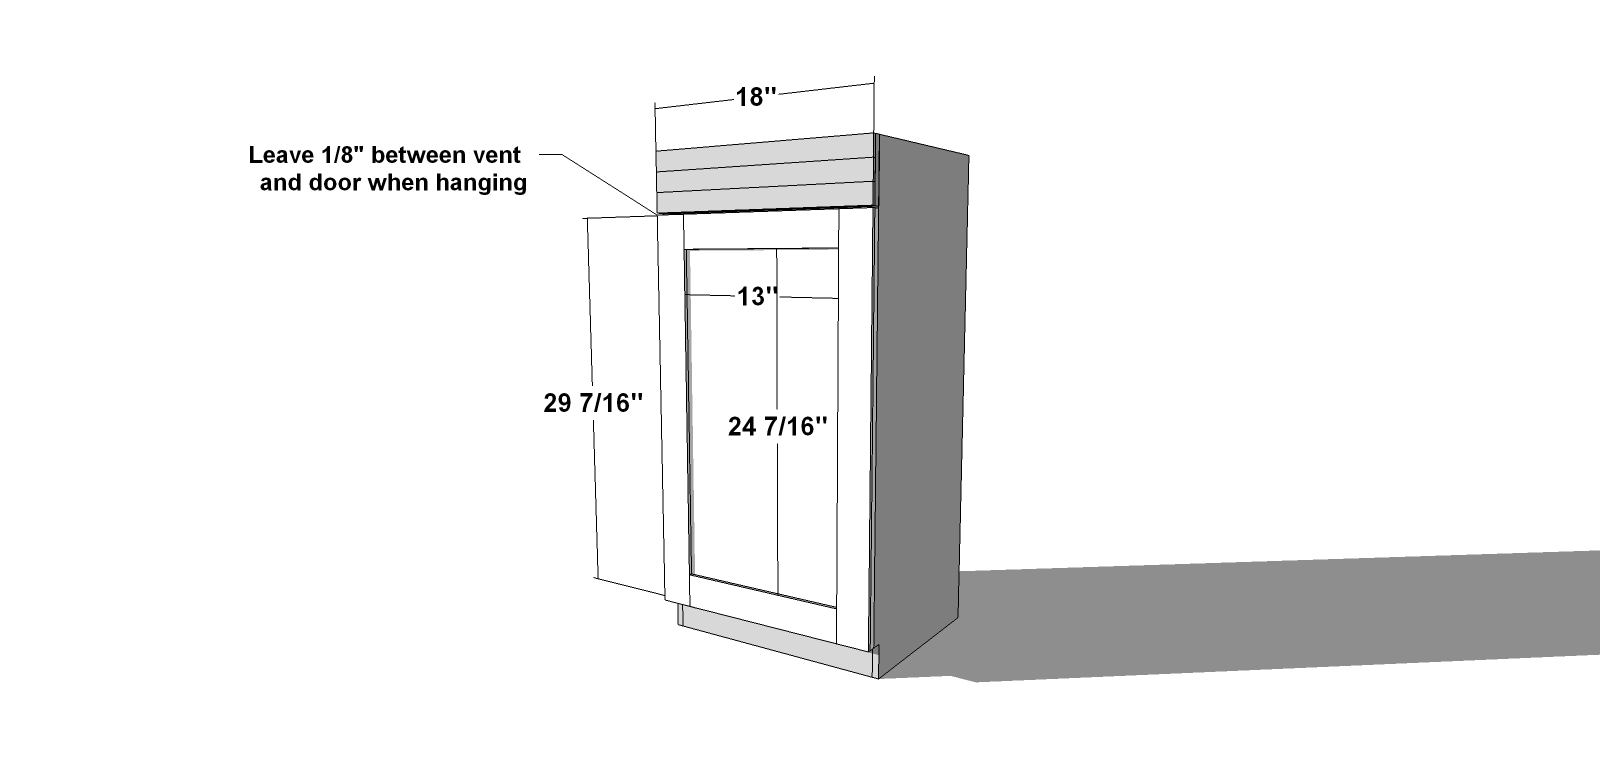
- 4 – 1×3 at 17″ – Kick Plate and Supports
- 3 – 1/4″ Plywood or Luann at 18″ x 1 1/2″ – Vent
- 2 – 1/4″ Plywood or Luann at 13″ x 2 1/2″ – Door Trim
- 2 – 1/4″ Plywood or Luann at 24 7/16″ – Door Trim
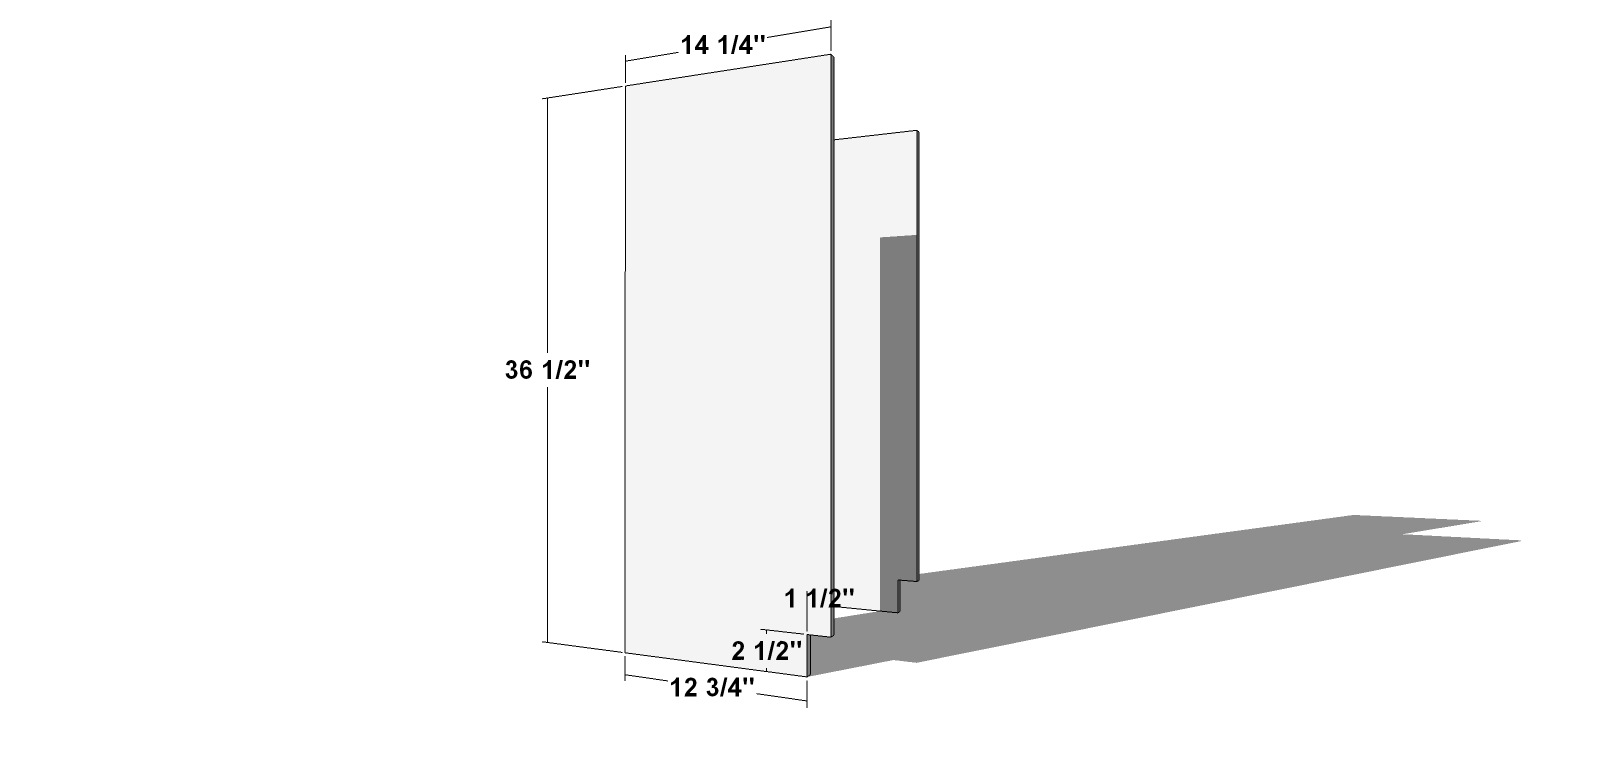
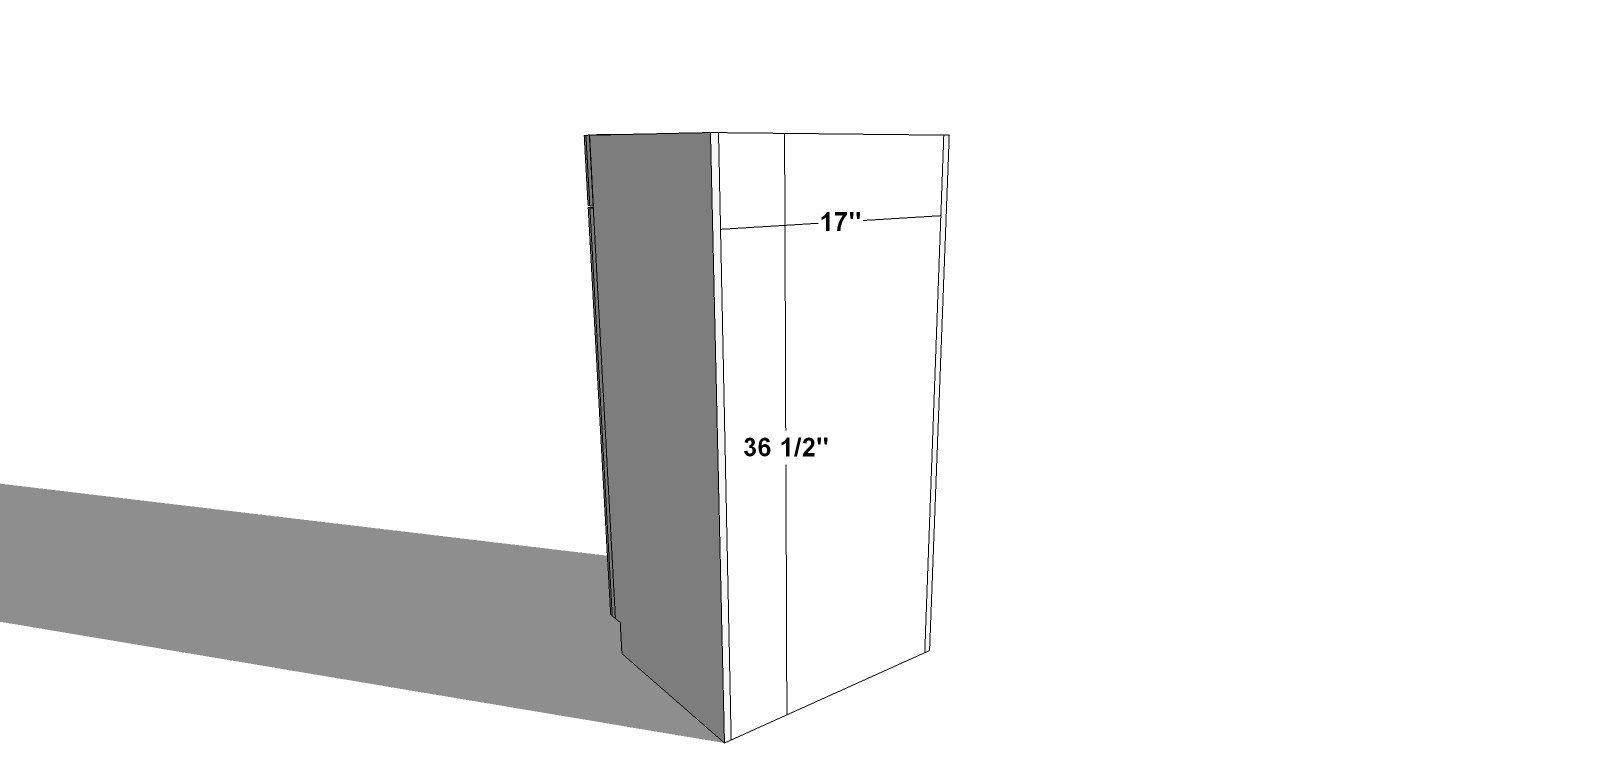
- 2 – 1/2″ Plywood or Mdf at 36 1/2″ x 14 1/4″ – Side Panels
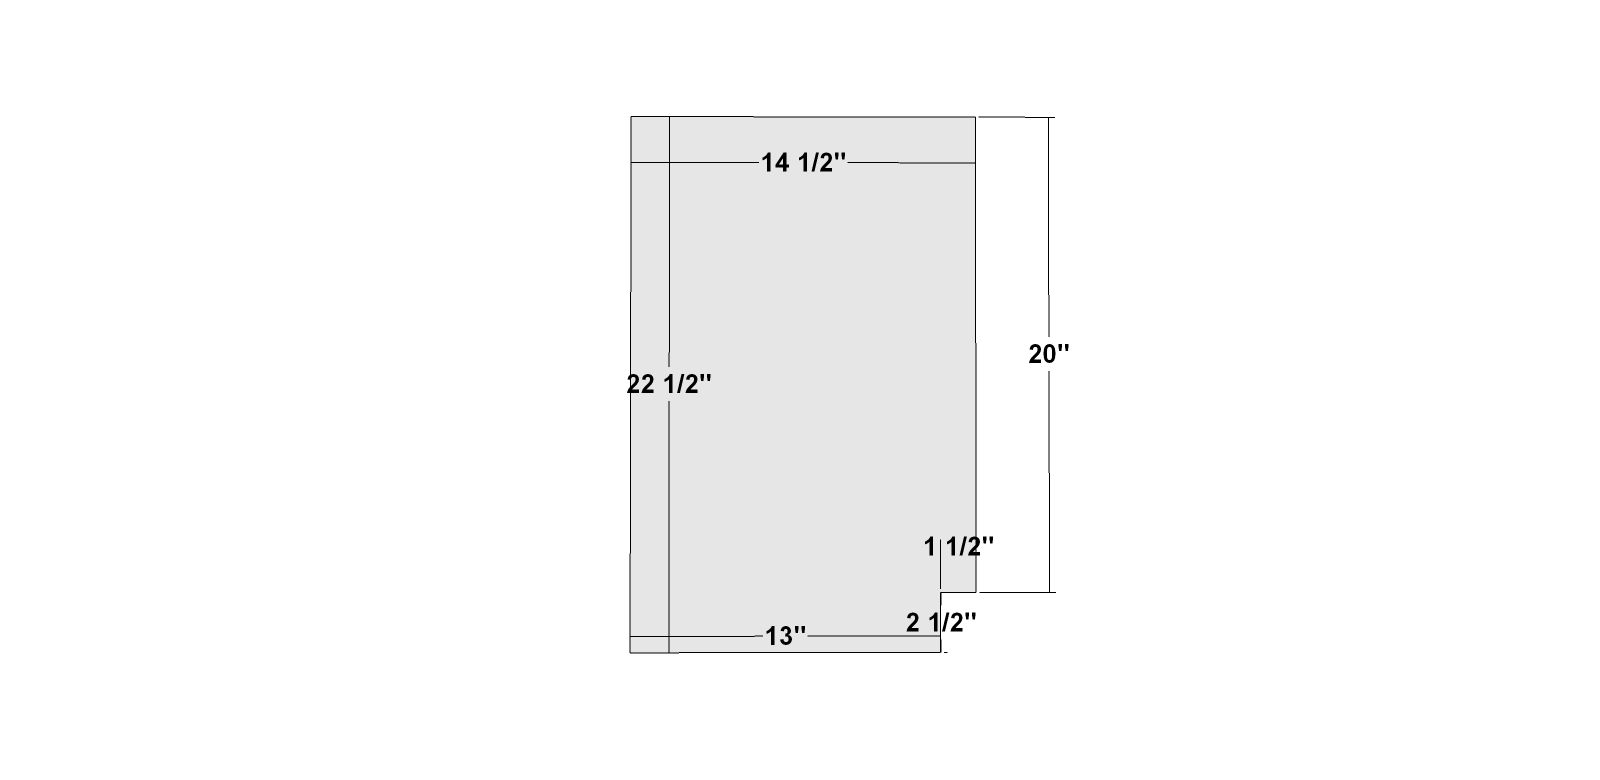
- 3 – 1/2″ Plywood or Mdf at 17″ x 14 3/4″ – Bottom and Shelves
- 1 – 1/2″ Plywood or Mdf at 18″ x 4 1/2″ – Vent Board
- 1 – 1/2″ Plywood or Mdf at 29 7/16″ x 18″ – Door
- 1 – 1/2″ Plywood or Mdf at 17″ x 36 1/2″ – Back
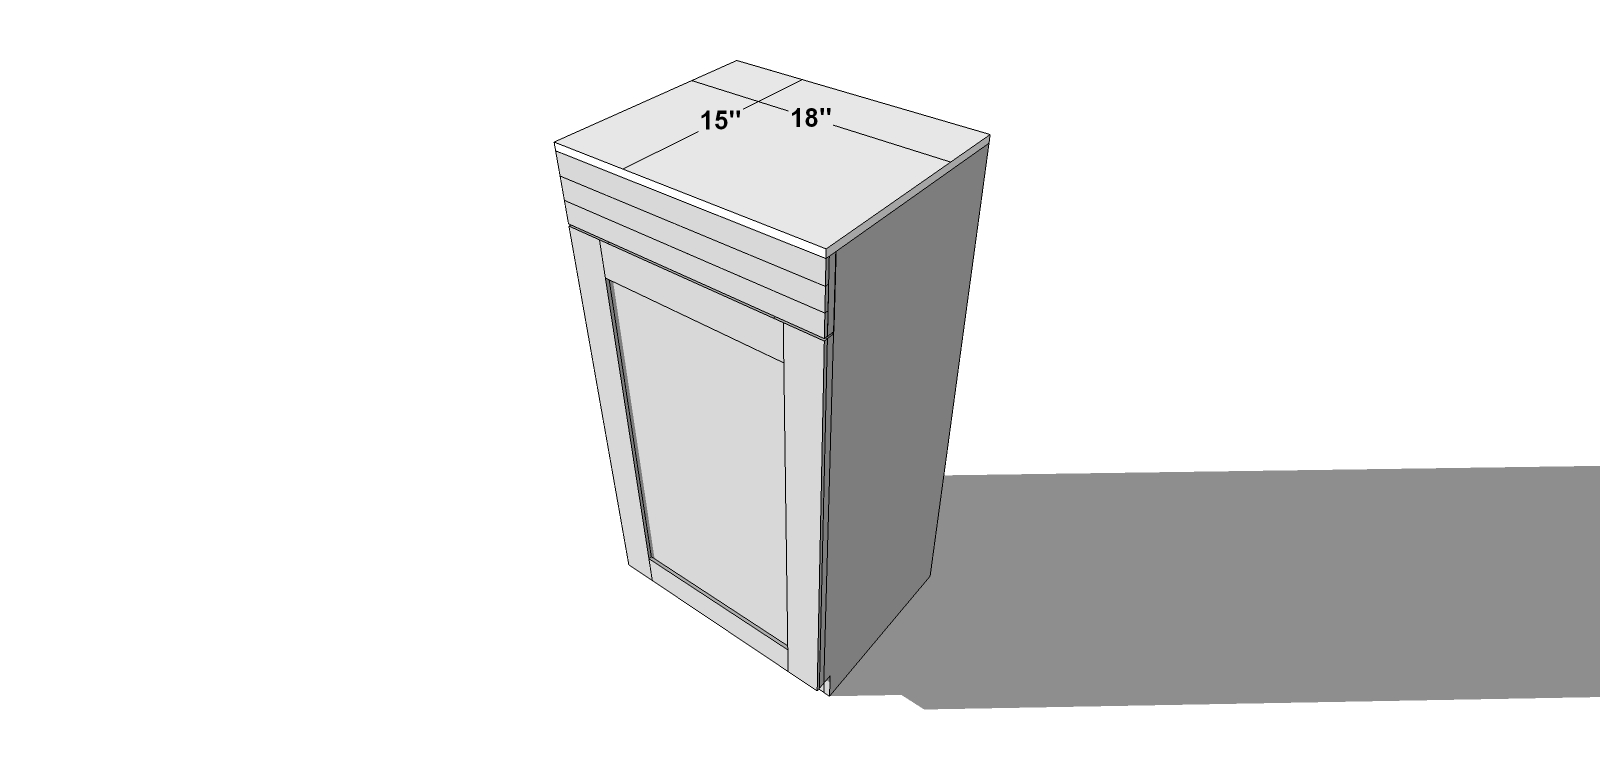
- 1 – 1/2″ Plywood or Mdf at 18″ x 15″ – Top
Before beginning to build, always check in on my site to make sure you have the most up to date set of plans, I occasionally update and change the plans to make the building process easier or to allow for less expensive purchasing of materials! Read through the entire set of instructions and all comments before beginning this project. If you print out or save plans, be sure to check in on my site to be sure you have the most up to date set of plans, as I occasionally update things for ease of building or buying. If you are new to building, read through the GETTING STARTED section and other articles found under the BUILD tab in the menu on my site, it has valuable information about how to get started, tools and techniques. If you are unfamiliar with the finishing process, visit my Finishing school for some tips and tricks for painting like a pro and for special finishing practices. Use glue to secure your joints and Consider Painting or Staining individual sections prior to assembling. This makes the paint application virtually flawless. Coat with a spray on Poly or Wipe on Poly to protect your finish and your piece and it will last for ages. Adhere to all safety standards and guidelines, and be sure you follow safety protocol throughout your build. If you are unsure about whether you are building safely, run a quick online search for the tool or technique you are using, or contact me via email or post to the forum before you move ahead. My contact info can be found in the menu of my site.
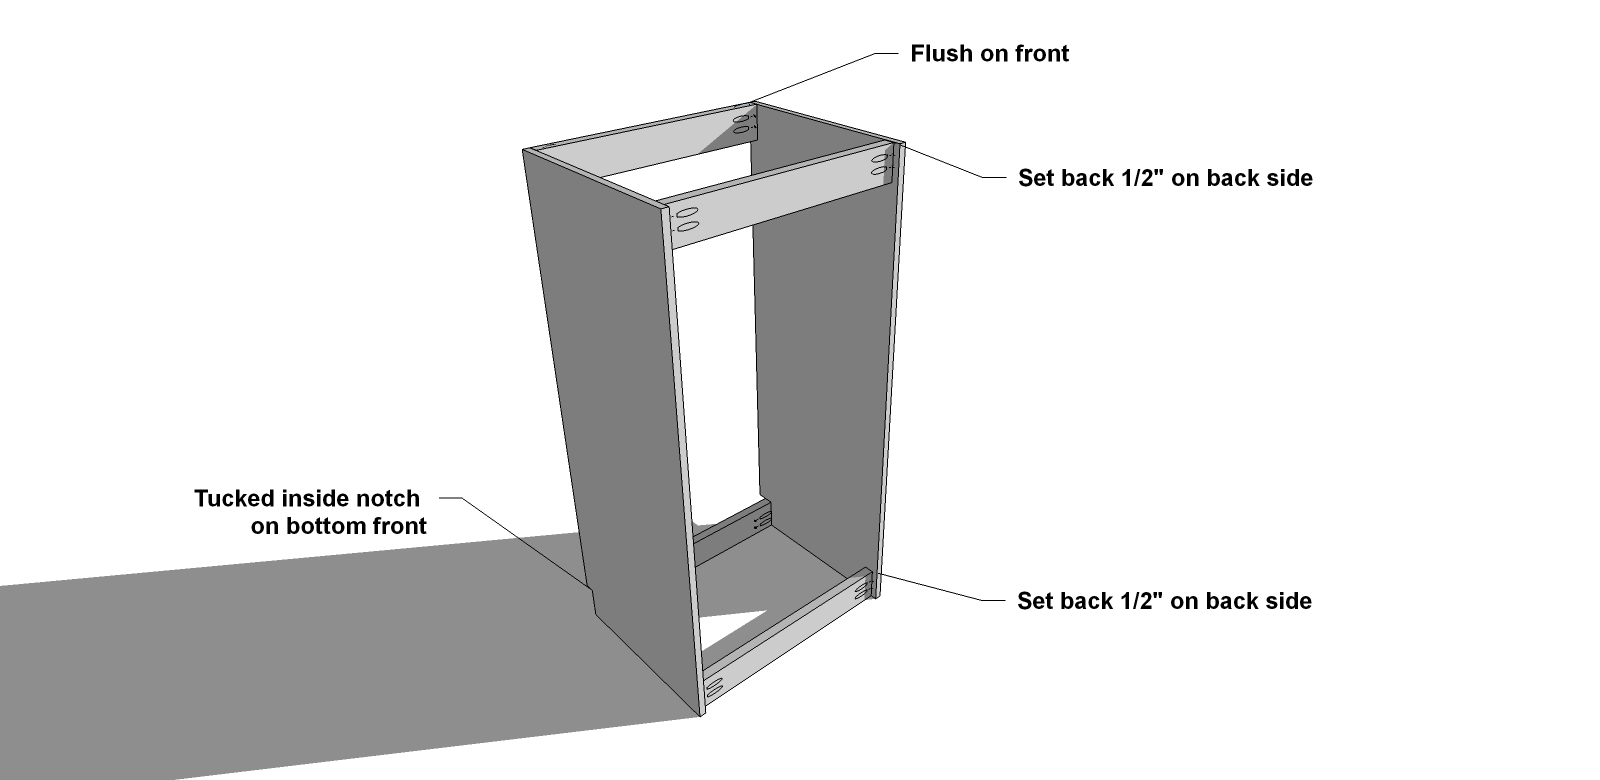
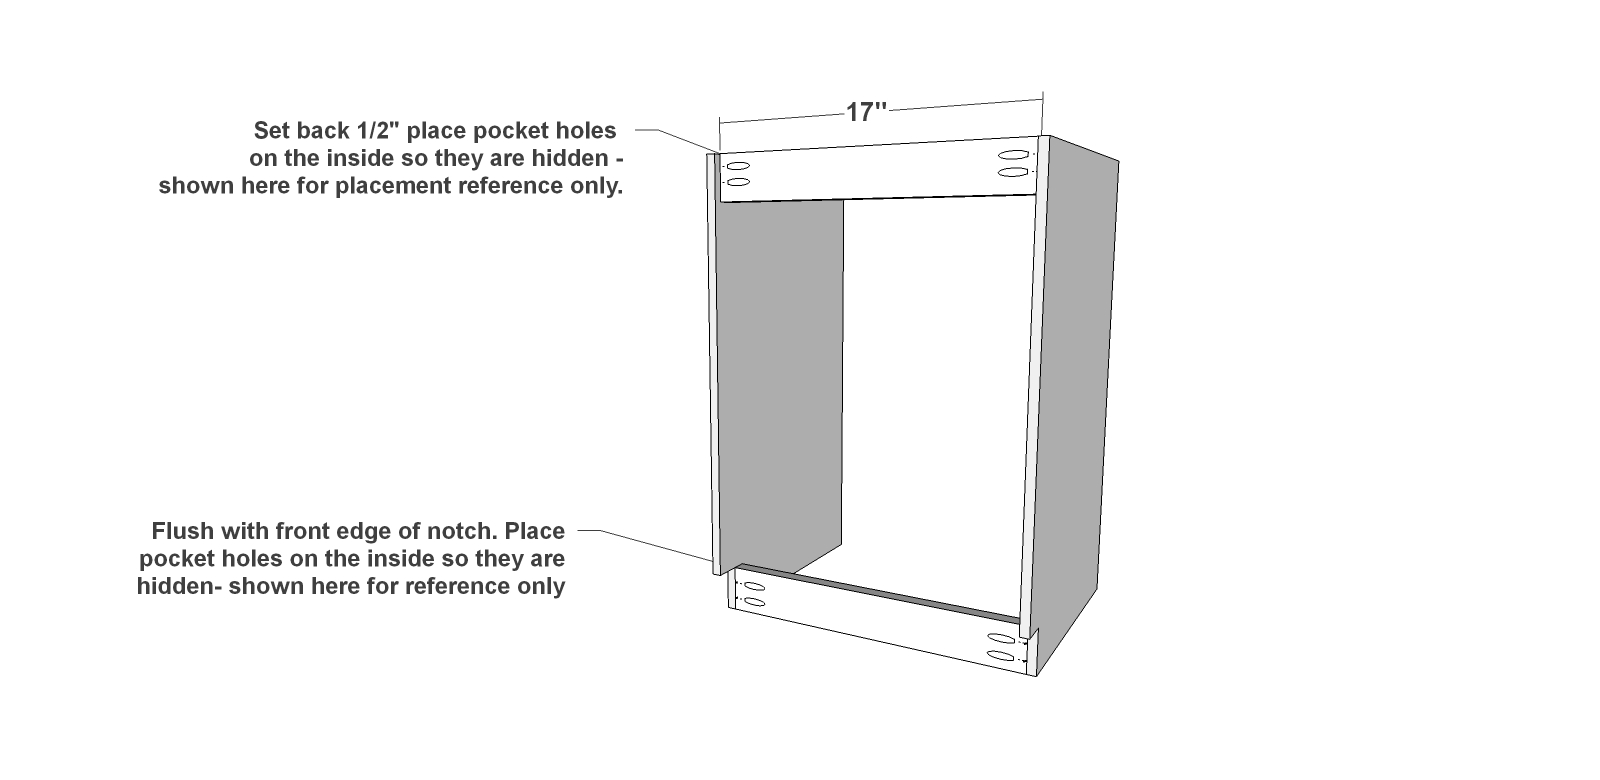
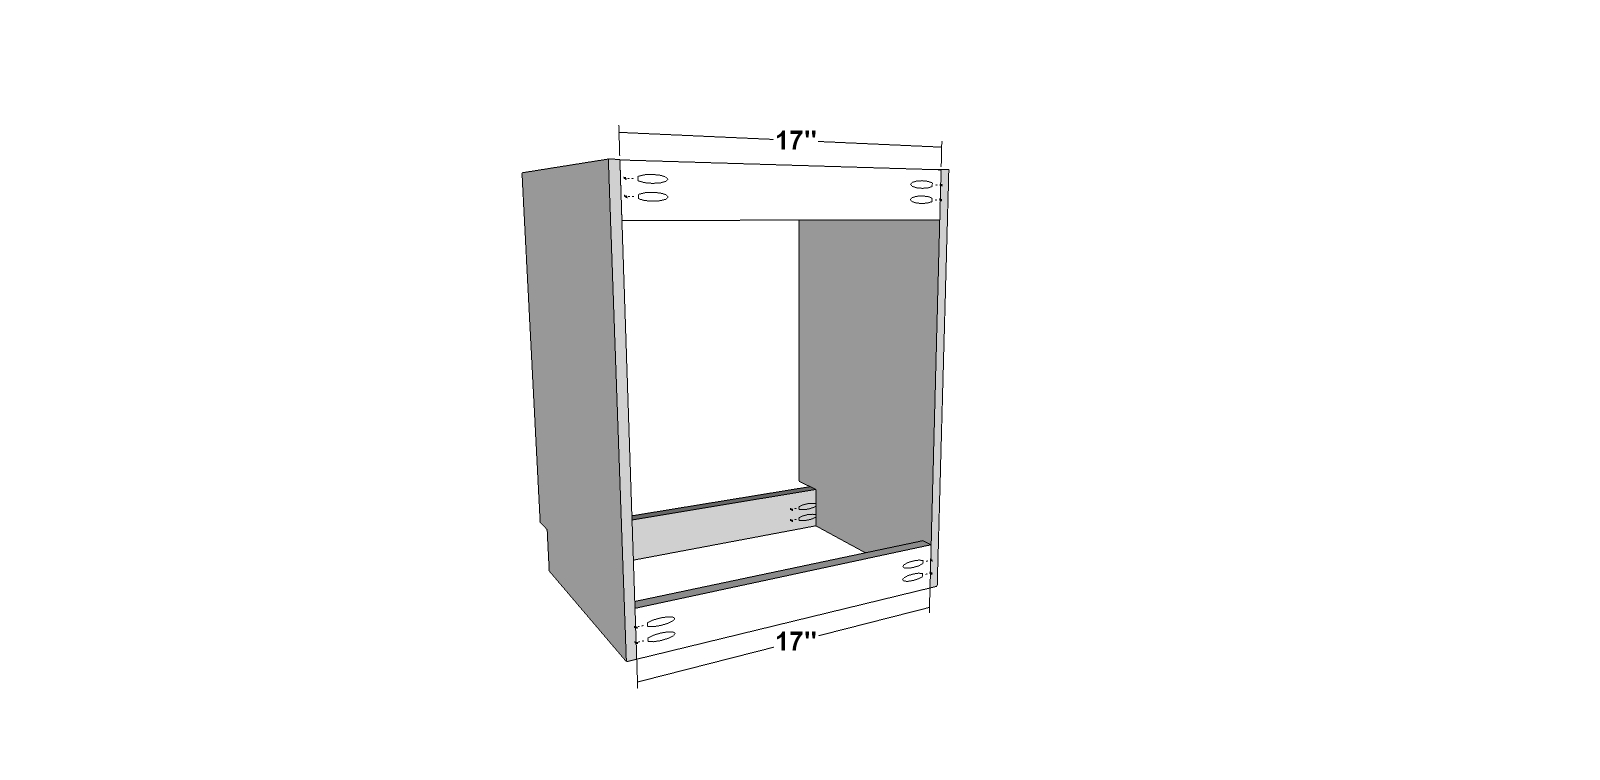
Cut your side panels to size and using a jig saw or circular saw (or plunge router or table saw) notch out a small rectangle in the lower corner of your panel. You will need two of these and they should mirror each other. If your plywood or mdf has a face side to it, you will want to pay attention to that so that you have the corner notched out of what will be the front facing section of your side panel.
Attach your kick plate, upper supports, and your lower back support using your Kreg Jig set for 1/2″ material and your 1″ pocket hole screws and glue. Place your pocket holes on the inside so they aren’t seen, and set your kick plate to be flush with the front facing edge of your notch and it will sit inside of your side panels. The upper and lower back support will sit 1/2″ back from the back edge.
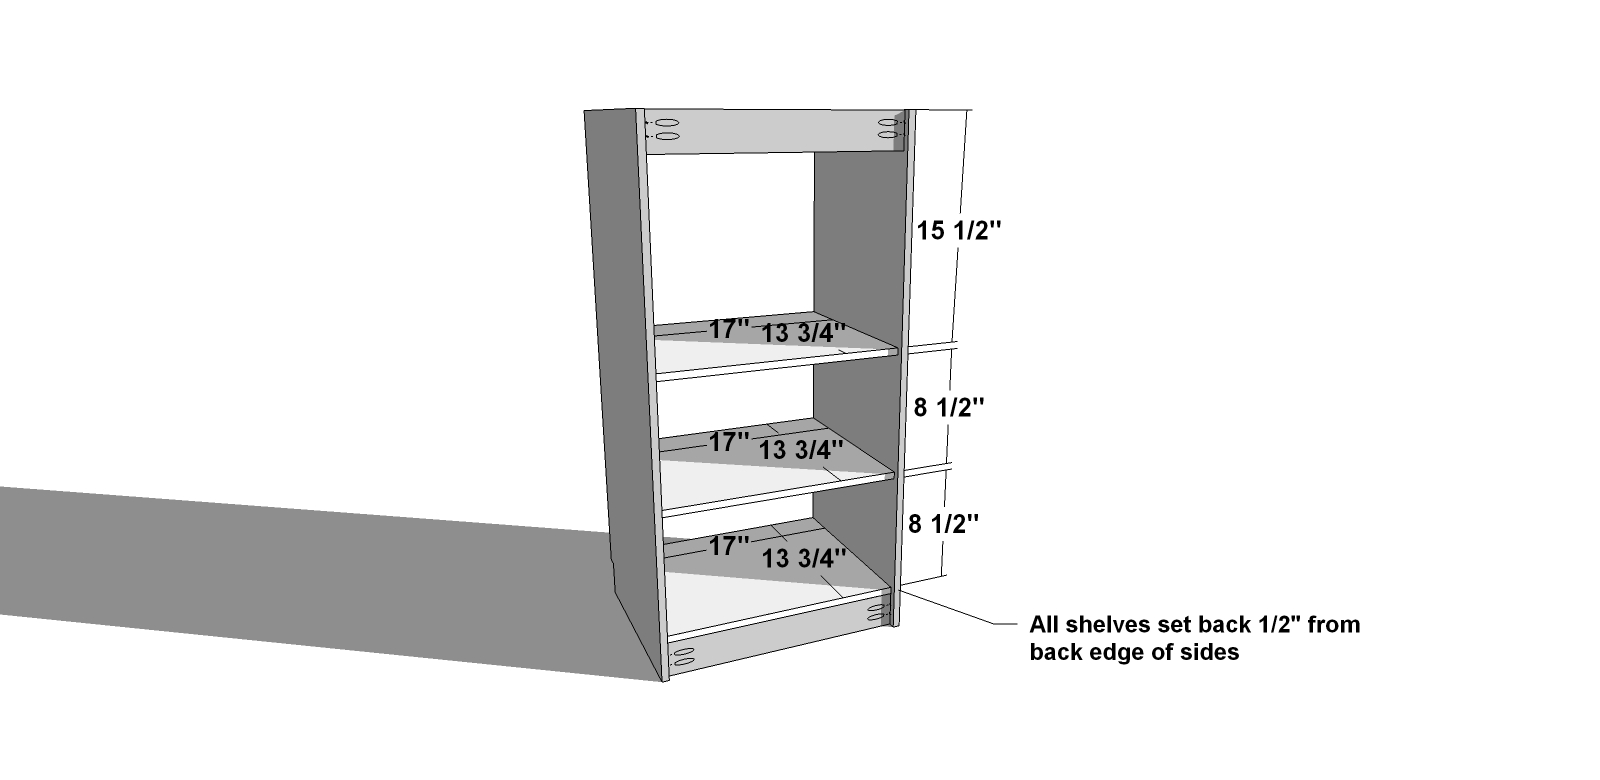
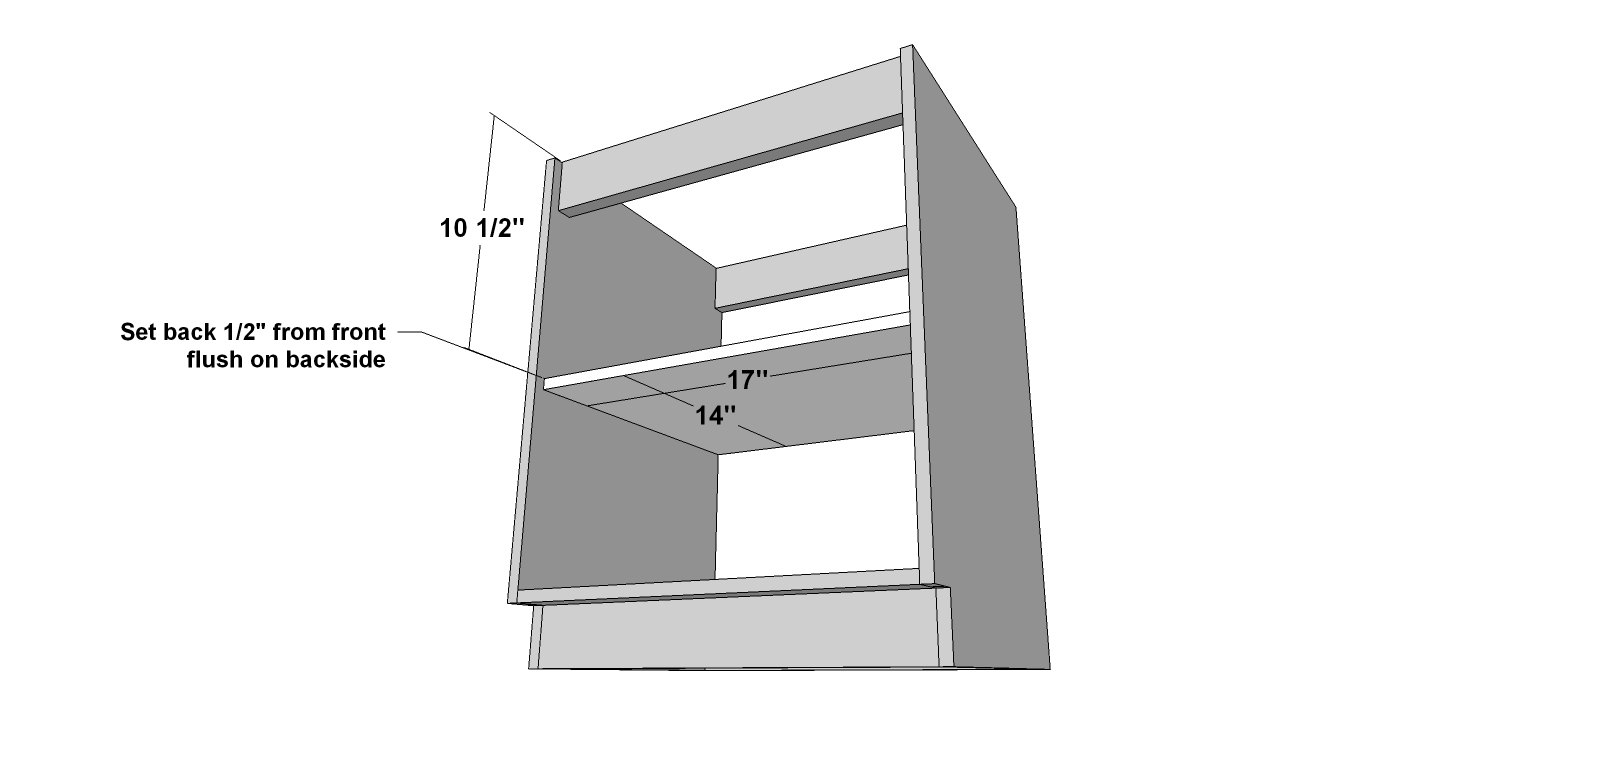
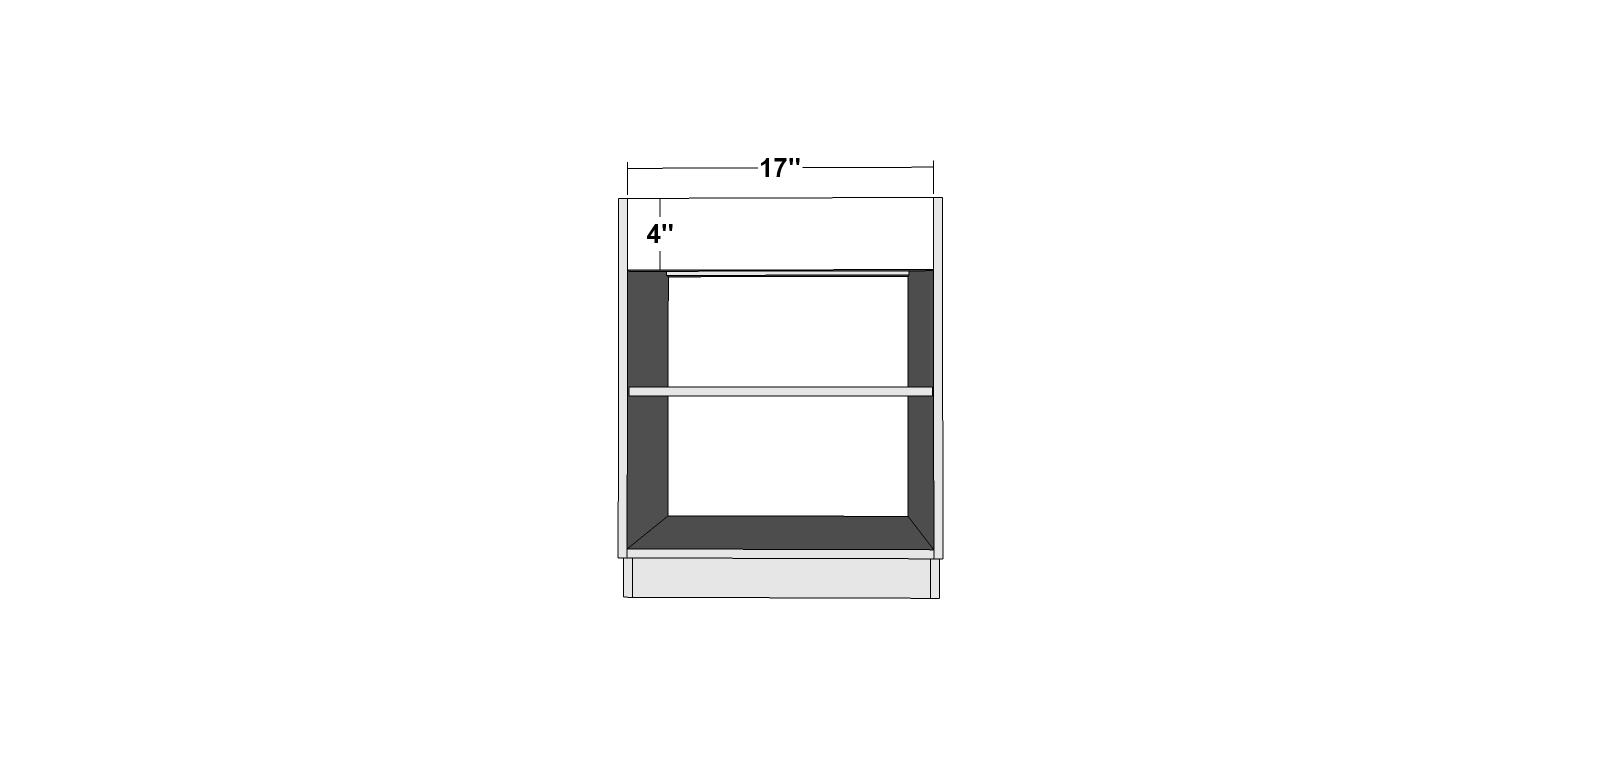
Fasten your bottom in place using your nail gun and 1 1/4″ brad nails or your countersink bit with 1 1/4″ wood screws and glue. For the remaining two shelves set your Kreg Jig set for 1/2″ material with your 1″ pocket hole screws and glue. You can place the 2 upper shelves wherever you see fit, this will depend on how your kiddos want to arrange their fridge and the type of things they will put in it! Just keep in mind that the vent will hang down about 4 1/2″ from the top so this will change how high the top shelf seems. I have put the shelves in place with some dimensions that will work, but feel free to change it if you like!
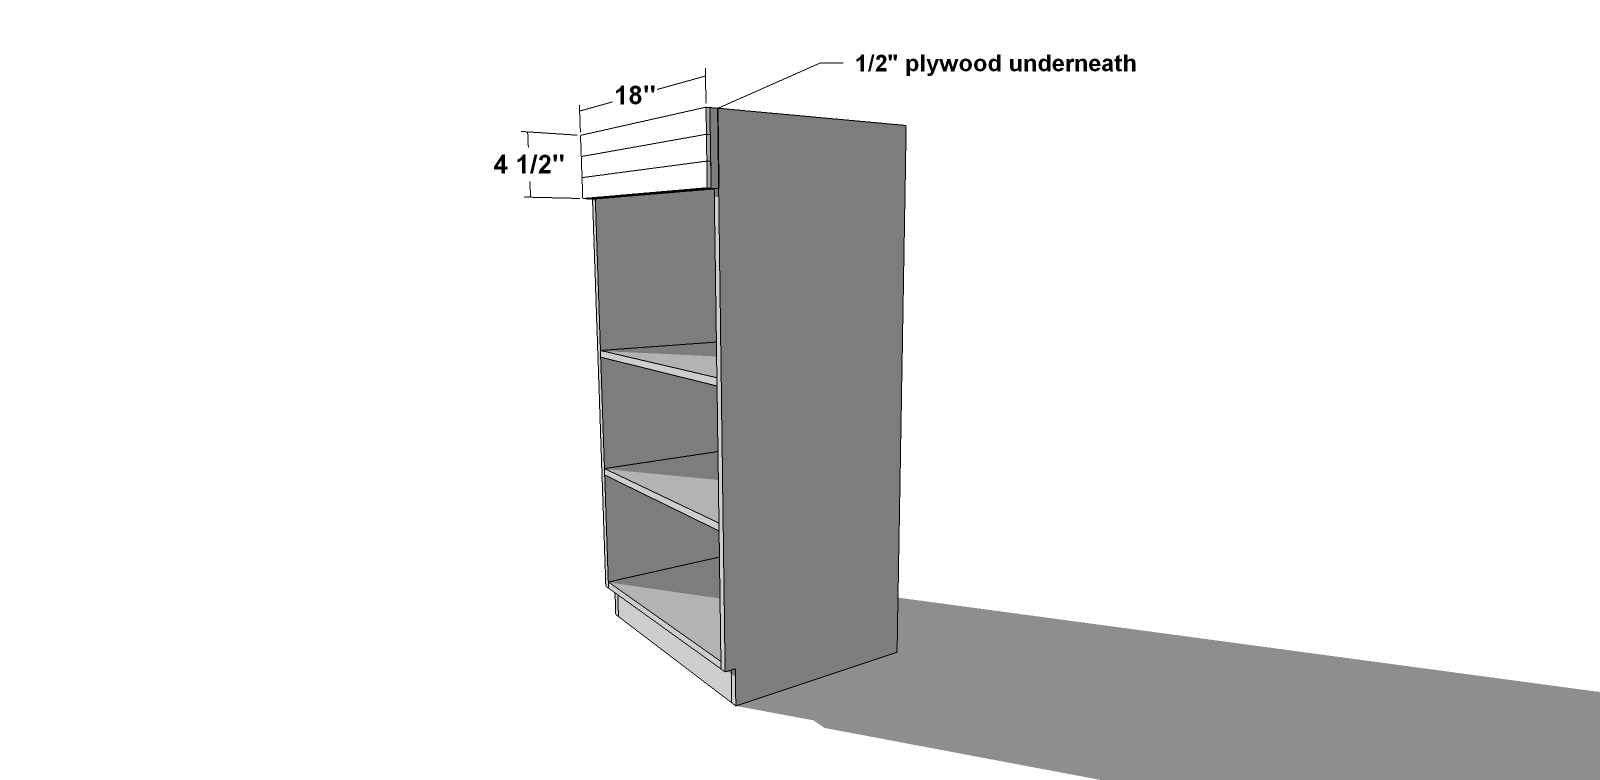
Cut your vent board to size and fasten to the upper front support using your nail gun and 1″ brad nails and glue. You can use 1″ wood screws and your countersink bit or simply glue this in place if neither of the previous options work for you. This will sit flush with the top edge of your side panels. Then simply nail and glue the trim pieces directly over the top of the vent board.
Cut your door to size and simply glue on the trim in much the same way you did for the vent board. Hang your door as you would might for a simple cabinet door with your hinges along one side (right or left) and follow manufacturer instructions to do this. You should leave 1/8″ between the vent and the top of the door for easy opening and closing.
Attach the back using 1″ brad nails or 1″ wood screws and glue.
Fasten the top in place using 1″ brad nails and glue or 1″ screws if necessary. The top will sit flush on all 4 sides.
Fill any Screw, Nail or Pocket Holes, Sand and Finish as Desired. For Finishing Tips and Tricks visit my Finishing School
// Disclaimer: Some rights reserved. Private use only. Feel Free to link to any of my plans so long as you ONLY use 1 image and provide an ADEQUATE link back to the original source and appropriate plan! Plans from this page are not to be used for commercial purposes or republished without the express written consent of Rayan Turner, The Design Confidential. By accessing or using any part of the web site, you agree to become bound by the terms and conditions of this website as outlined under Terms of Use. If you do not agree to all the terms and conditions of this agreement, then you may not access the Website or use any services. The information contained in this website is for general information purposes only. The information is provided by The Design Confidential.com and while we endeavor to keep the information up to date and correct, we make no representations or warranties of any kind, express or implied, about the completeness, accuracy, reliability, suitability or availability with respect to the website or the information, products, services, or related graphics contained on the website for any purpose. Any reliance you place on such information is therefore strictly at your own risk. In no event will we be liable for any loss or damage including without limitation, indirect or consequential loss or damage, personal injury or death, or any loss or damage whatsoever arising from loss of information or profits arising out of, or in connection with, the use of this website. I hope to provide accurate plans, however, I cannot guarantee each plan for accuracy. Not every plan that I post has been built and tested, so you are building at your own risk. It is recommended that you have a clear understanding of how the project works before beginning any project. Please contact me if you find an error or inaccuracy so that I might fix it. The Design Confidential.com is inspired by but does not replicate exact designs, any similarities between these plans and items sold at specialty retailers is coincidental and not endorsed by or related to any said retailers. // Affiliate links are used for tools and materials. The Design Confidential will earn a small commission for any items purchased using these links. Thank you for your support – every little bit counts!
Shopping
Plans
Weeee… I am a little late this year with our Handmade Holiday series of gifts, though I knocked out a few good hostess and adult gifts already – so, not all bad I guess. I will try to pump these out quickly in the midst of life, and birthdays… lots and lots of birthdays. Eek. And of course the holidays… which is precisely what you will want these for, no? Luckily this and the other pieces in this Chelsey Play Kitchen collection are easy builds! Seriously, like knock them out in an afternoon or so – easy. So let’s get right to it!
As with all of our plans, you are building at your own risk and you should have a firm understanding of building in general before you attempt many of our plans (some are easy as pie and perfect for beginners). With that, go forth, have fun, take lots of pictures and share them in a showcase on the site or on social media with the hashtag #builtTDCtuff and we will share our faves! Be sure to tag @thedesignconfidential on Instagram / FB and @thedesconf on Twitter / Pinterest. If you are a blogger and you post about your build, don’t forget to include a link to your post on your showcase here. Don’t forget… for all of our newer plans, clicking on the images will let them expand to enormous sizes with much greater clarity. The older plans may need updating so please let us know if you need one fixed!
Plans for the Chelsey Play Kitchen Refrigerator
- 1 – 1×3 at 8′
- 2 sheets of 1/2″ plywood or mdf
- 4 – 1×3 at 17″ – Kick Plate and Supports
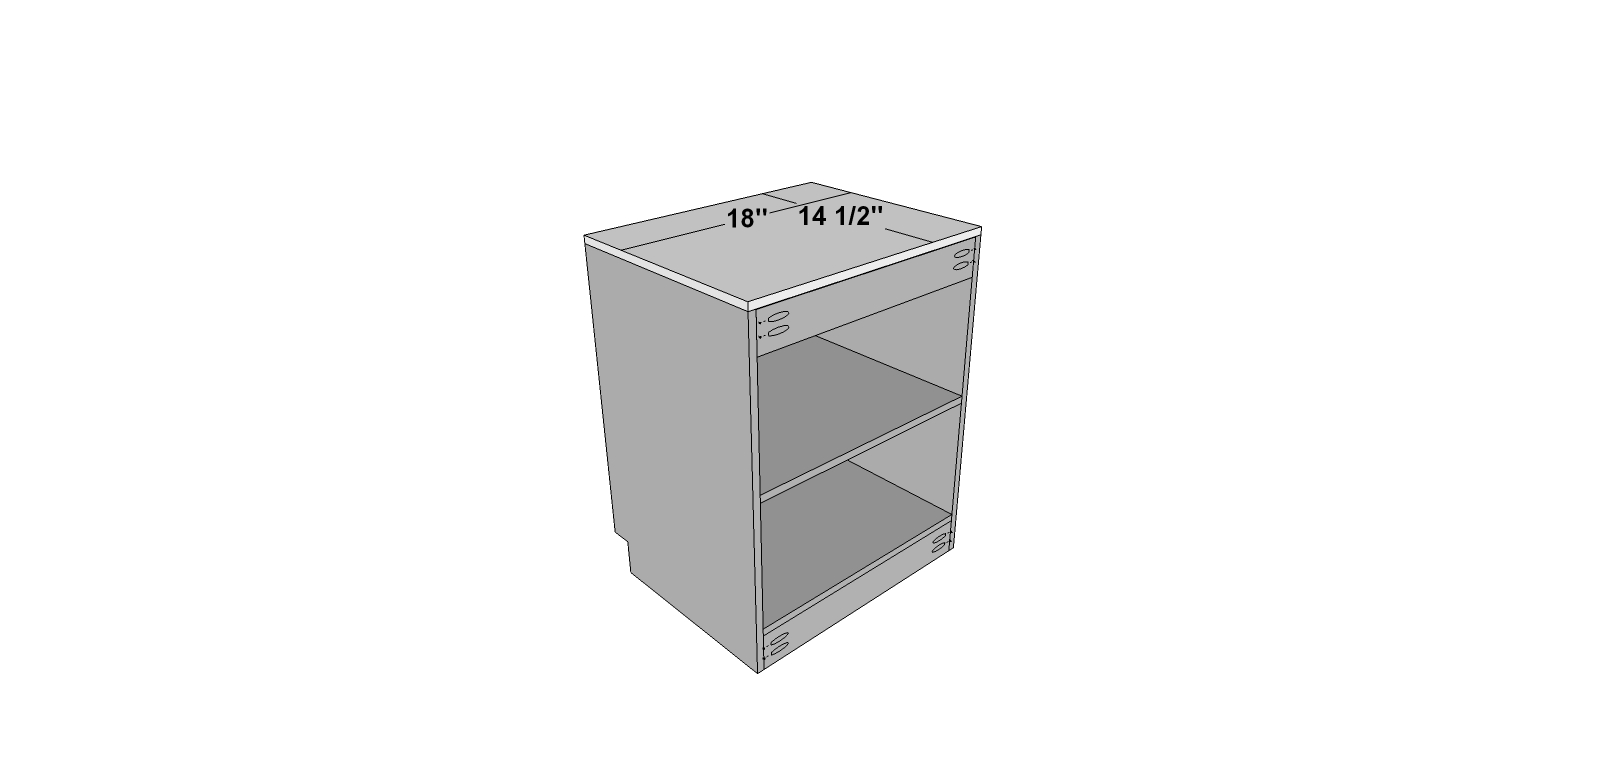
- 2 – 1/2″ Plywood or Mdf at 22 1/2″ x 14 1/2″ – Side Panels
- 1 – 1/2″ Plywood or Mdf at 17″ x 14 1/2″ – Bottom
- 1 – 1/2″ Plywood or Mdf at 17″ x 14″ – Shelf
- 1 – 1/2″ Plywood or Mdf at 17″ x 4″ – Range Board
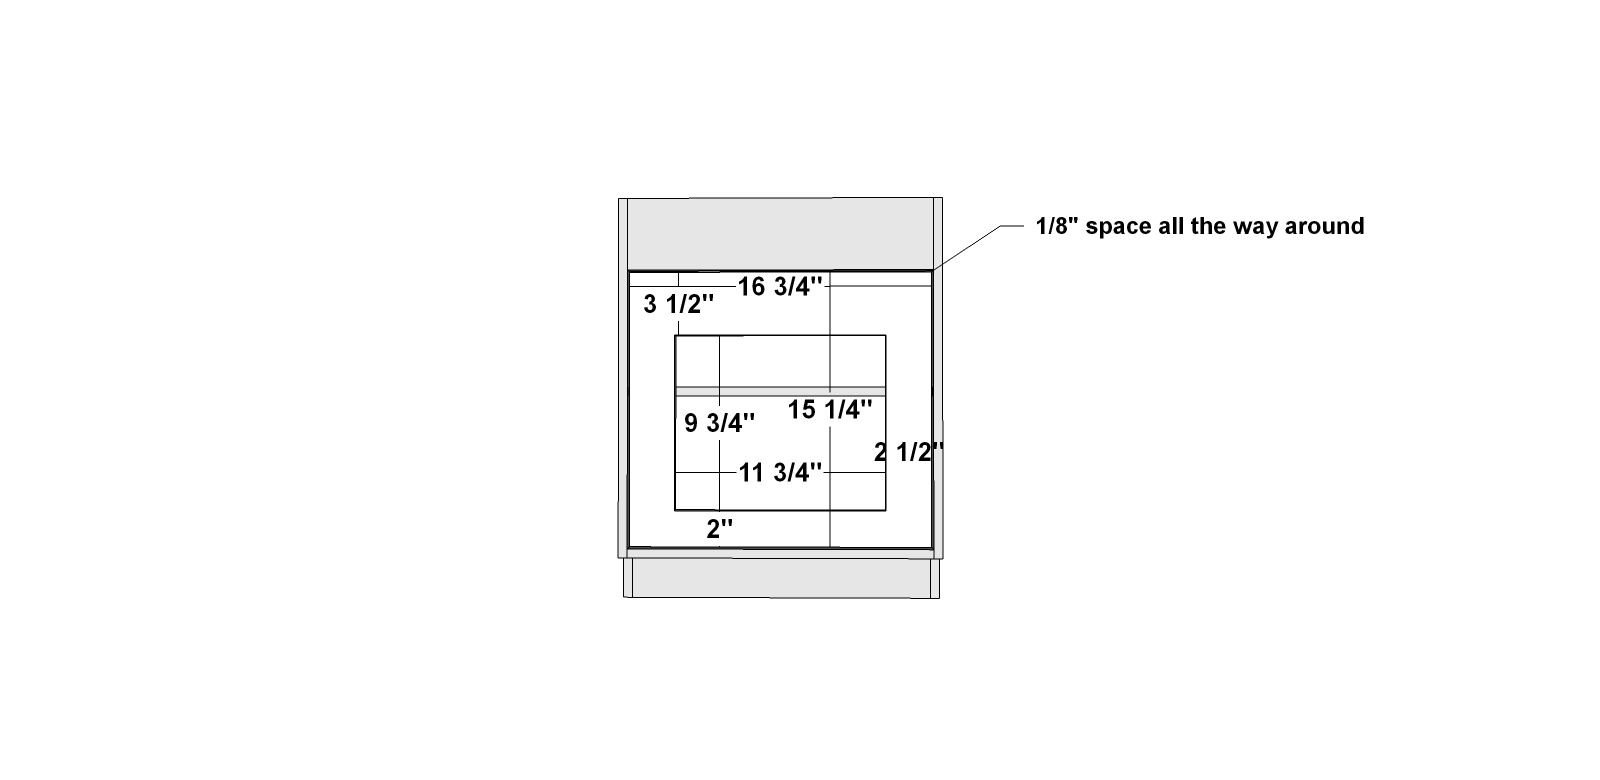
- 1 – 1/2″ Plywood or Mdf at 16 3/4″ x 15 1/4″ – Door
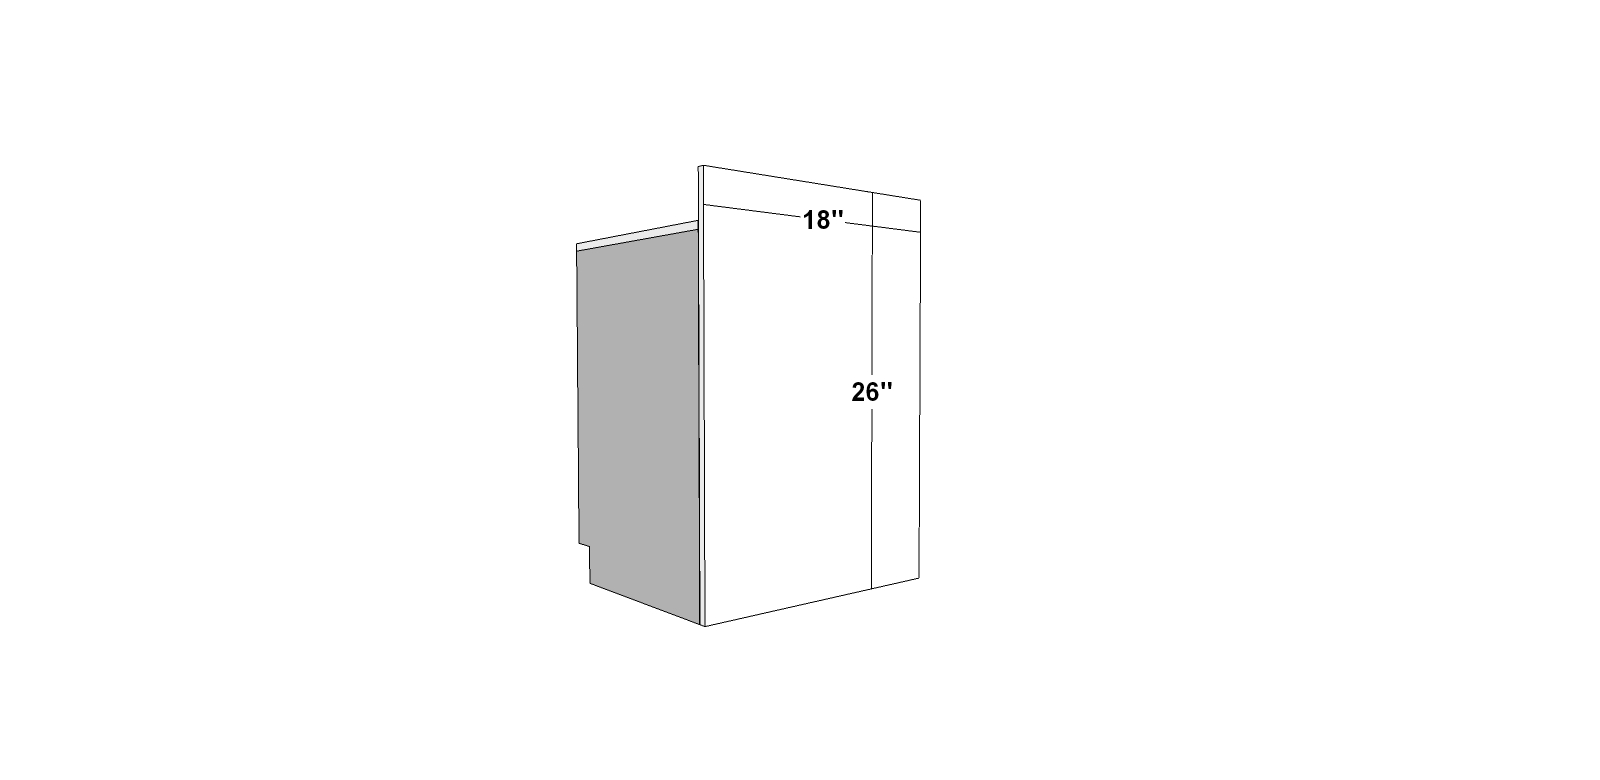
- 1 – 1/2″ Plywood or Mdf at 18″ x 14 1/2″ – Top
- 1 – 1/2″ Plywood or Mdf at 18″ x 26″ – Back
Before beginning to build, always check in on my site to make sure you have the most up to date set of plans, I occasionally update and change the plans to make the building process easier or to allow for less expensive purchasing of materials! Read through the entire set of instructions and all comments before beginning this project. If you print out or save plans, be sure to check in on my site to be sure you have the most up to date set of plans, as I occasionally update things for ease of building or buying. If you are new to building, read through the GETTING STARTED section and other articles found under the BUILD tab in the menu on my site, it has valuable information about how to get started, tools and techniques. If you are unfamiliar with the finishing process, visit my Finishing school for some tips and tricks for painting like a pro and for special finishing practices. Use glue to secure your joints and Consider Painting or Staining individual sections prior to assembling. This makes the paint application virtually flawless. Coat with a spray on Poly or Wipe on Poly to protect your finish and your piece and it will last for ages. Adhere to all safety standards and guidelines, and be sure you follow safety protocol throughout your build. If you are unsure about whether you are building safely, run a quick online search for the tool or technique you are using, or contact me via email or post to the forum before you move ahead. My contact info can be found in the menu of my site.
Cut your side panels to size and using a jig saw or circular saw (or plunge router or table saw) notch out a small rectangle in the lower corner of your panel. You will need two of these and they should mirror eachother. If your plywood or mdf has a face side to it, you will want to pay attention to that so that you have the corner notched out of what will be the front facing section of your side panel.
Attach your kick plate and upper front support using your Kreg Jig set for 1/2″ material and your 1″ pocket hole screws and glue. Place your pocket holes on the inside so they aren’t seen, and set your kick plate to be flush with the front facing edge of your notch and will sit inside of your side panels. The upper support will sit 1/2″ back from the front edge.
Attach your back supports using your Kreg Jig set for 1/2″ material and your 1″ pocket hole screws and glue. Both supports will sit flush with the back edge of the side panels. You can place your pocket holes on the backside facing outward since they will be covered in a later step.
Fasten your bottom in place using your nail gun and 1 1/4″ brad nails or your countersink bit with 1 1/4″ wood screws and glue.
Cut your shelf to size and place pocket holes along the bottom of it. Use your Kreg Jig set for 1/2″ material and your 1″ pocket hole screws and glue to attach approximately 10 1/2″ from the top edge of your side panels. This is a bit subjective so you can place this shelf anywhere it makes sense to you as long as it sits 1/2″ back from the front edge of your side panels.
Fasten the range board in place using your nail gun and 1″ brad nails and glue. You can use 1″ wood screws and your countersink bit or simply glue this in place if neither of the previous options work for you. This will sit flush with the top edge of your side panels.
Cut your oven door to size and cut out the center opening. If you would like to attach acrylic to the inside of this, a thin panel that is slightly larger than the opening should work just fine and can be screwed in place using small picture frame screws or something no longer than 1/2″. Hang your oven door as you would a cabinet door with your hinges along one side (right or left) and follow manufacturer instructions to do this. You should leave 1/8″ all the way around for easy opening and closing.
Fasten the top in place using 1 1/4″ brad nails and glue or 1 1/4″ screws if necessary. The top will sit flush on all 4 sides.
Attach the back using 1 1/4″ brad nails or 1 1/4″ wood screws and glue.
Now for the pretty stuff! Finish as desired and attach your burner knobs, grates and add your drawer pull and voila! donzo!
Fill any Screw, Nail or Pocket Holes, Sand and Finish as Desired. For Finishing Tips and Tricks visit my Finishing School
// Disclaimer: Some rights reserved. Private use only. Feel Free to link to any of my plans so long as you ONLY use 1 image and provide an ADEQUATE link back to the original source and appropriate plan! Plans from this page are not to be used for commercial purposes or republished without the express written consent of Rayan Turner, The Design Confidential. By accessing or using any part of the web site, you agree to become bound by the terms and conditions of this website as outlined under Terms of Use. If you do not agree to all the terms and conditions of this agreement, then you may not access the Website or use any services. The information contained in this website is for general information purposes only. The information is provided by The Design Confidential.com and while we endeavor to keep the information up to date and correct, we make no representations or warranties of any kind, express or implied, about the completeness, accuracy, reliability, suitability or availability with respect to the website or the information, products, services, or related graphics contained on the website for any purpose. Any reliance you place on such information is therefore strictly at your own risk. In no event will we be liable for any loss or damage including without limitation, indirect or consequential loss or damage, personal injury or death, or any loss or damage whatsoever arising from loss of information or profits arising out of, or in connection with, the use of this website. I hope to provide accurate plans, however, I cannot guarantee each plan for accuracy. Not every plan that I post has been built and tested, so you are building at your own risk. It is recommended that you have a clear understanding of how the project works before beginning any project. Please contact me if you find an error or inaccuracy so that I might fix it. The Design Confidential.com is inspired by but does not replicate exact designs, any similarities between these plans and items sold at specialty retailers is coincidental and not endorsed by or related to any said retailers. // Affiliate links are used for tools and materials. The Design Confidential will earn a small commission for any items purchased using these links. Thank you for your support – every little bit counts!
Showcase
Junior Loft Bed with a Slide!
To Read More About This Build, Visit This Blog Post
DIY / Entertaining / Studio
I think we can all agree that the Holidays tend to present unexpected and often stressful situations, precisely when it is least convenient. AmIright? Just when you think you have things under control and your holiday shopping finished, several of your amazing neighbors bring fresh baked holiday treats with a side of holiday cheer and leave you scrambling for something you can give in return so you don’t look like a modern day Ebeneezer Scrooge. This month’s Michael’s Makers Challenge is all about the Holiday Hacks you can tackle to relieve some of the stress and so you won’t be caught upstream without a paddle. Each of us is going to tackle one such Holiday Hack that will leave you prepped and ready for anything this stressful season might throw your way. Today I am sharing three easy Hostess Gifts you can make in a jiff, and that will also work perfectly for those unexpected carolers who show up at your door. Does anyone even do that anymore? Maybe it’s not a thing… no clue! So clear yourself an hour or so and knock out a several of each thing and you won’t have to worry about showing up to your next holiday party empty handed. Assembly line this, folks… And you can head over to The Glue String to see a whole range of Holiday Hacks from the other A-Mazing Makers that will have you wrapping odd things and gifting like a champ in no time!
First on our list is a cute organic ring dish or small catch-all. I made this one with a constellation pattern for the birth sign of the person this is for, but if you want to keep it less specific you can rim the edges and leave it at that or add a cute yet more general design to the center.
MATERIALS // Sculpey / Rolling Pin / Metallic Painter / Mod Podge – Optional
Start by warming up your clay. Once it feels pliable and easy to work with, roll it into a ball and then roll it out flat into an oval shape that is about 1/8 of an inch thick. Don’t worry about the shape since an oddity will lend to the organic nature of this dish later.
Gently lift the edges of your disk, forming a nice lip all the way around. Give your lip a slightly irregular shape by lifting some edges more than others and help it take on a natural form. Smooth the edges so that they look intentional and smooth the flat portion of your dish as well. Make sure there are no air bubbles or markings that you won’t love later. This is supposed to look organic, but not childlike, so use your fingertips and gently refine your work.
When it looks amazing, bake in the oven on a cookie sheet for 15 minutes at 275 degrees.
Once your dish has cooled, use your metallic painter to add a little glitz to the edges. If you want to add a design in the center, wait until the rim has dried so that you don’t smear anything. That’s it, 20 minutes and most of that is for baking so you can make several of these at once and knock out quite a few people! Who doesn’t like a cute jewelry dish or fancy spot to set their keys?
There are a number of ways you can decorate a vase or candle holder, one of which is to use a similar painter as for the ring dish and bake it to make it permanent. For those of you who don’t want to hand draw a pattern on your vessel, this is a fabulous way to make a permanent decorative design on a simple piece of glass.
MATERIALS // Vase or Pillar Candle Holder / Embossing Ink / Stamps / Heat Gun / Embossing Powder – optional
Embossing Ink in an ink pad and a fancy stamp are really all you need for this, but if you want to glitz things up even more… add a sprinkle of glittery embossing powder and give your design a bit of sparkle and dimension.
I chose to do a confetti or champagne bubbles type of pattern and my stamp set happened to have the perfect couple of bubble stamps so this made the process extremely easy. Simply stamp out your design using your ink pad and stamp all the way around your vessel. Since the ink has a slow drying time, you can wipe clean and begin again if it isn’t perfect.
Lay down a sheet or two of paper and while the ink is still a bit wet, sprinkle the glittery embossing powder over your stamped design. Shake off the excess and use your paper to pour it back into your powder jar.
Let your ink and powder set up a bit and then use a dry brush to remove any powder that remains where you don’t want it to. Using your heat gun, heat your design making sure to keep it moving in a circular pattern. You will see the embossing powder melt a bit and when you have heated your design all the way around, let it cool completely before handling. Add some stems or branches of something beautiful, or add a candle and delight your host with something that will bring holiday cheer to her table or home.
Cute tea towels and napkins are one of those things that people would love to have, and somehow never seem to buy. If you are someone who loves to bring a bottle of wine or fancy olive oil for your host, a quick and cute tea towel as gift wrap adds an extra layer of goodness to your gift!
MATERIALS // Napkin, Tea Towel or Bandana (usually about the size of a formal napkin or hand towel) / Painter in color of choice / Iron – if fabric marker calls for this.
I grabbed several bandana blanks in the tee-shirt, tote bag and fabric decorating aisle along with a Painter with a large chisel tip so my designs would be faster to create. If you want a more detailed or delicate pattern, choose a tip that caters to that.
I used the folds in the bandana to create a grid in a wide line. Go over your lines in any areas that aren’t well inked. Begin adding the angled lines using the finer tip of the chisel point. Go slow so that you can be sure you don’t mess up your pattern and be sure you always start at a line and end at a line. That doesn’t mean the larger grid lines necessarily, so if you want to stop in the middle of your grid square, just add a line heading in an alternate direction to finish it off.
Continue adding angled lines in varying angles and lengths. Then go back and widen a few of the angled lines to the same thickness as your grid lines. When you like your design, let it dry for a few minutes and then heat set with a household iron to make it permanent. The tea towel can now be washed and dryed as you typically might, and your bottle of wine has a fancy presentation that looks amazing even before it’s unwrapped.
DIY / Studio
Between all of the holiday entertaining and gifting that takes place this time of year, projects that are fun, easy, and work well for either, are taking major priority this year. This project is quite literally a 5 minute project and will make your bar cart look amazing even when it's off-duty. I also think this would be a fabulous hostess gift, or a special gift for someone who loves to entertain. Just think of all the possibilities… Monograms, snowflakes, confetti… so so good! It's possible I think this every time but this might be my favorite project so far in my ongoing series with Bernzomatic (to catch up on past projects, click here).
Let's get at it!
Lay out a couple of sheets of paper to work over, this will help you recapture your embossing powder later. Then either paint, draw, or stamp your embossing ink onto your mug. For this design, I used a paint brush, but the pens I linked to earlier would have been super duper helpful.
Then lightly sprinkle your design with embossing powder.
Gently shake off the excess and let things sit for a minute to dry. Once your ink has dried a bit, use a dry brush to remove the remaining powder from the areas that aren't part of your design.
Set your mug on your tripod or a heat tolerant surface and be sure to clear away any paper or other flammable items. Then with your heat gun attachment on your torch, press the ignite button and lightly heat your powder. Keep your torch moving so you aren't focused on one area for too long and be sure to hold it about 4 inches away. You will see your embossing powder heat up and begin to melt which is all it needs to do to become permanent. Let your beauty cool down and that is it, donzo!
The hardest part of this entire project is deciding on a pattern or design – and depending on what that design is, it might be hard to stamp onto a curved surface. Otherwise it is so simple and takes just a few minutes. Get an assembly line going and you will have a whole new round of fancy mugs for your next party or to give all of your friends!
This project is part of an ongoing series, brought to you in partnership between Bernzomatic and The Design Confidential! All opinions are 100% my own and I am grateful for your support of the brands that help bring fresh new content to The Design Confidential, just like this.
Shopping