[carousel-horizontal-posts-content-slider]
Plans
We covered the 38 Inch version here, but what if you need something a bit longer? Well this should do the trick! This simple bench or banquette is a stunner with it’s clean lines and slightly coastal feel! This is the perfect little seating piece for outside, perhaps with a dining table or even configured with a corner unit into a nook like arrangement. Another fabulous addition to our Chesapeake Collection and one that would look equally as fabulous inside or out! Did I mention that this will cost you less than $15 to build? Yep, true story!
Tools
Tape Measure
Sander
Drill
Jig Saw – if you prefer a more angular back leg you can use a circular saw or table saw as well.
Kreg Jig® (pocket hole system)
Lumber
1 – 2×2 at 6’ OR if 8’ is cheaper or all that your store sells, purchase that!
1 – 2×4 at 6’
7 – 1×3 at 8’
1 – 1×2 at 10’ OR 2 – at 6’
Materials
1 1/4” Pocket Hole Screws – Stainless Steel or Blue Kote if this is for outdoor use
1 1/4” Wood Screws or Nails or Finish Nails – galvanized or coated if for outdoor use
Wood Glue – suitable for outdoor use if need be
Sanding Supplies
Finishing Supplies
Cut List
2 – 2×4 at 35 1/2” Back Legs
2 – 2×2 at 16 1/2” Front Legs
6 – 1×3 at 45” Front / Back Aprons and Back Rest Slats
2 – 1×3 at 19 1/2” Side Aprons
13 – 1×3 at 19 7/8” Seat Slats
2 – 1×2 at 45” Seat Cleats
2 – 1×2 at 11 1/2” Decorative Back Supports
Instructions
Consider using a specie of wood suitable for outdoor use such as Cedar or Redwood, and if you use a less expensive specie be sure you seal your table well to avoid a premature and untimely death of your piece.
Before beginning to build, always check in on my site to make sure you have the most up to date set of plans, I occasionally update and change the plans to make the building process easier or to allow for less expensive purchasing of materials!
Read through the entire set of instructions and all comments before beginning this project. If you print out or save plans, be sure to check in on my site to be sure you have the most up to date set of plans, as I occasionally update things for ease of building or buying. If you are new to building, read through the GETTING STARTED section and other articles found under the BUILD tab in the menu on my site, it has valuable information about how to get started, tools and techniques. If you are unfamiliar with the finishing process, visit my Finishing school for some tips and tricks for painting like a pro and for special finishing practices.
Use glue to secure your joints and Consider Painting or Staining individual sections prior to assembling. This makes the paint application virtually flawless. Coat with a spray on Poly or Wipe on Poly to protect your finish and your piece and it will last for ages. Adhere to all safety standards and guidelines, and be sure you follow safety protocol throughout your build. If you are unsure about whether you are building safely, run a quick online search for the tool or technique you are using, or contact me via email or post to the forum before you move ahead. My contact info can be found in the menu of my site.
Step 1
Cut out Your Legs: Begin with a 2×4 and cut it down to a 2×2 at 35 1/2” in height. As long as you have a vertical straight space that is 2 1/2” in height at the 14” mark (up to 16 1/2” mark) then you can essentially make the shape how you like. The diagram below shows the back legs with a slight curve just like the inspiration piece, however if it’s easier for you to have an angular leg that is straight lined, you can do that also. Just be sure your leg is approximately 1 1/2” in width all the way down with the straight section at the Front Edge of the 14” mark and that it hits the top back corner and bottom back corner of the 2×4. Think Arc or Triangular shape, either will work. Create this with a jig saw or a circular saw depending on whether or not you will go with a curve or an angle.
Step 2
Fasten both Legs Together using the Back Aprons: This should be flush with the front side of the legs at the 14” mark. To attach use your Kreg Jig® set for 3/4” stock and your 1 1/4” pocket hole screws and glue.
Step 3
Construct the Front Leg Unit: Using your Kreg Jig® set for 3/4” stock and your 1 1/4” pocket hole screws and glue, fasten the Apron to the 2 front legs by attaching it 3/8” back from the front edge of the front legs.
Step 4
Attach the Side Aprons: Use your Kreg Jig® set for 3/4” stock and your 1 1/4” pocket hole screws and glue to attach the aprons to the Front and Back Legs. All Aprons should be at the same height and the side aprons will sit flush with the inside of the legs.
Step 5
Attach your Seat Cleats: Use 1 1/4” Wood Screws or nails and glue to attach the cleats in place on the front and back aprons. They should sit flush with the bottom of the aprons.
Tack on the Seat Slats: Use 1 1/4” screws or nails and glue to fasten the seat slats in place. Space them about 1” apart and secure them to the cleats.
Step 7
Attach the Back Rest Boards and Decorative Supports: Use your Kreg Jig® set for 3/4” stock and your 1 1/4” pocket hole screws and glue to fasten the back rest boards in place. The first board (top) should be set 1/2” down from the top of the back legs and each subsequent leg should be spaced about 1 1/2” apart. Keep the Back Rest Boards flush with in line with the front edge and curve (or angle) of your back legs. Once they are fastened in place, tack on the decorative supports using 1 1/4” screws or nails and glue. Depending on the angle of the top portion of your back legs, it’s possible that the decorative supports will only touch at the top board and bottom back rest board. That is perfectly fine, so you can suffice by securing them only at the top and bottom of the supports to the top and bottom back rest boards. Center them vertically and space them 13” from the Back Legs on either side. This piece has been designed to work with the PotteryBarn Cushions if you prefer to purchase it separately, and if you prefer to make them yourself, the cushion dimensions should be 21” deep x 48” wide and 2 1/2” thick.
Finishing Instructions
Fill any Screw, Nail or Pocket Holes, Sand and Finish as Desired. For Finishing Tips and Tricks visit my Finishing School
If you enjoyed this post PLEASE STUMBLE IT! Definitely comment below, Share it or Like it, and subscribe to my feed to stay up to date!
You can now also:
Follow my blog with blog lovin!
**Disclaimer: Some rights reserved. Private use only. Feel Free to link to any of my plans so long as you provide an adequate link back to the appropriate post! Plans from this page are not to be used for commercial purposes or republished without the express written consent of Rayan Turner, The Design Confidential I hope to provide accurate plans, however, I cannot guarantee each plan for accuracy. Not every plan that I post has been built and tested, so you are building at your own risk. It is recommended that you have a clear understanding of how the project works before beginning any project. Please contact me if you find an error or inaccuracy so that I might fix it.
Plans
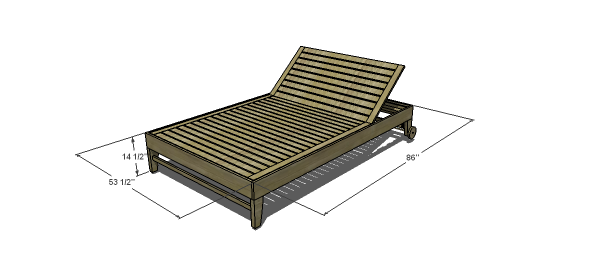
This piece continues our Chesapeake Collection and will be constructed just like the Free DIY Furiture Plan to Build a Chesapeake Single Lounger only this is twice the lovin’ and will fit twice the people on it! at least… The fabulous thing about this chaise lounge is that it is so beautiful, you can use it without a cushion if you prefer or to save yourself some dinero. I did construct it according to the Potterybarn dimensions so that their cushions and other standard lounge cushions will fit and work well. I can tell you right now, that I would be a happy gal if I had only 2 of these in my yard and no other seating…I would never leave! And of course this blog would either cease to exist or I would be blogging grass-side (since I don’t have a pool, I can’t say poolside…)!
As with all of our plans, you are building at your own risk and you should have a firm understanding of building in general before you attempt many of our plans (some are easy as pie and perfect for beginners). With that, go forth, have fun, take lots of pictures and share them in a showcase on the site or on social media with the hashtag #builtTDCtuff and we will share our faves! Be sure to tag @thedesignconfidential on Instagram / FB and @thedesconf on Twitter / Pinterest. If you are a blogger and you post about your build, don’t forget to include a link to your post on your showcase here. Don’t forget… for all of our newer plans, clicking on the images will let them expand to enormous sizes with much greater clarity. The older plans may need updating so please let us know if you need one fixed!
- 4 – 1×2 at 10’
- 2 – 1×2 at 8’
- 16 – 1×3 at 8’
- 2 – 1×6 at 8’
- 1 – 1×6 at 10’
- 1 – 1×8 at 6’ – optional for wheels
- 2 – 2×2 at 8’
- 1 – 2×4 at 6’
- 1 – 3/4” Dowel at 5’
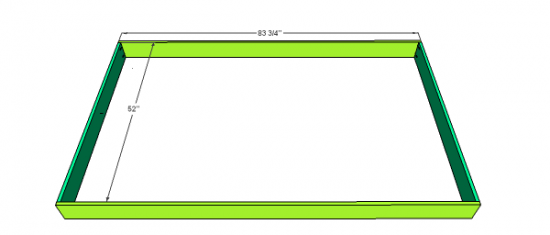
- 2 – 1×6 at 83 3/4” Frame
- 2 – 1×6 at 52” Frame
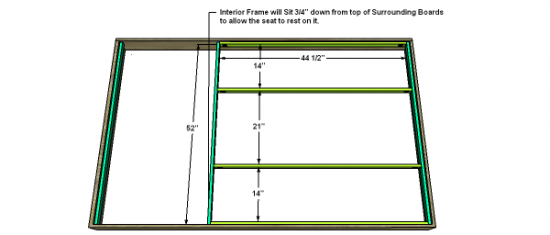
- 4 – 1×2 at 44 1/2” Interior Frame
- 3 – 1×2 at 52” Interior Frame
- 2 – 1×2 at 20 1/2” Back Rest Supports
- 1 – 1×2 at 51 1/2” Back Rest Support (Lower)
- 4 – 1×2 at 2 1/2” Back Rest Stops
- 2 – 1×2 at 2” Back Rest Stop
- 2 – 1×2 at 4 1/2” Back Rest Stop
- 2 – 1×2 at 14 1/2” Lower Back Rest Bar
- 2 – 1×2 at 24 1/2” Leg Stretchers
- 30 – 1×3 at 46 1/2” Seat Slats (Lower 17 and Back Rest Portion 13)
- 2 – 1×3 at 46 3/4” Seat Outside Runner Boards
- 2 – 1×3 at 35 1/2” Back Rest Outside Runner Boards
- 1 – 2×2 at 51 1/2” Back Rest Stand
- 1 – 2×2 at 27” Back Rest Stand
- 2 – 2×2 at 21 1/4” Back Rest Stand
- 2 – 2×4 at 9” Front Legs
- 2 – 2×4 at 7” Back Legs
- 1 – 3/4” Dowel Rod at 55” Axel
- 2 – 1×10 or 1×8 at an 7”-8” diameter circle (can also be a 7 1/4” diameter, this will depend on what you choose to carve from)
Before beginning to build, always check in on my site to make sure you have the most up to date set of plans, I occasionally update and change the plans to make the building process easier or to allow for less expensive purchasing of materials! Read through the entire set of instructions and all comments before beginning this project. If you print out or save plans, be sure to check in on my site to be sure you have the most up to date set of plans, as I occasionally update things for ease of building or buying. If you are new to building, read through the GETTING STARTED section and other articles found under the BUILD tab in the menu on my site, it has valuable information about how to get started, tools and techniques. If you are unfamiliar with the finishing process, visit my Finishing school for some tips and tricks for painting like a pro and for special finishing practices. Use glue to secure your joints and Consider Painting or Staining individual sections prior to assembling. This makes the paint application virtually flawless. Coat with a spray on Poly or Wipe on Poly to protect your finish and your piece and it will last for ages. Adhere to all safety standards and guidelines, and be sure you follow safety protocol throughout your build. If you are unsure about whether you are building safely, run a quick online search for the tool or technique you are using, or contact me via email or post to the forum before you move ahead. My contact info can be found in the menu of my site.
Build the Frame: Use your Kreg Jig set for 3/4” stock and your 1 1/4” pocket hole screws and glue.
Add the Interior Frame: Build using your Kreg Jig set for 3/4” stock and your 1 1/4” pocket hole screws and glue, then fasten to the Frame using 1 1/4” Wood Screws and glue. Place the Interior Frame 3/4” from the top edge of the Frame to allow for the Seat Slats to rest flush in the next step. **If you would like to use your Kreg Jig to secure the seat in the next step, you will want to add the pocket holes to the Interior Frame prior to constructing and attaching it to the Frame. You don’t need to go crazy for that step, just add 3-4 pocket holes per interior frame board to simply hold the seat in place. You will attach in the next step.
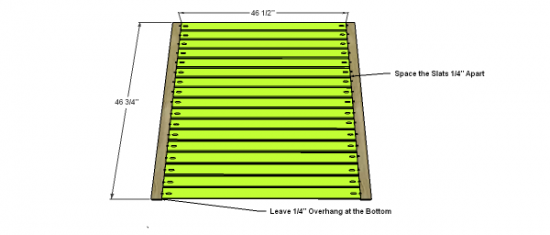
Construct the Lower Seat: Using your Kreg Jig set for 3/4” stock and your 1 1/4” pocket hole screws and glue, fasten the slats to the Outside Seat Boards. Leave 1/4” Overhang at one end of the Seat (the end that will sit in the center of the lounger and connect to the back rest). You will then attach this seat to the Interior Frame constructed in the previous step using 1 1/4” pocket hole screws in the locations you created in the previous step, or by fastening the seat to the frame using 1 1/4” wood screws from the top of the seat down into the frame.
Construct the Back Rest: Use your Kreg Jig set for 3/4” stock and your 1 1/4” pocket hole screws and glue to construct the back rest portion of the seat, then attach to the Lower Seat using standard butt hinges.
Add the Back Rest Supports: Use your Kreg Jig set for 3/4” stock and your 1 1/4” pocket hole screws and glue to attach your supports to the back rest. They will attach in a vertical position to the back rest and should be spaced 27 1/4” apart (yellow bars) to adequately allow for the back rest stand in the next step. The lower support (blue), will simply attach in the center of the lowest board to provide extra support for the back rest.
Construct the Back Rest Stand: Use your Kreg Jig set for 1 1/2” stock and your 2 1/2” pocket hole screws and glue to construct the stand. It will be something of a T Shape, only with 2 legs and a bottom, so not really a T Shape at all, but you get the point. Once you have fastened the stand together, attach it to the Back Rest using standard butt hinges as shown (it’s shown in an attached and lowered position, but please note that other than with the hinges, it doesn’t attach to the back rest itself, it needs to be able to move and rotate as you can see in the second image below for this step).
Add the Back Rest Stops: Use your 1 1/4” Wood Screws and glue to fasten the 1×2 sections in place. You will place the stops 3/4” from the top edge just as you did with the interior frame, and each small section should be place about 2 1/2” from the next small section, but you are free to place these as you see fit for allowing the back rest to sit at comfortable positions in recline. Just be sure to allow for adequate space between the last stop (the 4 1/2” section in yellow) and the seat itself so that when the back rest is in the completely flat position there is plenty of room for the back rest stand to sit. The lower stop bar, will sit just below the actual back rest stops to act as a stop for the stops, so to speak, and will sit under the top bar of the interior frame and rest against the top portion of the frame itself.
Create the Legs and Attach them: To carve the shape for the legs, begin with a 2×4 and carve the curve from the top edge down to the location 2” in from the outside. The front and back legs will be different heights to allow for the wheels in the next steps. If you prefer to skip the wheels, you can make all 4 legs the same length and stop after this step! This is up to you.
Add the Axle: This is really simple and you will use a drill bit to create a hole in the back legs at the distance that equals the same distance as the bottom of your wheel to the axle hole (don’t forget the back wheels sit higher and don’t rest fully on the ground – factor this in!). The hole needs to be just slightly bigger in diameter than the axle you are using so a 3/4” bit should be perfect. You will need to cut your axle rod down to size. Do not glue the rod, simply insert and move the the next step.
Add the Wheels: Slide the wheels onto the outside of the axle. Measure the length your rubber stoppers will sit on your rod by placing them on the ends of your rod and marking off at the bottom edge. Measure this distance and cut your axle to size considering the following things it needs to account for: Your axle rod length will equal the distance between the legs, through the legs, through the wheels and then you will want to leave enough axle rod to go inside your rubber stoppers (all the way into the stopper). You can place a bit of epoxy on the edge of your rod to secure the stopper or simply leave as is.
Fill any Screw, Nail or Pocket Holes, Sand and Finish as Desired. For Finishing Tips and Tricks visit my Finishing School
**Disclaimer: Some rights reserved. Private use only. Feel Free to link to any of my plans so long as you provide an adequate link back to the appropriate post! Plans from this page are not to be used for commercial purposes or republished without the express written consent of Rayan Turner, The Design Confidential I hope to provide accurate plans, however, I cannot guarantee each plan for accuracy. Not every plan that I post has been built and tested, so you are building at your own risk. It is recommended that you have a clear understanding of how the project works before beginning any project. Please contact me if you find an error or inaccuracy so that I might fix it. / Affiliate links are used for tools and materials. The Design Confidential will earn a small commission for any items purchased using these links. Thank you for your support – every little bit counts!
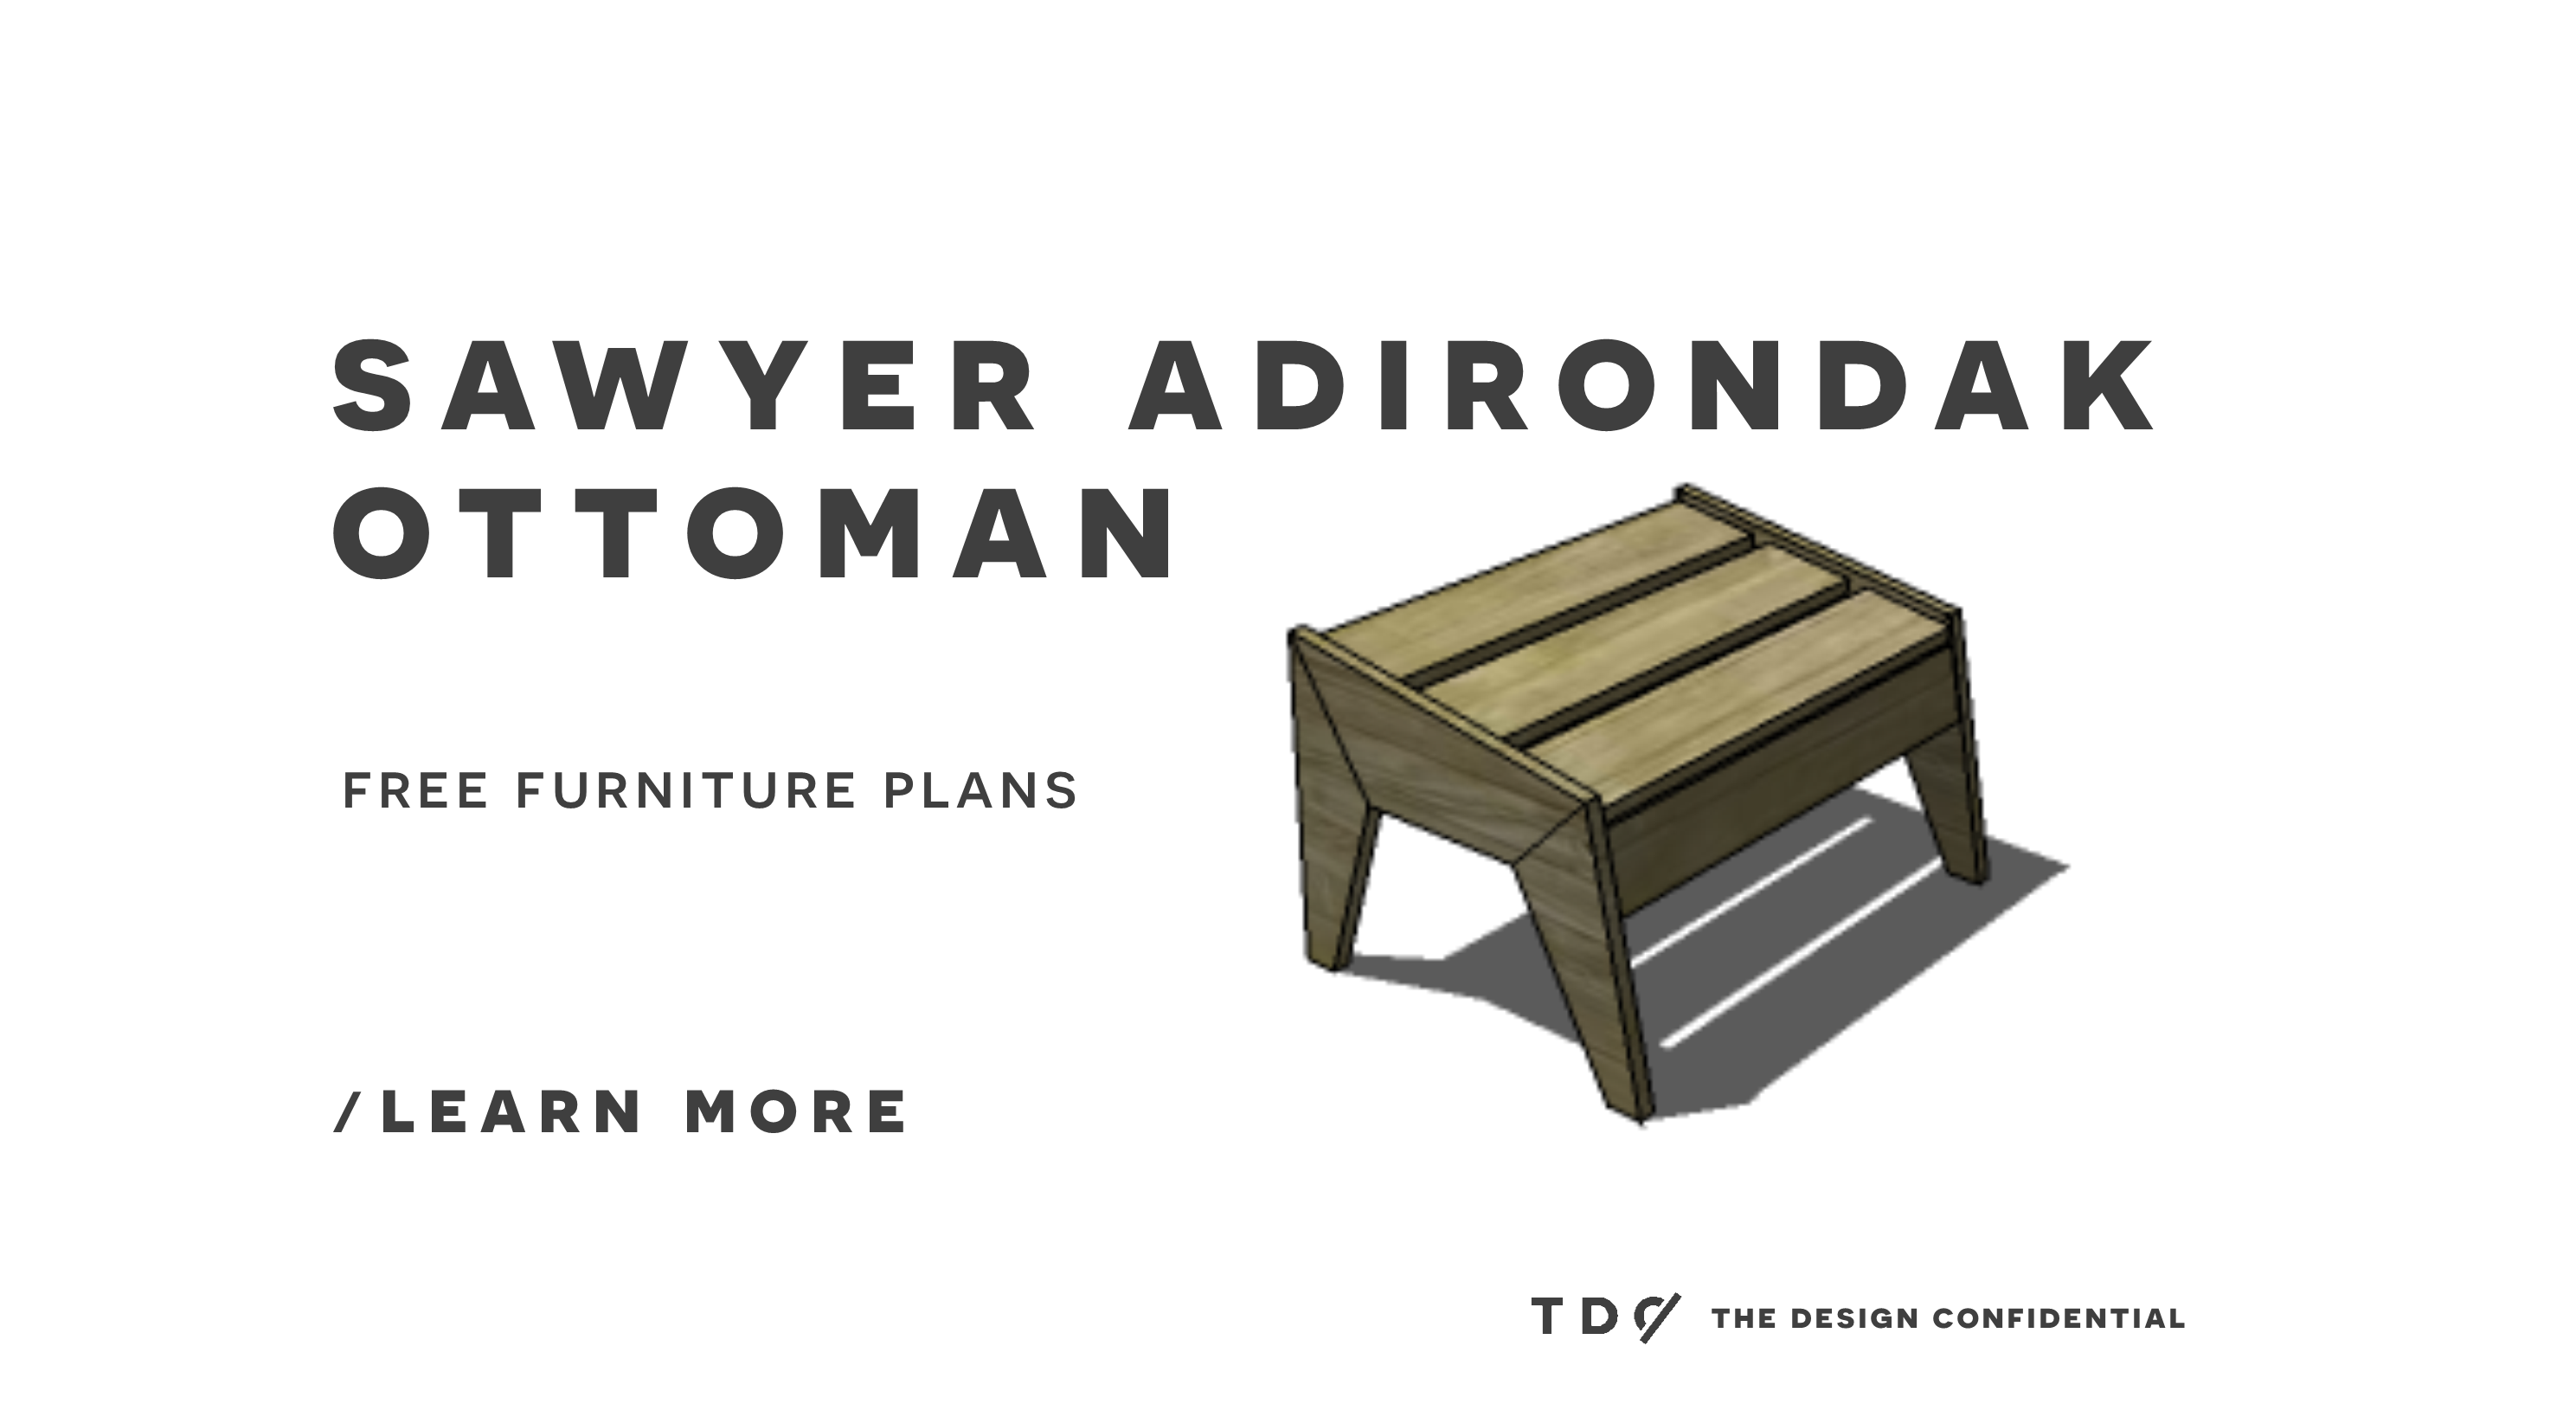
Plans
This fabulous ottoman pairs perfectly with the Sawyer Adirondack Outdoor Chair! What an amazing duo of DIY furniture these two projects are! The most difficult portion of this plan is the freehand cutting, and even that should actually be a bit of a fun challenge, nothing to difficult that you can’t tackle! All of the marking and and measuring should be quite fun! Did I mention this plan is inexpensive to build? Yep, just a small half sheet of plywood… Not bad considering the inspiration piece’s price tag of $100!
- 1 – 1×4 at 6’ ** you can purchase a fence board like this for savings, or use your plywood and cut it into strips.
- 1 – 1×6 at 6’ **you can purchase a fence board like this for big savings or use your plywood and cut it into strips. You will need to rip this down into 4 1/2” strip for the Slats.
- 1 – 4’x4′ sheet of 3/4″ plywood
- 2 – 3/4″ plywood at 15″ x 19″
- 2 – 1×4 at 22 1/2” Aprons
- 3 – 1×6 (ripped down into 4 1/2” width strips) at 22 1/2”
Before beginning to build, always check in on my site to make sure you have the most up to date set of plans, I occasionally update and change the plans to make the building process easier or to allow for less expensive purchasing of materials! Read through the entire set of instructions and all comments before beginning this project. If you print out or save plans, be sure to check in on my site to be sure you have the most up to date set of plans, as I occasionally update things for ease of building or buying. If you are new to building, read through the GETTING STARTED section and other articles found under the BUILD tab in the menu on my site, it has valuable information about how to get started, tools and techniques. If you are unfamiliar with the finishing process, visit my Finishing school for some tips and tricks for painting like a pro and for special finishing practices. Use glue to secure your joints and Consider Painting or Staining individual sections prior to assembling. This makes the paint application virtually flawless. Coat with a spray on Poly or Wipe on Poly to protect your finish and your piece and it will last for ages. Adhere to all safety standards and guidelines, and be sure you follow safety protocol throughout your build. If you are unsure about whether you are building safely, run a quick online search for the tool or technique you are using, or contact me via email or post to the forum before you move ahead. My contact info can be found in the menu of my site.
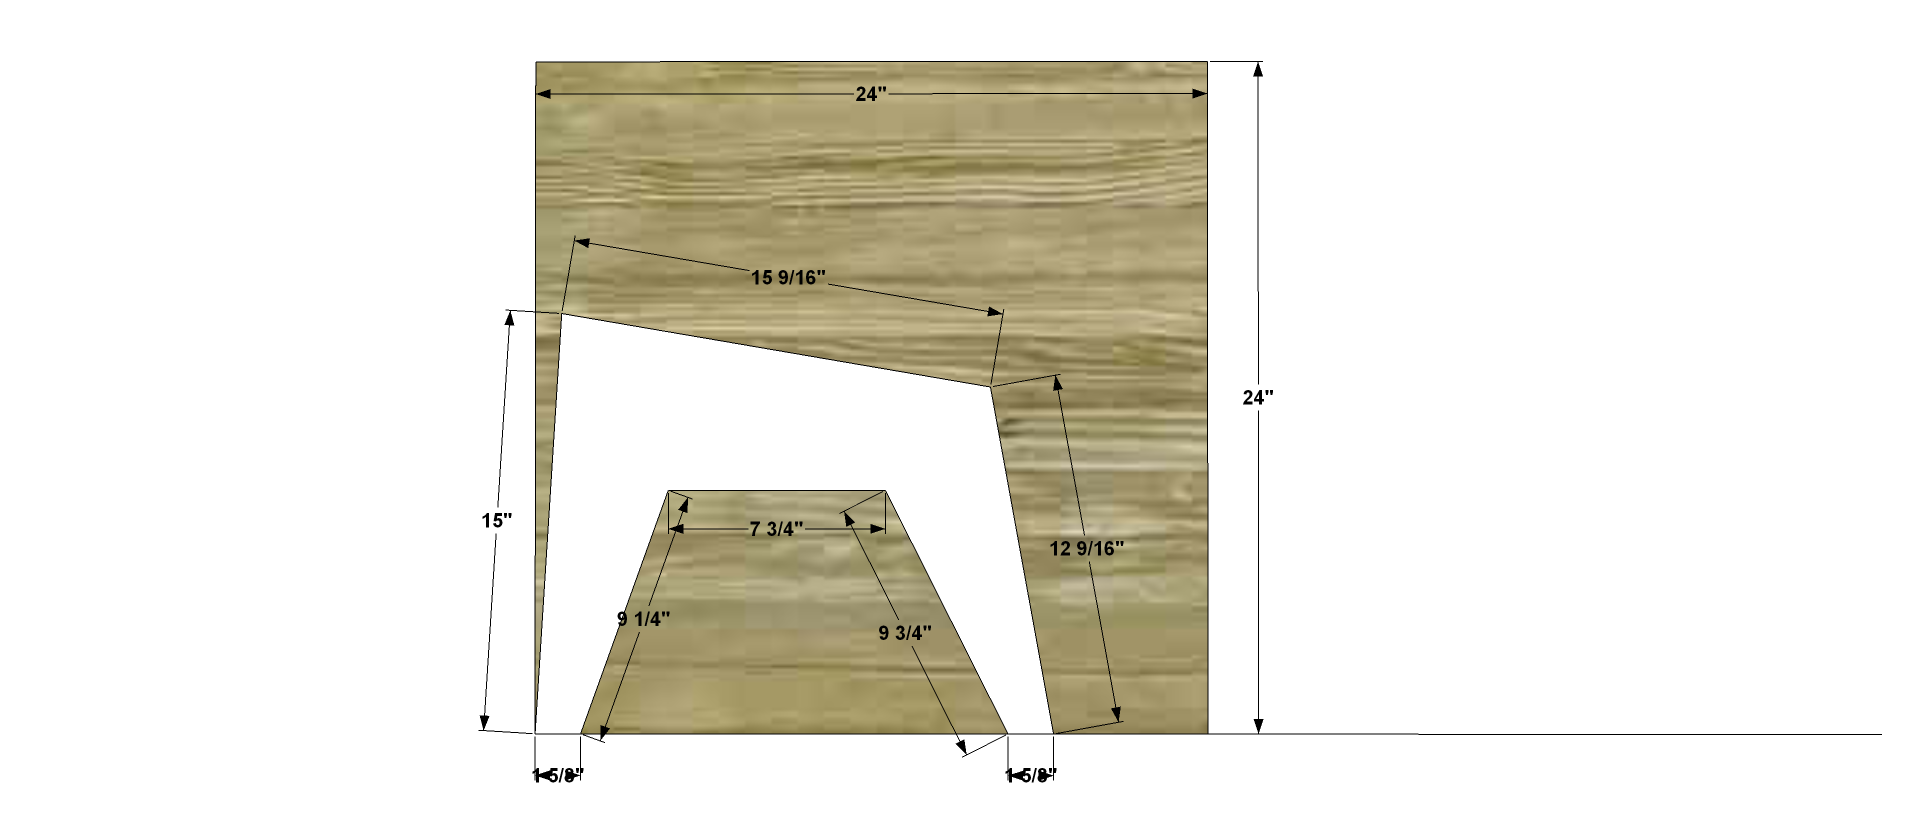
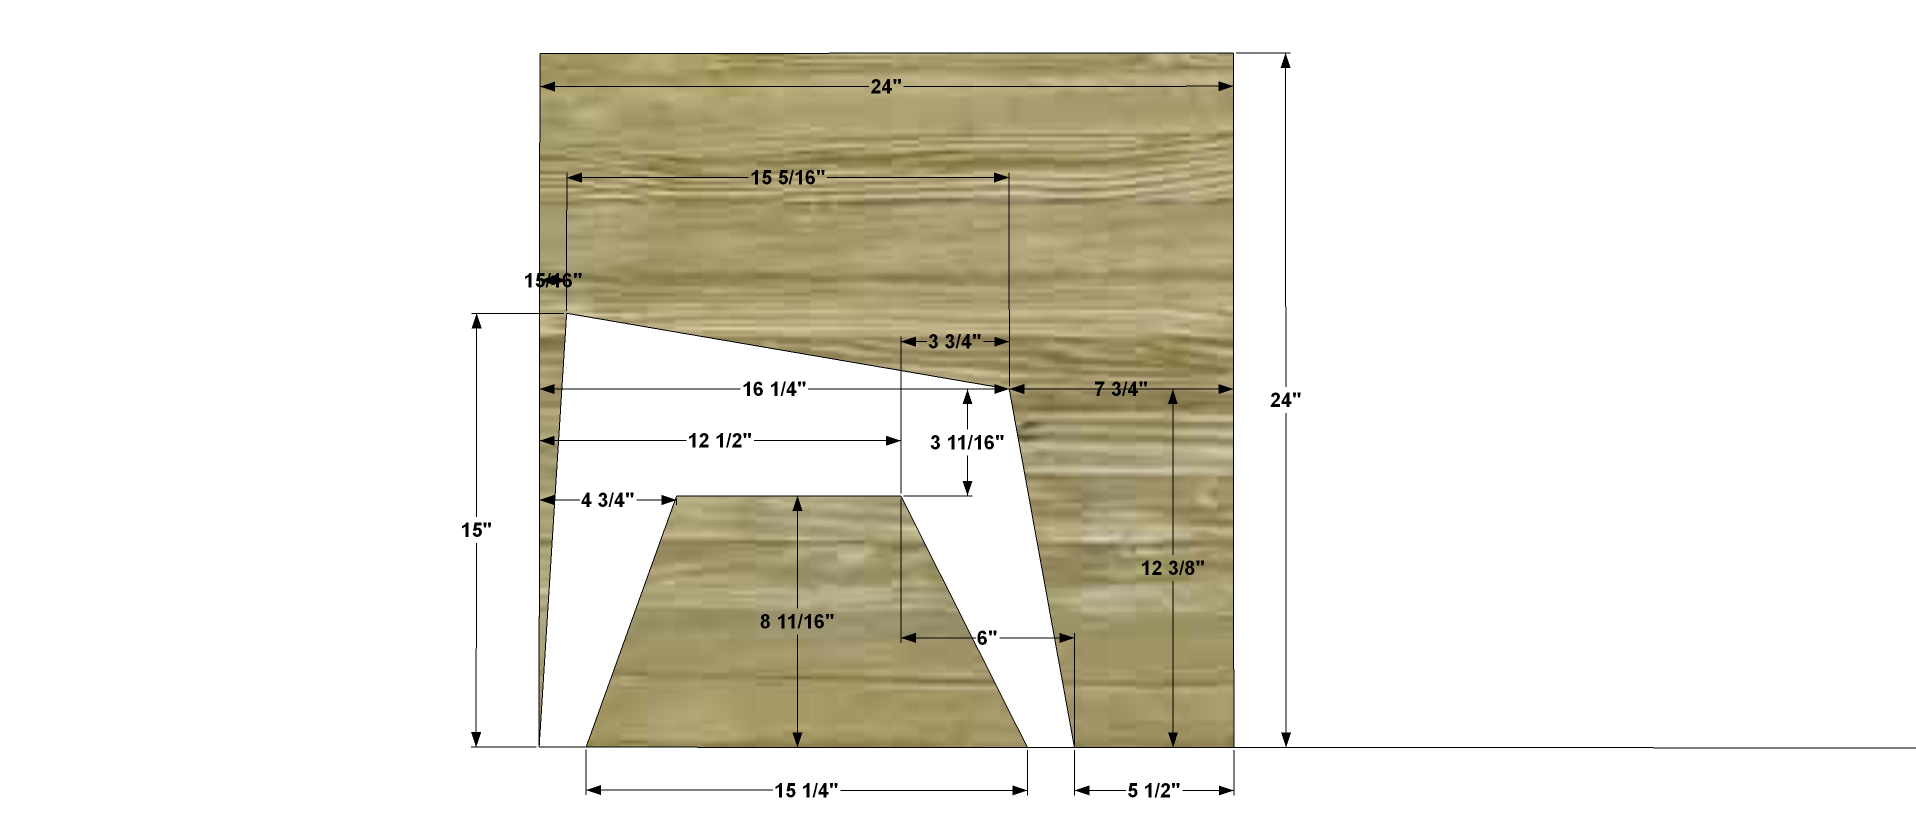
Cut Out your Legs: The first diagram shows you the lengths of each side you will cut and the actual dimensions of your leg unit. You will need two identical units like this that will mirror each other so you may want to flip your sheet to mark out the other panel. The image below shows you where these cuts sits relative to the edges of your plywood.
Cut Out your Legs: This is your guide for locating your leg panel. It helps you place your panel properly so you can get the correct angles without working overtime with fancy cuts and tools. Use a jigsaw or circular saw to cut this shape out of your plywood sheet. You will need two of these that mirror each other, so consider flipping your sheet over to place your second panel.
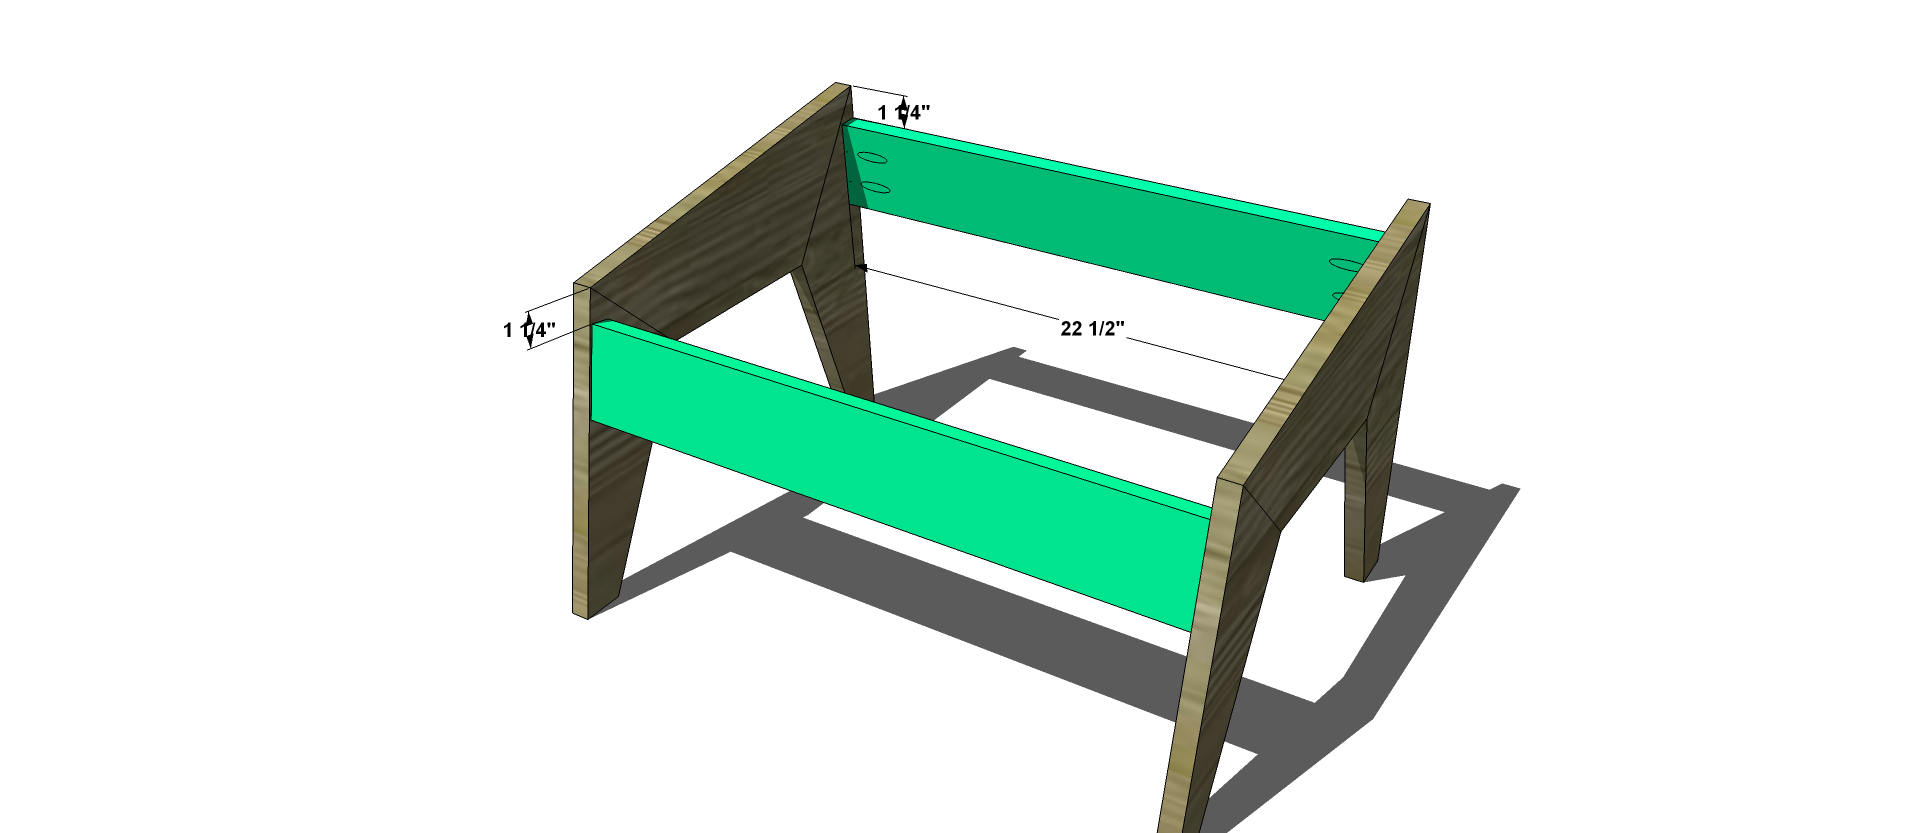
Attach the Ottoman Aprons: Using your Kreg Jig set for 3/4” stock and your 1 1/4” pocket hole screws and glue you will fasten the pieces together as shown below. The Aprons will be placed 1 1/4” from the top of the Front Edge and the Top of the Back edge.
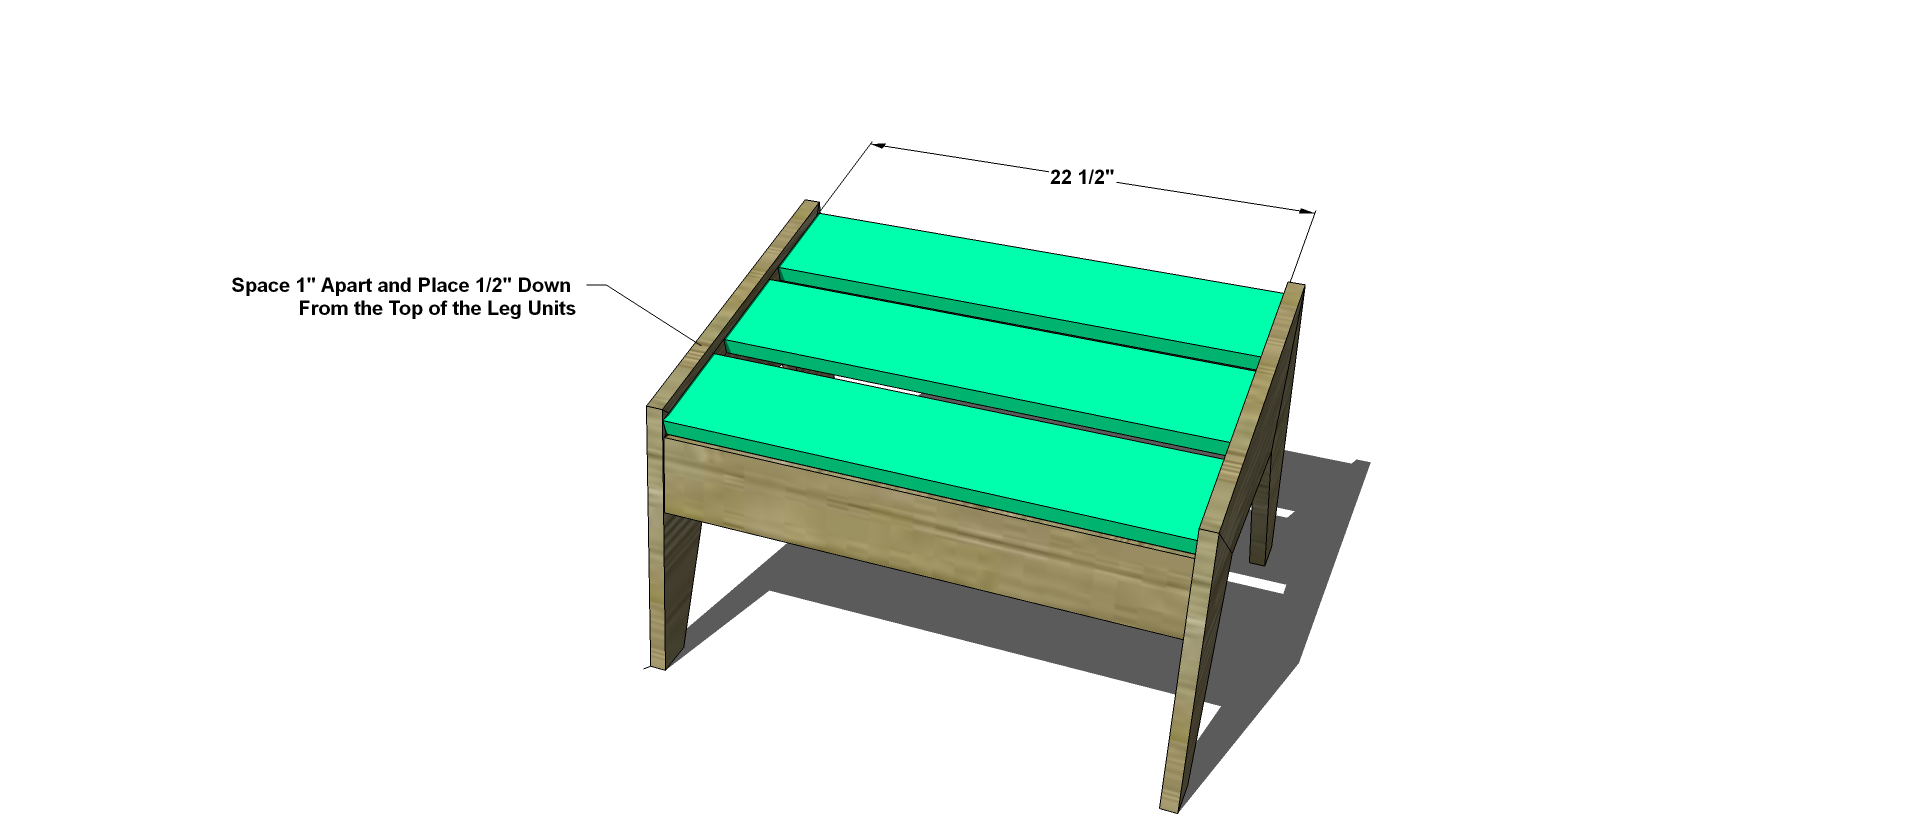
Rip your Slats down to Size: Beginning with a 1×6, you will rip your boards into a 4 1/2” width (shaving off 1” from the actual width of a 1×6) and then tack them down 1/2” from the Top Edge of the Top Leg, and space them 1” Apart. Use Galvanized Nails or Screws to Fasten in Place.
Fill any Screw, Nail or Pocket Holes, Sand and Finish as Desired. For Finishing Tips and Tricks visit my Finishing School
**Disclaimer: Some rights reserved. Private use only. Feel Free to link to any of my plans so long as you provide an adequate link back to the appropriate post! Plans from this page are not to be used for commercial purposes or republished without the express written consent of Rayan Turner, The Design Confidential I hope to provide accurate plans, however, I cannot guarantee each plan for accuracy. Not every plan that I post has been built and tested, so you are building at your own risk. It is recommended that you have a clear understanding of how the project works before beginning any project. Please contact me if you find an error or inaccuracy so that I might fix it.
DIY
This particular makeover has been a long time in the making, 3 years to be exact! To say that I am excited to finally have finished it, is an understatement. Elated is more like it! Can I get a yahoo? Yahoo!
Supplies required for your own Dandy Chandy Makeover:
-1 Brassy Retro Chandelier or a Builder Grade Chandelier (that happens to be what this particular specimen was)
–Krylon Spray Paint – I am using Satin Avocado for this much needed rehab.
I know many of you will know a thing or two about this type of light fixture seen below. Oh that fine brassy color, isn’t it fab? perhaps…but not in my particular home with my particular style, what can I say…
With a can of Krylon in my hot little hand, I headed out back with a plastic tarp in tow and got to work. This fixture only needed 2 very, very, thin coats of color for just the perfect finish. Whenever you are working with a metallic surface it is advisable that you consider a primer for flawless paint application, however my personal experience is that this makes the job a bit harder for me and occasionally results in a personal finishing mishap. So I just went for it, 2 very light coats, and 20 minutes or so of drying time = the fastest dandy chandy makeover ever!
The finish is ideal because with a Satin level of gloss, I have just the perfect amount of sheen, keeping it from appearing too chalky and yet allowing it to shine (no pun intended) just a bit while still having a much more modern style about it.
Isn’t she a beauty? Pop those candle covers back on, and all that’s left is to hang this baby up and let there be light! I’m afraid that is a whole tutorial in and of itself…but I feel moderately confident I won’t die in the process. I will keep you posted! Stay tuned for an update on that and a final reveal of this fine friend in it’s surprise location (surprise because I haven’t quite decided yet! haha)
Take a peak around your home, seek out those standard builder grade pieces, and breath a little new life into them. Take a risk, and buy stock on spray paint, it’s a DIY’ers greatest weapon!
Plans
This is perhaps one of the most exciting pieces in our Chesapeake Collection. The inspiration piece retails for more than $1000, the cost to build this…around $40! This project will be a tad tedious with the cutting and joining, but the savings, and the style it has…amazing! I hope you like this, I know I do! I am fairly certain I need this, and also fairly certain that I say that for every new plan! ha
Tools
- Tape Measure
- Sander
- Drill
- Kreg Jig
- Jig Saw – to notch out the corners of each shelf.
- Saw – if you prefer to have your lumber supply cut your boards then you can make do without this.
- Finish nail gun – optional and you can use screws or a finish nail set, but that is not necessarily preferable.
Lumber
- 2 – 2×2 at 8’
- 1 – 1×2 at 8’
- 1 – 1×2 at 10’
- 1 – 1×3 at 6’
- 20 – 1×3 at 8’
- 1/2 Sheet of 1/4” Ply at 4’x4’
Materials
- 1 1/4″ Pocket Hole Screws
- 1 1/4” Finish Nails
- 2 Door Handles
- 2 pair – Hinges
- Wood Glue
- Wood Filler
- Sanding Supplies
- Finishing Supplies
Cut List
- 4 – 2×2 at 35 1/4″ Legs
- 4 – 1×2 at 16 3/4″ Top and Bottom Rails Side Panels
- 3 – 1×2 at 45 3/4” Rails and Front Trim
- 12 – 1×3 at 27 3/4” Side Panel Boards
- 6 – 1×3 at 45 3/4” Shelf Rails
- 51 – 1×3 at 13 3/16” Shelves
- 2 – 1×3 at 52” Top
- 19 – 1×3 at 16 5/8” Top
- 1- 1/4″ Plywood at 45 3/4″x28 1/2″ Back Panel
Instructions
Before beginning to build, always check in on my site to make sure you have the most up to date set of plans, I occasionally update and change the plans to make the building process easier or to allow for less expensive purchasing of materials! Read through the entire set of instructions and all comments before beginning this project. If you print out or save plans, be sure to check in on my site to be sure you have the most up to date set of plans, as I occasionally update things for ease of building or buying. If you are new to building, read through the GETTING STARTED section and other articles found under the BUILD tab in the menu on my site, it has valuable information about how to get started, tools and techniques. If you are unfamiliar with the finishing process, visit my Finishing school for some tips and tricks for painting like a pro and for special finishing practices. Use glue to secure your joints and Consider Painting or Staining individual sections prior to assembling. This makes the paint application virtually flawless. Coat with a spray on Poly or Wipe on Poly to protect your finish and your piece and it will last for ages. Adhere to all safety standards and guidelines, and be sure you follow safety protocol throughout your build. If you are unsure about whether you are building safely, run a quick online search for the tool or technique you are using, or contact me via email or post to the forum before you move ahead. My contact info can be found in the menu of my site.
Step 1
Build your Side Panels: Join the Yellow Panel Boards to the Top and Bottom 1×2’s using your pocket hole system set for 3/4” stock and your 1 1/4” pocket hole screws and glue. Then Join the Top and Bottom 1×2’s (blue) to the Legs in the same manner. Center the Panels on the Legs leaving 3/8” on either side. Each of the Panel Boards will be 1/4” apart including a 1/4” space between the legs and the first panel boards (yellow) on the outside edges (both the front and the back sides, on both sides).
Step 2
Construct the Shelves: Use your pocket hole system (kreg jig) set for 3/4” stock and your 1 1/4” pocket hole screws and glue to attach each yellow panel board to the outside rails (blue) on the underneath side of the shelves. You will make a total of 3 shelves for this buffet. On the outside rails (blue) you will need to notch out a space that is 3/4” wide and 3/8” deep to accommodate the legs. The rails (blue) will sit 3/4” back from the front and back of the legs on both sides (this will leave space for the doors later). Attach each shelf to the Side Panels using your pocket hole screws and glue as shown below. You need to place the top shelf 8 7/8” down from the top of the legs and the bottom shelf needs to sit 5 1/4” from the ground, but the placement of the center shelf is entirely up to you and your needs. I have placed dimensions for the location of it, as I chose for this plan but you can alter this as needed for your particular needs.
Step 3
Fasten the Aprons and front trim in place: Use 1 1/4” pocket hole screws and glue to fasten the top 2 rails in place and for the bottom rail, align flush with the shelf and fasten using 1 1/4” finish nails and glue.
Step 4
Tack on the Back: you can use a sheet of 1/4” plywood as shown below, and fasten in place using your 1 1/4” finish nails and glue. You also have the option of constructing a back panel in the same manner as the sides, shelves, and top of this unit, using 1×3’s spaced 1/4” apart. I chose to skip this for the back simply because I was beginning to think it tedious to draw, which means it would be even more tedious to construct. So I leave this to you and your ambition!
Step 5
Construct the Top: If you want to secure this top down, you may, using finish nails. This will be constructed just as the sides, and shelves by spacing 1×3’s 1/4” apart and fastening to the outside boards using your 1 1/4” pocket hole screws and glue.
Construct the Doors: Yep, just like all of the other steps, join the horizontal boards to the outside boards using your 1 1/4” pocket hole screws and glue and then hang according to the instructions on the hinges you choose for this piece. The original appears to use standard butt hinges.
Finishing Instructions
Fill any Screw, Nail or Pocket Holes, Sand and Finish as Desired. For Finishing Tips and Tricks visit my Finishing School
**Disclaimer: Some rights reserved. Private use only. Feel Free to link to any of my plans so long as you provide an adequate link back to the appropriate post! Plans from this page are not to be used for commercial purposes or republished without the express written consent of Rayan Turner, The Design Confidential I hope to provide accurate plans, however, I cannot guarantee each plan for accuracy. Not every plan that I post has been built and tested, so you are building at your own risk. It is recommended that you have a clear understanding of how the project works before beginning any project. Please contact me if you find an error or inaccuracy so that I might fix it.
Plans
We have already covered plans for the table , found here, and the bench! We are moving right along to the Console today and for tomorrow…well you will just have to wait and see! Promise it’s one of the best yet… Outdoor Living here we come! Now if only I could Photoshop in some shade for my teeny tiny yard, we would be in business in a serious way!
This plan comes in at under $25! That makes me smile…hope you like that too! Who doesn’t like to save?
Tools
Tape Measure
Sander
Drill
Kreg Jig
Saw – Optional if you have your local lumber supply cut your boards.
Lumber
1 – 1×2 at 10’ or 2 at 6’ (purchase 2 – 8’ furring strips if your can, they are much cheaper and though you will have extra, you will save)
4 – 1×3 at 8’ (2 at 41” and 1 at 13 1/2” per board)
1 – 2×3 at 10’ or 2 at 6’
1 – 2×4 at 6’
2 – 2×4 at 8’
Materials
2 1/2” Pocket Hole Screws
1 1/4” Pocket Hole Screws
Wood Glue – needs to be suitable for outdoor use
Wood Filler – needs to be suitable for outdoor use
Sanding Supplies
Finishing Supplies – needs to be suitable for outdoor use
Cut List
4 – 2×3 at 28 1/2” Legs
2 – 2×4 at 48” Console Top
2 – 2×4 at 11 1/2” Console Top
3 – 2×4 at 41” Console Top
8 – 1×3 at 41” Aprons and Lower Shelf
4 – 1×3 at 13 1/2” Aprons and Lower Shelf
2 – 1×2 at 41” Lower Shelf Aprons
2 – 1×2 at 13 1/2” Lower Shelf Aprons
Instructions
If this will be for outdoor use, consider using a specie of wood that does well in an outdoor setting. Not required, but will make for a longer lasting piece that won’t need to be refinished or sealed as frequently. I have given you extra room for error when mitering the angles, just so you know.
Read through the entire set of instructions and all comments before beginning this project. If you print out or save plans, be sure to check in on my site to be sure you have the most up to date set of plans, as I occasionally update things for ease of building or buying. If you are new to building, read through the GETTING STARTED section and other articles found under the BUILD tab in the menu on my site, it has valuable information about how to get started, tools and techniques. If you are unfamiliar with the finishing process, visit my Finishing school for some tips and tricks for painting like a pro and for special finishing practices.
Use glue to secure your joints and Consider Painting or Staining individual sections prior to assembling. This makes the paint application virtually flawless. Coat with a spray on Poly or Wipe on Poly to protect your finish and your piece and it will last for ages. Adhere to all safety standards and guidelines, and be sure you follow safety protocol throughout your build. If you are unsure about whether you are building safely, run a quick online search for the tool or technique you are using, or contact me via email or post to the forum before you move ahead. My contact info can be found in the menu of my site.
Step 1
Build your ConsoleTop: Join the Bread Boards to the Outside Boards and join the Center Boards to the Outer Bread Boards using your pocket hole system set for 1 1/2” stock and your 2 1/2” pocket hole screws and glue. Be sure to use glue that is applicable for outdoor projects. Space the Center Boards 1/4” apart.
Step 2
Attach the Aprons and Legs: Use your pocket hole system set for 1 1/2” stock and your 2 1/2” pocket hole screws and glue to attach the Legs to the Table Top. The Legs will sit 1” in from the edges on both front/back and sides. After you attach the Legs to the table top, attach the Aprons to the Legs and to the Table Top using your pocket hole system set for 3/4” stock and your 1 1/4” pocket hole screws and glue. The Aprons will sit flush with the inside of the legs on the front and back and will sit 3/4” in from the outside of the legs on the sides.
Step 3
Fasten the Lower Shelf in Place: You will Fasten the Outer Side Boards to the Legs using your pocket hole system set for 3/4” stock and your 1 1/4” pocket hole screws and glue and you will fasten your Center Boards for the Shelf to the Outer Boards leaving 1/4” spacing between them, using your pocket hole system set for 3/4” stock and your 1 1/4” pocket hole screws and glue. The Front and Back, outermost board will sit in 1/8” from the front/back edges of the legs and will attach with one pocket hole to the outer boards and one pocket hole attaching it to the Legs, as shown in the image below.
Step 4
Attach the Lower Shelf Aprons: Fasten to the legs using your pocket hole system set for 3/4” stock and your 1 1/4” pocket hole screws and glue. The aprons will provide a bit of support for the shelf, but are also for aesthetic purposes…in other words, they look good… The aprons will sit flush with the inside of the legs on the front and back and will sit in 3/4” from the outside of the legs on the sides.
Finishing Instructions
Fill and Screw, Nail or Pocket Holes, Sand and Finish as Desired. For Finishing Tips and Tricks visit my Finishing School, consider a water seal or outdoor appropriate sealant/finish if this will be used outside.
If you enjoyed this post, comment below, Share it or Like it, and subscribe to my feed to stay up to date!
You can now also:
Follow my blog with blog lovin!
**Disclaimer: Some rights reserved. Private use only. Plans from this page are not to be used for commercial purposes or republished without the express written consent of Rayan Turner, The Design Confidential I hope to provide accurate plans, however, I cannot guarantee each plan for accuracy. Not every plan that I post has been built and tested, so you are building at your own risk. It is recommended that you have a clear understanding of how the project works before beginning any project. Please contact me if you find an error or inaccuracy so that I might fix it.
Plans
This is hands down our most popular piece in the Provence Collection, and with good reason…. it’s gorgeous, and super budget friendly, while the original is super duper pricey! This plan is constructed in almost the same manner as the original plan posted for the 10’ Provence Beam Dining Table, only this plan uses 4×4 beams for many of the pieces rather than a double stacked 2×4 that my original plans use. This will increase the cost slightly for the materials as you will need to purchase more specialized hardware, in addition to the beams themselves, but the savings on the retail price of this table will still be in the thousands! Yes you will save thousands on this Knock-Off since it will cost you just over $100 to build and the original is $4000!
Below are the other plans for variations for this table and plans for the benches!
Free DIY Furniture Plans to Build PRovence Beam Benches
Free Furniture Plans to Build a Restoration Hardware Inspired 10′ Provence Beam Dining
Free DIY Furniture Plans to Build an 8′ Provence Beam Dining Table
As with all of our plans, you are building at your own risk and you should have a firm understanding of building in general before you attempt many of our plans (some are easy as pie and perfect for beginners). With that, go forth, have fun, take lots of pictures and share them in a showcase on the site or on social media with the hashtag #builtTDCtuff and we will share our faves! Be sure to tag @thedesignconfidential on Instagram / FB and @thedesconf on Twitter / Pinterest. If you are a blogger and you post about your build, don’t forget to include a link to your post on your showcase here. Don’t forget… for all of our newer plans, clicking on the images will let them expand to enormous sizes with much greater clarity. The older plans may need updating so please let us know if you need one fixed!
- 4 – 4×4 at 8’
- 6 – 2×4 at 8′
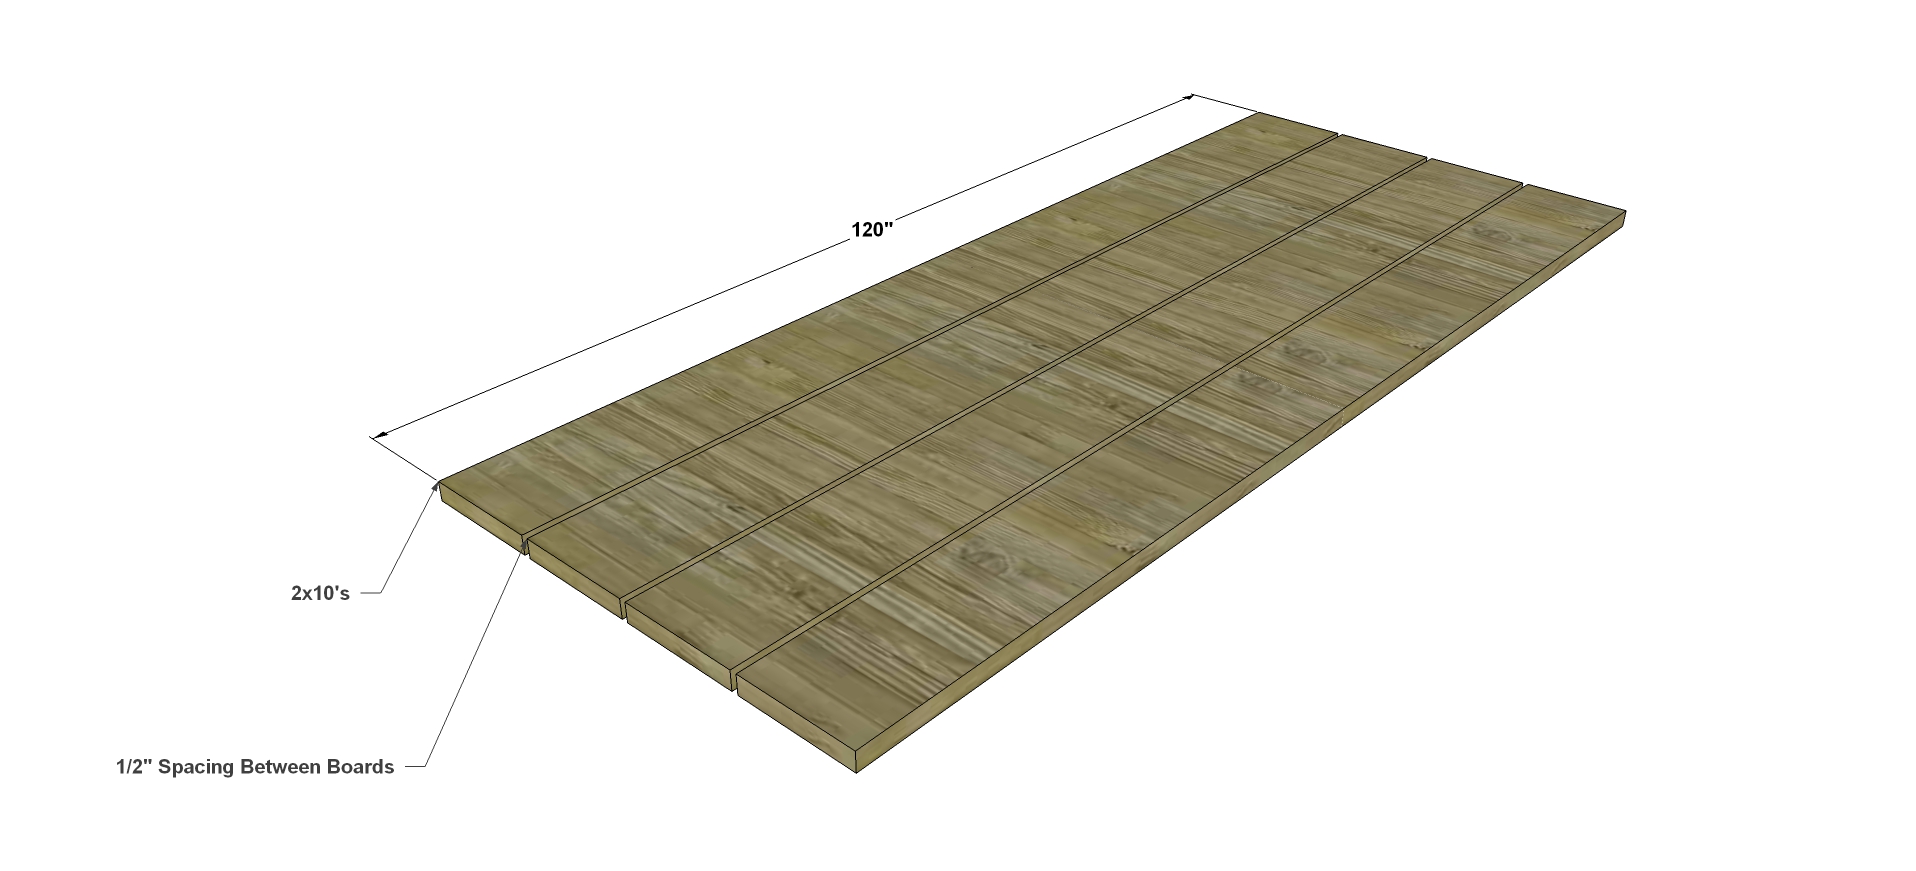
- 4 – 2×10 at 10’
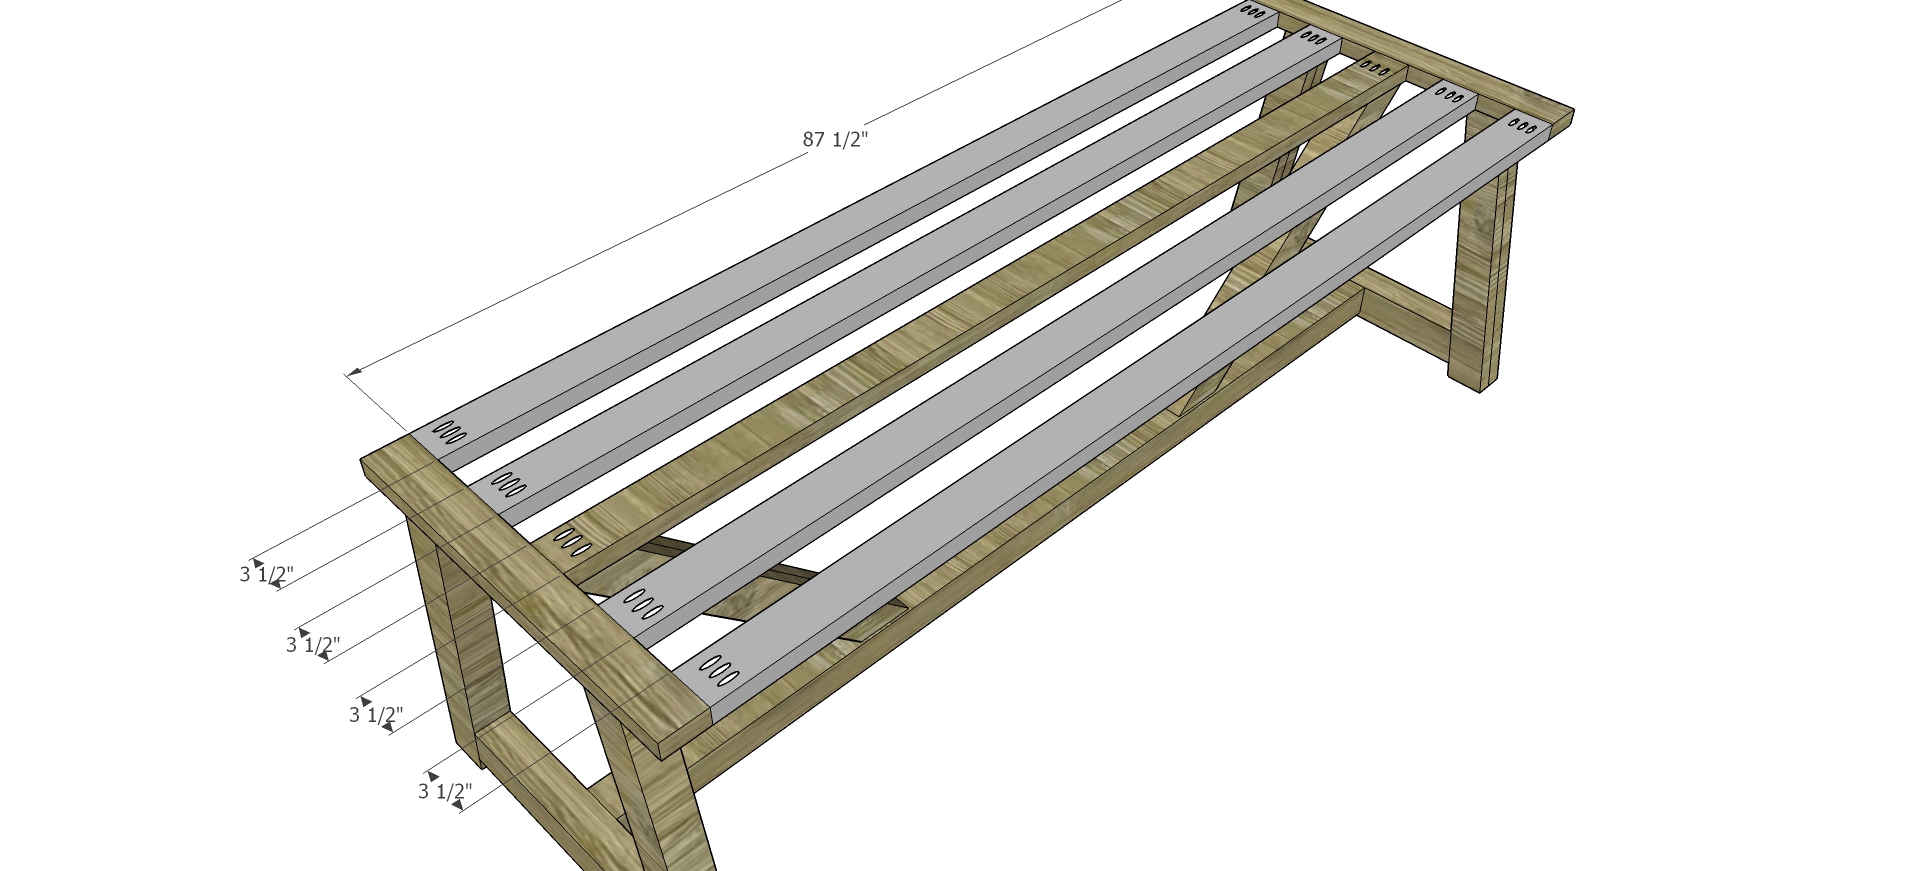
- 4 – 2×10 at 120” Table Top
- 4 – 4×4 at 27 7/16″ (Legs)
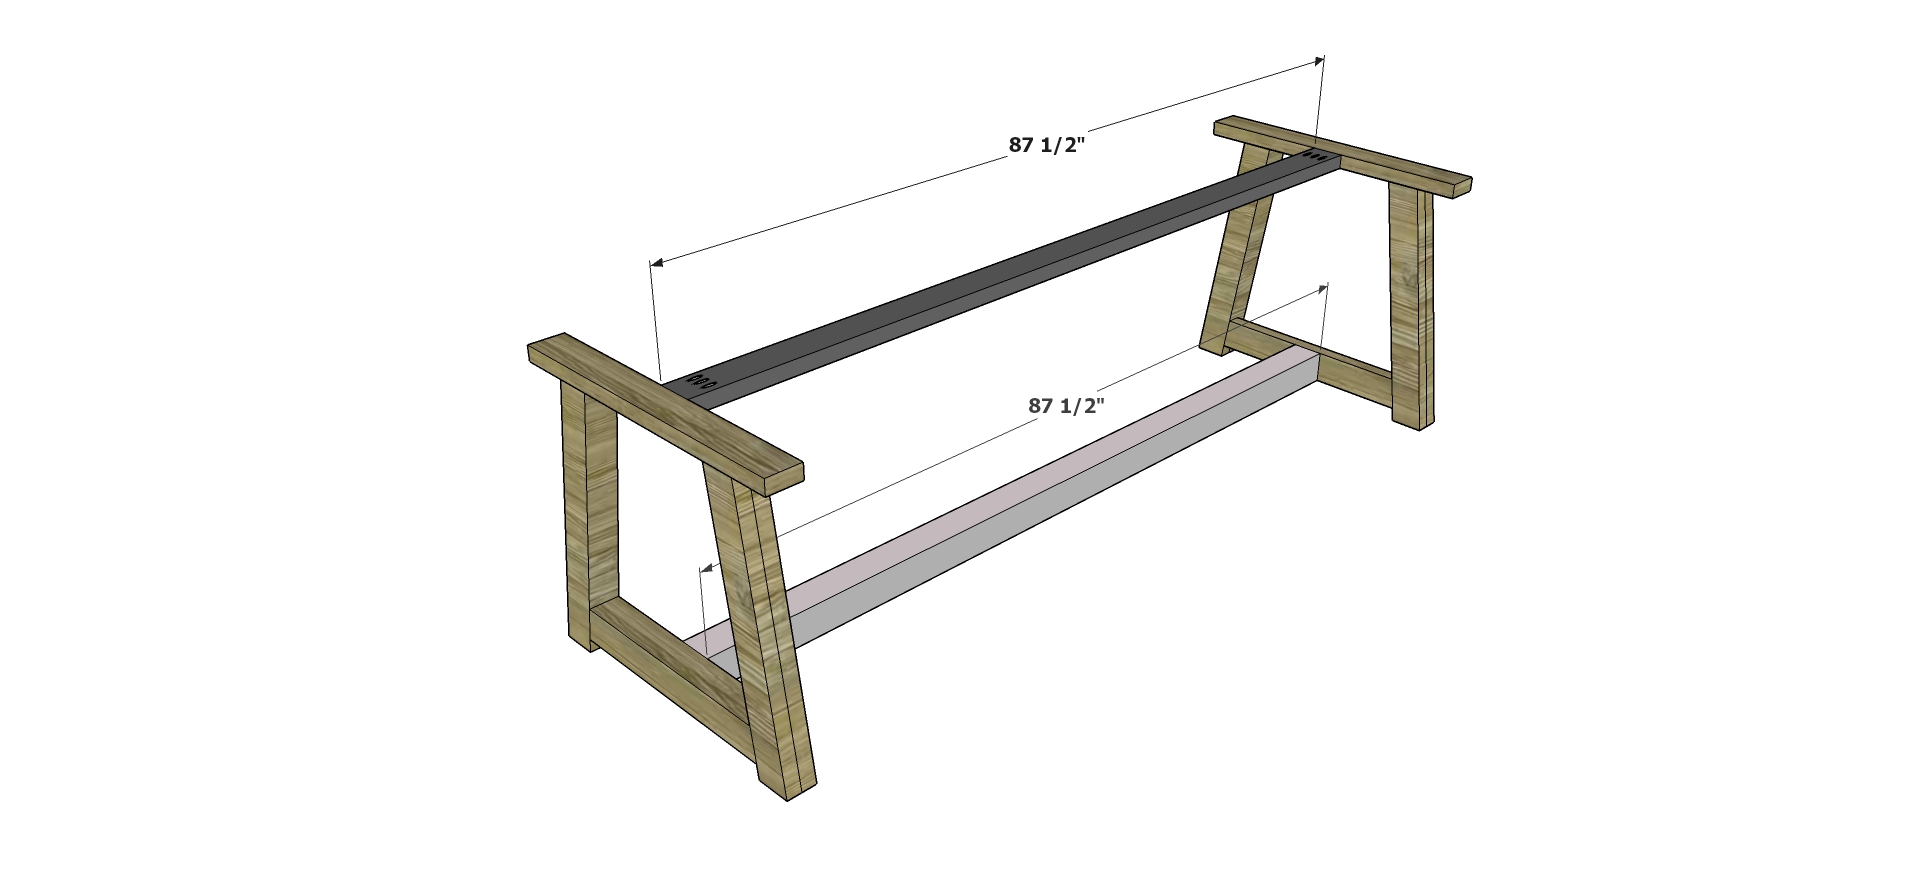
- 1 – 4×4 at 87 1/2″ Bottom Cross Beam
- 2 – 4×4 at 23 5/8″ Leg Stretchers
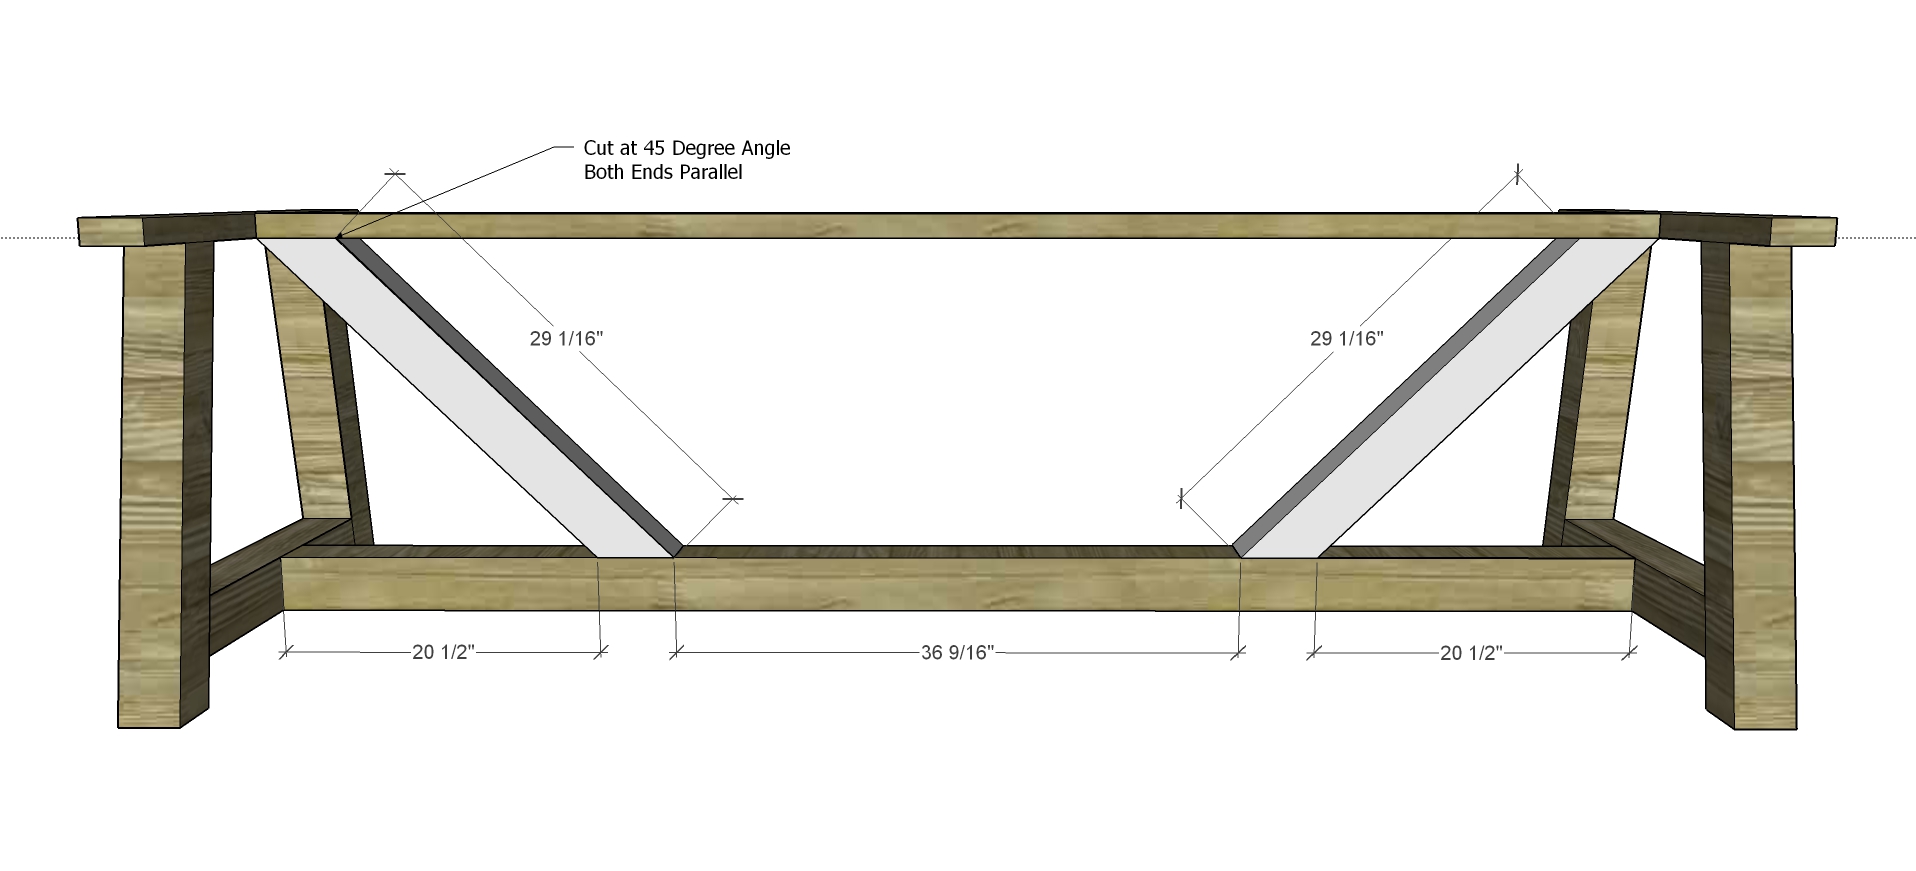
- 2 – 4×4 at 29 1/16″ Table Trusses
- 2 – 2×4 at 31 1/2” Top Supports
- 5 – 2×4 at 87 1/2″ Table Braces and Upper Cross Beams
** This table is ideal for use with reclaimed materials and it might save you a bit on cost if you decide to go that route. I would look at local ReStore locations and the like to find what you need!
**If this will be for outdoor use, consider using a species of wood that does well in an outdoor setting. Not required, but will make for a longer lasting piece that won’t need to be refinished or sealed as frequently Those options might include Cedar, Redwood, and Teak.
Before beginning to build, always check in on my site to make sure you have the most up to date set of plans, I occasionally update and change the plans to make the building process easier or to allow for less expensive purchasing of materials! Read through the entire set of instructions and all comments before beginning this project. If you print out or save plans, be sure to check in on my site to be sure you have the most up to date set of plans, as I occasionally update things for ease of building or buying. If you are new to building, read through the GETTING STARTED section and other articles found under the BUILD tab in the menu on my site, it has valuable information about how to get started, tools and techniques. If you are unfamiliar with the finishing process, visit my Finishing school for some tips and tricks for painting like a pro and for special finishing practices. Use glue to secure your joints and Consider Painting or Staining individual sections prior to assembling. This makes the paint application virtually flawless. Coat with a spray on Poly or Wipe on Poly to protect your finish and your piece and it will last for ages. Adhere to all safety standards and guidelines, and be sure you follow safety protocol throughout your build. If you are unsure about whether you are building safely, run a quick online search for the tool or technique you are using, or contact me via email or post to the forum before you move ahead. My contact info can be found in the menu of my site.
Build the Leg Bases: You will build 2 of these, exactly the same.
The Legs will be cut at a 10° Angle (off center) and since a 4×4 is square, you can miter or bevel at your choosing. The outside toe of each leg will be lined up with the outside of the Top Supports. To secure the legs to the Top Support, use your 3” screws to secure down through the Top Supports and into each leg with 4 screws per leg. Be sure to countersink so there isn’t an issue with the additional pieces in the table frame laying flat. For securing the leg supports, use your 5″ lag screws. I would secure with 3 lag screws per leg in a triangular pattern.
Cut the Pieces for the Table Top: it will be comprised of 4 – 2×10′s spaced 1/2″ apart for proper water run off if for outdoor use (not necessary if for indoor use or dry climate)
Fasten the Center Braces (Top and Bottom): Use your 5” lag screws to secure the Bottom Brace to the Leg Stretchers. Use your 2 1/2″ pocket hole screws to secure your Top Brace to the Top Support.
Cut and Fasten the Table Trusses. These will sit at a 45° Angle and will be cut at a 45° Angle . Secure to the Top Center Brace using 3” wood screws in the same manner you secured the top Support in Step 1. Use 5” Lag screws to secure to the Bottom Cross Beams.
Build out the remainder of the Frame: Use your Kreg Jig on a 1 1/2″ stock setting and your 2 1/2” pocket hole screws and glue, and fasten the remaining 4 cross beams.
Attach your Table Top Boards: Use 2 1/2″ Wood Screws and secure from underneath and up through the Cross Beams and Top Supports
Fill any Screw, Nail or Pocket Holes, Sand and Finish as Desired. For Finishing Tips and Tricks visit my Finishing School
**Disclaimer: Some rights reserved. Private use only. Feel Free to link to any of my plans so long as you provide an adequate link back to the appropriate post! Plans from this page are not to be used for commercial purposes or republished without the express written consent of Rayan Turner, The Design Confidential I hope to provide accurate plans, however, I cannot guarantee each plan for accuracy. Not every plan that I post has been built and tested, so you are building at your own risk. It is recommended that you have a clear understanding of how the project works before beginning any project. Please contact me if you find an error or inaccuracy so that I might fix it.
Plans
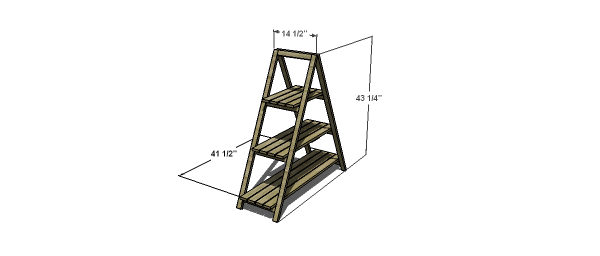
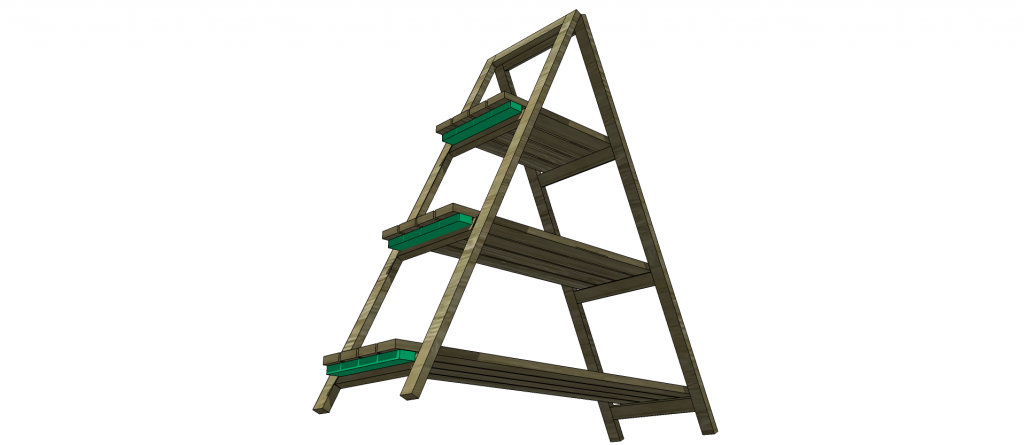
Need extra square footage for growing or displaying plants? Me too… This A-Frame Plant Stand is the perfect solution, providing angled display for optimum sun absorption on every level, spaced boards for water runoff, and perhaps even cascade watering, if you are strategic about it. Talk about maximizing your output and making the most out of every bit of sunshine and drop of water possible. I also think this would be a fabulous storage or shelving solution for indoor use and for displaying items not so related to plants! Multi-functional and fabulous!
As with all of our plans, you are building at your own risk and you should have a firm understanding of building in general before you attempt many of our plans (some are easy as pie and perfect for beginners). With that, go forth, have fun, take lots of pictures and share them in a showcase on the site or on social media with the hashtag #builtTDCtuff and we will share our faves! Be sure to tag @thedesignconfidential on Instagram / FB and @thedesconf on Twitter / Pinterest. If you are a blogger and you post about your build, don’t forget to include a link to your post on your showcase here. Don’t forget… for all of our newer plans, clicking on the images will let them expand to enormous sizes with much greater clarity. The older plans may need updating so please let us know if you need one fixed!
- 2 – 1×2 at 8’ if you aren’t using runner boards (see below) these can be at 6’ instead, for a total of 4 – 1×2 at 6’
- 2 – 1×2 at 6’
- 1 – 1×3 at 6’
- 2 – 1×3 at 8’
- 1 – 1×3 at 10’
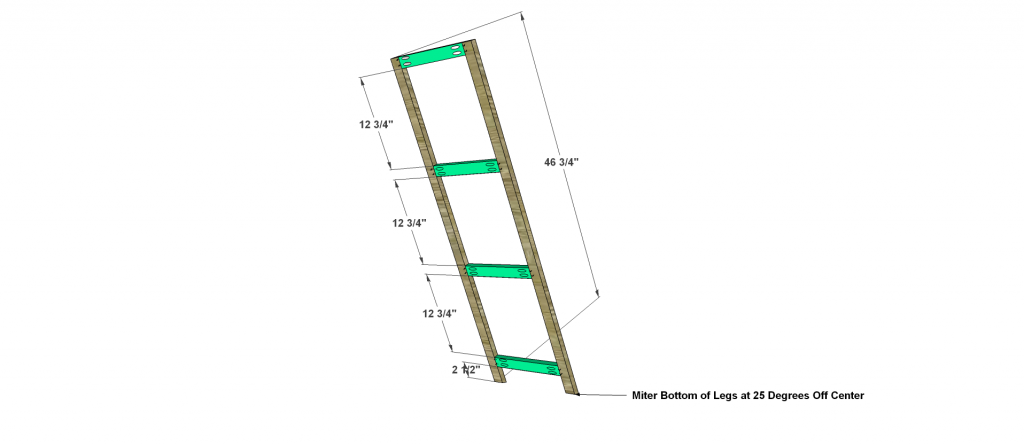
- 4 – 1×2 at 47 1/2” Legs
- 8 – 1×2 at 11 1/2” Rails
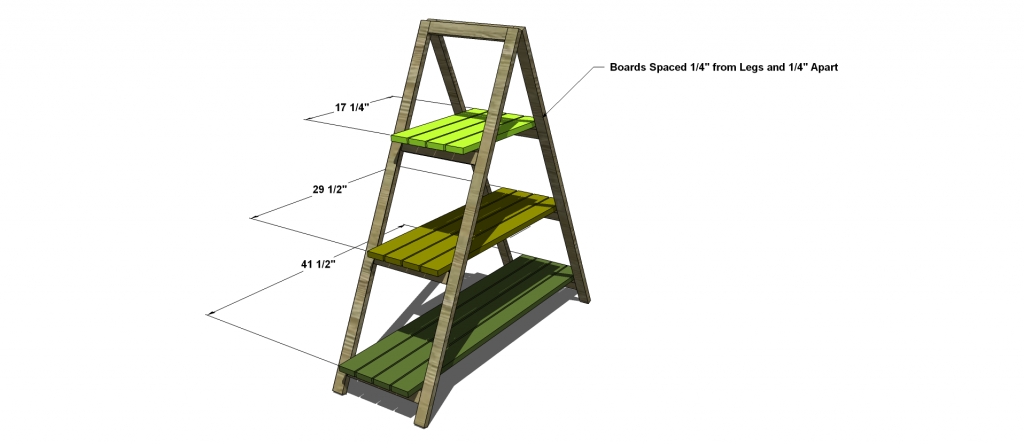
- 4 – 1×3 at 17 1/4” Top Shelf
- 4 – 1×3 at 29 1/2” Middle Shelf
- 4 – 1×3 at 41 1/2” Bottom Shelf
- **6 – 1×3 at 10 3/4” Runner Boards – optional for securing shelf boards together and allowing your unit to remain collapsible and easy to store
Before beginning to build, always check in on my site to make sure you have the most up to date set of plans, I occasionally update and change the plans to make the building process easier or to allow for less expensive purchasing of materials! Read through the entire set of instructions and all comments before beginning this project. If you print out or save plans, be sure to check in on my site to be sure you have the most up to date set of plans, as I occasionally update things for ease of building or buying. If you are new to building, read through the GETTING STARTED section and other articles found under the BUILD tab in the menu on my site, it has valuable information about how to get started, tools and techniques. If you are unfamiliar with the finishing process, visit my Finishing school for some tips and tricks for painting like a pro and for special finishing practices. Use glue to secure your joints and Consider Painting or Staining individual sections prior to assembling. This makes the paint application virtually flawless. Coat with a spray on Poly or Wipe on Poly to protect your finish and your piece and it will last for ages. Adhere to all safety standards and guidelines, and be sure you follow safety protocol throughout your build. If you are unsure about whether you are building safely, run a quick online search for the tool or technique you are using, or contact me via email or post to the forum before you move ahead. My contact info can be found in the menu of my site.
Build the Structure: You will need 2 of the units shown below, consider that the placement of screws/procket holes might be best left for the inside of each leg unit and so rather than making each unit a duplicate it is better to mirror them. This really only refers to the pocket hole placement once the bottom of the legs have been mitered. So, the easiest way to do this is to cut all 4 legs to size as listed in the Cut List above, then miter all 4 legs at 25 Degrees Off Center or From Center. Prior to Fastening the Rails in place, turn 2 of the legs around so that they look like an A-Frame Set of Legs. Easy Peasy… To fasten the rails in place, you are basically constructing a face frame with the horizontal rails connected to the Legs (stiles) through the use of your Kreg Jig set for 3/4” stock and your 1 1/4” pocket hole screws and glue (if you so choose).
Fasten Both Leg Units Together: You will use simple hinges for this and secure to the inside of the top of each leg unit. A Butt Hinge will do just fine and be simply to install.
Tack down the Shelves: Secure with 2” Screws to secure to the rails. The Outside Boards will sit 1/4” from the inside of the legs, and then each board will be spaced 1/4” from the next. This will allow for proper water drainage and run off. If you prefer for your plant stand to be portable or collapsible skip to the next step and do not secure your boards to the rails. , consider adding a runner board along the bottom edges of the shelf boards to keep it from opening farther than it should and to allow you to simply lift each shelf off and remove for storing.
Keep it Portable: Consider adding a runner board along the bottom edges of the shelf boards to keep the boards secure and keep the A-Frame from opening farther than it should. This will allow you to simply lift each shelf off and remove for storing.
Fill any Screw, Nail or Pocket Holes, Sand and Finish as Desired. For Finishing Tips and Tricks visit my Finishing School
**Disclaimer: Some rights reserved. Private use only. Feel Free to link to any of my plans so long as you provide an adequate link back to the appropriate post! Plans from this page are not to be used for commercial purposes or republished without the express written consent of Rayan Turner, The Design Confidential I hope to provide accurate plans, however, I cannot guarantee each plan for accuracy. Not every plan that I post has been built and tested, so you are building at your own risk. It is recommended that you have a clear understanding of how the project works before beginning any project. Please contact me if you find an error or inaccuracy so that I might fix it.
Plans
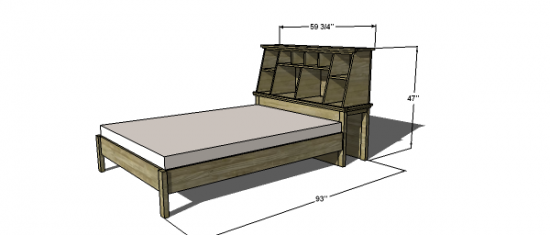
This piece completes our full sized bed unit for the Stuff your Stuff Collection! It works in conjunction with the Classic Bed we covered here, and the Headboard Base we covered here, and of course with the Trolley Storage Carts tucked in either end, this is the perfect storage/sleep solution! I am really excited about all of the storage and display possibilities for this collection! I hope you like it as much as I do!
As with all of our plans, you are building at your own risk and you should have a firm understanding of building in general before you attempt many of our plans (some are easy as pie and perfect for beginners). With that, go forth, have fun, take lots of pictures and share them in a showcase on the site or on social media with the hashtag #builtTDCtuff and we will share our faves! Be sure to tag @thedesignconfidential on Instagram / FB and @thedesconf on Twitter / Pinterest. If you are a blogger and you post about your build, don’t forget to include a link to your post on your showcase here. Don’t forget… for all of our newer plans, clicking on the images will let them expand to enormous sizes with much greater clarity. The older plans may need updating so please let us know if you need one fixed!
- 1 – 1×2 at 6’
- 1 – 1×2 at 8’
- 1 – 3/4”x3/4” Square Dowel or Trim at 5’
- 1 – 3/4”x3/4” Square Dowel or Trim at 2’
- 1 Sheet of 3/4” Ply or MDF
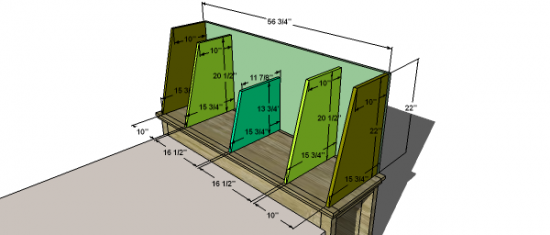
- 1 – 3/4” Ply at 22” x 56 3/4” Back Panel
- 2 – 3/4” Ply at 15 3/4” x 22” x 10” Outside Panels
- 2 –3/4” Ply at 15 3/4” x 20 1/2” x 10” Inside Panels
- 1 – 3/4” Ply at 15 3/4” x 13 3/4” x 11 7/8” Center Panel
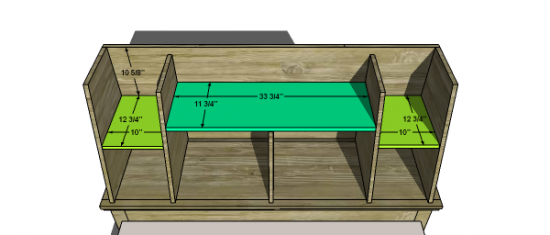
- 1 – 3/4” Ply at 33 3/4” x 11 3/4” Center Shelf
- 2 – 3/4” Ply at 10” x 12 3/4” Outside Shelves
- 3 – 3/4” Ply at 10” x 6” Middle Cubby Dividers
- 1 – 3/4” Ply at 56 3/4” x 10 3/4” Top
- 1 – 1×2 at 55 1/4” Front Rail
- 2 – 1×2 at 12 1/4” Top Side Trim
- 1 – 1×2 at 59 3/4” Top Front Trim
- 1 – 3/4” Square Dowel at 58 1/4” Front Square Trim
- 2 – 3/4” Square Dowel at 10 3/4” Side Square Trim
Before beginning to build, always check in on my site to make sure you have the most up to date set of plans, I occasionally update and change the plans to make the building process easier or to allow for less expensive purchasing of materials! Read through the entire set of instructions and all comments before beginning this project. If you print out or save plans, be sure to check in on my site to be sure you have the most up to date set of plans, as I occasionally update things for ease of building or buying. If you are new to building, read through the GETTING STARTED section and other articles found under the BUILD tab in the menu on my site, it has valuable information about how to get started, tools and techniques. If you are unfamiliar with the finishing process, visit my Finishing school for some tips and tricks for painting like a pro and for special finishing practices. Use glue to secure your joints and Consider Painting or Staining individual sections prior to assembling. This makes the paint application virtually flawless. Coat with a spray on Poly or Wipe on Poly to protect your finish and your piece and it will last for ages. Adhere to all safety standards and guidelines, and be sure you follow safety protocol throughout your build. If you are unsure about whether you are building safely, run a quick online search for the tool or technique you are using, or contact me via email or post to the forum before you move ahead. My contact info can be found in the menu of my site.
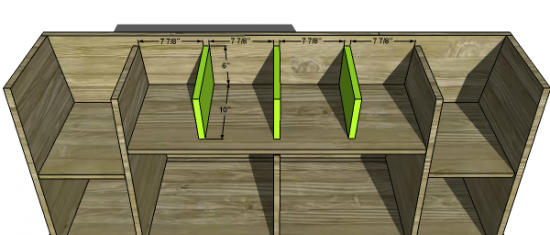
Build the Structure: You will cut 5 dividers in 3 different shapes/sizes. Note the bottom, top, and back measurement of each divider and connect the top and bottom measurement to get the angle. To Fasten to the back and the Headboard Base, you can use your Kreg Jig set for 3/4” stock and your 1 1/4” pocket hole screws and glue. I did not indicate pocket hole placement in the image below given how busy it would make the diagram, but you will want to place pocket holes along the back side of each divider and along the bottom edge as well. Place your pocket holes 2” from any edge and about 6” apart. Screw to the Top of the Base and to the Back Panel.
Add the Shelves: You can secure each shelf to the sides, dividers and back using your Kreg Jig set for 3/4” stock and your 1 1/4” pocket hole screws and glue, or you can tack the shelves in place using 2” wood screws or finish nails and glue. If you think the outside shelves will be susceptible to decent amount of weight, be sure to fasten them using screws (wood or pocket hole) since they don’t have a support divider as the middle shelf does.
Add the Dividers: Fasten in place using your Kreg Jig set for 3/4” stock and your 1 1/4” pocket hole screws and glue or your 1 1/4” finish nails and glue.
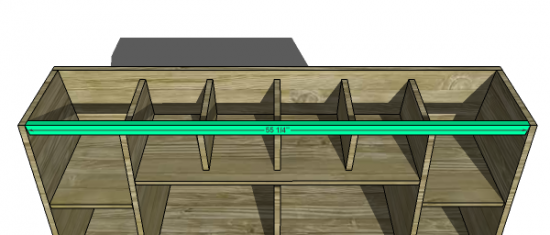
Add the Front Rail: Use your Kreg jig set for 3/4” stock and your 1 1/4” pocket hole screws and glue or 2” wood screws from the outside, or finish nails and glue.
Add the Square Trim: Use 1 1/4” Finish Nails and glue to secure in place.
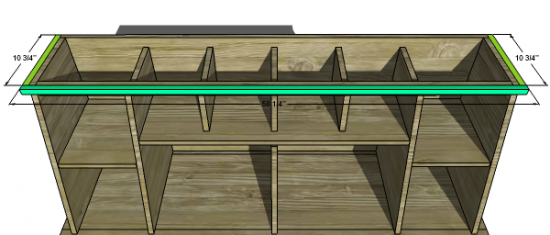
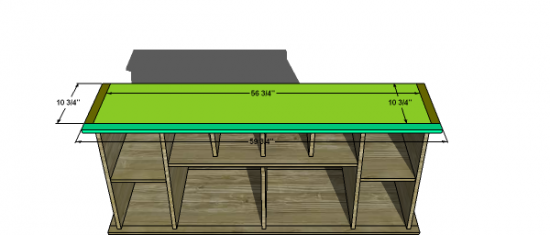
Construct the Top: Use your Kreg Jig set for 3/4” stock and your 1 1/4” pocket hole screws and glue to fasten the surrounding trim to the top (place your pocket holes on the under side of the top, on all 3 sides that will connect to the trim, then tack onto the unit using finish nails and glue.
Fill any Screw, Nail or Pocket Holes, Sand and Finish as Desired. For Finishing Tips and Tricks visit my Finishing School
**Disclaimer: Some rights reserved. Private use only. Feel Free to link to any of my plans so long as you provide an adequate link back to the appropriate post! Plans from this page are not to be used for commercial purposes or republished without the express written consent of Rayan Turner, The Design Confidential I hope to provide accurate plans, however, I cannot guarantee each plan for accuracy. Not every plan that I post has been built and tested, so you are building at your own risk. It is recommended that you have a clear understanding of how the project works before beginning any project. Please contact me if you find an error or inaccuracy so that I might fix it.
/ Affiliate links are used for tools and materials. The Design Confidential will earn a small commission for any items purchased using these links. Thank you for your support – every little bit counts!
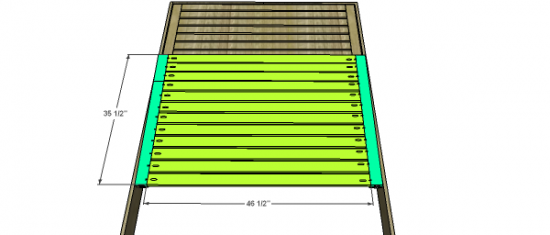
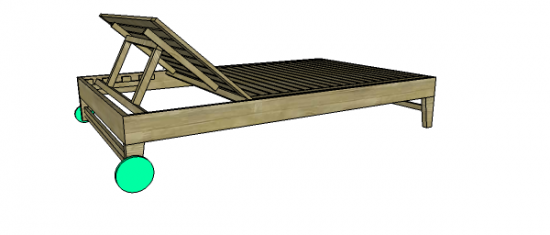
Plans
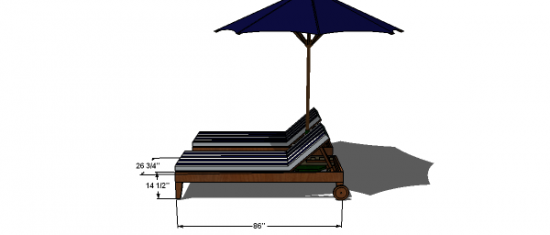
This piece continues our Chesapeake Collection and takes it to a whole new level! Yay for outdoor lounging! I need to get myself a bigger backyard so I can build myself a resort style outdoor room. The fabulous thing about this chaise lounge is that it is so beautiful, you can use it without a cushion if you prefer. I did construct it according to the Potterybarn dimensions so that their cushions and other standard lounge cushions will fit and work well.
If you prefer a chaise lounge that is twice the size, try our Free DIY Furniture Plans to Build a Chesapeake Double Lounger
- 6 – 1×2 at 8’
- 9 – 1×3 at 8’
- 2 – 1×6 at 10’
- 1 – 1×8 at 6’ – optional for wheels
- 1 – 2×2 at 8’
- 1 – 2×4 at 6’
- 1 – 3/4” Dowel at 3’
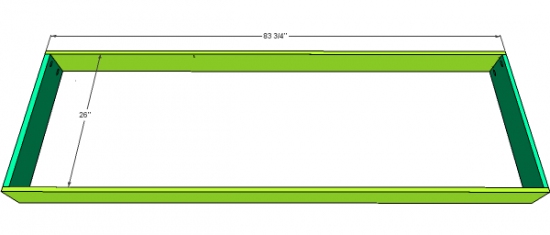
- 2 – 1×6 at 83 3/4″ Frame
- 2 – 1×6 at 26” Frame
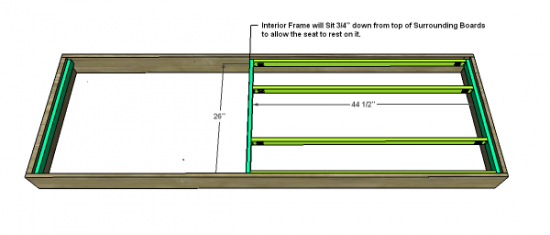
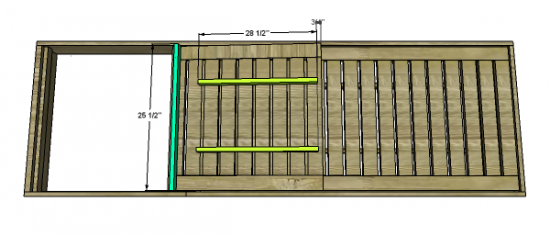
- 4 – 1×2 at 44 1/2” Interior Frame
- 3 – 1×2 at 26” Interior Frame
- 2 – 1×2 at 28 1/2” Vertical Back Rest Supports
- 1 – 1×2 at 25 1/2” Back Rest Support (Lower)
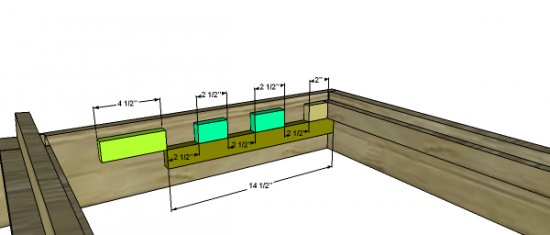
- 4 – 1×2 at 2 1/2” Back Rest Stops
- 2 – 1×2 at 2” Back Rest Stop
- 2 – 1×2 at 4 1/2” Back Rest Stop
- 2 – 1×2 at 14 1/2” Lower Back Rest Bar
- 2 – 1×2 at 24 1/2” Leg Stretchers
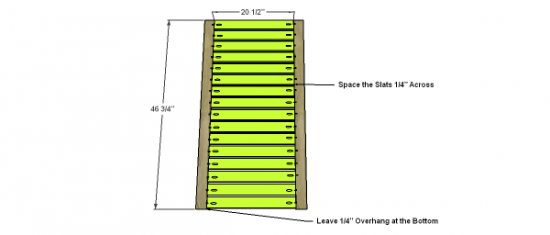
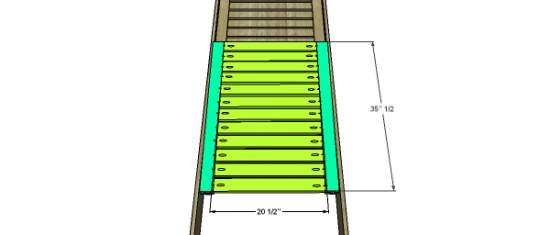
- 30 – 1×3 at 20 1/2” Seat Slats (Lower 17 and Back Rest Portion 13)
- 2 – 1×3 at 46 3/4” Seat Outside Runner Boards
- 2 – 1×3 at 35 1/2” Back Rest Outside Runner Boards
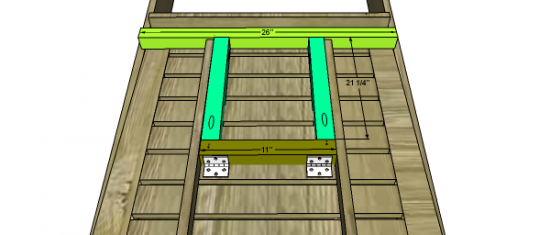
- 1 – 2×2 at 26” Back Rest Stand
- 1 – 2×2 at 11” Back Rest Stand
- 2 – 2×2 at 21 1/4” Back Rest Stand
- 2 – 2×4 at 9” Front Legs
- 2 – 2×4 at 7” Back Legs
This project has some options for the wheel section for you to decide on. You can opt to skip wheels altogether in which case you will make all 4 legs the same length and skip the last 2 steps in this post. You can also opt to either purchase wheels, or create your own wheels (I would recommend giving this a try) in which choice you will simply carve circular shapes from 3/4” stock and drill a hole halfway into the wheels in the center to hold the axel rod (dowel). Easy peasy… Consider using a specie of wood suitable for outdoor use such as cedar, redwood, teak, etc., and be sure you choose galvanized or coated hardware to avoid rust. Be sure you finishing materials and products are suitable for outdoor use as well. Read through the entire set of instructions and all comments before beginning this project. If you print out or save plans, be sure to check in on my site to be sure you have the most up to date set of plans, as I occasionally update things for ease of building or buying. If you are new to building, read through the GETTING STARTED section and other articles found under the BUILD tab in the menu on my site, it has valuable information about how to get started, tools and techniques. If you are unfamiliar with the finishing process, visit my Finishing school for some tips and tricks for painting like a pro and for special finishing practices. Use glue to secure your joints and Consider Painting or Staining individual sections prior to assembling. This makes the paint application virtually flawless. Coat with a spray on Poly or Wipe on Poly to protect your finish and your piece and it will last for ages. Adhere to all safety standards and guidelines, and be sure you follow safety protocol throughout your build. If you are unsure about whether you are building safely, run a quick online search for the tool or technique you are using, or contact me via email or post to the forum before you move ahead. My contact info can be found on the main page of my site.
Build the Frame: Use your Kreg Jigs® set for 3/4” stock and your 1 1/4” pocket hole screws and glue.
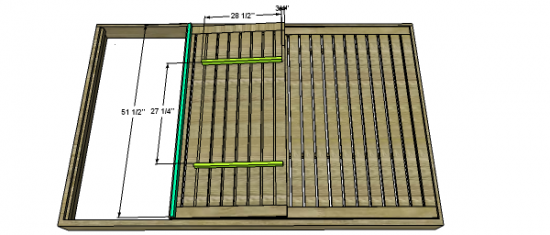
Add the Interior Frame: Build using your Kreg Jigs® set for 3/4” stock and your 1 1/4” pocket hole screws and glue, then fasten to the Frame using 1 1/4” Wood Screws and glue. Place the Interior Frame 3/4” from the top edge of the Frame to allow for the Seat Slats to rest flush in the next step.
Construct the Lower Seat: Fasten the Slats in place using your Kreg Jigs®set for 3/4” stock and your 1 1/4” pocket hole screws and glue to fasten the slats to the Outside Seat Boards. Leave 1/4” Overhang at one end of the Seat (the end that will sit in the center of the lounger and connect to the back rest).
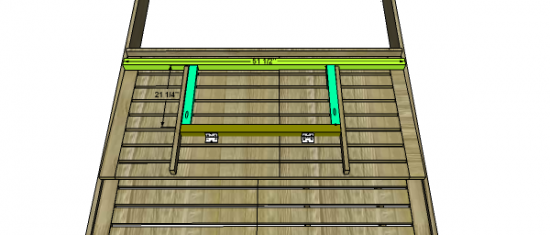
Construct the Back Rest: Use your Kreg Jigs®set for 3/4” stock and your 1 1/4” pocket hole screws and glue to construct the back rest portion of the seat, then attach to the Lower Seat using standard butt hinges.
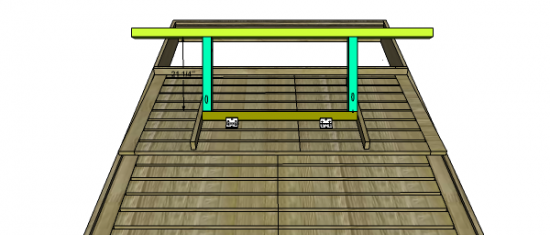
Add the Back Rest Supports: Use your Kreg Jigs®set for 3/4” stock and your 1 1/4” pocket hole screws and glue to attach your supports to the back rest. They will attach in a vertical position to the back rest and should be spaced 11 1/4” apart (yellow bars) to adequately allow for the back rest stand in the next step. The lower support (blue), will simply attach in the center of the lowest board to provide extra support for the back rest.
Construct the Back Rest Stand: Use your Kreg Jigs® set for 1 1/2” stock and your 2 1/2” pocket hole screws and glue to construct the stand. It will be something of a T Shape, only with 2 legs and a bottom, so not really a T Shape at all, but you get the point. Once you have fastened the stand together, attach it to the Back Rest using standard butt hinges as shown (it’s shown in an attached position, but please note that other than with the hinges, it doesn’t attach to the back rest itself, it needs to be able to move and rotate) .
Add the Back Rest Stops: Use your 1 1/4” Wood Screws and glue to fasten the 1×2 sections in place. You will place the stops 3/4” from the top edge just as you did with the interior frame, and each small section should be place about 2 1/2” from the next small section, but you are free to place these as you see fit for allowing the back rest to sit at comfortable positions in recline. Just be sure to allow for adequate space between the last stop (the 4 1/2” section in yellow) and the seat itself so that when the back rest is in the completely flat position there is plenty of room for the back rest stand to sit. The lower stop bar, will sit just below the actual back rest stops to act as a stop for the stops, so to speak, and will sit under the top bar of the interior frame and rest against the top portion of the frame itself.
Create the Legs and Attach them: To carve the shape for the legs, begin with a 2×4 and carve the curve from the top edge down to the location 2” in from the outside. The front and back legs will be different heights to allow for the wheels in the next steps. If you prefer to skip the wheels, you can make all 4 legs the same length and stop after this step! This is up to you.

Add the Axle: This is really simple and you will use a drill bit to create a hole in the back legs at the distance that equals the same distance as the bottom of your wheel to the axle hole (don’t forget the back wheels sit higher and don’t rest fully on the ground – factor this in!). The hole needs to be just slightly bigger in diameter than the axle you are using so a 3/4” bit should be perfect. You will need to cut your axle rod down to size. Do not glue the rod, simply insert and move the the next step.
Add the Wheels: Slide the wheels onto the outside of the axel. Measure the length your rubber stoppers will sit on your rod by placing them on the ends of your rod and marking off at the bottom edge. Measure this distance and cut your axel to size considering the following things it needs to account for: Your axel rod length will equal the distance between the legs, through the legs, through the wheels and then you will want to leave enough axel rod to go inside your rubber stoppers (all the way into the stopper). You can place a bit of epoxy on the edge of your rod to secure the stopper or simply leave as is.
Finishing Instructions
Fill any Screw Holes, Sand and Finish as Desired!
If you enjoyed this post, comment below, Share it or Like it, and subscribe to my feed to stay up to date! You can now also: Follow my blog with blog lovin!
**Disclaimer: Some rights reserved. Private use only. Plans from this page are not to be used for commercial purposes or republished without the express consent of Rayan Turner, The Design Confidential. I hope to provide accurate plans, however, I cannot guarantee each plan for accuracy. Not every plan that I post has been built and tested, so you are building at your own risk. It is recommended that you have a clear understanding of how the project works before beginning any project. Please contact me if you find an error or inaccuracy so that I might fix it.
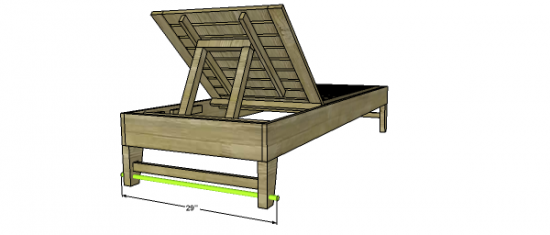
Plans
This piece continues kicks off what promises to be a VERY exciting new collection, the Shabby Chic Cottage Collection! I know you all adore Gina’s Site, and for those of you who aren’t familiar with her, you should head over and check things out, I promise you will enjoy! She has built some amazing pieces for her home that we will be creating step by step plans for, so that all of you might build them for yourselves! Exciting right? This first project is for the dining chairs she and her hubs built, based on our Louis Chairs and our Farmhouse Chairs, and so we have what is now our Shabby Chic Cottage Dining Chair! Isn’t it amazing?
To see the finished build, head over here, and you can read about her build and see how amazing it looks. Be sure to read up and note the wood she chose to use, because her choices saved her a ton, and allowed her to build 8 chairs for around $25! Pretty major right? If you have the ability to purchase wood products in bulk and cut them down into the sizes you need, you definitely should, but just in case that isn’t an option I have designed this plan around typical dimensional lumber sizes! Something for everyone!
As with all of our plans, you are building at your own risk and you should have a firm understanding of building in general before you attempt many of our plans (some are easy as pie and perfect for beginners). With that, go forth, have fun, take lots of pictures and share them in a showcase on the site or on social media with the hashtag #builtTDCtuff and we will share our faves! Be sure to tag @thedesignconfidential on Instagram / FB and @thedesconf on Twitter / Pinterest. If you are a blogger and you post about your build, don’t forget to include a link to your post on your showcase here. Don’t forget… for all of our newer plans, clicking on the images will let them expand to enormous sizes with much greater clarity. The older plans may need updating so please let us know if you need one fixed!
- 1 – 1×2 at 10’ (if 8’ furring strips are cheaper, purchase 2 of those)
- 1 – 1×3 at 6’ 2 – 1×4 at 6’
- 1 – 2×2 at 10’ (if 8’ furring strips are cheaper, purchase 2 of those)
- 1 – 2×4 at 8’
- 2 – 2×2 at 18 1/4” Front Legs
- 2 – 2×2 at 16” Front and Back Aprons
- 2 – 2×2 at 15 1/4” Side Aprons
- 5 – 1×2 at 16” Kick Rests and Back Portion of Seat
- 1 – 1×4 at 16” Back Rest
- 5 – 1×4 at 20 1/2” Seat
- 1 – 1×3 at 16” Back Rest
- 2 – 2×4 at 39 1/4” Back Legs
Before beginning to build, always check in on my site to make sure you have the most up to date set of plans, I occasionally update and change the plans to make the building process easier or to allow for less expensive purchasing of materials! Read through the entire set of instructions and all comments before beginning this project. If you print out or save plans, be sure to check in on my site to be sure you have the most up to date set of plans, as I occasionally update things for ease of building or buying. If you are new to building, read through the GETTING STARTED section and other articles found under the BUILD tab in the menu on my site, it has valuable information about how to get started, tools and techniques. If you are unfamiliar with the finishing process, visit my Finishing school for some tips and tricks for painting like a pro and for special finishing practices. Use glue to secure your joints and Consider Painting or Staining individual sections prior to assembling. This makes the paint application virtually flawless. Coat with a spray on Poly or Wipe on Poly to protect your finish and your piece and it will last for ages. Adhere to all safety standards and guidelines, and be sure you follow safety protocol throughout your build. If you are unsure about whether you are building safely, run a quick online search for the tool or technique you are using, or contact me via email or post to the forum before you move ahead. My contact info can be found in the menu of my site.
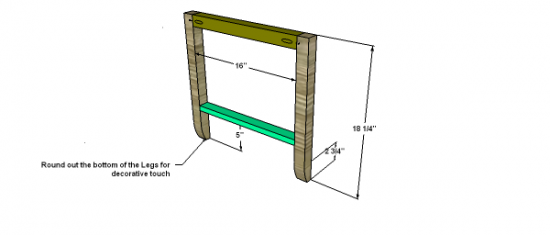
Build the Front Leg Unit: Use your Kreg Jigs® set for 1 1/2” stock and your 2 1/2” pocket hole screws and glue to attach the apron to the leg and then set for 3/4” stock and your 1 1/4” pocket hole screws and glue to fasten the kick rest in place. If you would like to round out the bottom of the front legs for a decorative touch, you can do so using your sander, a router, or even a jig saw.
Add the Side Aprons and Kick Rests: Attach the aprons using your Kreg Jig® set for 1 1/2” stock and your 2 1/2” pocket hole screws and glue, be sure to add your pocket holes for attaching the side aprons and kick rests to the back portion of the chair at this step as well, even though you aren’t attaching just yet. To fasten the side kick rests in place set your Kreg Jig® for 3/4” stock and use your 1 1/4” pocket hole screws and glue.
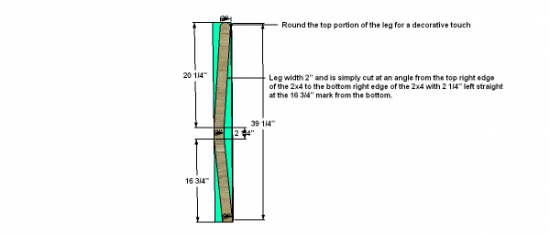
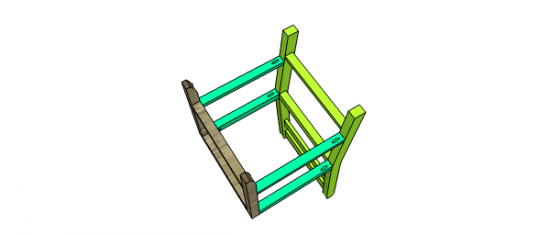
Cut out your Back Legs: This is often the portion of the chair build that SEEMS difficult, but I assure you this is very simple. You are going to mark out the basic shape on your 2×4. You will keep a 2” width all through the height of the leg and you will mark in 2” from the bottom right edge, then again at the 2” mark from the top right edge. You will then mark off the point 16 3/4” from the bottom left edge, and connect that mark with the 2” mark on the bottom right. You now have your bottom angle marked out. From the bottom right corner you will connect to the point measureed in 2” from the 16 3/4” mark. You now have the entire bottom of the leg lined out! To get the top portion of the leg marked out, you will measure up 2 1/4” from the 16 3/4” mark, then you will connect that point with the 2” mark you made on the top edge of your board. Then you will measure in 2” from the mark you made 2 1/4” up from the 16 3/4” mark and connect that with the very outermost corner of your board. That is that! Easy peasy, now you carve this using a jig saw, router or even a circular saw. To perfect both legs, simply clamp them together to sand out the shape so that you ensure they are both the same. It really only matters that you have the vertical portion of the leg (the 2 1/4” section) and that the legs are virtually identical, which you can ensure by sanding them clamped together at the same time. None of the other aspects of this step are as important as these two items. You can round out the top of both legs using your sander while the legs are clamped together (this is the easiest way in my opinion) for a decorative touch.
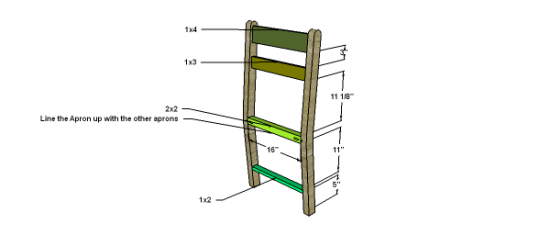
Fasten the Back Rest, Back Apron and Kick Rest in Place: Use your Kreg Jigs®set for 3/4” stock and your 1 1/4” pocket hole screws and glue to connect the back rest boards, and the kick rest. Then set your Kreg Jigs® for 1 1/2” stock and your 2 1/2” pocket hole screws and glue to connect the apron. It is important to be sure the apron is in line with the remaining aprons on the front unit as you will be supporting the seat with all four aprons.
Attach the Front and Back Portions: Use your Kreg Jigs®set for 3/4” stock and your 1 1/4” pocket hole screws and glue to attach your kick rests to the back and your Kreg Jigs®set for 1 1/2” stock and your 2 1/2” pocket hole screws and glue to attach the aprons to the back .
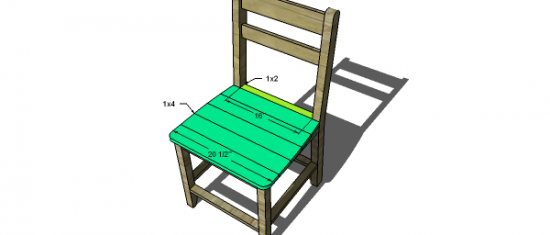
Construct the Seat: Use your Kreg Jigs® set for 3/4” stock and your 1 1/4” pocket hole screws and glue to construct the seat by fastening the boards together (underneath). You can see an example of this on Gina’s build here. Then you can fasten the entire seat to the aprons from underneath using 2” wood screws with a countersink bit and glue. Once you have the seat attached you can round out the front corners and the sides using your sander to create the approximate shape you see below. This is a matter of choice, and you can elect to shape this however you like. I personally love the rounded shape Gina chose for both style reasons and also for the overall functionality of the chair. A rounded out seat is less likely to be cumbersome in your living space! That is all she wrote! Isn’t this the most amazing chair? I am so glad Gina has built these and shared her work with us!
Fill any Screw, Nail or Pocket Holes, Sand and Finish as Desired. For Finishing Tips and Tricks visit my Finishing School
// Disclaimer: Some rights reserved. Private use only. Feel Free to link to any of my plans so long as you ONLY use 1 image and provide an ADEQUATE link back to the original source and appropriate plan! Plans from this page are not to be used for commercial purposes or republished without the express written consent of Rayan Turner, The Design Confidential. By accessing or using any part of the web site, you agree to become bound by the terms and conditions of this website as outlined under Terms of Use. If you do not agree to all the terms and conditions of this agreement, then you may not access the Website or use any services. The information contained in this website is for general information purposes only. The information is provided by The Design Confidential.com and while we endeavor to keep the information up to date and correct, we make no representations or warranties of any kind, express or implied, about the completeness, accuracy, reliability, suitability or availability with respect to the website or the information, products, services, or related graphics contained on the website for any purpose. Any reliance you place on such information is therefore strictly at your own risk. In no event will we be liable for any loss or damage including without limitation, indirect or consequential loss or damage, personal injury or death, or any loss or damage whatsoever arising from loss of information or profits arising out of, or in connection with, the use of this website. I hope to provide accurate plans, however, I cannot guarantee each plan for accuracy. Not every plan that I post has been built and tested, so you are building at your own risk. It is recommended that you have a clear understanding of how the project works before beginning any project. Please contact me if you find an error or inaccuracy so that I might fix it. The Design Confidential.com is inspired by but does not replicate exact designs, any similarities between these plans and items sold at specialty retailers is coincidental and not endorsed by or related to any said retailers. // Affiliate links are used for tools and materials. The Design Confidential will earn a small commission for any items purchased using these links. Thank you for your support – every little bit counts!
DIY / Entertaining
The countdown to Easter has begun…there is no time for bunny business, ya hear? If you plan to decorate this season for this fun and crafty holiday, why not give some bunny themed projects a try? I know my monster mash holds a special place in his heart for animals (and bugs, but we shall save THAT topic for another day!) and he would love nothing more than some softy bunnies abound!
Projects listed from Top to Bottom, Left to Right:
If you enjoyed this post PLEASE PIN IT! Definitely comment below, Share it or Like it, and subscribe to my feed to stay up to date!
You can now also: Follow my blog with blog lovin!
I would love for you to check out my other site: Handmade-Holiday! For all of your DIY Holiday Decor, Gifts, Parties, and More!


