This year has been downright insane. No joke, it has almost killed me off on more than one occasion, which is why you didn’t see my dream tree post go up last month. Insert sad face here. Normally when life gets crazy, which is usually this time of year, I want to hide in a hole and not come out until spring… but since that isn’t an option and never actually has been, getting my hands dirty and making a huge crafty mess is a decent substitute and just the medicine I need to calm the chaos and quiet the voices…
With a higher than average amount of holiday decorating that took place this year, I wanted to head in an entirely different direction with my own holiday decor. So, this became the year the kids got to help. Well, as much as a gal of my profession can handle their help before losing my mind. Why is it that I can’t let them do their thing and have a blast without mapping out how I can switch things up once they go to bed? I am sure some of you relate, but for those of you that don’t, I think the rest of us need an intervention. I had no problem letting them put their mark on making some ornaments, though, and my littlest bird loved helping make the balloon dogs and clay icicles. He also liked unraveling the yarn while I was trying to finger knit (not that easy, by the way – but also not super difficult) which was amazingly helpful, to be sure. My Blakey helped me cut out several of the moon circles, right up until he saw sheet after sheet of moon circles needing to be cut, and threw in the towel. It was also in that moment that I had the bright idea to let the Cricut machine do the heavy lifting. Duh…
As with the holiday decor I brought into my space way back in October, I brought pattern and color to my tree by printing my designs and cutting, folding and pasting them into and onto ornaments and blanks. It was the most satisfying group of ornaments and trimmings we have ever made. By we, I really just mean me and maybe the Bird, he sure did love working with the clay – and consequently smashing and killing the clay into an enormous mess. The day my boys don’t build, destroy and make the hugest mess ever will be a day for the record books indeed. All in the name of holiday spirit, amiright?
This year the holiday decor at Michael’s was pretty amazing – if you didn’t have a chance to see it, you should try to get yourself out to your local store and pick through the good stuff that remains – it is marked down up to 70% off for a limited time! They have really tuned in to the public-at-large and have a fabulous variety of some pretty rad pieces. When I saw the gold antler picks and faux antlers in their holiday florals… I did a big excited happy dance right in the middle of the store. Every year I have used antlers in my tree (at least 5 or more years now) they have been the real deal, and folks that makes them heavy, so incredibly heavy. Yahoo for fantastic holiday production! Don’t even get me started on all of the mirrored, modern, graphic text, and furry goodness that was plentifull. This ‘always pushing the envelope with abstract holiday trimmings’ gal is super appreciative.
Along with their specialty holiday decor du jour, I always bring in a healthy dose of floral and feathered finds as well, so these are a good investment for me anytime I can find them on sale. Plants and softy or sparkly pretties will never go out of style, so even if you change up your holiday decor every year, I imagine many of these items could be neutral tree trimming staples.
Unique or beautiful wired ribbon always needs a place on the tree and can be grounded in your gift wrap as well, if that’s your thing. I always stock up on this when I see something I love and I keep the sections I cut for the tree to use in the future. Ribbon is such an easy way to make a big impact without spending a small fortune.
I don’t typically bring red into my holiday decor or my home in large doses, so in true-to-me fashion, I painted the candy canes in camel colored leather. Of course by paint, I actually mean hot glued, but who doesn’t love a good romp with the old hot glue gun every now and then? I only take mine out of my craft supply closet once or twice a year, but each and every time I wonder why I don’t think of it more often. It really is the easiest way to secure things, more often than not.
GET THE LOOK // Stock up on these holiday decor items and handmade holiday supplies while they are on sale! You can use them year after year and they will always make your tree trimmings absolutely showstopping! Major markdowns at Michael’s (like 70% off!) through the 17th so don’t wait because the goods will get gone before you can kick yourself for not moving more quickly.
SHOP THIS POST //
This post was created in partnership with Michael’s and my role as a Michael’s Maker! Thank you for supporting the brands that help bring new ideas and projects to this site. As per the usual, all opinions and ideas are 100% my own!
This makeover has been a long time in the making… Two years in the making, if you want to know the truth. For those of you who wonder how the room makeovers of blogland come together so quickly, the answer is they generally don’t if there isn’t a reason for them to. My reasons for putting this project on the front burners after such a long while, are complex, but in part it has a lot to do with space. For those of you who have small bedroom spaces, you probably know what I mean, when I say that it has taken me two years of trying everything I can think of to avoid the fact that I must leave the idea of matching side-by-side beds behind, and move my boys into a bunk bed. Le Sigh… With the Bird being barely four, and something of a wild animal, this was not a decision I was eager to rush into. But with the holidays at our doorsteps and the impending doom of more stuff, just chomping at the bit to bring clutter and chaos into my home – it was time to bite the bullet and make some sweeping changes.
So I thought it was the perfect time to partner with Modern Masters to help bring my vision to life and give this room a little bit of something spectacular. I let go of one design dream and ushered in a clean and organized version of another that is even better than the original!
There will be a lot of details shared over the next couple of weeks and some super clever sources, but the wall treatment is definitely at the forefront and is without doubt the star of the show. Also this entire sitting area, because, duh – it didn’t exist before and is also something to celebrate!
I wanted to create a pattern on the walls that had a lot of movement, but would ultimately read as neutral and not busy… This is a hard concept to explain, but I know most of you get what I am trying to say! I came up with a cloud pattern that is more extreme at the lower portion of the wall, working up to a lighter pattern near the top. I used the Warm Silver Matte Metallic and used an empty marker pen to draw my clouds into reality. I honestly wasn’t sure how this would turn out, but it worked beautifully and is absolutely fantastic in real life. Just enough shimmer without a full-blown shine… you know, because this is a boys room after all, and while my boys adore shimmer and shine right now, I am not sure how it would age with them. The Matte Metallics are perfect for them and also happened to be kind on me since out here in California, we all have slightly textured walls.
It was tough to let go of my symmetrical dreams and move on to a more vertical arrangement for this room, but ultimately it is the only way I was able to regain wall and floor space. I can’t tell you how amazing it feels to have a place to sit in here with them, and room for them to play. If I am clever I may even find a way to work in a desk! No guarantees though… this room is teeny tiny. I can’t wait to show you the rest of the space – coming soon – I promise! And you guys… those curtains – they are the most divine things ever, aside from the wall treatment of course. For all of you who have rough and tumble boys in your lives, you will love them so much, true story!
I will be sharing the full tutorial for creating this wall treatment, later this week and it is so much easier than it appears. In fact I would even go so far as to say it was fun. So, if you would like to create something similar or your own version with a metallic paint, Modern Masters is currently offering a BOGO free deal through the end of the year! Two quarts is more than enough for any pattern you can imagine so be sure to stock up by stopping in to your local retailer and grabbing a quart or two of your faves… Of course you can also buy online through participating retailers and Modern Masters.
Go, buy and then come back here for the full set of instructions… I will see you soon!
A huge thank you to Modern Masters for partnering with me on this project. An even bigger thank you to all of you fine folks who help support the brands that help me bring you fresh new projects and content like this!
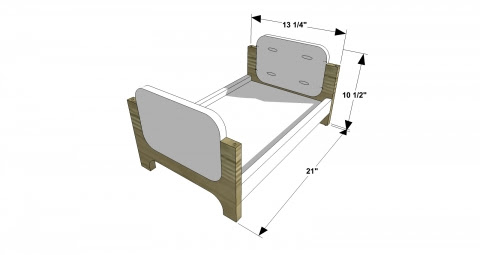
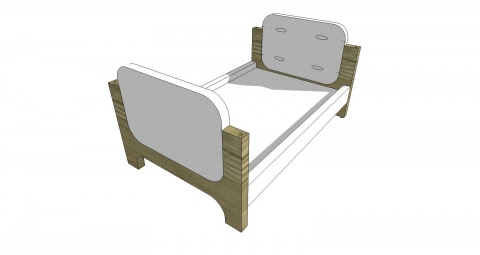
Looking for an easy build that will dazzle your little doll lovers? This Modern Doll Bed surely fits the bill! It has gorgeous modern lines and is ready for stacking into bunk beds! So, obviously, you must build two – go ahead, they are THAT easy to build – they will take you no time at all…
As with all of our plans, you are building at your own risk and you should have a firm understanding of building in general before you attempt many of our plans (some are easy as pie and perfect for beginners). With that, go forth, have fun, take lots of pictures and share them in a showcase on the site or on social media with the hashtag #builtTDCtuff and we will share our faves! Be sure to tag @thedesignconfidential on Instagram / FB and @thedesconf on Twitter / Pinterest. Don’t forget… for all of our newer plans, clicking on the images will let them expand to enormous sizes with much greater clarity. The older plans may need updating so please let us know if you need one fixed!
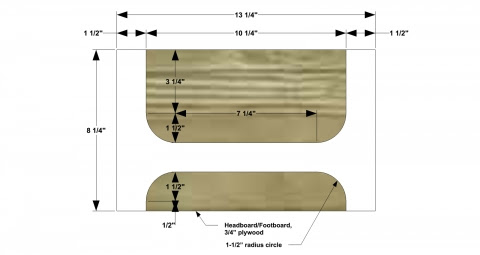
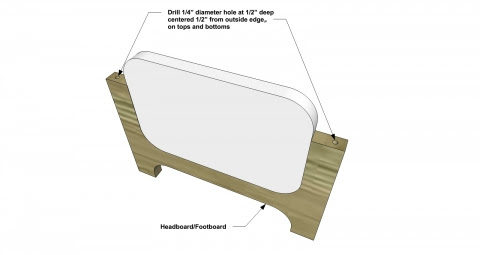
2 – 3/4” plywood at 13-1/4” x 8-1/4”– Headboard and Footboard
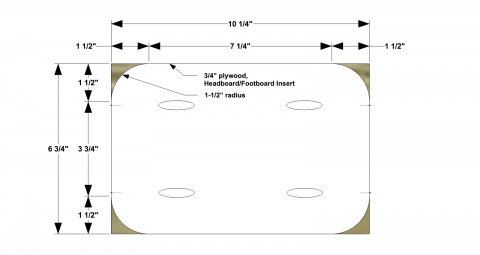
2 – 3/4” plywood at 10-1/4” x 6-3/4”– Headboard and Footboard Inserts
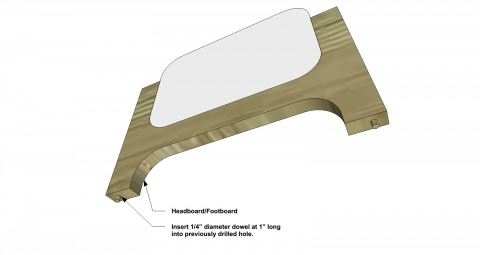
4 – 1/4” dowel at 1” – Dowel Inserts
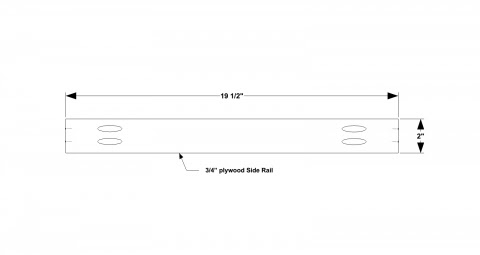
2 – 3/4” plywood at 19-1/2” x 2”– Side Rails
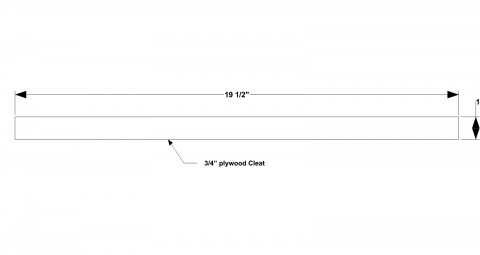
2 – 3/4” plywood at 19-1/2” x 1”– Cleats
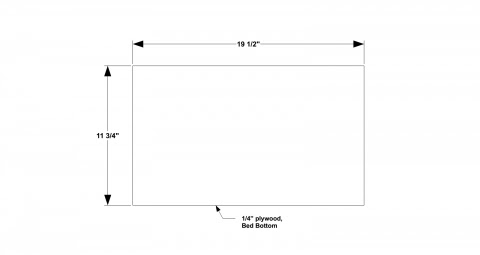
1 – 1/4” plywood at 19-1/2” x 11-3/4”– Bed Bottom
Before beginning to build, always check in on my site to make sure you have the most up to date set of plans, I occasionally update and change the plans to make the building process easier or to allow for less expensive purchasing of materials! Read through the entire set of instructions and all comments before beginning this project. If you print out or save plans, be sure to check in on my site to be sure you have the most up to date set of plans, as I occasionally update things for ease of building or buying. If you are new to building, read through the GETTING STARTED section and other articles found under the BUILD tab in the menu on my site, it has valuable information about how to get started, tools and techniques. If you are unfamiliar with the finishing process, visit my Finishing school for some tips and tricks for painting like a pro and for special finishing practices. Use glue to secure your joints and Consider Painting or Staining individual sections prior to assembling. This makes the paint application virtually flawless. Coat with a spray on Poly or Wipe on Poly to protect your finish and your piece and it will last for ages. Adhere to all safety standards and guidelines, and be sure you follow safety protocol throughout your build. If you are unsure about whether you are building safely, run a quick online search for the tool or technique you are using, or contact me via email or post to the forum before you move ahead. My contact info can be found in the menu of my site.
Cut the pieces for the Headboard and Footboard. Using your jigsaw, cut out the 1-1/2” rounded inner corners.
Cut the pieces for the Headboard and Footboard Inserts. Using your jigsaw, cut out the 1-1/2” rounded outer corners. With the Kreg jig set for 3/4” material, drill pocket holes in each end of the Headboard and Footboard Inserts.
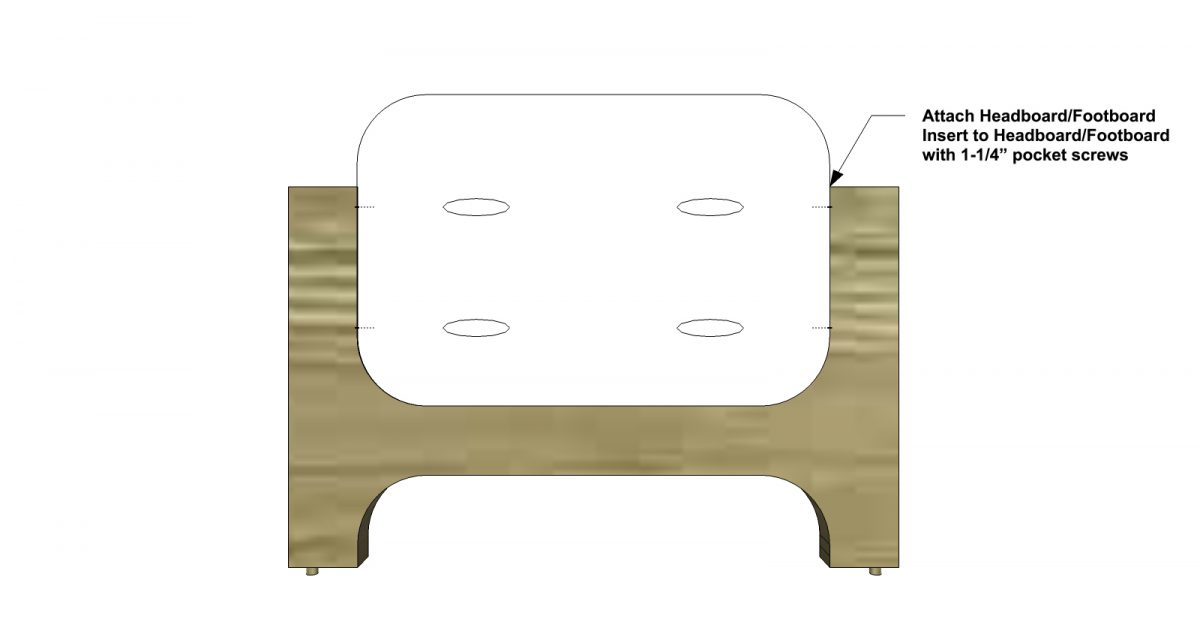
Drop one insert into each Headboard and Footboard. If the Inserts do not fit exactly, use a sander to shape. Assemble as shown with glue and 1-1/4” pocket screws. Use veneer edging to cover exposed edges of the plywood if desired.
At the tops and bottoms of the “legs” on each Headboard and Footboard, drill a 1/2” deep hole with a 1/4” drill bit as shown. You may need to wiggle the drill bit as you drill the hole to make it just a tiny bit larger than the 1/4” diameter. This will allow for easier installation of the Leg Dowels at the bottoms of the Headboard and Footboard and for stacking the doll bed as bunk beds.
Cut the pieces for the Leg Dowels. Drop a small amount of wood glue into the holes drilled at the bottoms of the Headboard and Footboard. Insert a 1” Leg Dowel into each hole. Make sure to clean any extra glue at the base of the dowels after they are inserted into the holes.
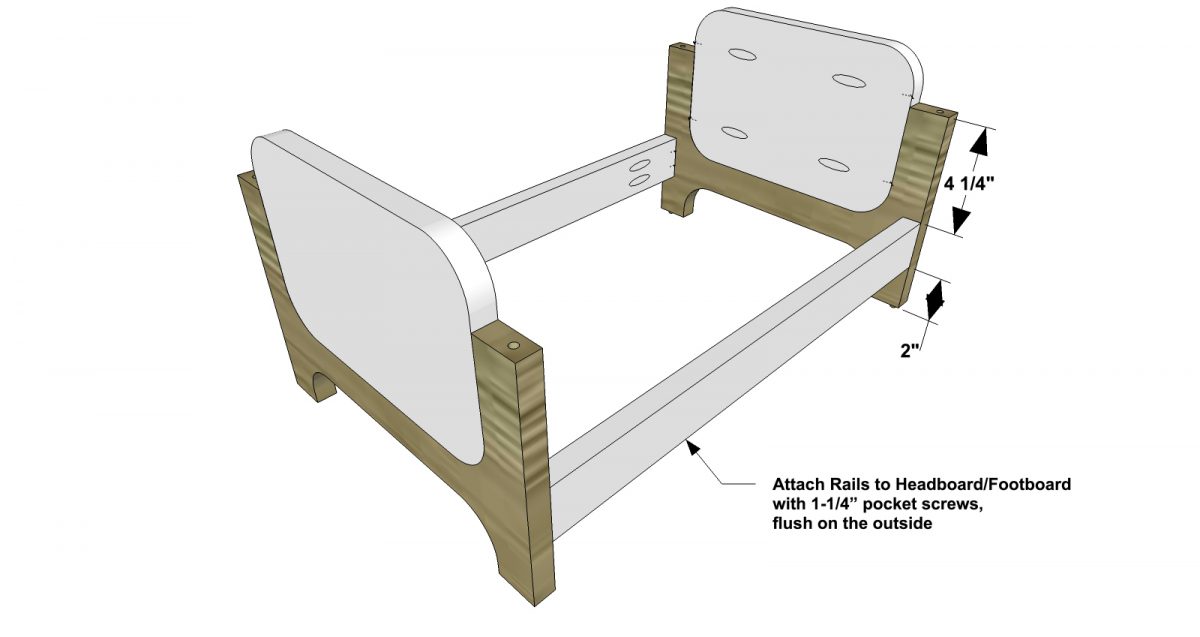
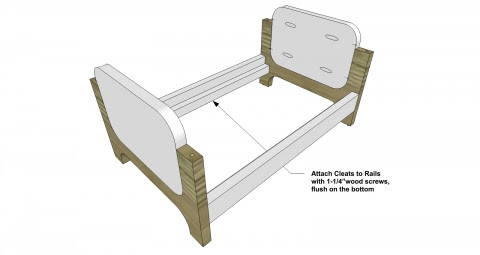
Cut the pieces for the Side Rails. With the Kreg jig set for 3/4” material, drill pocket holes at each end of the Side Rails. Position the Side Rails on the Headboard and Footboard as shown, flush on the outside of the Headboard and Footboards. Assemble with glue and 1-1/4” pocket screws. Use veneer edging to cover exposed edges of the plywood if desired.
Cut the pieces for the Cleats. Attach to the inside of the Side Rails, flush on the bottom with the Side Rails with 1-1/4” wood screws.
Cut the piece for the Bed Bottom. Place the Bed Bottom on top of the Cleats as shown.
Fill any Screw, Nail or Pocket Holes, Sand and Finish as Desired. For Finishing Tips and Tricks visit my Finishing School
// Disclaimer: Some rights reserved. Private use only. Feel Free to link to any of my plans so long as you ONLY use 1 image and provide an ADEQUATE link back to the original source and appropriate plan! Plans from this page are not to be used for commercial purposes or republished without the express written consent of Rayan Turner, The Design Confidential. By accessing or using any part of the web site, you agree to become bound by the terms and conditions of this website as outlined under Terms of Use. If you do not agree to all the terms and conditions of this agreement, then you may not access the Website or use any services. The information contained in this website is for general information purposes only. The information is provided by The Design Confidential.com and while we endeavor to keep the information up to date and correct, we make no representations or warranties of any kind, express or implied, about the completeness, accuracy, reliability, suitability or availability with respect to the website or the information, products, services, or related graphics contained on the website for any purpose. Any reliance you place on such information is therefore strictly at your own risk. In no event will we be liable for any loss or damage including without limitation, indirect or consequential loss or damage, personal injury or death, or any loss or damage whatsoever arising from loss of information or profits arising out of, or in connection with, the use of this website. I hope to provide accurate plans, however, I cannot guarantee each plan for accuracy. Not every plan that I post has been built and tested, so you are building at your own risk. It is recommended that you have a clear understanding of how the project works before beginning any project. Please contact me if you find an error or inaccuracy so that I might fix it. The Design Confidential.com is inspired by but does not replicate exact designs, any similarities between these plans and items sold at specialty retailers is coincidential and not endorsed by or related to any said retailers. // Post May Contain Affiliate Links
Friends have I got a treat for you today… Behold the most gorgeous DIY Table in all the land! Ok, perhaps I feel this way about every single build that stumbles across my desk… but I truly mean it – every. single. time. All of you builders out there are consistently knocking my socks off, and this is no exception!
Kim and Scott, he amazing duo behind Yellow Brick Home, has finished this most glorious build and the result is stunning! I love their rundown of the process and mods, the info will absolutely be helpful to any of you who plan to tackle this project in the near future. It’s funny that I found myself enjoying their paint color dilemma, because duh… I can absolutely relate. I’m not sure if misery does indeed love company, or if I am just a bit twisted and like to commiserate with folks who experience the same first world problems that I do! When it comes to choosing color – eek – there are just so many options.
This post is sponsored by Shutterfly. Awaken your space with your vision. Shop Shutterfly Home Décor for personalized home accents that are uniquely you.There are quite a few things about life as a blogger that cause you to throw caution to the wind and tradition out the window. Decorating for the holidays can often be one of those things…
The month of October is generally the peak season for all things holiday decor and happens to be where real life and life in media, collide. Since I am on the fast track for decorating, and often decorate months in advance, this month brings an interesting mix of Halloween, Christmas and Birthday celebrations as the first round of holidays actually begin to happen. Rather than trying to fight this, I have learned to embrace it and we simply enjoy these moments a tad earlier than most, but with just as much tradition and holiday spirit.
So break out the hot cocoa and put on some holiday music… while it might be 80 degrees outside, we are lighting a fire and settling in to make some ornaments and a popcorn garland. This year is all about the personal touches and handmade pieces.
Since I am a firm believer in coordinating your holiday décor with your everyday décor, it doesn’t really matter which holiday is thrown into the mix at any given time… it all works on some level. But this year, is an extra special year, because I have partnered with Shutterfly and consequently (and coincidentally) made one of my forever dreams come true!
If you are a long time reader of this here blog (thank you!) you might already know that it is my dream to design products. This is something I have dreamed of doing since I was a wee little tadpole. Having this opportunity to put some of my designs to work and make them a reality was a very special thing, indeed. Shutterfly has literally hundreds of items you can personalize in any way you wish and the quality of the end result is astounding – even if you have no prior experience with graphic design or photography. For those of you who aren’t entirely sure you want that much freedom, not to worry, they also have a crazy good selection of prefab layouts that you can easily drag and drop your photos right into. It couldn’t be easier to make your décor look profesh! If you prefer items that aren’t photo-centric, they also have ready-made designer artwork you can use to plug and play, making your pieces look custom and unique! … You can crop, size, rotate and even edit in detail right on their site till everything looks just how you like. It couldn’t be easier – truly…
I entertain pretty regularly from October through January, which makes the ‘design your own’ tabletop décor a fairly important and a much-appreciated addition to my arsenal of serve-ware and tableware. The events I tend to host, range in purpose from birthday to seasonal festivities du jour. Having décor that will work regardless of the holiday, while still be festive and special is at the top of my list.
For most of the glassware, the design process is as simple as typing your last name and choosing your favorite font. For the ‘design your own’ option, it is equally as easy but you have the freedom to type anything you like, which is exactly what I did for the pilsner glasses and growler. I chose a font and alignment, then gave each glass a different series of international salutations – Cin Cin, Cheers, Prost and Salud, Sante, Na Zdrowia. I am hoping this will make it easier for guests to tell which glass is theirs (or mine… always losing track of my glass) and subliminally suggest a happy festive occasion at the same time. I love the matte black option for the growler and gave it an unrelated but equally cute turn of phrase: ‘Fill, Pour, Then Some More’, that would coordinate well with glasses that say ‘Fill, Drink, Repeat’ or 1 Drink, 2 Drink, 3 Drink, Floor’.
No cozy spot by the fire is complete without a snuggly soft throw and a comfy pillow, so naturally I gave in to this need and put my spin on both. I tried to capture the sheen and beauty of these pieces but I’m just not sure it translates on film in quite the same way it does in person. The quality of the pillow is superb and the Sherpa throw is the softest most wonderful thing on the planet. I will be designing one for each of my boys, rather immediately, since they are fighting over it already. Both my babes are lovers of snuggling up under a silky blanket – and I am sure I have mortified their future selves by saying as much (sorry!).
The blanket design is one of my hand drawn pieces and is part of a series of designs I did recently that draws inspiration from a variety of vintage textiles and hand-woven goods. That design in particular is inspired by some of my favorite Moroccan rugs.
The pillow design is from a photograph I took of the sunset that I crafted into the shape of the sun melting into the water. It’s dreamy and reminds me of a special time with my family, which I love. The framed canvas print above the chair is a photo from a trip the hubby and I took for our anniversary last year. I love the naturally neutral colors it adds to the space while celebrating a sentimental moment in time that will work year round.
Hot chocolate is a regular staple in the Turner House during the holidays and the metallic mugs add just the right amount of sparkle to mark the occasion as ‘not just another regular day’. There were several designs they offered that I loved so much, I hardly modified a thing. The fine looking friend above says ‘You’ve Totally Got This’ on the front, so rather than add photos or a design to the back, I simply used the preformatted box (meant to show the year) and added my own text to say – ‘Ya You Do’. It is a chic little semi-hidden message, reaffirming the sentiment on the front. Love it.
I have major heart eyes for the Cupid’s arrow heart on the marble and wood cheeseboard. How adorable would it be for a newlywed couple…? I chose one of my shibori inspired paintings for the glass tray and it turned out both subtle and chic with what looks like a combination of etching and printing. It will make for a gorgeous addition to my table or for corralling various things in my entryway. The table runner design is a digital painting I created, that was inspired by a photo I took during a random moment with my boys. We were standing in line for a ride at a theme park and the leaves and trees were putting on a seriously good show of shadow play and contrast. It was spectacular and the runner turned out even better than I imagined! The color is so well saturated and just as vivid as I remember that moment to be. The design is a definite family favorite already.
Even our tree has personal touches this year and alongside the ornaments my boys helped me make, I hung a smattering of glass ornaments with photos from our travels, to mark some of the highlights of our year. If you are noticing a slightly beachy theme running through many of my designs and photos, you would not be wrong. I am an eternal lover of summer, and even in the midst of cooler weather, all I want is the sun and sand between my toes. I have passed this gene on to both my boys as well, since their proclaimed favorite memories and time together usually revolves around the beach.
I am excited to have some of my photos and digital memories put to print and out on display for all of us to enjoy. I take literally thousands of photos each year and so frequently I upload those images to the cloud and that is precisely where they stay. I know I’m not alone on this one. Having some of my favorite moments printed onto acrylic photo blocks and acrylic plaques is a wonderful and far less stressful way to enjoy these memories, with all of the crazy boy-energy bouncing around in here.
My family thinks I am crazy for only ever displaying art and photos of places, never images of any of us, I think they forget how difficult it can be to capture children moving at the speed of light. I certainly wasn’t going to pass up a chance to showcase a single rare photo that has both my boys actually holding still. It was definitely a miraculous moment in time. Of course I added a tiny bit of artistic flair to the shot of my beauties by removing the background and adding a touch of super power in the form of lasers shooting out of their hands… You can’t quite take the designer out of me, even for these real life moments.
Above is a grid of all the various patterns and pictures I used in designing my pieces. There is only a very slight theme running through the photos, and a bit of repetition with color, but otherwise nothing is too matchy, matchy – which is just the way I like things. The one common thread amongst the designs is that they either show a moment in time that is special, or represent something special to me and were made by my hand with love. All you need is love, amiright? And now you have that song stuck in your head – sorry!
You can see how many of these designs translate when put to product, and hopefully it helps give you a good understanding of how your designs and photos will look when you do the same. I was pleasantly surprised to see many of the items use the natural color of the product in place of white. I was actually worried about this since I wasn’t able to upload images with transparency, but I am over the moon excited to report that it wasn’t an issue and it worked out perfectly.
The large tote with gold details is so very roomy and luxurious that it has been adopted as my slightly smaller and less red version of a Santa Bag. It will be just the thing to load with gifts to bring to my extended family on Christmas morning. And if I’m lucky… might just hold a few special gifts for me – and the boys, of course – on our return. We shall see if I make the ‘Nice’ list this year… it’s always a bit questionable.
Every single thing I ordered and personalized is absolutely wonderful and I am certain I will be ordering more of everything, right away. But the star of the show in my eyes, is undoubtedly the stockings. They are stunning on their own, and with the four variations of one of my designs – I could not love them more.
Now I just need to work on a few additional pieces to coordinate with my existing designs – like napkins, wine glasses and plates (which by the way, Shutterfly offers!). I have obviously gone off the deep end with my excitement and should probably be stopped before I fall entirely into happy, dream fulfilling product design oblivion, but a girl can enjoy a few more moments of bliss before you pull the plug, can she not? What’s the harm…
From my family to yours… Happy Early Holiday Decorating! What are some of your favorite family traditions and favorite décor items for the holidays? Do you use the same pieces for decorating each year or do you go for a new look and do something different each time?
A big thank you to Shutterfly for partnering with me on this campaign and an even bigger thank you to all of you for supporting the fabulous companies that help The Design Confidential create fun new projects like this! I heart you guys!
In September, I had the distinct pleasure of attending the Michael’s Makers Summit for the second time. I thought the first year couldn’t possibly be topped, but oh how wrong I was. That amazing company thinks of every single detail and it really is mind blowing. It is actually difficult to fully describe to you, just how thoughtful and gorgeous these events are. But I will share a few pics I snapped during the festivities, and maybe, just maybe, you will get a feel for how insanely glorious the surroundings, classes and events actually were.
This year, a group of 50 gals who won a contest earlier this year, were invited to join us for a day of crafty classes and a couple of dinners, and I can’t even imagine how they must of felt to be part of this experience – because I was pinching myself the entire time – and I experienced this the year before! The rooms alone were the stuff my dreams are made of. I had an outdoor bathtub and a double sided fireplace for goodness sake. The rooms that didn’t have the outdoor tub, had a fully functional living room with library and dining area in their rooms. I mean… I can’t even…
I can only hope that I am fortunate enough to stay in a place this crazy amazing , one day, ever again… Though honestly, it’s somewhat doubtful!
If you can imagine taking the most fabulous classes like watercolor, macrame, shibori dying, and woodburning (and that was just day 1) from some of the most profound artists and instructors, and sitting side-by-side with 45 of the most amazing crafters and DIY’ers…. then perhaps you can imagine how fantastic this was for me. I have come to love those gals so very much and can’t wait to see them again soon! I was fortunate enough to have a quick 15 seconds of fame and managed to have Buffy (Sarah Michelle Geller – now the founder of @foodstirs) snap a selfie of us while we were attempting to rock the Cricut machine and app on our phones (and utterly failing – it was my last class of the day so perhaps I was Hangry and more than a bit out of my mind).
I’m pretty excited to share today’s showcase with you, because this beauty was in fact built by a beauty – my sweet friend Kristin of Hunted Interior. She never fails to knock it out of the park and everything she touches turns to design glory. This table is no exception and she has a fantastic tutorial for creating this outdoor sealer over on her site, be sure to check it out, it has me all heart eyes over here – Rayan
It’s officially September, which means it is time to kick fall projects into high gear and pumpkin decorating shall now commence…
It seems like Fall sneaks up on me every single year and before I know it, the holidays are upon us, eek. I’m never really ready to let go of summer but the reward of holiday decorating is a nice consolation prize. I am a firm believer that any and all holiday decor should blend seamlessly into your existing decor, and this pumpkin project is no exception. I have a relatively neutral and somewhat masculine thing happening in my family room which was crying out for beautiful horn accessories to coordinate. Naturally I gave in to this need and gave these faux pumpkins a durable and lasting decorative finish that was precisely that.
I wish I could say this project was easy, but in fact it wasn’t. It did however, lead me to happen upon a few helpful hints to make this easier for anyone trying to reproduce it. Because the process was so piecemeal, I don’t have decent images showing the steps, but I think you will do fine anyhow.
MATERIALS // Faux Pumpkins, Paper, Flour, Water, Foam Brush, Paintbrush, Mod Podge, Craft Paint in white, black, brown, grey and beige (or a close match to several of the colors in your design).
You will need to find a natural horn pattern you like on the interwebs. I found a series of three tumblers on a shopping site that I liked and cropped a screenshot of each one into a square shape to print. I then covered each pumpkin with paper mâché to smooth the surface and level some of the ridges. I used a combination of flour and water to make my paste and kept it fairly thick. I initially tried to simply cut my horn design into strips to glue onto the pumpkins, but along with the circular shape it was also the ridges that made decoupaging so difficult. By removing this obstacle, it was so much easier to get the paper to lay down in alignment, without wrinkling. It also helped tremendously to keep my printed strips fairly skinny, but finding the perfect size was absolutely a Goldie Locks conundrum. As it turns out, the wider your strips, the more realistic your design will look, but the greater width makes lining them up properly an exercise in futility. The size of the pumpkin will also alter the ideal width of your strips so I recommend trying a few sizes before you commit to cutting them up. Don’t worry about how the strips line up around the base of the stem because you can cut away any excess paper with an exacto knife and use a bit of brown paint to blend the edges of the paper and the stem. This is also a great way to hide the seams of your paper strips and any areas where there are slight gaps in your design. With the paper mâché underneath, you have an ideal surface for blending things with a few coordinating colors of paint.
Dab and blend with several of your paint colors until all evidence of the paper disappears and your pumpkin looks as if it was carved straight from the horns on the head of something magnificent – in a vegan and cruelty free way, of course.
Psst… If you are looking for more pumpkin projects or inspiration, click here to browse the full arsenal of our Pumpkin Project list.
To kick off fall in your own home, visit Michaels.com and check out the variety of craft pumpkins available – they have every color, shape and size imaginable! Be sure to check out all of the other Michaels Makers pumpkin ideas on the Michaels blog.
For my third and final installment with the AVE Raw line from Ave Home, I really wanted to celebrate the beauty of the piece by leaving it in all it’s Raw and beautiful glory. But… let’s be real – I have two boys, dogs, a husband and a couple of frogs and all of them specialize in making messes and breaking things. Some sort of protective finish was a must, but many layers of wax and buffing or a true oil finish that would alter the color of the wood or give it an unnatural shine were quite the opposite of what I had in mind.
I am over the moon excited to share this project with you fine folks, because it is truly the first and only finish I have ever done that was actually clear and didn’t alter the original look of the wood at all. No added sheen or shine, no hours of labor intensive applications of varnish or wax. Just pure and simple – a gorgeous oil based finish in the convenience of a spray.
Let’s talk about the piece for a minute, shall we? This fine piece of work is the Audrey Butler Tray + Brass Stand and it could be the poster child for all the beautiful things. It is much larger than I imagined it would be, which opens it up for more amazing uses that I hadn’t even thought to use it for. I have been slowly attempting to add lighter tones of wood throughout my family room and kitchen area so this piece is now replacing a darker vintage piece I formerly had in this spot. It is a far better height and width and the brass stand is mighty handsome too, giving it just a bit of that something extra. It is perfect and it arrived in a perfect state with absolutely no need to sand or condition it prior to finishing.
Wholesale online orders will be open through the end of the month, and beginning September 1st, you will be able to order the pieces in the Raw line through your local dealer. Of course if you don’t have a dealer near you, you can contact the lovely folks at Ave Home for a special order!
An oil finish is timeless and durable. Most of the time an oil finish demands much more of you than this particular product did and all that beauty often comes at a price if altering the color is not your goal. An oil will soak down into the pores of the wood and will provide a marvelous water resistance and protective durability. This good looking oil I used here, could not be easier if it tried. I used a spray water proofing product that is clear and gave this piece two light coats and done. There really wasn’t much else to it.
The most difficult part of the application is that you actually need to spray a light coat. I hope that you can see above just how lightly this can be sprayed. If you are like me, this is the hardest thing ever because my perfectionist nature wants to have each and every coat have perfect coverage. Luckily it won’t be the end of the world if you accidentally spray more on than you should have. It will pool and it may even drip or run, but it matters not, just use a brush or a smooth cloth rag and wipe away excess. Let it cure and dry for at least 24 hours before you bring your furniture inside and be sure to wear a respirator and eye protection. This is a product that should be applied outside, just be sure to protect your plants.
MATERIALS //
Once you have addressed any excess and allowed for the finish to dry, you won’t be able to tell you applied anything at all except that your wood will be happy and water will bead if it is spilled on the surface.
The finish and this piece are truly dreamy and a clear oil based finish was perfect way to show off the natural beauty of this butler tray and the craftsmanship that went into it. It lives on a little wall that is a straight shot down a long hallway and can be seen almost instantly when you enter my home. It was an honor to put my mark on it and I love seeing this little vignette every time I walk in the front door.
This project was created in partnership with Ave Home. All crazy talk and opinions are 100% my own.
Over the last few weeks, I have been working on a couple of double wide chaise lounges that I found on your site. Thanks so much for putting together such a useful site. I'll be building the c shaped tables to go with these next month.
I couldn't figure out how you had the legs mounted, and failed to get them on securely at 9 inches long, so I made new ones that were 12 inches long, and mounted on the inside of the frame using 3 2 inch screws, and 2 pocket hole screws each.
Introducing the Outdoor Slat Coffee Table – the third piece in our new outdoor collection. Not only is it beautiful, but it has tons of storage and the table top features nifty removeable panels. The perfect place to set your drink and store all of the messy kid toys out of sight, so you can actually enjoy said drink a little more fully. Win, win!
As with all of our plans, you are building at your own risk and you should have a firm understanding of building in general before you attempt many of our plans (some are easy as pie and perfect for beginners). With that, go forth, have fun, take lots of pictures and share them in a showcase on the site or on social media with the hashtag #builtTDCtuff and we will share our faves! Be sure to tag @thedesignconfidential on Instagram / FB and @thedesconf on Twitter / Pinterest. Don’t forget… for all of our newer plans, clicking on the images will let them expand to enormous sizes with much greater clarity. The older plans may need updating so please let us know if you need one fixed!
Showcase: Built From These PlansI am so honored each and every time one of you fine friends builds from these very plans! If you have built this piece, please take a moment and showcase your build! We are dying to see your fabulous hard work!
Before beginning to build, always check in on my site to make sure you have the most up to date set of plans, I occasionally update and change the plans to make the building process easier or to allow for less expensive purchasing of materials! Read through the entire set of instructions and all comments before beginning this project. If you print out or save plans, be sure to check in on my site to be sure you have the most up to date set of plans, as I occasionally update things for ease of building or buying. If you are new to building, read through the GETTING STARTED section and other articles found under the BUILD tab in the menu on my site, it has valuable information about how to get started, tools and techniques. If you are unfamiliar with the finishing process, visit my Finishing school for some tips and tricks for painting like a pro and for special finishing practices. Use glue to secure your joints and Consider Painting or Staining individual sections prior to assembling. This makes the paint application virtually flawless. Coat with a spray on Poly or Wipe on Poly to protect your finish and your piece and it will last for ages. Adhere to all safety standards and guidelines, and be sure you follow safety protocol throughout your build. If you are unsure about whether you are building safely, run a quick online search for the tool or technique you are using, or contact me via email or post to the forum before you move ahead. My contact info can be found in the menu of my site.
Cut the pieces for the Legs and the End Tops/Bottoms. With the Kreg jig set for 1-1/2” material, drill pocket holes in both ends of the End Tops/Bottoms. Assemble as shown with glue and 2-1/2” pocket screws. Face the pocket holes to the inside of the table so that they are hidden once the table is assembled. This step should be completed twice.
Cut the pieces for the End Slats. With the Kreg jig set for 3/4” material, drill pocket holes in both ends of the End Slats. Place the End Slats to where they are flush with the outside edge of the Legs and spaced 1/4” from each other. Assemble as shown with glue and 1-1/4” pocket screws.
Cut the pieces for the Front/Back Tops/Bottoms. With the Kreg jig set for 1-1/2” material, drill pocket holes in both ends of the Front/Back Tops/Bottoms. Assemble as shown with glue and 2-1/2” pocket screws. Face the pocket holes to the inside of the table so that they are hidden once the table is assembled.
Cut the pieces for the Front/Back Slats. With the Kreg jig set for 3/4” material, drill pocket holes in both ends of the Front/Back Slats. Place the Front/Back Slats to where they are flush with the outside edge of the Legs and spaced 1/4” from each other. Assemble as shown with glue and 1-1/4” pocket screws.
Cut the piece for the Table Bottom. With the Kreg jig set for 3/4” material, drill pocket holes along all sides of the Table Bottom. Place the Table Bottom to where it is flush with the top edge of the Front/Back Bottoms and End Bottoms. Assemble as shown with glue and 1-1/4” pocket screws.
Cut the pieces for the Table Bottom Supports. Position the Table Bottom Supports as shown and secure into place with glue and 2-1/2” wood screws – start the screws from the inside of the Coffee Table, through the Table Bottom, and into the Table Bottom Supports.
Cut the pieces for the Front/Back Slat Supports. With the Kreg jig set for 3/4” material, drill pocket holes in both ends of the Front/Back Slat Supports. Assemble as shown with glue and 1-1/4” pocket screws. Face the pocket holes to the inside of the table. Insert 1-1/4” wood screws into the Front/Back Slats to attach them to the Front/Back Slat Supports.
Cut the piece for the Long Table Top Support. With the Kreg jig set for 1-1/2” material, drill pocket holes in both ends of the Long Table Top Support. Assemble as shown with glue and 2-1/2” pocket screws.
Cut the pieces for the Short Table Top Supports. With the Kreg jig set for 1-1/2” material, drill pocket holes in both ends of the Short Table Top Supports. Assemble as shown with glue and 2-1/2” pocket screws.
Cut the pieces for the Table Top Short Frames and the Table Top Long Frames. With the Kreg jig set for 3/4” material, drill pocket holes in both ends of the Table Top Long Frames. Attach to the Table Top Short Frames as shown with glue and 1-1/4” pocket screws. Repeat this step 4 times.
Cut the pieces for the Table Top Slats. With the Kreg jig set for 3/4” material, drill pocket holes in both ends of the Table Top Slats. Place the Table Top Slats to where they are flush with the Frame pieces and spaced 1/4” from each other. Attach to the Frame pieces as shown with glue and 1-1/4” pocket screws.
Cut the pieces for the Table Top Insets. Attach the Table Top Inset pieces to the Table Top “Panels” as shown with glue and 1-1/4” brad nails. This step should be repeated a total of 4 times. When set in place, the Table Top Panels will each have a 3/4” overhang past the outer edges of the Coffee Table and will have a 1/4” internal gap between each Panel.
Fill any Screw, Nail or Pocket Holes, Sand and Finish as Desired. For Finishing Tips and Tricks visit my Finishing School
// Disclaimer: Some rights reserved. Private use only. Feel Free to link to any of my plans so long as you ONLY use 1 image and provide an ADEQUATE link back to the original source and appropriate plan! Plans from this page are not to be used for commercial purposes or republished without the express written consent of Rayan Turner, The Design Confidential. By accessing or using any part of the web site, you agree to become bound by the terms and conditions of this website as outlined under Terms of Use. If you do not agree to all the terms and conditions of this agreement, then you may not access the Website or use any services. The information contained in this website is for general information purposes only. The information is provided by The Design Confidential.com and while we endeavor to keep the information up to date and correct, we make no representations or warranties of any kind, express or implied, about the completeness, accuracy, reliability, suitability or availability with respect to the website or the information, products, services, or related graphics contained on the website for any purpose. Any reliance you place on such information is therefore strictly at your own risk. In no event will we be liable for any loss or damage including without limitation, indirect or consequential loss or damage, personal injury or death, or any loss or damage whatsoever arising from loss of information or profits arising out of, or in connection with, the use of this website. I hope to provide accurate plans, however, I cannot guarantee each plan for accuracy. Not every plan that I post has been built and tested, so you are building at your own risk. It is recommended that you have a clear understanding of how the project works before beginning any project. Please contact me if you find an error or inaccuracy so that I might fix it. The Design Confidential.com is inspired by but does not replicate exact designs, any similarities between these plans and items sold at specialty retailers is coincidential and not endorsed by or related to any said retailers. // Post May Contain Affiliate Links
We are back with our second installment in the AVE Raw series, giving a gorgeous set of pieces from Ave Home a fab new finish and sharing all the details along the way! As a group of like minded people, we certainly have use of a good furniture finish more than the average Joe. I am particularly excited about this project because it may very well be the easiest solution for a durable paint finish that sprays, yet doesn’t require expensive equipment to apply and isn’t difficult to work with or clean up. In fact, I can’t believe this didn’t occur to me earlier.
I chose the Mollie Nesting Tables and they did not disappoint. Nesting tables are the ultimate multi-purpose tables, in my opinion. Use them as a chic end table, an accent table with extra display space or separate and scatter them about, you have 3 tables to work with, so go crazy.
The unfinished state the pieces from the AVE Raw collection arrive with is flawless. This is not an exaggeration. My thought is that if you are planning a finish that typically requires an immaculate sanding prior to application – you would be well suited to leave it well enough alone because it will be exactly that when it lands on your doorstep. If you plan to stain, then a good cleaning with a special thinner would be a great idea. It will remove any oils or dirt that occur during transit and packing, but otherwise – don’t touch with a sander as you run the risk of having any irregularities show once the stain has been applied.
That being said, a paint finish is an entirely different animal. The one thing you will experience regardless, is that when you apply a finish to a raw wood surface, it will open the pores of your wood and may cause that slightly rough textured appearance until you give it another coat of paint or a sealant. Many product lines suggest a light sanding in between coats and this is to solve for that and to help your second coat adhere to the first. But what about those products that do not want you to sand in between? Well no worries, another coat or two usually does the trick. This was certainly the case for the finish I used on these gorgeous nesting tables.
I think we are all in agreement that an oil based finish is going to be far more durable than one that isn’t. But applying an oil based finish with a natural brush is no walk in the park. If you must go the way of applying your finish with a brush – switch to a roller with an ultra smooth nap and pretend you didn’t that portion of the instructions. Trust me on this. No amount of self-leveling properties the paint may have will actually solve for the brush marks and that doesn’t even take into account the cleanup. Enamel paints aren’t typically the most user friendly if you aren’t a pro in the finishing industry. I knew I needed the durability of a true enamel oil based finish for these tables, so I set out to find an easy solution for this and stumbled upon spray cans of oil based automotive paint. Duh. How did this never occur to me? It was the ultimate face-palm moment and once I set my sights on the color and sheen I was looking for, I was chomping at the bit for my paint to arrive.
I used a matte black enamel automotive spray paint, and it is the most glorious finish you have ever laid eyes on, that wasn’t done in a professional setting. I always start a spray finish on the bottom, with my piece turned upsidedown.
This particular type of paint suggests a mere 15 minutes in between coats, which is fantastic since that is approximately the same amount of time I normally wait regardless of the suggestions on the can. I will chalk that up to my lack of patience. I continued to spray very light coats on the bottom sides until they appeared to be fully covered and the finish looked solid. If you have ever worked with an oil based paint, you will know what I mean by solid… hardened might also be a good word to describe what I mean. I let the finish cure for about 45 minutes before I turned the tables right side up and began the coat the top and any nooks and crannies that aren’t accessible from the bottom. I used 5 cans of paint to finish the three tables and they are glorious. I always use a spray can trigger when I am working with spray paint and it helps with fatigue – which allows for a smoother finish in the end.
It is always recommended that you use a primer on raw wood, but I did not and it is flawless. I would definitely suggest you do though, since it will likely solve for the open pores and help with adhesion – making your finish more durable and lasting. A primer is always the way to go if you have the option and in the case of automotive enamel… you do have the option! Since these are oil based products, you will definitely need to work in a well ventalated space, and preferably outside. No amount of venting for a standard space will actually help so get outside and get yourself a good respirator mask and you will be set!
The thing about a matte finish is that it’s a bit hard to capture on film. It doesn’t play nicely with the light and tends to refract it, so you will have to take my word for it when I say that it is indeed glorious and smooth like glass. Of course this is entirely, due in part (you like what I did there?) to how pristine the pieces are from the AVE Raw collection from Ave Home. Major heart eyes for everything in their online shop. Lucky for all of you fine folks – if you use the code DESIGNCONF at checkout you will get an amazing 20% discount for the next 2 weeks, on what I consider already fantastic prices… so if you are on the fence – run, don’t walk and plop yourself in front of your computer or grab your phone and get to clicking! You will be so happy you did!


 This post is sponsored by


