[carousel-horizontal-posts-content-slider]
Plans

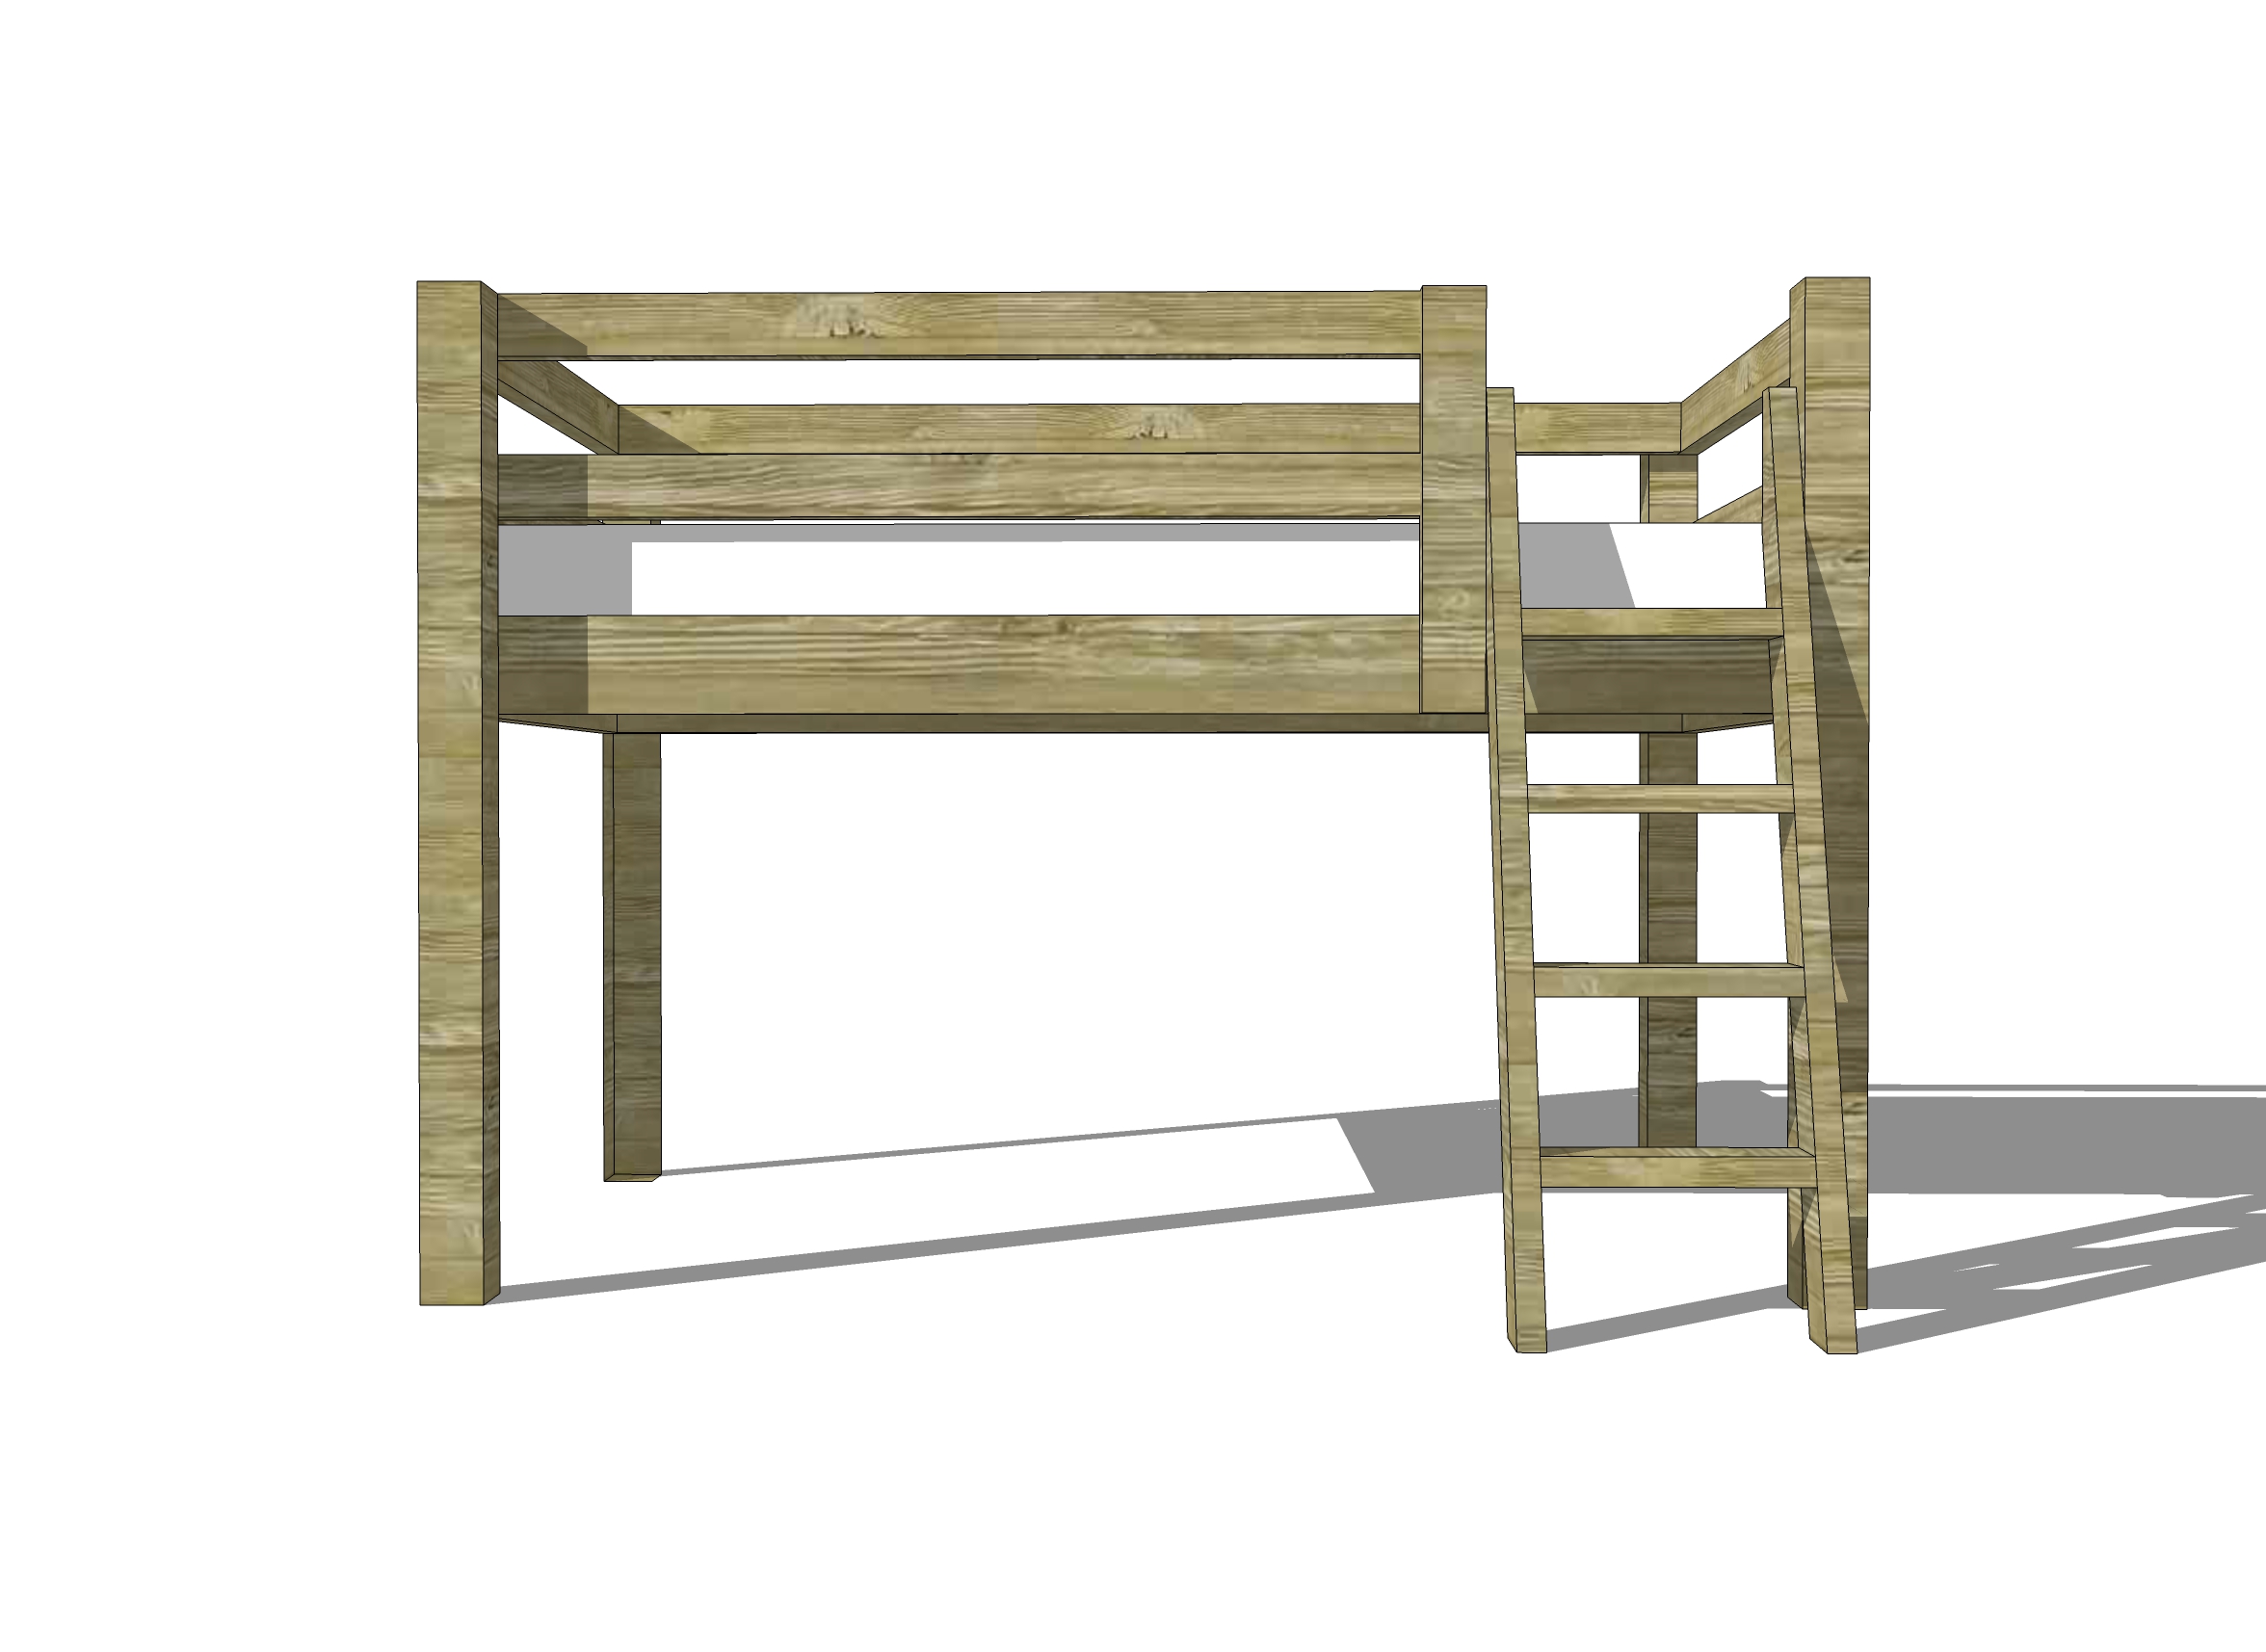
Now, I am going to assume most of you have kiddos…or will have kiddos…or your kiddos have grown and have their own kiddos..either way I know this will excite you because the project I will share with you retails for more than $1300 when you add up all of the extras. Can I tell you how much I spent on this from start to finish? $118 TOTAL including an entire gallon of Zinc by Martha Stewart for Home Depot (we all know that isn’t the cheapest…) That’s right, barely over $100 with screws, bolts, wood, paint, EVERYTHING! Even sandpaper..
Below are the plans for this bed in other sizes! Something for everyone!
<

- 2 – 4×4 at 10′ Can use Fence Posts – untreated
- 3 – 2×6 at 8′
- 5 – 2×4 at 10′
- 2 – 2×4 at 8′
- 1 – 2×4 at 6′
- 6 – 1×4 at 10′
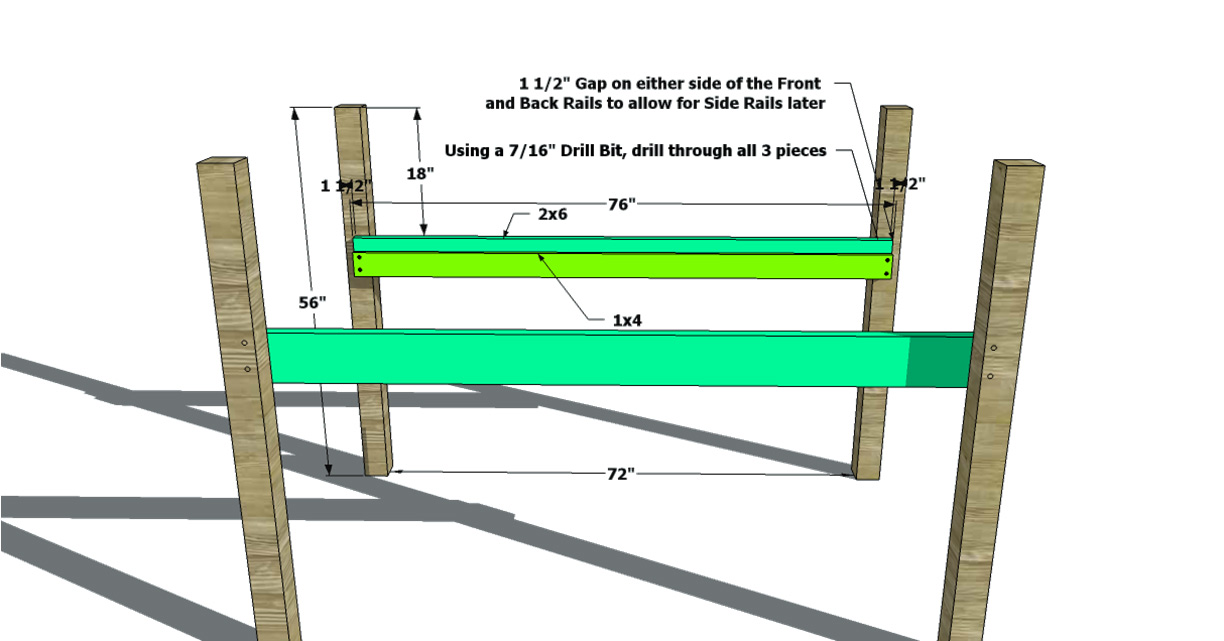
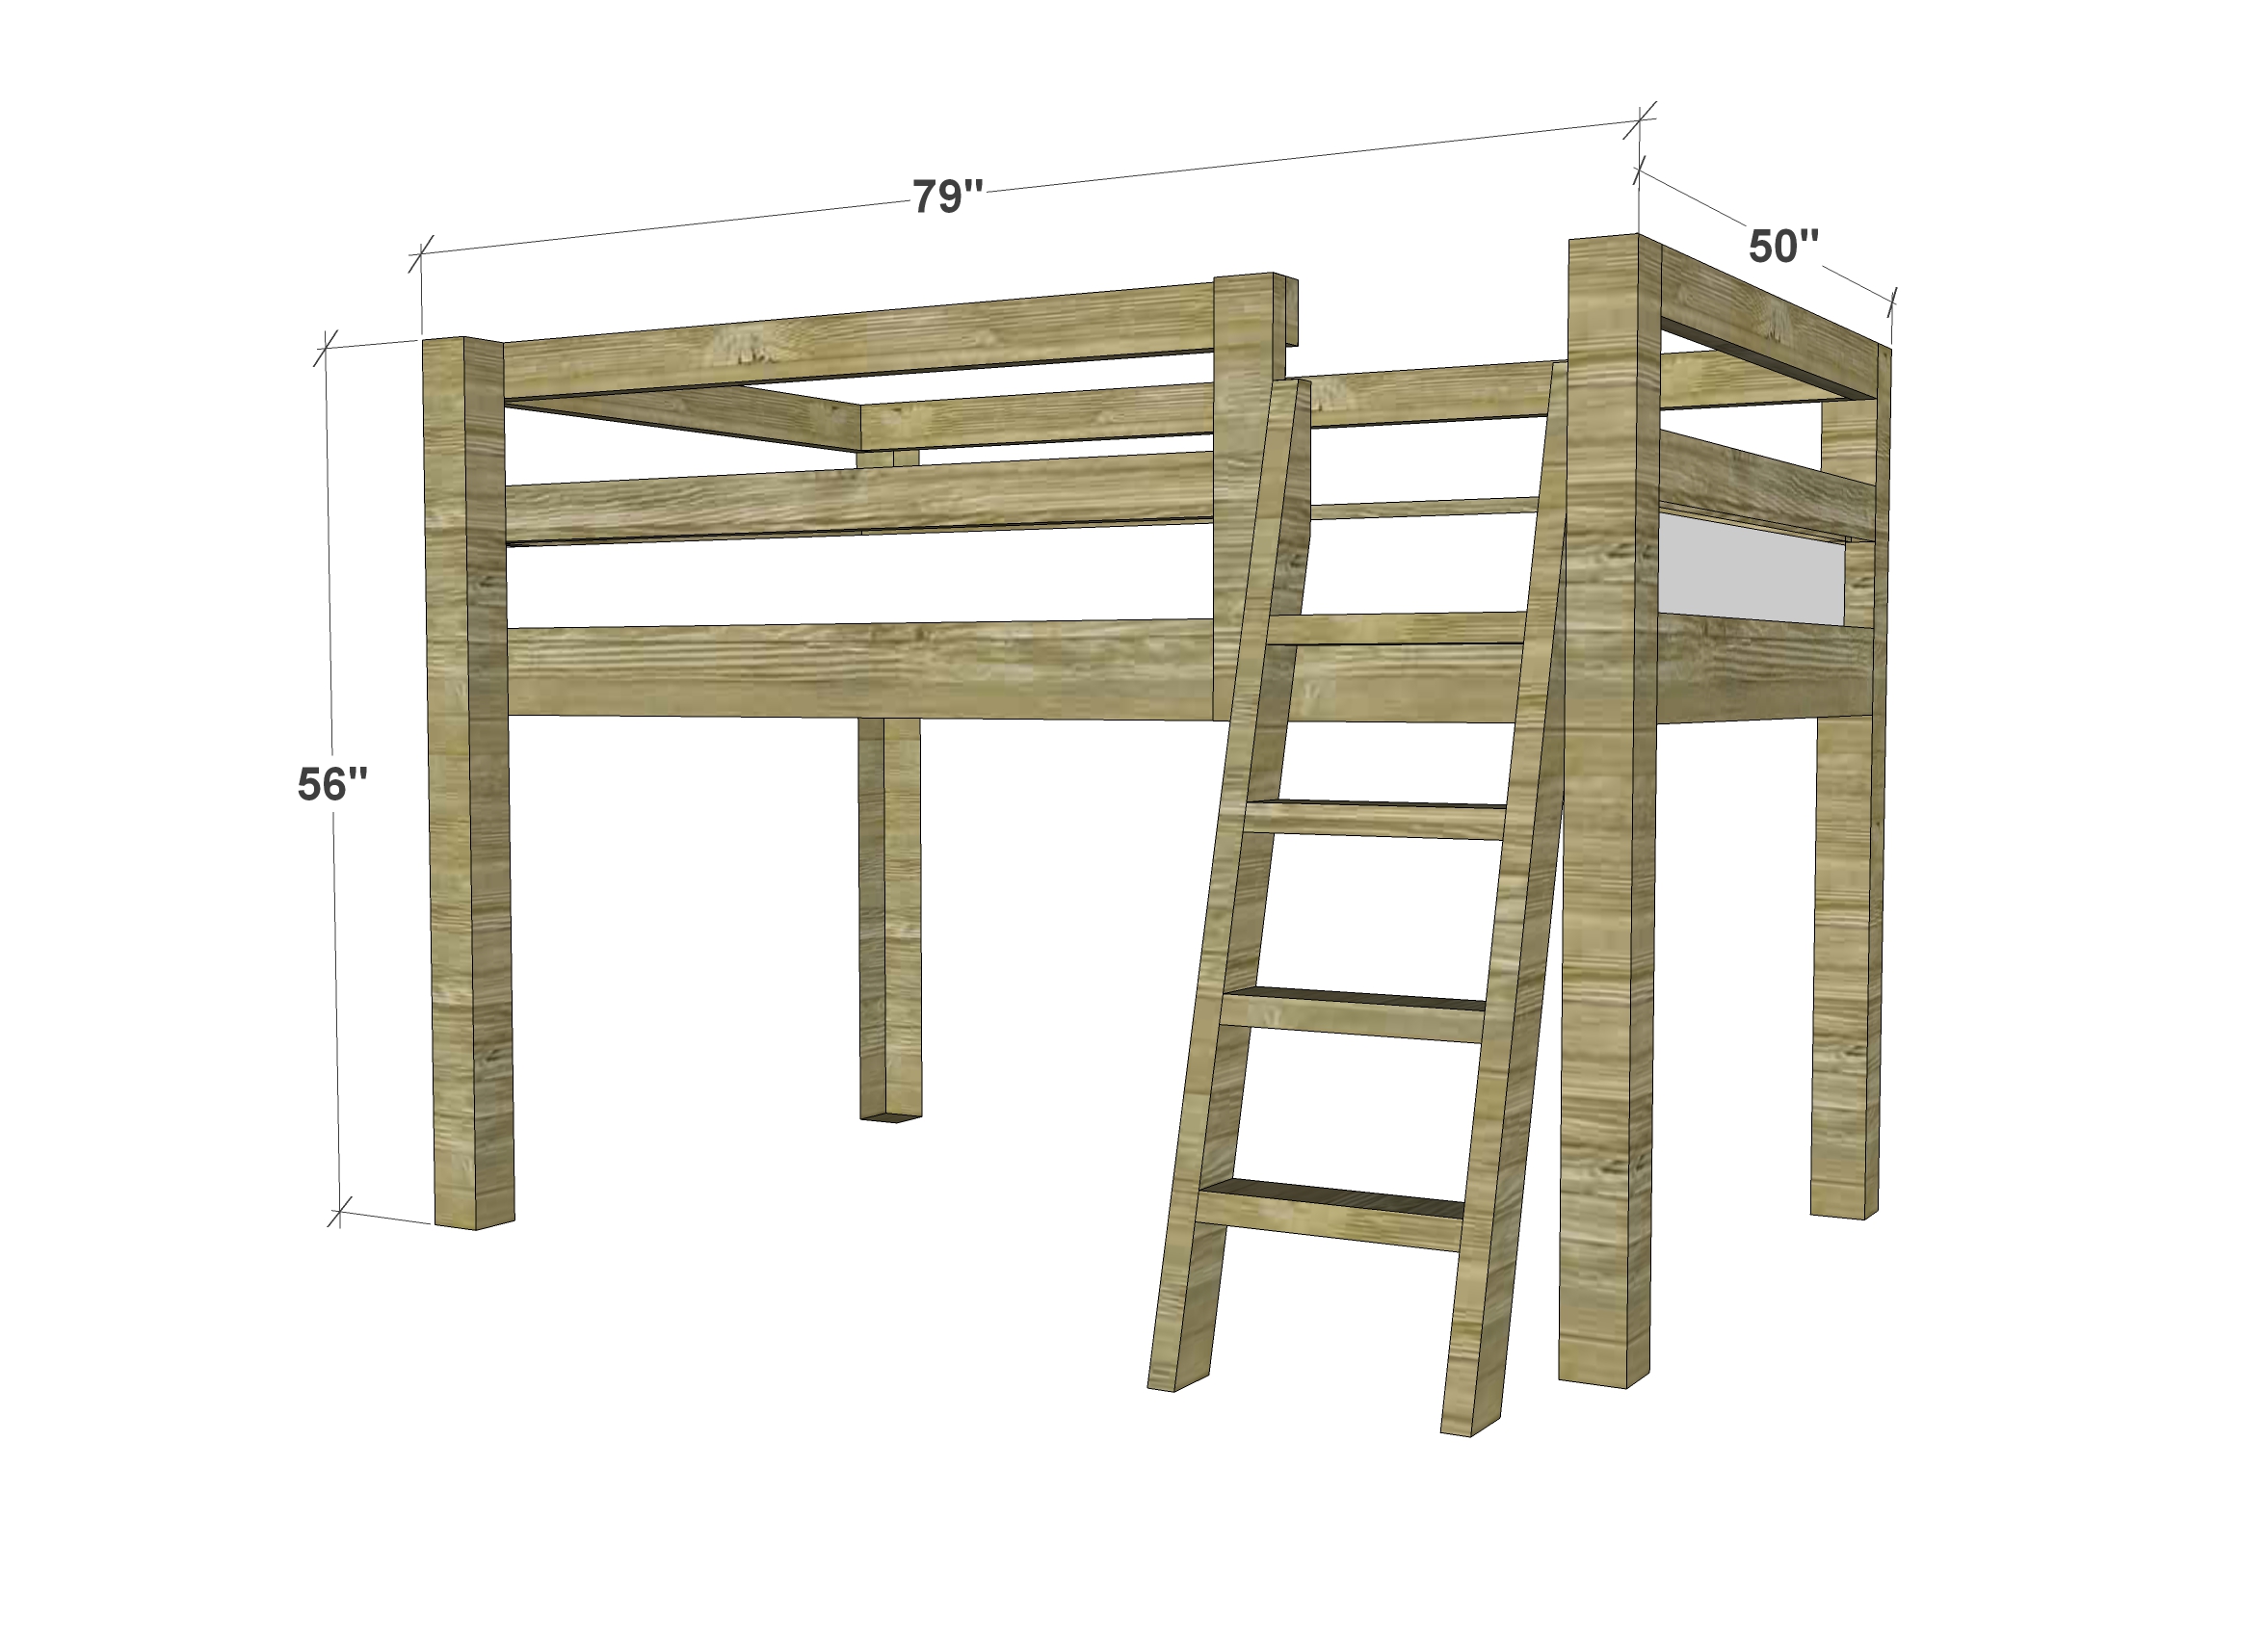
- 4 – 4×4 at 56″ (Legs)
- 2 – 2×6 at 76″ (Front and Back Rails)
- 2 – 1×4 at 76″ (Cleats)
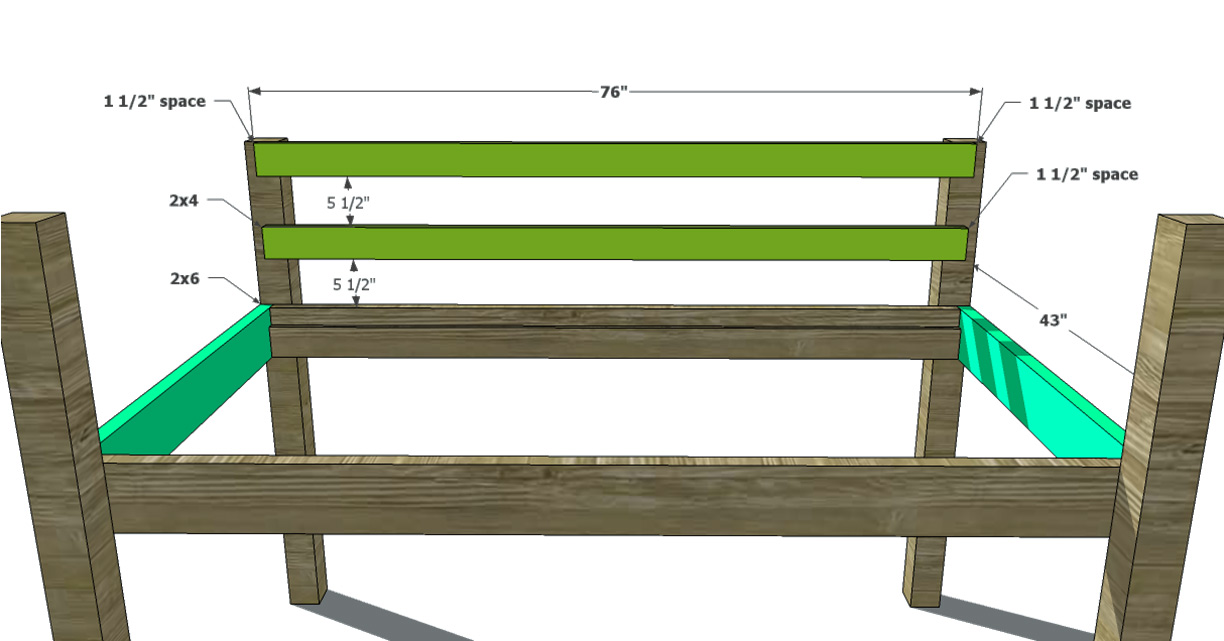
- 2 – 2×6 at 43″ (Side Rails)
- 2 – 2×4 at 76″ (Upper Back Rails)
- 4 – 2×4 at 43″ (Upper Side Rails)
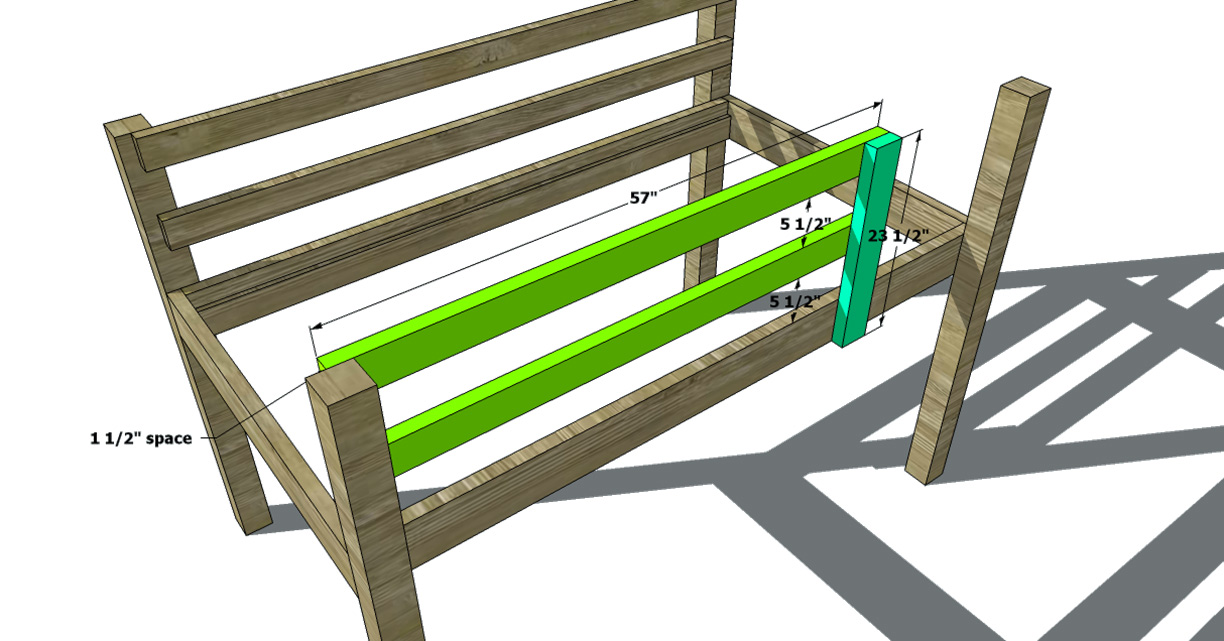
- 1 – 2×4 at 23 1/2″ (Front Guard Rail)
- 2 – 2×4 at 57″ (Front Upper Rails)
- 11 – 1×4 at 40″ (Slats)
- 2 – 2×4 at 60″ (Ladder Rails)
- 4 – 2×4 at 14″ (Ladder Rungs)
**I recommend finishing your boards and posts prior to assembling and simply touching up later. This will make for easier painting and will keep you from having to paint this wherever this piece will actually live (bedroom) since you will have to assemble it in the area it will be placed (at 45 or more inches wide this will not fit through a doorway after it’s assembled). ** I also recommend using Wood Filler to fill in any knots or uneven areas on your boards prior to painting if you are NOT going for a rustic look. Please also consider giving each post and board slightly rounded edges as you sand, for added comfort for your kiddos. Before beginning to build, always check in on my site to make sure you have the most up to date set of plans, I occasionally update and change the plans to make the building process easier or to allow for less expensive purchasing of materials! Read through the entire set of instructions and all comments before beginning this project. If you print out or save plans, be sure to check in on my site to be sure you have the most up to date set of plans, as I occasionally update things for ease of building or buying. If you are new to building, read through the GETTING STARTED section and other articles found under the BUILD tab in the menu on my site, it has valuable information about how to get started, tools and techniques. If you are unfamiliar with the finishing process, visit my Finishing school for some tips and tricks for painting like a pro and for special finishing practices. Use glue to secure your joints and Consider Painting or Staining individual sections prior to assembling. This makes the paint application virtually flawless. Coat with a spray on Poly or Wipe on Poly to protect your finish and your piece and it will last for ages. Adhere to all safety standards and guidelines, and be sure you follow safety protocol throughout your build. If you are unsure about whether you are building safely, run a quick online search for the tool or technique you are using, or contact me via email or post to the forum before you move ahead. My contact info can be found in the menu of my site.
Cut the Legs to size and attach the Cleat to the Front and Back Rails using 2″ Screws. To attach the Rails to the Legs you will arrange the 4 pieces as shown in the diagram below, making sure to leave 1 1/2″ on either side of the Rails to allow for the Side Rails later, and clamp together making sure everything is completely square before you proceed. Once square and aligned as needed, you will use a 5/16″ Drill Bit and drill through all 3 pieces on each side, creating 2 holes on either side for the bolts. Fasten with your Carriage Bolts and tighten.
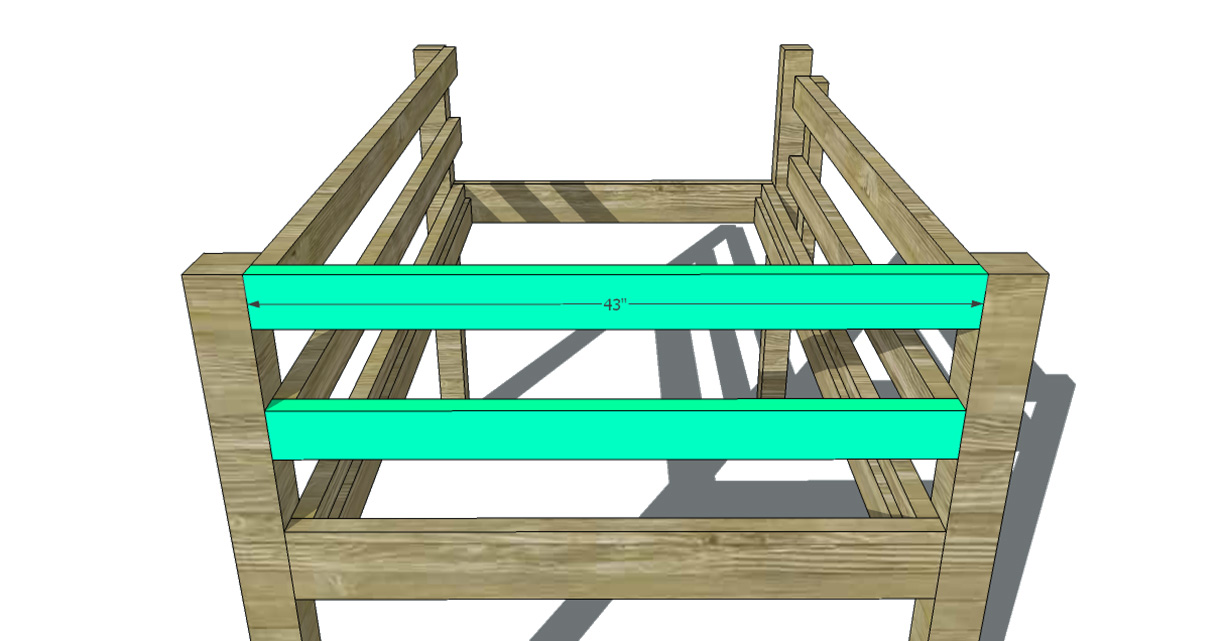
Attach the Side Rails to the Front and Back Rails then fasten the Upper Back Rails to the Back Legs. Use 3″ Screws
Attach the Front Vertical Guard Rail, use 2″ Screws. Then fasten the Front Upper Rails to it and the Front left or right Leg. Use 3″ Screws to attach to the Leg.
Attach the Upper Side Rails on the side opposite where you choose to put the ladder, in my example this would be the left side. Use 3″ Screws.
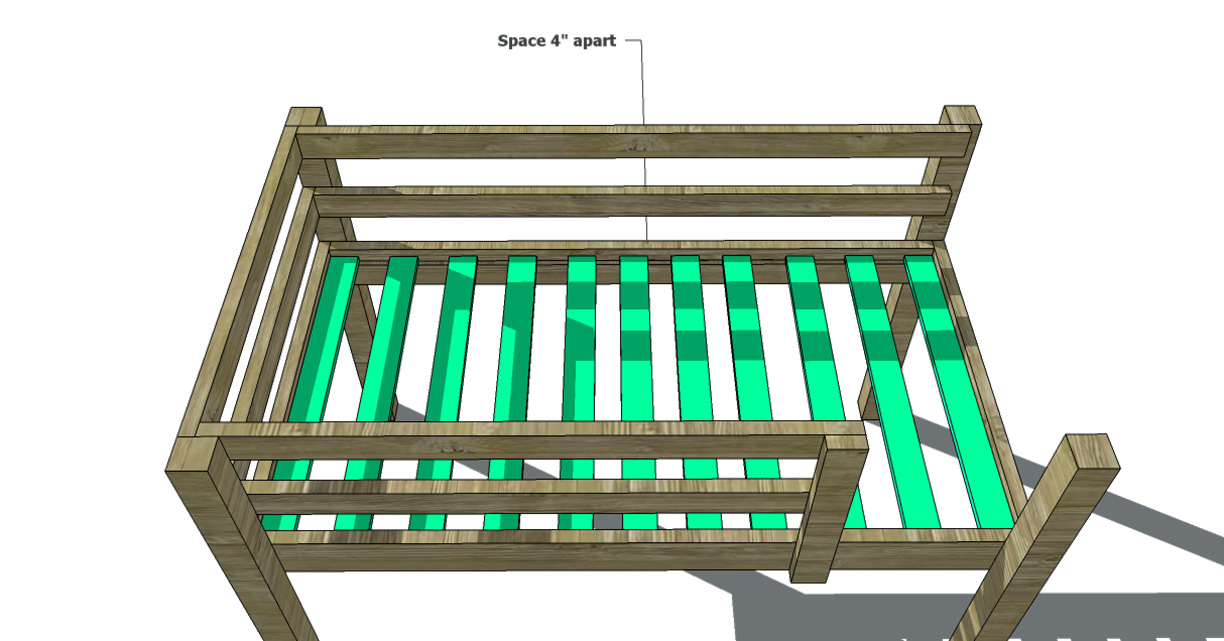
Lay your Slats approximately 4″ apart. Be sure the 2 on the outside edges are flush in both corners. Screw down using 1 1/4″ Screws.
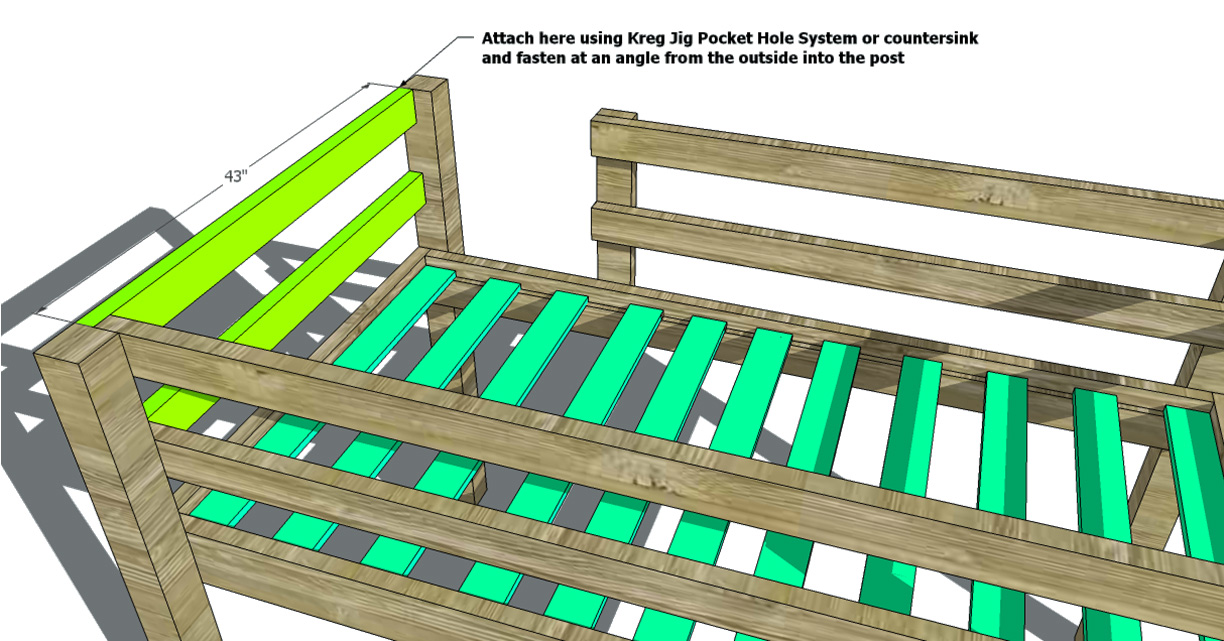
Attach the remaining 2 upper Side Rails to the Back Rails and then either use a Pocket hole System (Kreg Jig) to create pocket holes and fasten to the front leg. If you don’t own a Kreg Jig you can also countersink and predrill at an angle from the outside edge into the leg. Use 3″ Screws
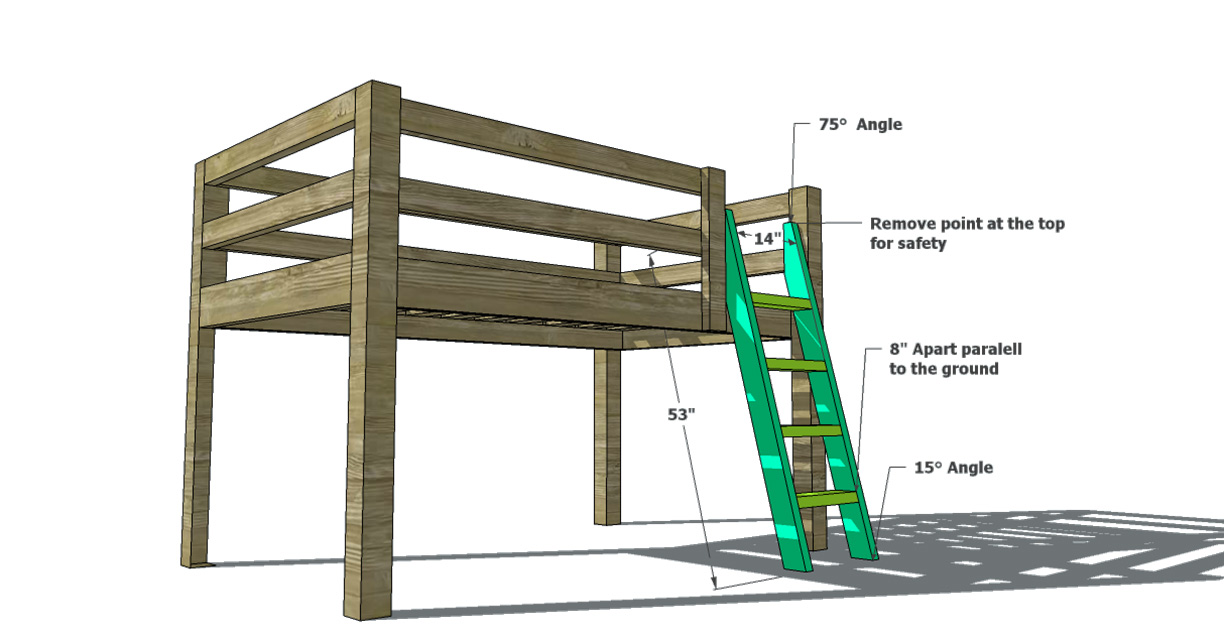
Create the Ladder. I give approximate dimensions for the height below, but the important aspect to focus on is the angle you will cut the top and bottom. The top of the ladder rails will be at a 75°angle and the bottom of the rails will be a 15°angle where the boards will rest on the ground. Attach the rungs at approximately 8″ apart (this will depend on the age of your kiddo, the smaller and younger, the closer together these should be, you need to consider how easy it will be for them to climb down) and parallel to the ground. Use 3″ Screws or 2 1/2″ Pocket Hole Screws to fasten the rungs to the rails and to fasten the rails to the Leg and Front Guard Rail. I suggest cutting away the point you will create at the very top, when you cut the 75°angle, for added safety. This will also give your ladder a bit of a hand grip up top.
Fill any Screw, Nail or Pocket Holes, Sand and Finish as Desired. For Finishing Tips and Tricks visit my Finishing School
**Disclaimer: Some rights reserved. Private use only. Feel Free to link to any of my plans so long as you provide an adequate link back to the appropriate post! Plans from this page are not to be used for commercial purposes or republished without the express written consent of Rayan Turner, The Design Confidential I hope to provide accurate plans, however, I cannot guarantee each plan for accuracy. Not every plan that I post has been built and tested, so you are building at your own risk. It is recommended that you have a clear understanding of how the project works before beginning any project. Please contact me if you find an error or inaccuracy so that I might fix it.
Plans
This easy to build cantilevered table can be used for a variety of things, but my main purpose for creating this plan is to give you a table that can tuck under the edge of your sofa or a chair and sit over the armrest for use with a laptop, drinks, remotes, your book…whatever you might fancy. This would be fabulous outside next to a chaise lounge or reclining chair, it would even be a fabulous plant stand. Did I mention this is cheap to build? Yep super cheap, under $20 for the wood and you can use a box of construction screws meant for wood on wood building, which are typically cheaper and much more durable. You won’t tear out the top of your screws as frequently…
As with all of our plans, you are building at your own risk and you should have a firm understanding of building in general before you attempt many of our plans (some are easy as pie and perfect for beginners). With that, go forth, have fun, take lots of pictures and share them in a showcase on the site or on social media with the hashtag #builtTDCtuff and we will share our faves! Be sure to tag @thedesignconfidential on Instagram / FB and @thedesconf on Twitter / Pinterest. If you are a blogger and you post about your build, don’t forget to include a link to your post on your showcase here. Don’t forget… for all of our newer plans, clicking on the images will let them expand to enormous sizes with much greater clarity. The older plans may need updating so please let us know if you need one fixed!
- Here you have a choice again…This decision has no bearing on strength or stability, this is simply a matter of choice based on availability and price.You will choose option 2 if 1×2’s are less expensive (my experience is that they generally aren’t) or if the selection of boards available in 1×2’s is better…
- Option 1:
- 4 – 2×2 at 8′
- Option 2:
- 2 – 2×2 at 8′
- 2 – 1×2 at 8′
NOTE // You will purchase one of the following 3 Screws, you don’t need all of them!
Option 1 Cut list:
- 4 – 2×2 at 20″ (Base and Top Frame)
- 2 – 2×2 at 24 1/2″ (Legs)
- 11 – 2×2 at 17″ (Base, Top Frame and Table Slats)
Option 2 Cut list:
- 4 – 2×2 at 20″ (Base and Top Frame)
- 2 – 2×2 at 24 1/2″ (Legs)
- 3 – 2×2 at 17″ (Base Frame and Top Frame)
- 8 – 1×2 at 17″ (Table Slats)
Before beginning to build, always check in on my site to make sure you have the most up to date set of plans, I occasionally update and change the plans to make the building process easier or to allow for less expensive purchasing of materials! Read through the entire set of instructions and all comments before beginning this project. If you print out or save plans, be sure to check in on my site to be sure you have the most up to date set of plans, as I occasionally update things for ease of building or buying. If you are new to building, read through the GETTING STARTED section and other articles found under the BUILD tab in the menu on my site, it has valuable information about how to get started, tools and techniques. If you are unfamiliar with the finishing process, visit my Finishing school for some tips and tricks for painting like a pro and for special finishing practices. Use glue to secure your joints and Consider Painting or Staining individual sections prior to assembling. This makes the paint application virtually flawless. Coat with a spray on Poly or Wipe on Poly to protect your finish and your piece and it will last for ages. Adhere to all safety standards and guidelines, and be sure you follow safety protocol throughout your build. If you are unsure about whether you are building safely, run a quick online search for the tool or technique you are using, or contact me via email or post to the forum before you move ahead. My contact info can be found in the menu of my site.
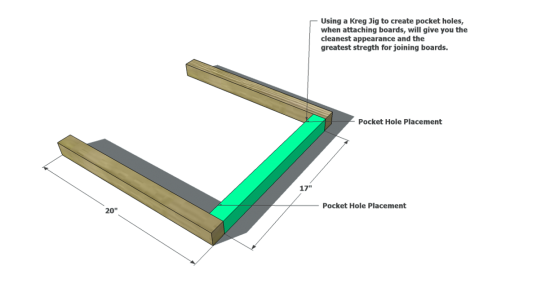
Build the Base: if you are using a Kreg Jig, place your pocket holes on the inside of the 17″ piece. For regular screws fasten from the outside of the 20″ pieces into the 17″ piece on both sides.
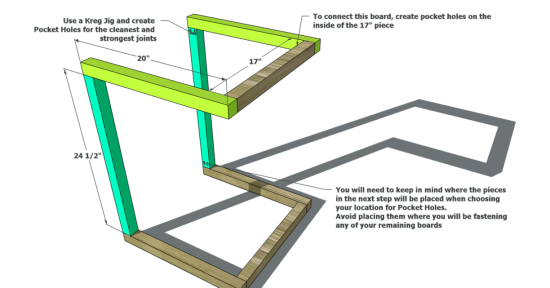
Fasten the Legs to the top of the Base Frame: place pocket holes on the inside of legs.
Fasten the 20″ Top Frame pieces to the top of the Legs, then attach the 17″ Frame pieces to them. Once you have that structure in place you can attach your Table Slats.
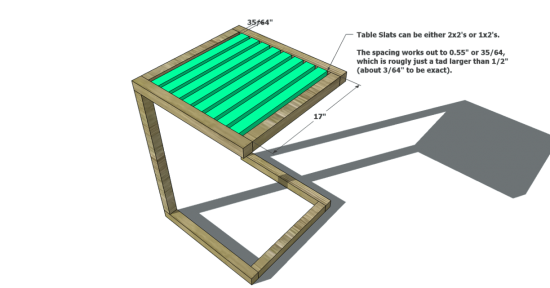
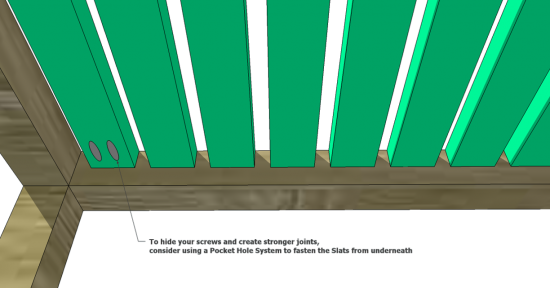
If you are using a Pocket Hole System create your pockets as shown in the diagram below. If you are using regular screws to assemble, you might also consider attaching the slats by screwing from underneath the 20″ Top Frame pieces at an angle up into the slats to hide them. This is a bit trickier to do, and you will need to pre-drill with a countersink drill bit to avoid having your screw stick out a bit, but is definitely a possibility. You would need to use 2×2’s for the slats if you were going to do this last option. The image below shows this piece with 1×2 slats.
Fill any Screw, Nail or Pocket Holes, Sand and Finish as Desired. For Finishing Tips and Tricks visit my Finishing School
// Disclaimer: Some rights reserved. Private use only. Feel Free to link to any of my plans so long as you ONLY use 1 image and provide an ADEQUATE link back to the original source and appropriate plan! Plans from this page are not to be used for commercial purposes or republished without the express written consent of Rayan Turner, The Design Confidential. By accessing or using any part of the web site, you agree to become bound by the terms and conditions of this website as outlined under Terms of Use. If you do not agree to all the terms and conditions of this agreement, then you may not access the Website or use any services. The information contained in this website is for general information purposes only. The information is provided by The Design Confidential.com and while we endeavor to keep the information up to date and correct, we make no representations or warranties of any kind, express or implied, about the completeness, accuracy, reliability, suitability or availability with respect to the website or the information, products, services, or related graphics contained on the website for any purpose. Any reliance you place on such information is therefore strictly at your own risk. In no event will we be liable for any loss or damage including without limitation, indirect or consequential loss or damage, personal injury or death, or any loss or damage whatsoever arising from loss of information or profits arising out of, or in connection with, the use of this website. I hope to provide accurate plans, however, I cannot guarantee each plan for accuracy. Not every plan that I post has been built and tested, so you are building at your own risk. It is recommended that you have a clear understanding of how the project works before beginning any project. Please contact me if you find an error or inaccuracy so that I might fix it. The Design Confidential.com is inspired by but does not replicate exact designs, any similarities between these plans and items sold at specialty retailers is coincidental and not endorsed by or related to any said retailers. // Affiliate links are used for tools and materials. The Design Confidential will earn a small commission for any items purchased using these links. Thank you for your support – every little bit counts!
Plans
This bed is so simple to construct, you will be done in no time! It’s also extremely easy on the budget…I see no reason why this couldn’t be add to an amazing seating area outdoors as well! If you use outdoor fabric on your pillows or a mattress cover, you will be in business!
Tools
- Tape Measure
- Square
- Sander
- Drill
- Saw
Lumber
- 7 – 2×3 at 8′
- 1 – 2×2 at 6′
- 3 – 1×3 at 10′
- 1 – 1×3 at 8′
- 2 – 1×2 at 8′
Materials
- 3″ Screws
- 2 1/2″ Screws
- 2″ Screws
- Wood Glue **if you would like this to be taken apart at any point, do not use glue.
- Wood Filler or Paintable Silicone Sealant if being used outside and painted.
- Finishing Supplies or Sealant for outdoor use.
Cut List
- 5 – 2×3 at 25 1/2″ (Legs)
- 2 – 2×3 at 75 1/2″ (Front and Back Rails)
- 4 – 2×3 at 34 1/2″ (Stretchers)
- 2 – 1×2 at 75 1/2″ (Cleats)
- 2 – 1×3 at 39″ (End Aprons)
- 9 – 1×3 at 36″ (Supports)
- 1 – 2×3 at 72″ (Front Apron)
- 2 – 2×3 at 37 1/4″ (Back Apron)
- 2 – 2×3 at 40 1/2″ (Arm Rest)
- 2 – 2×2 at 38 1/2″ (Back Rest)
Instructions
Notes: If you are making this for outdoor use, purchase wood that holds up well to weather and moisture. This might include Cedar, Redwood, and Teak , but I would ask your local lumber supply for appropriate wood species for your area and climate. You should Finish and Seal all boards prior to assembling if this is for outdoor use. This will keep it water tight and protected. You can likely get away with using a different wood if you finish and seal all pieces really well. **Always Pre-Drill and Counter Sink for the most professional appearance. Check for Square after every step.
Before beginning to build, always check in on my site to make sure you have the most up to date set of plans, I occasionally update and change the plans to make the building process easier or to allow for less expensive purchasing of materials! Read through the entire set of instructions and all comments before beginning this project. If you print out or save plans, be sure to check in on my site to be sure you have the most up to date set of plans, as I occasionally update things for ease of building or buying. If you are new to building, read through the GETTING STARTED section and other articles found under the BUILD tab in the menu on my site, it has valuable information about how to get started, tools and techniques. If you are unfamiliar with the finishing process, visit my Finishing school for some tips and tricks for painting like a pro and for special finishing practices. Use glue to secure your joints and Consider Painting or Staining individual sections prior to assembling. This makes the paint application virtually flawless. Coat with a spray on Poly or Wipe on Poly to protect your finish and your piece and it will last for ages. Adhere to all safety standards and guidelines, and be sure you follow safety protocol throughout your build. If you are unsure about whether you are building safely, run a quick online search for the tool or technique you are using, or contact me via email or post to the forum before you move ahead. My contact info can be found in the menu of my site.
Step 1
Attach the Rails to the Legs: Use 2 1/2″ Screws and Wood Glue. Place the bottom of the rails 4″ from the bottom of the legs (top of the rails will fall at 6 1/2″ from the ground).
Step 2
First attach the Stretchers to the Cleats: Use 3″” Screws and Wood Glue. Then Attach the Cleats to the Frame Rails: Use 2″ Screws and Wood Glue.
Step 3
Attach the End Aprons: Use 2″ Screws and Wood Glue
Step 4
Lay the Slats approximately 6″ Apart and screw in place using 1 1/4″ Screws. Do not glue the slats if you plan to remove them at any point.
Step 5
Attach the Back Rests (Green), then attach the Arm Rests (Red). Use 3″ Screws and Wood Glue. Then attach the Front and Back Aprons: Use 2 1/2″ Screws and Wood Glue.
Finishing Instructions
Fill any Screw, Nail or Pocket Holes, Sand and Finish as Desired. For Finishing Tips and Tricks visit my Finishing School
**Disclaimer: Some rights reserved. Private use only. Feel Free to link to any of my plans so long as you provide an adequate link back to the appropriate post! Plans from this page are not to be used for commercial purposes or republished without the express written consent of Rayan Turner, The Design Confidential I hope to provide accurate plans, however, I cannot guarantee each plan for accuracy. Not every plan that I post has been built and tested, so you are building at your own risk. It is recommended that you have a clear understanding of how the project works before beginning any project. Please contact me if you find an error or inaccuracy so that I might fix it.
Plans
This collection is really fun, and easy to build. Perfect for a low cost build with a ton of style!
Showcase: Built From These PlansI am so honored each and every time one of you fine friends builds from these very plans! If you have built this piece, please take a moment and showcase your build! We are dying to see your fabulous hard work!
- Tape Measure
- Square
- Sander
- Drill
- Saw ** Miter Saw or Miter Box and Hand Saw – Optional for mitering the bottom and outside edges of the Legs, Bases, and Outside Cross Bars.
- ** Kreg Jig – Optional, and can be built without one, but will have a few tricky attachments for this project and as is the case with most projects, would definitely benefit from using one.
- 1 Sheet – 3/4″ Plywood (my lumber supply sells 2' x 4' sheets for around 1/3 of the cost of an entire 4' x 8' sheet, check to see if yours will do this for you and you will reduce your cost quite a bit and you won't have a lot of excess)
- 1 – 1×2 @ 10'
- 1 – 1×2 @ 6'
- If mitering you will need: 1 – 2×3 @ 10' OR 1 – 2×3 @ 8' If you aren't mitering: 2 – 2×3 @ 8'
- **Kreg Jig Owners: 1 1/2″ Pocket Hole Screws.
- 3″ Screws – ** Kreg Owners will not need this item and will use the 1 1/2″ PHS in place of this.
- 2 1/2″ Screws
- 1 1/4″ Screws
- 2″ Finish Nails (you can also use the 1 1/4″ Screws for the table trim if you prefer not to buy this or don't have a finish nail gun)
- Wood Glue
- Wood Filler
- Sandpaper
- Finishing Supplies
**Note: I am providing 2 cut measurements for a few pieces that have the option of being mitered.
- 6 – 2×3 @ 18 1/2″ (Legs)
- 3 – 2×3 @ 19″ (Bases and Center Cross Bar) ** you will change 2 of these 3 above to 22″ (Bases) if mitering.
- 2 – 2×3 @ 6 1/2″ (Outside Cross Bars) ** this will become 8″ if mitering.
- 2 – 1×2 @ 22″ (Sides of the Frame)
- 2 – 1×2 @ 37″ (Front and Back of the Frame)
- 1 – 3/4″ Plywood @ 40″x22″ (Table Top)
- 2 – 1×2 @ 41 1/2″ (Table Trim)
- 2 – 1×2 @ 22″ (Table Trim) ** this will become 23 1/2″ if mitering
Before beginning to build, always check in on my site to make sure you have the most up to date set of plans, I occasionally update and change the plans to make the building process easier or to allow for less expensive purchasing of materials! Read through the entire set of instructions and all comments before beginning this project. If you print out or save plans, be sure to check in on my site to be sure you have the most up to date set of plans, as I occasionally update things for ease of building or buying. If you are new to building, read through the GETTING STARTED section and other articles found under the BUILD tab in the menu on my site, it has valuable information about how to get started, tools and techniques. If you are unfamiliar with the finishing process, visit my Finishing school for some tips and tricks for painting like a pro and for special finishing practices. Use glue to secure your joints and Consider Painting or Staining individual sections prior to assembling. This makes the paint application virtually flawless. Coat with a spray on Poly or Wipe on Poly to protect your finish and your piece and it will last for ages. Adhere to all safety standards and guidelines, and be sure you follow safety protocol throughout your build. If you are unsure about whether you are building safely, run a quick online search for the tool or technique you are using, or contact me via email or post to the forum before you move ahead. My contact info can be found in the menu of my site.
Attach the Center Legs to their Bases and attach the Center Cross Bar: Use 3″ Screws. ** You can miter the edges of the Legs and Base pieces for a more polished appearance and so that you attach from underneath (this is helpful if you aren't using a Kreg Jig so that you can hide your screws), but this is not entirely necessary and as you can see below looks just fine without mitered edges. Without mitered Leg/Base, and with mitered Leg/Base, respectively:
Attach the Outside Cross Bars: if you are planning on mitering the leg/base connections, you will want to miter the outside edge of these before you attach them in this step (they will also be a tad longer if you are mitering, see cut list above). This is the trickiest portion of this plan if you aren't using a Kreg Jig. You will need to attach the Outside Cross Bars to the Bases by fastening them from a spot near the circle shown in the diagram below. You will fasten from the outside edges of each Cross Bar, inward at an angle into your Base (forming an X shape with your screws when they are both fastened).
Attach the Outside Legs: Use 3″ Screws if you are going to fasten them as shown below. You can also miter the bottom of the Legs, in which case a 2 1/2″ Screw will be more appropriate. Kreg Jig Owners, use your trusty 1 1/2″ PHS.
Build your Table Frame: Use your Pocket Hole system to fasten the frame pieces to each other and then attach to each leg using 2 1/2″ Screws. Otherwise, attach the frame pieces together using 2 1/2″ Screws and then fasten to the Legs. This frame serves the purpose of providing something to attach your table top to, so that you won't have to make visible holes in it.
Attach your Table Top: Use 1 1/4″ Screws and fasten to the frame from underneath, all the way around. No visible screw holes…
Trim out the Table Top: Use 2″ Finish Nails to attach, or if you have trouble with this (because you don't have a finish nail gun and doing it by hand is hard) you can also use your 1 1/4″ Screws, just be strategic in where you place them and how many you use along each edge. ** Optional – for a very polished appearance you can miter the corners of your trim pieces. Without mitered trim, and with mitered tr:m, respectively:
Fill any Screw, Nail or Pocket Holes, Sand and Finish as Desired. For Finishing Tips and Tricks visit my Finishing School
If you enjoyed this post PLEASE STUMBLE IT! Definitely comment below, Share it or Like it, and subscribe to my feed to stay up to date! You can now also: Follow my blog with blog lovin! I would love for you to check out my other site: Handmade-Holiday! For all of your DIY Holiday Decor, Gifts, Parties, and More!
**Disclaimer: Some rights reserved. Private use only. Feel Free to link to any of my plans so long as you provide an adequate link back to the appropriate post! Plans from this page are not to be used for commercial purposes or republished without the express written consent of Rayan Turner, The Design Confidential I hope to provide accurate plans, however, I cannot guarantee each plan for accuracy. Not every plan that I post has been built and tested, so you are building at your own risk. It is recommended that you have a clear understanding of how the project works before beginning any project. Please contact me if you find an error or inaccuracy so that I might fix it.
Plans
This plan is inspired by the Viva Terra Vintage Fir Platform Bed and is so easy to build. If you are afraid to give building a try, this is a project you can handle, it is just so simple. I have had such a wonderful response from this plan, that I will be providing it in different bed sizes throughout the week. Stay tuned…
- Tape Measure
- Square
- Sander
- Saw
- Drill
- Kreg Jig
- 5 – 2×8 at 8′
- 2 – 2×8 at 6′
- 15 – 2×4 at 8′
- 9 – 1×3 at 6′
- 2 – 1×3 at 8′
- Kreg Owners: 2 1/2″ pocket hole screws
- 4″ Screws
- 3″ Screws
- 2 1/2″ Screws
- 2″ Screws
- Wood Glue
- Wood Filler or a Paintable Silicone if you prefer
- Sandpaper
- Finishing Supplies
- 2 – 2×8 at 80 3/4″ (Sides of Base Frame)
- 2 – 2×8 at 66″ (Head and Foot of Base Frame)
- 2 – 2×8 at 80 1/2″ (Sides of Perimeter)
- 1 – 2×8 at 76″ (Foot Perimeter)
- 9 – 1×3 at 63″ (Slats)
- 2 – 1×3 at 80 3/4″ (Cleats)
- 1 – 2×4 at 80 3/4″ (Center Joist)
- 12 – 2×4 at 76″ (Headboard)
- 4 – 2×4 at 41 1/2″ (Back Brace’s)
Before beginning to build, always check in on my site to make sure you have the most up to date set of plans, I occasionally update and change the plans to make the building process easier or to allow for less expensive purchasing of materials! Read through the entire set of instructions and all comments before beginning this project. If you print out or save plans, be sure to check in on my site to be sure you have the most up to date set of plans, as I occasionally update things for ease of building or buying. If you are new to building, read through the GETTING STARTED section and other articles found under the BUILD tab in the menu on my site, it has valuable information about how to get started, tools and techniques. If you are unfamiliar with the finishing process, visit my Finishing school for some tips and tricks for painting like a pro and for special finishing practices. Use glue to secure your joints and Consider Painting or Staining individual sections prior to assembling. This makes the paint application virtually flawless. Coat with a spray on Poly or Wipe on Poly to protect your finish and your piece and it will last for ages. Adhere to all safety standards and guidelines, and be sure you follow safety protocol throughout your build. If you are unsure about whether you are building safely, run a quick online search for the tool or technique you are using, or contact me via email or post to the forum before you move ahead. My contact info can be found in the menu of my site.
Build the Base Frame: Use 3″ Screws and Wood Glue or your Kreg Jig set for 1 1/2″ stock and your 2 1/2″ pocket hole screws to fasten the frame together. Attach the Cleats and Center Joist 1 1/2″ from the top of the Frame edge and use 2″ Screws and Glue. The Slats should be spaced about 4-6″ apart, screw down using 1 1/4″ Screws.
Attach the Bordering Platform: Use 4″ Screws and Wood Glue. Leave a 5″ overhang on the sides and foot of the bed. The Side Platform Boards should be flush with the head of the beds frame.
Create the Headboard: Use 12 – 2×4’s and attach them using 4 – 2×4’s on the back side. Use 2 1/2″ Screws and Wood Glue.
Attach the Headboard to the Frame and Platform Boards. **Use 4″ Screws to attach the Headboard to the Frame AT the frame sides, so that the screws go through the head of the frame and into the side boards. ** Everywhere else you attach the headboard along the top of the frame, use 2 1/2″ Screws. This headboard will be top heavy, so it should sit against a wall for extra support.
Fill any Screw, Nail or Pocket Holes, Sand and Finish as Desired. For Finishing Tips and Tricks visit my Finishing School
If you enjoyed this post PLEASE PIN IT! Definitely comment below, Share it or Like it, and subscribe to my feed to stay up to date!
You can now also: Follow my blog with blog lovin!
I would love for you to check out my other site: Handmade-Holiday! For all of your DIY Holiday Decor, Gifts, Parties, and More!
**Disclaimer: Some rights reserved. Private use only. Feel Free to link to any of my plans so long as you provide an adequate link back to the appropriate post! Plans from this page are not to be used for commercial purposes or republished without the express written consent of Rayan Turner, The Design Confidential I hope to provide accurate plans, however, I cannot guarantee each plan for accuracy. Not every plan that I post has been built and tested, so you are building at your own risk. It is recommended that you have a clear understanding of how the project works before beginning any project. Please contact me if you find an error or inaccuracy so that I might fix it.
Plans
This desk is the perfect toddler size, and would work well with a little bench and cushion. This Storage Desk is designed mainly with paintable grade MDF and would look fabulous in just about any color! You can always substitute for wood as well, and it would be equally as incredible!
- 1 – Sheet of 3/4″ MDF or Plywood at 4' x 8'
- 1 – 1×3 at 8'
- 3 – 1×2 at 10'
- 2 – 3/4″ MDF at 25 1/4 x 13″ (Sides Panels)
- 1 – 3/4″ MDF at 13 x 12 1/4″ (Upper Divider)
- 2 – 3/4″ MDF at 22 1/2 x 12 1/4″ (Shelf Bottoms)
- 1 – 3/4″ MDF at 12 1/4 x 11 1/2″ (Bottom Divider)
- 1 – 3/4″ MDF at 22 1/2 x 25 1/4″ (Back)
- 1 – 3/4″ MDF at 22 1/2 x 6 1/4″ (Front Face Plate)
- 1 – 3/4″ MDF at 24 x 36″ (Top)
- 2 – 1×3 at 25 1/4″ (Legs)
- 1 – 1×3 at 25 1/2″ (Top of Face Plate Trim)
- 2 – 1×2 at 25 1/4″ (Legs)
- 2 – 1×2 at 36 3/4″ (Front and Back Desk Top Trim)
- 1 – 1×2 at 25 1/2″ (Storage Unit Side Desk Top Trim)
- 1 – 1×2 at 24″ (Desk Top Right Side Trim)
- 2 – 1×2 at 24 1/2″ (Side Panel Trim)
- 2 – 1×2 at 10″ (Side Panel Trim)
- 4 – 1×2 at 19 1/4″ (Side Panel and Storage Front Trim)
- 3 – 1×2 at 22 1/2″ (Storage Front Trim)
Before beginning to build, always check in on my site to make sure you have the most up to date set of plans, I occasionally update and change the plans to make the building process easier or to allow for less expensive purchasing of materials! Read through the entire set of instructions and all comments before beginning this project. If you print out or save plans, be sure to check in on my site to be sure you have the most up to date set of plans, as I occasionally update things for ease of building or buying. If you are new to building, read through the GETTING STARTED section and other articles found under the BUILD tab in the menu on my site, it has valuable information about how to get started, tools and techniques. If you are unfamiliar with the finishing process, visit my Finishing school for some tips and tricks for painting like a pro and for special finishing practices. Use glue to secure your joints and Consider Painting or Staining individual sections prior to assembling. This makes the paint application virtually flawless. Coat with a spray on Poly or Wipe on Poly to protect your finish and your piece and it will last for ages. Adhere to all safety standards and guidelines, and be sure you follow safety protocol throughout your build. If you are unsure about whether you are building safely, run a quick online search for the tool or technique you are using, or contact me via email or post to the forum before you move ahead. My contact info can be found in the menu of my site.
Begin by cutting the arc in your Side Panels and Divider. You will need to stay within the measurements I have outlined in this diagrams, otherwise your arc shape is entirely up to you. Be sure to begin your arc 3/4″ from the top and 1 1/2″ from the side to allow for trim later. Sketch out and cut the first panel then use it as a template for the other 2. Once you have created your arc for all 3 pieces, remove 3/4″ from the front and back of the Divider. This will allow for the Face Plate and the Back, later.
Construct your Bottom Shelf by attaching the Divider to the Shelf Bottom. Attach the Back to the side Panels, then attach the Bottom Shelf to the Back and Side Panels. Use 2″ Screws and Glue.
Construct the Top Shelf in the same manner leaving a 3/4″ space toward the front of the Divider to house the Face Plate later. Then attach the Shelf to the Back and Side Panels, use 2″ Screws and Glue.
Create the Legs for the desk by forming an L Shape using a 1×3 (Orange) and a 1×2 (Dark Green). The 1×3's will face the front and back while the 1×2's will face out on the side. Attach the Legs to the Top and attach the Top to the Storage Unit. Fasten the Face Plate in place. Use 2″ Screws and Glue.
Trim out the Desk Top and the Sides of the Storage Unit. Note the dimensions below since the left side of the Desk Top Trim is longer than the Right Side. This is for aesthetic reasons and allows for the top trim on the Storage unit to take center stage. Use Finish Nails and Glue.
Trim out the Front of the Storage Unit and fasten the Top Face Plate Trim as well, use Finish Nails and Glue.
Fill any Screw, Nail or Pocket Holes, Sand and Finish as Desired. For Finishing Tips and Tricks visit my Finishing School
If you enjoyed this post PLEASE PIN IT! Definitely comment below, Share it or Like it, and subscribe to my feed to stay up to date!
You can now also: Follow my blog with blog lovin!
I would love for you to check out my other site: Handmade-Holiday! For all of your DIY Holiday Decor, Gifts, Parties, and More!
**Disclaimer: Some rights reserved. Private use only. Feel Free to link to any of my plans so long as you provide an adequate link back to the appropriate post! Plans from this page are not to be used for commercial purposes or republished without the express written consent of Rayan Turner, The Design Confidential I hope to provide accurate plans, however, I cannot guarantee each plan for accuracy. Not every plan that I post has been built and tested, so you are building at your own risk. It is recommended that you have a clear understanding of how the project works before beginning any project. Please contact me if you find an error or inaccuracy so that I might fix it.
Home / Showcase
I’ve been building, building, and more building! I should warn you that building is hard work. It’s fun and so completely satisfying…but between the building and the painting even my fingernails are sore. Mainly from the painting, since I decided I really don’t enjoy painting, and that spray paint might be the way to go…boy was I wrong! Oh is it ever hard work spray painting, and you know…it actually takes longer to a certain extent. Have I ever mentioned to you how impossible it is to get good coverage fast without creating drips…yes…almost impossible, for someone with my lack of patience. So, first up on the list of “recently checked off the to-do list” items is a fabulous low toddler activity table, for my monster mash of a boy. Plans are here, and I am about to adjust them slightly since I was able to make it less expensively, and didn’t lose any of the stability or sturdiness. Mine is without the casters, since he is not quite ready for that in my opinion, and only has 2 cubbies since I was quite literally using scraps to build this (limited my options a tad). The table top surface is a tad smaller as well (again limited by scrap remnants) but I am oh so happy with the result and so is my Mr. Blakey!
Length of Time
Did I mention this took me less than an hour to throw together, and an extra 30 minutes for paint? Yes well, if you look closely you can tell that I did this at 8:30 at night, and the lighting wasn’t great, and neither was my level of effort or precision…but Blake can’t tell, in fact he couldn’t love it more if he tried and moved himself right on in!
Lumber Used
To be honest, the cuts on this aren’t straight, thanks to some mistakes my nearest Orange made on the measurements I gave them for the Storage Cubbies I was originally planning on building. In fact they were so bad that I scrapped the whole plan, so to speak, and built this instead…so you can see in the image above that some of the boards don’t line up perfectly and that I didn’t even bother to sand or fix them.
I think my actual dimensions ended up right around 2.5 x 3′ for the surface and it still fits his race track, not to mention his entire body just fine! My house is small and I feel like this coincidence actually worked out nicely.
Below is another photo so you can see how it sits in the room where it lives! Perfectly underneath the Low Loft Bunk!
Plans
These nightstands are fabulous for either side of your bed, but I think they would make super stylish end tables to flank your sofa as well!
Showcase: Built From These PlansI am so honored each and every time one of you fine friends builds from these very plans! If you have built this piece, please take a moment and showcase your build! We are dying to see your fabulous hard work!
- Tape Measure
- Sander
- Drill
- Saw
- Miter Saw
- Kreg Jig
- 1 – 2×10 @ 10'
- 1 – 2×10 @ 6'
- 1 – 1×6 @ 6' (check for any scraps available in this before purchasing)
- 1 – 1×2 @ 10'
- 1 – 3/4″ Plywood Sheet at 4'x8'
- 2 1/2″ Screws
- 2″ Screws
- **1 1/4″ Screw – optional for joining boards together.
- Wood Glue
- Wood Filler
- Sanding Supplies
- Finishing Supplies
- 4 – 2×10 @ 24″ (Top and Bottom)
- 4 – 2×10 @ 16 1/2″ (Sides)
- 1 – 1×6 @ 21″ (Drawer Face)
- 2 – 1×2 @ 21″ (Base Frame)
- 4 – 1×2 @ 13 1/2″ (Base Frame)
- 1 – 3/4″ Ply @ 19 1/2 x 17″ (Top of Drawer Casing)
- 2 – 3/4″ Ply @ 21 x 4 3/4″ (Sides of Drawer Casing)
- 1 – 3/4″ Ply @ 21 x 17 3/4″ (Bottom of Drawer Casing)
- 1 – 3/4″ Ply @ 19 1/2 x 16 1/4″ (Drawer Bottom)
- 2 – 3/4″ Ply @ 16 1/4 x 3 1/4″ (Drawer Sides)
- 1 – 3/4″ Ply @ 19 1/2 x 4″ (Drawer Back)
- **Optional: 1 – 3/4″ Ply @ 15 1/2 x 3 1/4″ (Drawer Front)
Before beginning to build, always check in on my site to make sure you have the most up to date set of plans, I occasionally update and change the plans to make the building process easier or to allow for less expensive purchasing of materials! Read through the entire set of instructions and all comments before beginning this project. If you print out or save plans, be sure to check in on my site to be sure you have the most up to date set of plans, as I occasionally update things for ease of building or buying. If you are new to building, read through the GETTING STARTED section and other articles found under the BUILD tab in the menu on my site, it has valuable information about how to get started, tools and techniques. If you are unfamiliar with the finishing process, visit my Finishing school for some tips and tricks for painting like a pro and for special finishing practices. Use glue to secure your joints and Consider Painting or Staining individual sections prior to assembling. This makes the paint application virtually flawless. Coat with a spray on Poly or Wipe on Poly to protect your finish and your piece and it will last for ages. Adhere to all safety standards and guidelines, and be sure you follow safety protocol throughout your build. If you are unsure about whether you are building safely, run a quick online search for the tool or technique you are using, or contact me via email or post to the forum before you move ahead. My contact info can be found in the menu of my site.
Build the Frame for the Base: Use 2″ Screws and Wood Glue.
Pair the 2×10's together, 2 per side, for all 4 sides and Bevel Cut the Edges at a 45° Angle (this is a miter along an edge rather than the length). Do this for both outside edges of each pair. ** After you have Bevel Cut your edges, Glue the Boards together. ** I have designed the Casing to actually fasten and hold the Boards in place for this project, however, you now have the option to either fasten them together using 1 1/4″ screws from the edge of one board (on the inside or shorter side) up and into the adjacent board at an angle or if you own a Kreg Jig, then you can use that as well. This is not a necessary step, but is an option available to you.
Attach the top of the Drawer Casing to the bottom of the nightstand Top: Use 2″ Screws and Wood Glue, fasten from the plywood side so that you don't have to fill screw holes.
Attach the Back and Sides of the Drawer Casing: Use 2″ Screws and Wood Glue.
Attach what will be the bottom of the Drawer Casing (even though you are working upside down at the moment): Use 2″ Screws and Wood Glue.
Attach the Sides to the Top and the Drawer Casing: Use 2″ Screws and Wood Glue to fasten to the Drawer Casing and 2 1/2″ Screws to fasten the sides to the top. The Drawer Casing will essentially hold the 2 boards. that make up each side, together. Do not attach the bottom yet.
Attach the Bottom to the Base Frame: Use 2 1/2″ Screws and Wood Glue, fasten from underneath up through the frame and into the bottom of the nightstand. This will keep you from filling screw holes.
Attach the Sides and Bottom: Use 2 1/2″ Screws and Wood Glue. Fasten from underneath to avoid screw holes.
Build the Drawer: Use 2″ Screws and Wood Glue and notice how the pieces line up in the image below. You can fasten a drawer front to this as explained in the step below to keep from filling screw holes on the drawer face, but it will remove a bit of the depth from your drawer and is a tiny bit redundant. It is merely for aesthetic purposes, so I will leave this up to you. If you elect to do this step, the piece will measure 15 1/2 x 3 1/4″ and sit right on top of the bottom and attach to the bottom and sides.
Attach the Drawer Face: Use 2" Screws and Wood Glue. If you don't want to fill screw holes, you can fasten a front to your drawer, just inside the front edges. then when you attach the drawer face you will fasten from inside the drawer front.
Fill any Screw, Nail or Pocket Holes, Sand and Finish as Desired. For Finishing Tips and Tricks visit my Finishing School
If you enjoyed this post PLEASE PIN IT! Definitely comment below, Share it or Like it, and subscribe to my feed to stay up to date!
You can now also: Follow my blog with blog lovin!
I would love for you to check out my other site: Handmade-Holiday! For all of your DIY Holiday Decor, Gifts, Parties, and More!
**Disclaimer: Some rights reserved. Private use only. Feel Free to link to any of my plans so long as you provide an adequate link back to the appropriate post! Plans from this page are not to be used for commercial purposes or republished without the express written consent of Rayan Turner, The Design Confidential I hope to provide accurate plans, however, I cannot guarantee each plan for accuracy. Not every plan that I post has been built and tested, so you are building at your own risk. It is recommended that you have a clear understanding of how the project works before beginning any project. Please contact me if you find an error or inaccuracy so that I might fix it.
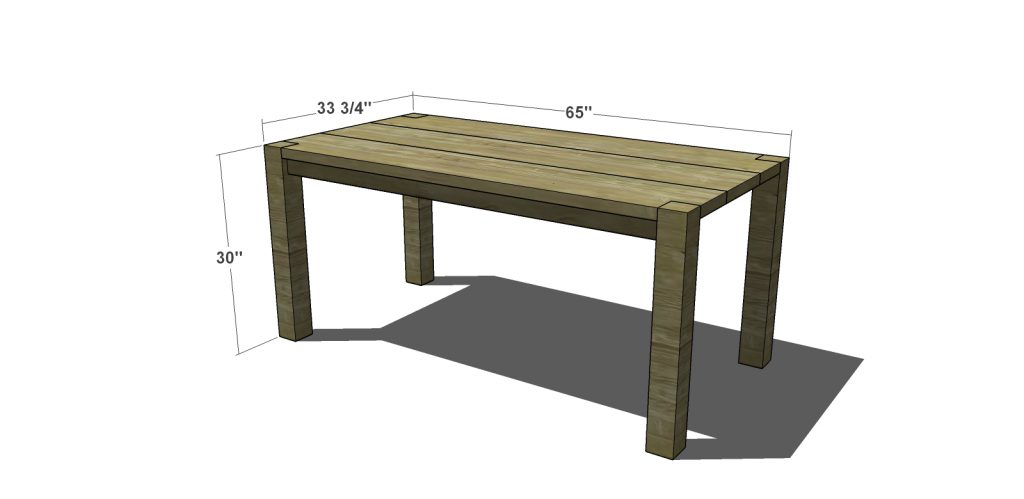
Plans
I adore this table! And with bench seating…to die for…
As with all of our plans, you are building at your own risk and you should have a firm understanding of building in general before you attempt many of our plans (some are easy as pie and perfect for beginners). With that, go forth, have fun, take lots of pictures and share them in a showcase or on social media with the hashtag #builtTDCtuff and we will share our faves! Be sure to tag @thedesignconfidential on Instagram / FB and @thedesconf on Twitter / Pinterest. Don’t forget… for all of our newer plans, clicking on the images will let them expand to enormous sizes with much greater clarity. The older plans may need updating so please let us know if you need one fixed!
- 3 – 2×12 at 6′ (or 8′ if you can’t find 6′, but you will have some scrap, you can also use a configuration of other 2x boards if you aren’t able to find 2×12, you need to reach 36″ in width for the table top)
- 4 – 1×3 at 8′
- 2 – 4×4 at 6′
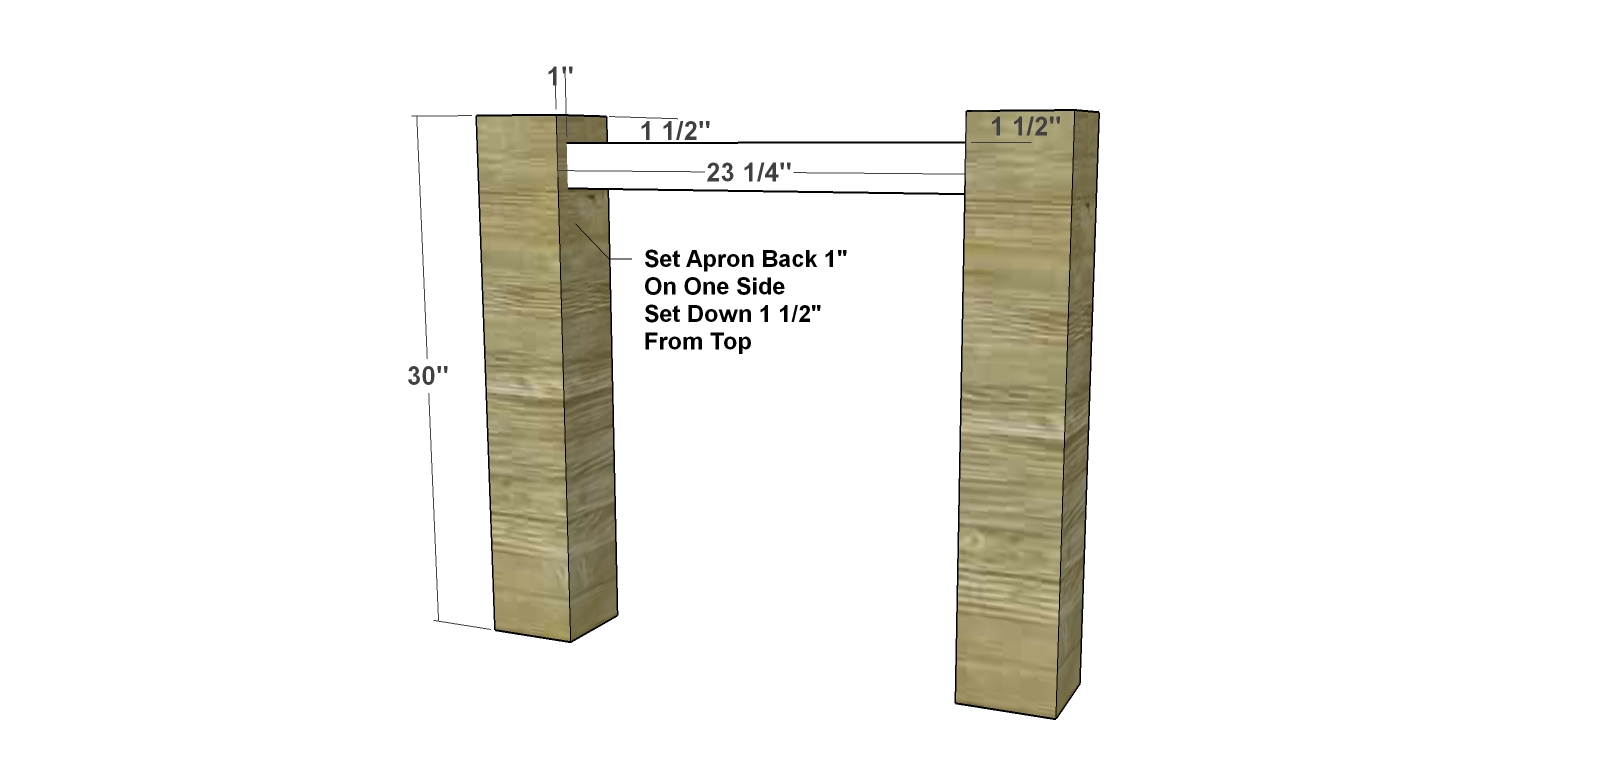
- 4 – 4×4 at 30″ (Legs)
- 2 – 1×3 at 26 3/4″ (Side Aprons)
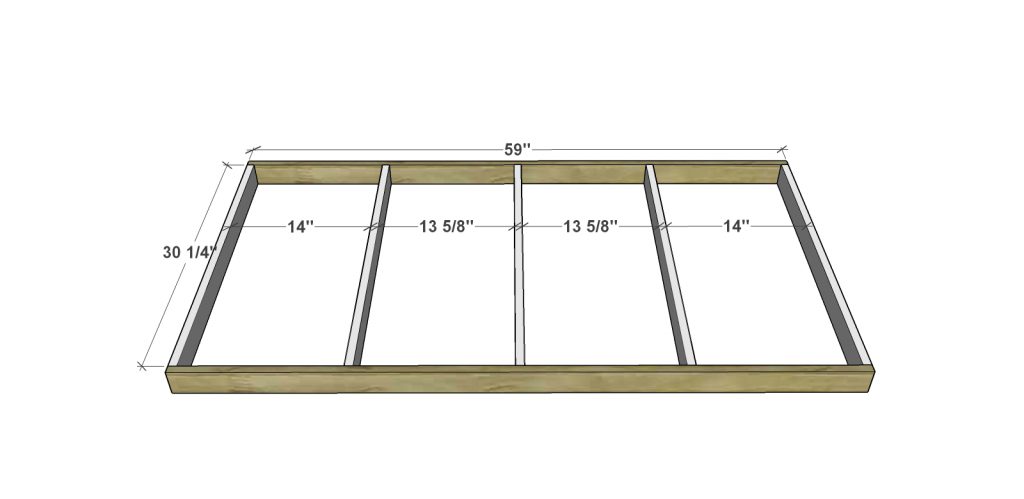
- 5 – 1×3 at 30 1/4″ (Table Supports)
- 2 – 1×3 at 58″ (Front/Back Aprons)
- 3 – 2×12 at 65 ” (Table Tops)
Before beginning to build, always check in on my site to make sure you have the most up to date set of plans, I occasionally update and change the plans to make the building process easier or to allow for less expensive purchasing of materials! Read through the entire set of instructions and all comments before beginning this project. If you print out or save plans, be sure to check in on my site to be sure you have the most up to date set of plans, as I occasionally update things for ease of building or buying. If you are new to building, read through the GETTING STARTED section and other articles found under the BUILD tab in the menu on my site, it has valuable information about how to get started, tools and techniques. If you are unfamiliar with the finishing process, visit my Finishing school for some tips and tricks for painting like a pro and for special finishing practices. Use glue to secure your joints and Consider Painting or Staining individual sections prior to assembling. This makes the paint application virtually flawless. Coat with a spray on Poly or Wipe on Poly to protect your finish and your piece and it will last for ages. Adhere to all safety standards and guidelines, and be sure you follow safety protocol throughout your build. If you are unsure about whether you are building safely, run a quick online search for the tool or technique you are using, or contact me via email or post to the forum before you move ahead. My contact info can be found in the menu of my site.
Attach the Side Aprons to the Legs. These will be fastened 1 1/2″ from the top of the leg and will sit back 1″ from the outside edge of your legs. Use your Kreg Jig set for 3/4″ material and your 1 1/4″ pocket hole screws with glue.
Build the Frame // set your Kreg Jig for 3/4″ material and create your pocket holes. Use 1 1/4″ Pocket Hole Screws and Wood Glue to fasten together.
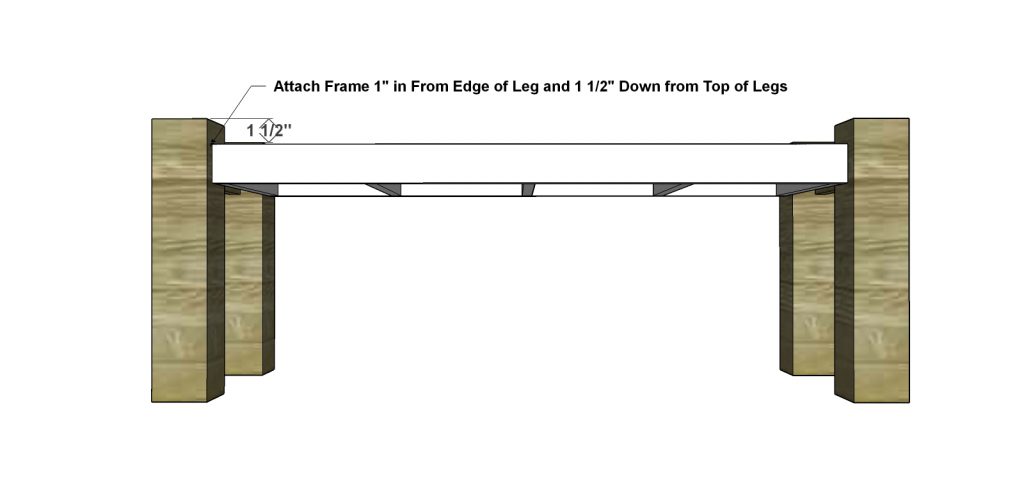
Attach the Frame to the Legs // Use 3″ Screws and Wood Glue. Frame will sit 1 1/2″ from the top edge of the legs and will be centered front to back with a setback of 1″ from front edge of legs as well as on the backside.
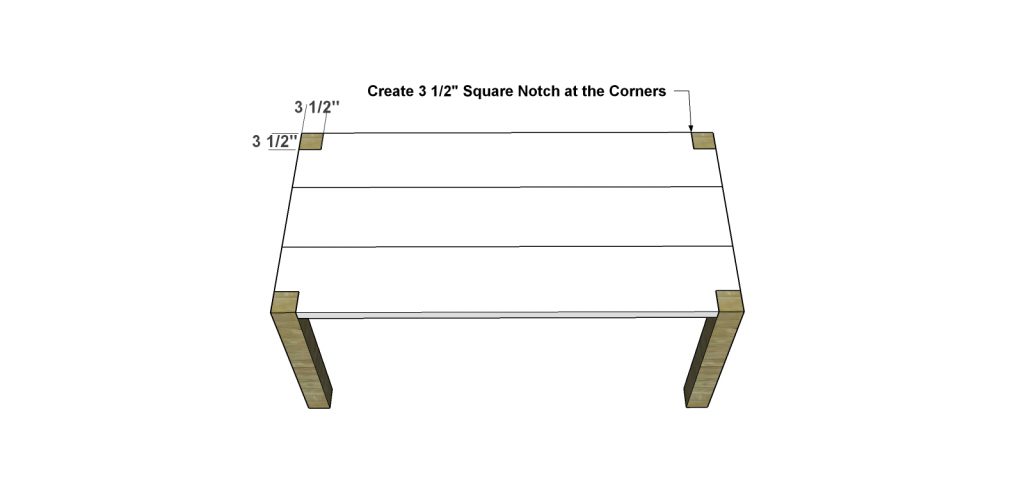
Cut 3 boards to length for the top of your table. Remove a 3 1/2″ square from 2 of the corners for 2 of your boards. Use a jig saw, circular saw or router for this. Then attach your table top boards to the frame and aprons using 2″ finish nails and glue.
Fill any Screw, Nail or Pocket Holes, Sand and Finish as Desired. For Finishing Tips and Tricks visit my Finishing School
**Disclaimer: Some rights reserved. Private use only. Feel Free to link to any of my plans so long as you ONLY use 1 image and provide an ADEQUATE link back to the original source and appropriate plan! Plans from this page are not to be used for commercial purposes or republished without the express written consent of Rayan Turner, The Design Confidential I hope to provide accurate plans, however, I cannot guarantee each plan for accuracy. Not every plan that I post has been built and tested, so you are building at your own risk. It is recommended that you have a clear understanding of how the project works before beginning any project. Please contact me if you find an error or inaccuracy so that I might fix it.
Build
This finishing technique is used by every major specialty furniture retailer…I won’t mention names… you know who they are!
This technique is specific to using black or a dark color. You will change your technique slightly if you choose a lighter color or a white, keep this in mind. I will create a tutorial specifically for creating an Antique Rubbed Finish in a lighter color at a later date.
Step 1
We are going to start this tutorial by assuming you have sanded, prepped and primed your furniture. These are
steps you need to do regardless of whether you are using MDF or natural wood. Don’t skimp on the prep work, it will really pay off in the end. If you would like a bit more information on this process, please visit the Tips and Tricks for Painting Like a Pro article in the Finishing School! That should do the trick…
Once your piece is primed you should have a nice even surface to work with:
Step 2
Apply 2-3 coats of your Base Color, which in this case will be Black. The number of coats necessary will be determined by the level of coverage you receive with each coat. You will want to make sure your furniture is completely covered with a nice and even finish. Take your time with this step as it is the basis for achieving a professional look. Keep my tips and tricks page handy (print it out) so that you are sure to stay on track. If you have to use a brush in any particular area of your furniture piece keep your brush strokes consistent.
Step 3
Once your furniture piece has dried completely (allow 24 hours to be on the safe side) you are ready for sanding. This is the most intricate step in the process, so go slow and keep in mind that you can always throw another coat of paint on should you mess up.
You will want to purchase a variety pack of sand paper that includes both 150 grit and 100 grit paper. You should always start with the finest grit possible that will still remove paint (that would be your 150 grit paper, the higher the number the finer the grit) so that you have the most control over how much paint you are removing and from where you are removing it.
Cut your sheets into small rectangles or squares. I prefer to have mine be no larger than 3″x4″ so that I have enough control and yet enough of an edge to rotate the sandpaper piece around as I wear down the grit. Keep rotating your paper every so often as dull paper will not work as well and will remove more paint from a larger area than you prefer.
Step 4
You will begin with the edges of your furniture piece first. Hold your paper at a 45 degree angle to your edge as shown in the picture above and wrap your sandpaper around your index finger just a bit as shown in the picture below. This will give you one point of contact between the paper and the furniture rather than an entire area of the sandpaper.
Step 5
You will begin lightly sanding just along one edge of the top or outside surface area of your furniture piece. You will lightly sand all the way around each edge and slightly round out the corners. Go slow and maintain a light touch as MDF is easy to sand down fairly quickly and you don’t want to alter the shape of your piece. Do not attempt to sand in a crevice or corner. You have to think of this as representing wear and tear on an old piece of furniture. The finish will wear down around the outside edges of the top of a table or the outside (and inside) edges of the front of a bookshelf. Anywhere people are likely to grab and rub against.
Step 6
If you have added trim work, sand only along the outside edges (for now) of the peaks and not the valleys of the trim work. Once you have sanded around each edge on each side of the furniture piece, you are ready for the detail work. Remember however, that if you are not a professional you should always err on the side of caution when Faux Finishing and be conservative with the areas you sand. The less you ‘rub’ the more professional it will look, until you have increased your painting skill level quite a bit. Rubbing off too much is the single most problematic mistake people make (that, and a poly coating that is too glossy) and will make your paint finish look ‘handmade’ faster than any other thing you can do. Less is more is the rule of the game here!
To accomplish the detail work on any areas with trim or the front/top fascia of your furniture piece you will want to sporadically sand areas that would get the greatest wear in real life. For areas with trim work this will be the peaks or highest points and for flat surfaces this will be around the edges.
I have done both in my example below. I have sanded in a parallel direction for each side and horizontally along the peaks of the trim detailing.
I have tried to slightly exaggerate the amount of sanding that should be done. If you do more than I have done in the example below you have gone too far!
Step 7
Once you have finished your sanding and you are satisfied with the amount you have rubbed off, you need to clean your piece thoroughly. Once again tacky cloth or a barely dampened cloth will work well. If you have a considerable amount of sanding debris and your piece of furniture is large, consider vacuuming it before you wipe it down. Your piece will most likely look fabulous like this, but Black paint is tricky in that when you sand it the area around the portions where paint has been removed, will have a dullness to them and it will look slightly unfinished. This next step will fix that and will also make the ‘rubbed’ portion appear to be showing a bit of wood grain underneath.
Purchase a water based wood stain in a color you enjoy and some foam brushes in an appropriate size to your furniture piece and trim work. I chose Behr Premium (the other options that aren’t Premium aren’t water based) in Mahogany. Because it is water based stain it won’t turn out as dark as it might otherwise, but a honey colored stain that runs on the warm side of the color wheel is going to
give you the best result here.
Step 8
You are going to work in small sections because the stain sets in quickly. You want to work fast applying light layers and the adding to them as you see fit. Cover the entire section you are working on and then wipe away the excess with a rag or towel. Wipe it as though you are wiping it clean and don’t leave any stain in the crevices or corners,you are only trying to darken the areas you previously sanded.
For the trim sections, you need only apply it to the peaks and then wipe away the excess. You will want to cover the entirety of the flat surfaces however. The stain will act to fix the areas previously dulled slightly by the sanding (this mainly occurs on the flat surfaces, but might also occur on the larger peaks in your trim work).
Below you can see how I applied the stain lightly to the peaks of the trim work, then wiped the excess, and then covered the entire flat surface before wiping away the excess. I did each section separately, working quickly and repeatedly applying layers of stain and wiping the excess until I was happy with the color.
Step 9
Let your furniture dry completely but this shouldn’t take long since you have been wiping away the majority of the
stain each time you apply it.
Apply 3-4 coats of Satin Finish Water Based Polyurethane. Allow each coat to dry completely before applying the next. Do make sure to apply several coats of this as it will act as a barrier to spills, stains and everyday wear for your beautiful and professional looking finish. I chose to use a fast drying spray polyurethane and chose Minwax for this project. I am not partial but they do make a good product.
Step 10
Let your furniture completely dry before you bring it in the house or place it out for use. The polyurethane will remain sticky until dry and you will smudge your surface if you touch it too quickly after sealing.
Congratulations you are done!
I hope you have enjoyed this very long and detailed tutorial (that is just the way finishing is, if it is done right)! Please feel free to ask me any questions you might have along the way, I would be happy to walk you through this if you are struggling or nervous about any of the steps.
Plans
Here are the plans for the Coastal Collection Big Sur bench seating. This would be wonderful with the 65″ Dining Table, or used outside alongside the raised planter beds I designed. Perhaps against an entry wall with a few baskets underneath…Maybe at the foot of a bed..
Showcase: Built From These PlansI am so honored each and every time one of you fine friends builds from these very plans! If you have built this piece, please take a moment and showcase your build! We are dying to see your fabulous hard work!
Lumber
- 1 – 4×4 at 8′
- 2 – 1×3 at 8′ (1 board for the front/ back aprons and 1 board for the supports and side aprons)
- 1 – 2×6 at 10′ (2 of the bench tops)
- 1 – 2×6 at 6′ (the other bench top)
Cut List
- 4 – 4×4 at 18″ (Legs)
- 2 – 1×3 at 9 1/2″ (Side Aprons)
- 5 – 1×3 at 13″ (Bench Supports)
- 2 – 1×3 at 41″ (Front/Back Aprons)
- 3 – 2×6 at 48 ” (Bench Tops)
Instructions
Notes: Use 2″ Screws and glue unless directed to use the 3″ Screws. If you are making this for outdoor use, purchase wood that holds up well to weather and moisture. This might include Cedar, Redwood, and Teak , but I would ask your local lumber supply for appropriate wood species for your area and climate. You should Finish and Seal all boards prior to assembling if this is for outdoor use. This will keep it water tight and protected. You will place 1/4″ Gap between the Table Top Boards and increase the Side Support and Side Apron length by 1/2″ to allow for water drainage and accommodate the gaps. This isn’t necessary for every climate zone, so if you climate doesn’t require this, it will be a matter of taste preference.
Before beginning to build, always check in on my site to make sure you have the most up to date set of plans, I occasionally update and change the plans to make the building process easier or to allow for less expensive purchasing of materials! Read through the entire set of instructions and all comments before beginning this project. If you print out or save plans, be sure to check in on my site to be sure you have the most up to date set of plans, as I occasionally update things for ease of building or buying. If you are new to building, read through the GETTING STARTED section and other articles found under the BUILD tab in the menu on my site, it has valuable information about how to get started, tools and techniques. If you are unfamiliar with the finishing process, visit my Finishing school for some tips and tricks for painting like a pro and for special finishing practices. Use glue to secure your joints and Consider Painting or Staining individual sections prior to assembling. This makes the paint application virtually flawless. Coat with a spray on Poly or Wipe on Poly to protect your finish and your piece and it will last for ages. Adhere to all safety standards and guidelines, and be sure you follow safety protocol throughout your build. If you are unsure about whether you are building safely, run a quick online search for the tool or technique you are using, or contact me via email or post to the forum before you move ahead. My contact info can be found in the menu of my site.
Step 1
Attach the Side Aprons to the Legs. These will be fastened 1 1/2″ from the top of the leg and will sit back 1″ from the outside edge of your legs. Use your Kreg Jig set for 3/4″ material and your 1 1/4″ pocket hole screws with glue.
Step 2
Build the Frame // set your Kreg Jig for 3/4″ material and create your pocket holes. Use 1 1/4″ Pocket Hole Screws and Wood Glue to fasten together.
Step 3
Attach the Frame to the Legs// Use 3″ Screws and Wood Glue. Frame will sit 1 1/2″ from the top edge of the legs and will be centered front to back with a setback of 1″ from front edge of legs as well as on the backside.
Step 4
Cut 3 boards to length for the top of your bench. Remove a 3 1/2″ square from 2 of the corners for 2 of your boards. Use a jig saw, circular saw or router for this. Then attach your bench top boards to the frame and aprons using 2″ finish nails and glue. Leave 3/8″ in between your center board and the outside boards.
Finishing Instructions
Fill any Screw, Nail or Pocket Holes, Sand and Finish as Desired. For Finishing Tips and Tricks visit my Finishing School
**Disclaimer: Some rights reserved. Private use only. Feel Free to link to any of my plans so long as you ONLY use 1 image and provide an ADEQUATE link back to the original source and appropriate plan! Plans from this page are not to be used for commercial purposes or republished without the express written consent of Rayan Turner, The Design Confidential I hope to provide accurate plans, however, I cannot guarantee each plan for accuracy. Not every plan that I post has been built and tested, so you are building at your own risk. It is recommended that you have a clear understanding of how the project works before beginning any project. Please contact me if you find an error or inaccuracy so that I might fix it.
Plans
This 3 Drawer Dresser is part of the Vintage Fir Collection, and I am just smitten with it’s chunky edges and platform base.
It would be a fabulous addition to any room needing storage, regardless of the other pieces already in the room. It’s clean lines and unimposing size make this a great piece for anyone. As a grouping with the other pieces in the collection, well… just see for yourself…
Showcase: Built From These PlansI am so honored each and every time one of you fine friends builds from these very plans! If you have built this piece, please take a moment and showcase your build! We are dying to see your fabulous hard work!
Tools
- Tape Measure
- Square
- Sander
- Drill
- Saw
- Table Saw or Miter Saw – or circular saw to Bevel
- Router – optional hand grip indentation along bottom of drawer facing.
Lumber
- 1 – 1×3 at 10′
- 1 – 1×3 at 8′
- 2 – 2×12 at 10′
- 2 – 2×12 at 6′
- 1 – 1×8 at 12′
- 1 – 1×2 at 8′
- 4 Sheets- 3/4″ Plywood at 4’x8′
Materials
- 2″ Screws
- 1 1/4″ Screws
- Wood Glue
- Wood Filler
- Sandpaper
- Finishing Supplies
- 3/4″ Edge Banding for the Face of the Shelves.
- Iron – for applying the edge banding. You can generally just use a standard iron.
Cut List
6 – 1×3 at 17 1/2″ (Base Frame)
2 – 1×3 at 47″ (Base Frame)
4 – 2×12 at 50″ (Top and Bottom Exterior Perimeter)
4 – 2×12 at 33″ (Side Panels Exterior Perimeter)
4 – 1×2 at 21″ (Cleats)
3 – 1×8 at 47″ (Drawer Faces)
2 – 3/4″ Ply at 47×21″ (Top and Bottom Interior Box)
2 – 3/4″ Ply at 28 1/2″ x 21″
1 – 3/4″ Ply at 47×30″ (Back)
2 – 3/4″ Ply at 45 1/2 x 21″ (Shelves)
4 – 3/4″ Ply at 45 1/2 x 8 1/2″ (Bottom Drawers – Front and Back)
4 – 3/4″ Ply at 19 1/2 x 7 3/4″ (Bottom Drawers – Sides)
2 – 3/4″ Ply at 45 1/2 x 7 3/4″ (Top Drawer – Front and Back)
2 – 3/4″ Ply at 19 1/2 x 7″ (Top Drawer – Sides)
3 – 3/4″ Ply at 45 1/2 x 19 1/2″ (Drawer Bottoms
Instructions
** I have designed this project so that you can merely glue the panels together and the Interior Box Frame will actually act to fasten and hold the Outside Boards in place. This project should be very easy to complete.
** Because we are skipping the drawer track hardware I have
designed the actual drawers themselves to fit very snugly inside their casings, so you may need to sand them down the tiniest bit to allow for ease of opening and closing.
** You have the option of using a Router along the bottom edge of each Drawer Face for creating a hand hold for opening and closing the drawers more easily as well. If you don’t have this tool and don’t care to rent one, you will not suffer for it, and this piece will be just as
beautiful.
Before beginning to build, always check in on my site to make sure you have the most up to date set of plans, I occasionally update and change the plans to make the building process easier or to allow for less expensive purchasing of materials!
Read through the entire set of instructions and all comments before beginning this project. If you print out or save plans, be sure to check in on my site to be sure you have the most up to date set of plans, as I occasionally update things for ease of building or buying. If you are new to building, read through the GETTING STARTED section and other articles found under the BUILD tab in the menu on my site, it has valuable information about how to get started, tools and techniques. If you are unfamiliar with the finishing process, visit my Finishing school for some tips and tricks for painting like a pro and for special finishing practices.
Use glue to secure your joints and Consider Painting or Staining individual sections prior to assembling. This makes the paint application virtually flawless. Coat with a spray on Poly or Wipe on Poly to protect your finish and your piece and it will last for ages. Adhere to all safety standards and guidelines, and be sure you follow safety protocol throughout your build. If you are unsure about whether you are building safely, run a quick online search for the tool or technique you are using, or contact me via email or post to the forum before you move ahead. My contact info can be found in the menu of my site.
Step 1
Build the Frame for the Base: Use 2″ Screws and Wood Glue or your Kreg Jig.
Step 2
Bevel the outside edges of each pair of Perimeter Boards at 45 Degrees: Glue each pair together.
Step 3
Using the underside of the Top Pair of Perimeter Boards as a Base, build your Interior Box: Use 2″ Screws and Wood Glue.
Step 4
Fasten the Cleats to the Interior Box at the dimensions shown below: Use 1 1/4″ Screws and wood glue.
Step 5
Attach the Back of the Dresser: Use 2″ Screws and Wood Glue
Attach the Side Panels: Use 2″ Screws and Wood Glue, fasten from the inside.
Step 7
Attach the Base Pair of Boards to the Base Frame: Use 2″ Screws and Wood Glue.
Step 8
Turn the Main Component over and fasten to the Base Panel and Frame. Use 2″ Screws and Wood glue. The mitered edges should align perfectly.
Iron on 3/4″ Edge Banding to the front of the shelves. Choose a type that matches your Exterior Boards.
Insert the Shelves: Fasten to the cleats and the Back using 2″ Screws and Wood Glue.
Step 9
Build the drawers using the measurements shown above. The top drawer will be a different size than the bottom 2 drawers, however all of the Drawer Faces will be the same.
Notice how the boards fit together, and their placement, in the images below. Build the Drawer first, then attach the Drawer face from the inside.
The bottom of the drawer face is flush with the bottom of the drawer. Use 2″ Screws and Wood glue for the Drawer and 1 1/4″ Screws for attaching the drawer face. The Drawer Face will have a 3/4″ Overhang on either side of the Drawer itself.
Top Drawer:
Finishing Instructions
Fill any Screw, Nail or Pocket Holes, Sand and Finish as Desired. For Finishing Tips and Tricks visit my Finishing School
**Disclaimer: Some rights reserved. Private use only. Feel Free to link to any of my plans so long as you ONLY use 1 image and provide an ADEQUATE link back to the original source and appropriate plan! Plans from this page are not to be used for commercial purposes or republished without the express written consent of Rayan Turner, The Design Confidential I hope to provide accurate plans, however, I cannot guarantee each plan for accuracy. Not every plan that I post has been built and tested, so you are building at your own risk. It is recommended that you have a clear understanding of how the project works before beginning any project. Please contact me if you find an error or inaccuracy so that I might fix it.


